您现在的位置是:首页 >技术教程 >3、Flutter项目搭建网站首页技术教程
3、Flutter项目搭建
简介3、Flutter项目搭建
一、搭建项目
1.1 搭建空壳项目
- 接上篇的项目搭建、本篇将继续搭建各个界面.
- 当BottomNavigationBar搭建起来后,在各个界面,没有显示对应的元素,因此我们在包含它的Scaffold中,添加body,这样让每个界面撑起来.每次点击就切换对应的界面.
- 那么我们创建一个_RootPageState中的私有成员列表_pages,用来存放每个界面的Scaffold界面视图.
- 在取值时通过currentIndex,获取列表中每个界面的视图._pages[_currentIndex] ;填充在总的Scaffold中.
class _RootPageState extends State<RootPage> {
    final List<Widget>_pages = [Scaffold(
      appBar: AppBar(title: Text("微信"),),
      body: const Center(child: Text("微信页面"),),
    ), Scaffold(
      appBar: AppBar(title: Text("通讯录"),),
      body: const Center(child: Text("通讯录界面"),),
    ), Scaffold(
      appBar: AppBar(title: Text("发现"),),
      body: const Center(child: Text("发现界面"),),
    ), Scaffold(
      appBar: AppBar(title: Text("我"),),
      body: const Center(child: Text("我的界面"),),
    )];
    //6.设置当前BarItems的默认选中Item, 当某一个被选中的时候,这个index值会发生变化.
    int _currentIndex = 0;
    @override
    Widget build(BuildContext context) {
      return  Container(
        child: Scaffold(
          body: _pages[_currentIndex],
          //2.bottomNavigationBar相当于iOS中的TabBar
          bottomNavigationBar: BottomNavigationBar(...),
          ),
        );
    }
}- 填充之后,效果大概如下

1.2 替换填充的界面
- 在lib文件夹下创建一个pages文件夹Directory,用来存放各个界面.
- 依次创建chat_page、friends_page、discover_page、mine_page文件.为四个主界面
- 在chat_page文件中创建一个ChatPage组件
import 'package:flutter/material.dart';

class ChatPage extends StatefulWidget {
  const ChatPage({Key? key}) : super(key: key);
  @override
  State<ChatPage> createState() => _ChatPageState();
}
class _ChatPageState extends State<ChatPage> {
  @override
  Widget build(BuildContext context) {
    return Scaffold(
      appBar: AppBar(
        title: const Text("通讯录"),
      ),
      body: const Center(child:
        Text("通讯录界面"),
      ),
    );
  }
}- 来到rootpage中, 首先导入chat_page文件,
- 然后将_pages中的第一个界面"微信"界面替换为ChatPage.
import 'package:wechat_demo/page/chat_page.dart';
....
final List<Widget>_pages = [ChatPage(),...];
....
按照上述方法、依次替换_pages中的其他界面
final List<Widget>_pages = [ const ChatPage(), const FriendsPage(), const DiscoverPage(), const MinePage() ];
1.3 遗留问题
1. 当我们点击NavigationBarItem的时候会存在灰色的水波纹动画,以及高亮的颜色问题

-
- 这个问题属于Material中主题自带的控件特性.那么就需要来到main.dart中,设置主题的地方修改它的特性.
import 'package:flutter/material.dart';
import 'rootpage.dart';
void main() => runApp(MyApp());
class MyApp extends StatelessWidget {
  const MyApp({super.key});
  @override
  Widget build(BuildContext context) {
    return MaterialApp(
      title: "Flutter Demo",
      theme: ThemeData(
          primarySwatch: Colors.blue,
          //1.高亮颜色问题
          highlightColor: Color.fromRGBO(1, 0, 0,0.0),
          //2.点击后水波纹动画颜色.
          splashColor: Color.fromRGBO(1, 0, 0,0.0),
      ),
      home: RootPage(),
    );}
}
2.点击后字体变大
-
- 这个问题属于NavigationBar中的选中文字大小,来到rootpage中,修改选中文字大小属性.默认12.0
   bottomNavigationBar: BottomNavigationBar(
    //选中的文字大小
    selectedFontSize: 12.0,
    //4.如果没有设置相应的type、那么默认情况下BarItem设置的都为白色.设置BarType之后默认为蓝色
    type: BottomNavigationBarType.fixed,
    //5.设置fixed类型后,需要添加一个填充色.这样一个TabBar就设置完毕了.
    fixedColor: Colors.green,
    ...),
二、本地资源文件配置
2.1 安卓中应用名称的修改
- 来到android文件夹下 app --> src --> main --> AndroidManifest.xml
android:label="微信"
2.2 安卓中图片资源放在哪里?
- 如图所示:
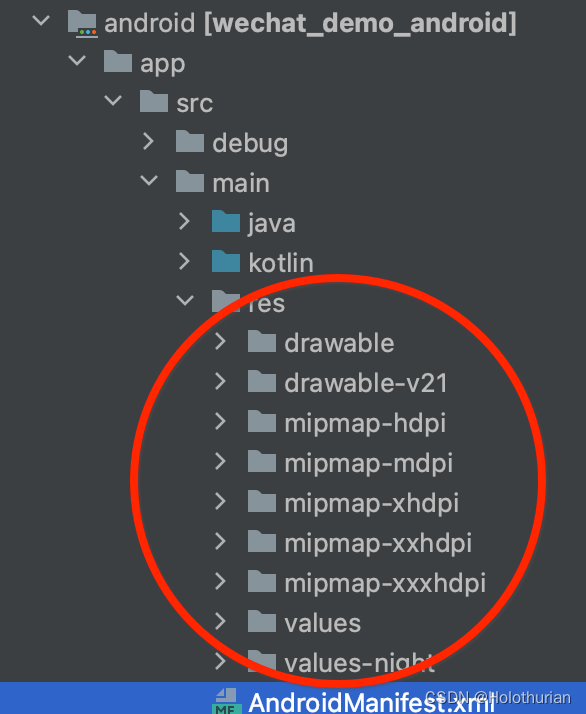
- mdpi: 对应1x 像素的图片
- hdpi: 对应 1.5x像素的图片
- xhdpi: 对应 2x像素图片
- xxhdpi: 对应3x像素图片
- xxxhdpi: 对应4x像素图片
2.3 将Demo的应用图标放入Android指定位置
- 将App图标的2x和3x图片分别拖入两个文件夹中.并且改名为app_icon
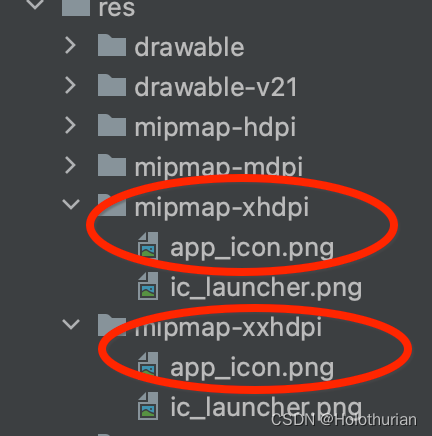
- 在AndroidManifest.xml文件中配置图标名称

2.4 安卓的启动图
- 在drawable中,launch_background.xml是启动图的配置,将启动图放入1x文件夹下,打开注释.修改xml中启动图的名字与图片名称匹配

- 因为放在drawable中不显示,猜测版本问题,放在drawable-21中正常显示.
2.5 在安卓模拟器上验证
- 打开项目目录对应的终端,执行 flutter run,选择安卓模拟器设备
~/wechat_demo2 $ flutter run
Multiple devices found:
sdk gphone x86 (mobile)    • emulator-5554                        • android-x86    • Android 11 (API 30)
(emulator)
iPhone 14 Pro Max (mobile) • 8702647C-F052-4CA5-A758-C7BD3CD49057 • ios            •
com.apple.CoreSimulator.SimRuntime.iOS-16-2 (simulator)
macOS (desktop)            • macos                                • darwin-x64     • macOS 12.6.3 21G419
darwin-x64
Chrome (web)               • chrome                               • web-javascript • Google Chrome
112.0.5615.137
[1]: sdk gphone x86 (emulator-5554)
[2]: iPhone 14 Pro Max (8702647C-F052-4CA5-A758-C7BD3CD49057)
[3]: macOS (macos)
[4]: Chrome (chrome)
Please choose one (To quit, press "q/Q"): 1

Using hardware rendering with device sdk gphone x86. If you notice graphics artifacts, consider enabling
software rendering with "--enable-software-rendering".
Launching lib/main.dart on sdk gphone x86 in debug mode...
Running Gradle task 'assembleDebug'...
✓  Built build/app/outputs/flutter-apk/app-debug.apk.
Installing build/app/outputs/flutter-apk/app-debug.apk...         93.0s⣯
Syncing files to device sdk gphone x86...                        1,848ms
💪 Running with sound null safety 💪
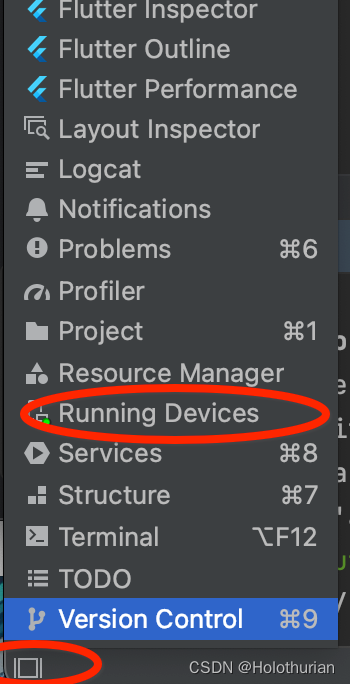
.... - 如果看不到安卓模拟器、就选择左下角拓展,选择Running Devices
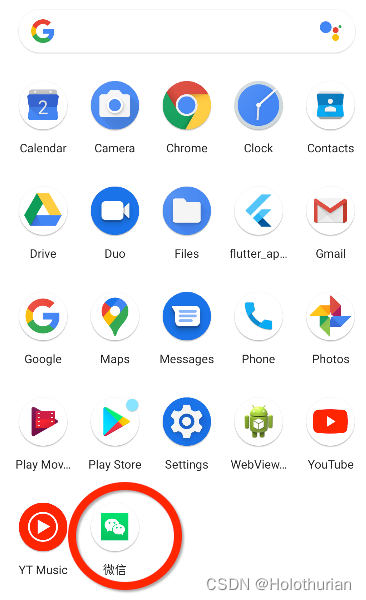
- 从下往上拉安卓模拟器界面、可以看到替换成功的项目图标
- 安卓启动图

- 运行完毕与iOS设备对比,样式一致.

- 存在一个标题居左一个标题居中的问题
- 这个是和系统默认样式有关系.我们需要特意设置 AppBar的标题居中默认值.

2.6 pubspec.yaml文件
- 在这个文件中是导入我们需要的package的.
dependencies:
  flutter:
    sdk: flutter
  # The following adds the Cupertino Icons font to your application.
  # Use with the CupertinoIcons class for iOS style icons.
  cupertino_icons: ^1.0.2
- 也就是可以导入在新建项目时,创建的那种package包
dependencies:
flutter:
sdk: flutter
# The following adds the Cupertino Icons font to your application.
# Use with the CupertinoIcons class for iOS style icons.
cupertino_icons: ^1.0.2- 浏览这个文件,我们可以看到关于图片设置这一块.
assets:
  - images/a_dot_burr.jpeg
- images/a_dot_ham.jpeg- assets在这里也就是资源的意思.下面表示images文件夹下添加的图片资源.
- 添加我们的images图片资源放进项目

- 所以我们的目的是在这里引用我们导入的图片资源.将NavigationBarItem上配置上我们的图片.
assets:
- images/-
- 注意:当assets报错时,表示放开注释的时候,多占用了空格.与其他配置项对齐即可.
2.7 配置NavigationBarItem的图片
- 这个时候回到rootpage中.我们将对应的图片资源依次加载上去. 形如:
BottomNavigationBarItem(
  //默认状态下的图片
  icon: Image(image: AssetImage("images/tabbar_chat.png"),),
  //选中状态下的图片
  activeIcon: Image(image: AssetImage("images/tabbar_chat_hl.png"),),
  label: "微信",
),- 全部修改完毕后,运行程序在iPhone14ProMax模拟器上.
- 因为图片给的都是不带@2x和@3x的.也就是默认时1x倍像素.
- 所以显示起来有些大.
- 不改变图片的原则下,发现Image中有width和height属性.因此设置上宽高分别为25.这样看起来就适配了.

三、搭建发现界面Cell
- 纵观要搭建的各个界面.发现界面看起来相对简便一些.因此我们由浅入深.先从发现界面开始.
- 首先设置发现界面的标题默认居中
centerTitle: true,- 配置主题颜色
- 设置一个私有成员变量背景颜色,给AppBar配置上
- 去除导航条上的默认黑线
- 随便填充一些Text数据
class _DiscoverPageState extends State<DiscoverPage> {
  Color _themColor = Color.fromRGBO(220, 220, 220, 1.0);
  @override
  Widget build(BuildContext context) {
    return Scaffold(
      appBar: AppBar(
        //2. 背景颜色
        backgroundColor: _themColor,
        //1.默认标题居中
        centerTitle: true,
        title: const Text("发现"),
        //3. 去除导航条上的默认黑线
        elevation: 0.0,
      ),
      body: Container(
        color: _themColor,
        height: 800,
        child: ListView( children: <Widget>[ Text('111111111'),Text('22222222'),Text('33333333'),],),
      ),);
   }
}- 在page文件夹下新建一个discover文件夹,将discover_page拖入其中,再新建一个discover_cell.dart文件.
- 在discover_cell上搭建UI.根据微信的UI,需要四个属性.
final String title;
final String? subTitle;
final String imageName;
final String? subImageName;- 其中的subtitle有值就显示,没有值就不显示.那么加上可选值设定标志 ?
- 根据系统提示,可以得到规范的构造函数编写方式为:
const DiscoverCell({super.key,required this.title, this.subTitle,required this.imageName,this.subImageName});- 根据UI效果,cell高度固定,那么在discover_cell中的Container内容为
import 'package:flutter/material.dart';
class DiscoverCell extends StatelessWidget {
     final String title;
    final String? subTitle;
    final String imageName;
    final String? subImageName;
    const DiscoverCell({super.key,required this.title, this.subTitle,required this.imageName, this.subImageName});
  @override
  Widget build(BuildContext context) {
    return Container(
      color: Colors.white,
      height: 55,
      child: Row(

      ),
    );
  }
}- 在discover_page调用discover_cell,在_DiscoverPageState中的ListView内容假定为
ListView(
  children: <Widget>[
    DiscoverCell(title: "111",imageName: '',),
  ],
),- 效果如图:

- UI分析,需要两个文本,两个图片.于是来到Cell中,定制我们的Cell展示样式
- cell上放置控件的思路为
- 整个cell为一个Row布局
- 左边是一个放置image和title的Container,
- 右边是一个放置subtilte、subImage、右箭头的Container.
- 左边Container居左,右边Container居右.
- 控件整体要有边距,背景为白色.
- 整个cell为一个Row布局
- 因此Cell内容为
@override
Widget build(BuildContext context) {
  return Container(
    //2.边距
    padding: EdgeInsets.all(10),
    color: Colors.white,
    height: 55,
    child: Row(
      //5. 设置左边的Container靠左,右边的Container靠右,设置主轴属性
      mainAxisAlignment: MainAxisAlignment.spaceBetween,
      children: <Widget>[
          //left
          Container(
            //1.当前结构为 image和title在同一个Container上
            child: Row(
              children: [
                Image(image: AssetImage(imageName),width: 20,),//图标
                SizedBox(width: 15,),//间距
                Text(title),//标题
              ],
            ),
          ),
          //right
          Container(
            child: Row(
              children: <Widget>[
                //3. 设置子标题,如果不为空,强制解包
                Text(subTitle != null ? subTitle! : ''),
                //4. 设置子图标: 如果图片名称不为空,则设置图片,否则填充Container
                subImageName != null ? Image(image: AssetImage(subImageName!),) : Container(),
                Image(image: AssetImage('images/icon_right.png'),width: 15),
              ],
            ),
          )
      ],
    ),
  );
}-
- 1.当前结构为 image和title在同一个Container上
- 2.边距padding: EdgeInsets.all(10)
- 3. 设置子标题,如果不为空,强制解包
- 4. 设置子图标: 如果图片名称不为空,则设置图片,否则填充Container
- 5. 设置左边的Container靠左,右边的Container靠右,设置主轴属性
- 将相关图片资源在pubspec.yaml全部加载上
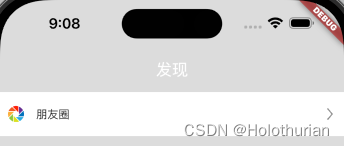
- 细节增加, title和imageName不能为空,那么在构造函数后增加运行时的断言.其实不加也行,现在多了required限定,必然非空.
const DiscoverCell({super.key,required this.title, this.subTitle,required this.imageName, this.subImageName}) :
assert(title != null, 'title 不能为空'), assert(imageName != null, 'imageName不能为空');
四、发现界面完善
- 在发现界面除了cell之外,还有空白间距,打算用SizedBox设置空白间距.
SizedBox(height: 10,),- 两个Cell之间又有一条灰色的线,因此需要额外添加一条线: 左边50px白色,右边铺满灰色,高度0.5
Row(children: [
  Container(color: Colors.white, height: 0.5 , width: 50,),
  Container(color: Colors.grey, height:0.5),
],),- 在购物一栏、会有subTitle和subImageName,这个时候,需要我们完善Cell上这块的布局
- 设置子标题文字样式
- 设置小图片显示样式(添加边距)
Container(
  child: Row(
    children: <Widget>[
      //3. 设置子标题,如果不为空,强制解包
      Text(subTitle != null ? subTitle! : '',
        //6. 设置文字样式
        style: TextStyle(color: Colors.grey),
      ),
      //4. 设置子图标: 如果图片名称不为空,则设置图片,否则填充Container
      subImageName != null ?
      //7.这里是小红圆点
      Container(child: Image(image: AssetImage(subImageName!),width: 15,) ,margin: EdgeInsets.only(left: 10,right: 10),) :
      Container(),
      Image(image: AssetImage('images/icon_right.png'),width: 15),
    ],
  ),
)- 综上discover_page中的ListView实现为
ListView(
  children: <Widget>[
    DiscoverCell(title: "朋友圈",imageName: 'images/朋友圈.png',),
    SizedBox(height: 10,),
    DiscoverCell(title: "扫一扫",imageName: 'images/扫一扫.png',),
    Row(children: [
      Container(color: Colors.white, height: 0.5 , width: 50,),
      Container(color: Colors.grey, height:0.5),
    ],),
    DiscoverCell(title: "摇一摇",imageName: 'images/摇一摇.png',),
    SizedBox(height: 10,),
    DiscoverCell(title: "看一看",imageName: 'images/看一看.png',),
    Row(children: [
      Container(color: Colors.white, height: 0.5 , width: 50,),
      Container(color: Colors.grey, height:0.5),
    ],),
    DiscoverCell(title: "搜一搜",imageName: 'images/搜一搜.png',),
    SizedBox(height: 10,),
    DiscoverCell(title: "附近的人",imageName: 'images/附近的人.png',),
    SizedBox(height: 10,),
    DiscoverCell(title: "购物",imageName: 'images/购物.png',subTitle: '618限时特惠',subImageName: 'images/badge.png',),
    Row(children: [
      Container(color: Colors.white, height: 0.5 , width: 50,),
      Container(color: Colors.grey, height:0.5),
    ],),
    DiscoverCell(title: "游戏",imageName: 'images/游戏.png',),
    SizedBox(height: 10,),
    DiscoverCell(title: "小程序",imageName: 'images/小程序.png',),
  ],
),
五、发现界面Cell点击切换界面
- 在cell中使用GestureDetector,用于监听点击事件.
-
- onTap作为事件响应,写点代码用于测试点击的响应事件.
@override
Widget build(BuildContext context) {
  //5.1 GestureDetector可以监听点击事件.
  return GestureDetector(
    onTap: (){
      print("hello cell");
    },
    child: Container(...),
    );
}- 发现点击无误,那么在点击的同时,我们想要跳转到下一个界面.
-
- 这个时候,创建一个发现的子界面discover_child_page.dart;
import 'package:flutter/material.dart';
class DiscoverChildPage extends StatefulWidget {
  //1.添加一个标题,对外暴露.
  final String title;
  const DiscoverChildPage({Key? key, required this.title}) : super(key: key);
  @override
  State<DiscoverChildPage> createState() => _DiscoverChildPageState();
}
class _DiscoverChildPageState extends State<DiscoverChildPage> {
  @override
  Widget build(BuildContext context) {
    return Scaffold(
      //2.设置导航栏标题
      appBar: AppBar(
        title: Text(widget.title),
      ),
      body: Center(
        //3.设置界面中显示一行标题名称.
        child: Text(widget.title),
      ),
    );
  }
}- 回到discover_cell,当点击cell时,我们想要它跳转到discover_child_page中去.
-
- 拿到Navigator对象.获取context,push到下一个界面
- MaterialPageRoute:一种模式路线,它用平台自适应转换来替换整个屏幕。构造BuildContext
- 返回值对象为:需要跳转到的界面
- 因此cell中的跳转部分的实现为
@override
Widget build(BuildContext context) {
  //5.1 GestureDetector可以监听点击事件.
  return GestureDetector(
    onTap: (){
      //5.2 拿到Navigator对象.获取context,push到下一个界面
      Navigator.of(context).push(
        //5.3 MaterialPageRoute:一种模式路线,它用平台自适应转换来替换整个屏幕。构造BuildContext
        MaterialPageRoute(builder: (BuildContext context){
            //5.4 需要返回跳转到的界面作为返回值对象.
            return DiscoverChildPage(title: title);
        })
      );
    },
    child: Container(...),
    );
}- 注释5.3与5.4部分可以采用箭头函数简写为
MaterialPageRoute(builder: (BuildContext context) => DiscoverChildPage(title: title)) //不带分号;- 综上Cell的跳转交互就完成了.
六、发现界面Cell状态的设置
- Cell点击时默认应该有置灰色状态的,当手势离开Cell时,灰色状态取消.现在我们实现的效果还没有状态的响应.
- 因此需要我们添加一些特殊效果.首先这种点击离开对应的手势事件为onTapCancel
//5.5 点击取消时
onTapCancel: (){
   print("1222");
},- 牵扯到状态的改变,那么我们就需要将当前的StatelessWidget改为StatefulWidget.
- 首先定义一个相同的StatefulWidget.然后将原先StatelessWidget的Widget build(BuildContext context) {} 剪切至StatefulWidget中完成替换.
- 再将StatelessWidget设置的属性剪切至StatefulWidget中.
- 在有状态组件中没法直接拿到之前无状态的属性,需要添加widget. 前缀
- 汇总一下实现思路
-
- 定义一个私有成员变量:当前颜色 Color _currentColor = Colors.white;
- 在GestureDetector下的child里的Container:设置color:_currentColor
- 在onTap点击方法中通过有状态组件的setState设置当前颜色为白色
- 在onTapDown: (TapDownDetails details)点击下去的方法中通过setState设置当前颜色为灰色
- 在onTapCancel点击取消方法中通过setState设置当前颜色恢复为白色
综上.有状态的Cell就实现了.
七、回顾总结
- 本地资源文件在pubspec.yaml中配置.
- 由无状态组件改为有状态组件,访问属性时需要添加上widget.
- GestureDetector,用于监听点击事件.
- 点击cell时,我们想要它跳转到下一个界面去.
-
- Navigator对象.of获取context,push到下一个界面
- MaterialPageRoute:一种模式路线,它用平台自适应转换来替换整个屏幕。构造BuildContext
- 返回值对象为:需要跳转到的界面
风语者!平时喜欢研究各种技术,目前在从事后端开发工作,热爱生活、热爱工作。


 U8W/U8W-Mini使用与常见问题解决
 QT多线程的5种用法,通过使用线程解决UI主界面的耗时操作代码,防止界面卡死。...
 stm32使用HAL库配置串口中断收发数据(保姆级教程)
 分享几个国内免费的ChatGPT镜像网址(亲测有效)
 Allegro16.6差分等长设置及走线总结