您现在的位置是:首页 >技术交流 >关于Maven,你真的了解它吗?网站首页技术交流
关于Maven,你真的了解它吗?
编译软件:IntelliJ IDEA 2019.2.4 x64
操作系统:win10 x64 位 家庭版
Maven版本:apache-maven-3.6.3
目录
一. Maven有哪些核心概念?
1.1 Maven中的POM
释义:
POM,英文全称为Project Object Model,意思是项目对象模型,就是将项目封装为对象模型,便于开发者使用Maven管理构建项目
常见POM标签:
代码示例如下
<?xml version="1.0" encoding="UTF-8"?>
<project xmlns="http://maven.apache.org/POM/4.0.0"
         xmlns:xsi="http://www.w3.org/2001/XMLSchema-instance"
         xsi:schemaLocation="http://maven.apache.org/POM/4.0.0 http://maven.apache.org/xsd/maven-4.0.0.xsd">
     //设置父工程坐标
    <parent>
        <artifactId>maven_test</artifactId>
        <groupId>com.bd</groupId>
        <version>1.0-SNAPSHOT</version>
    </parent>
    <modelVersion>4.0.0</modelVersion>

    <artifactId>maven_makefriend</artifactId>

	//引入依赖(子工程的jar包或第三方库库)的坐标
    <dependencies>

        <dependency>
            <groupId>com.bd</groupId>
            <artifactId>maven_make</artifactId>
            <version>1.0-SNAPSHOT</version>
        </dependency>

        <dependency>
            <groupId>com.bd</groupId>
            <artifactId>maven_hellofriend</artifactId>
            <version>1.0-SNAPSHOT</version>
        </dependency>


        <dependency>
            <groupId>junit</groupId>
            <artifactId>junit</artifactId>
            <version>4.12</version>
            //定义依赖范围
            <scope>test</scope>
        </dependency>

    </dependencies>


</project>
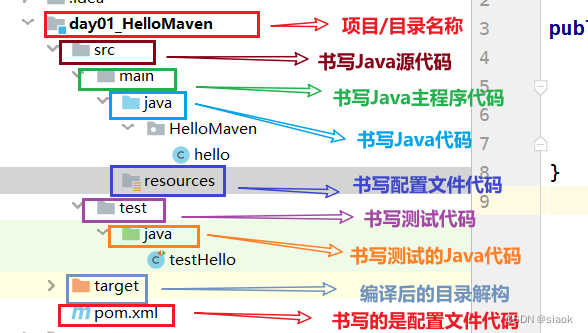
1.2 Maven约定的目录结构
详细目录结构如下所示:
1.3 Maven生命周期
Maven生命周期:
按照一定的顺序执行各个命令的过程
Maven生命周期包含以下三个部分组成:
-
Clean LifeCycle:在进行真正的项目构建之前进行的一些清理工作。 -
Default LifeCycle:项目构建的核心步骤包括编译,测试,打包,安装,部署等步骤。
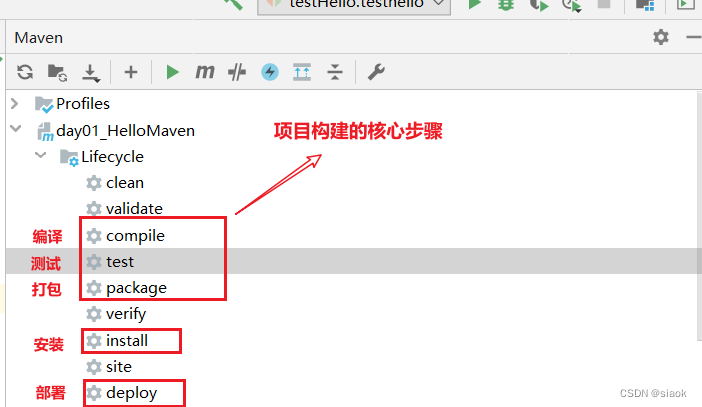
注意:
当你点击“install”时,前面会自”ccompile“依次按顺序执行到install时【红框中的步
骤】,install才 会执行安装,它不是点击”install“就会直接执行安装步骤。执行clean
时,它只会清除IDEA中maven模块 下的target目录,而不会删除安装在本地的jar包, 除非你手动删除。
Site LifeCycle:生成项目报告,站点,发布站点。
附注:
以上三个生命周期彼此之间互不干涉,相互独立。每个生命周期阶段都由一个或多个插件目标组成。通过在 pom.xml文件中绑定插件和目标到生命周期阶段上,就可以使用一条命令来自动化执行所有构建任务。
1.4 Maven的插件和目标
-
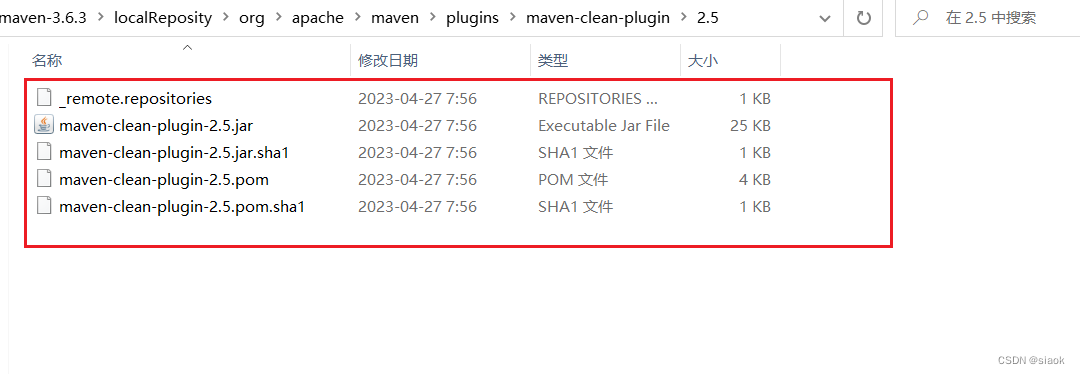
插件:它的本质是由jar包和配置文件组成,如下图所示例如插件maven-clean-plugin的构成如下:
-
目标:每个插件都能实现多个功能,而每个功能就是一个插件目标。例如:compile就是插件maven-compiler-plugin的一个功能;pre-clean是插件
maven-cean-plugin的一个目标。
1.5 Maven中的仓库
仓库的分类:
本地仓库:为当前计算机提供maven服务远程仓库:为其他计算机也可以提供maven服务- 私服:架设在当前局域网环境下,为
当前局域网范围内的所有Maven工程服务。 - 中央仓库:架设在Internet.上,为
全世界所有Maven工程服务。 - 中央仓库的镜像:架设在各个大洲,为
中央仓库分担流量。减轻中央仓库的压力,同时更快的响应用户请求。
- 私服:架设在当前局域网环境下,为
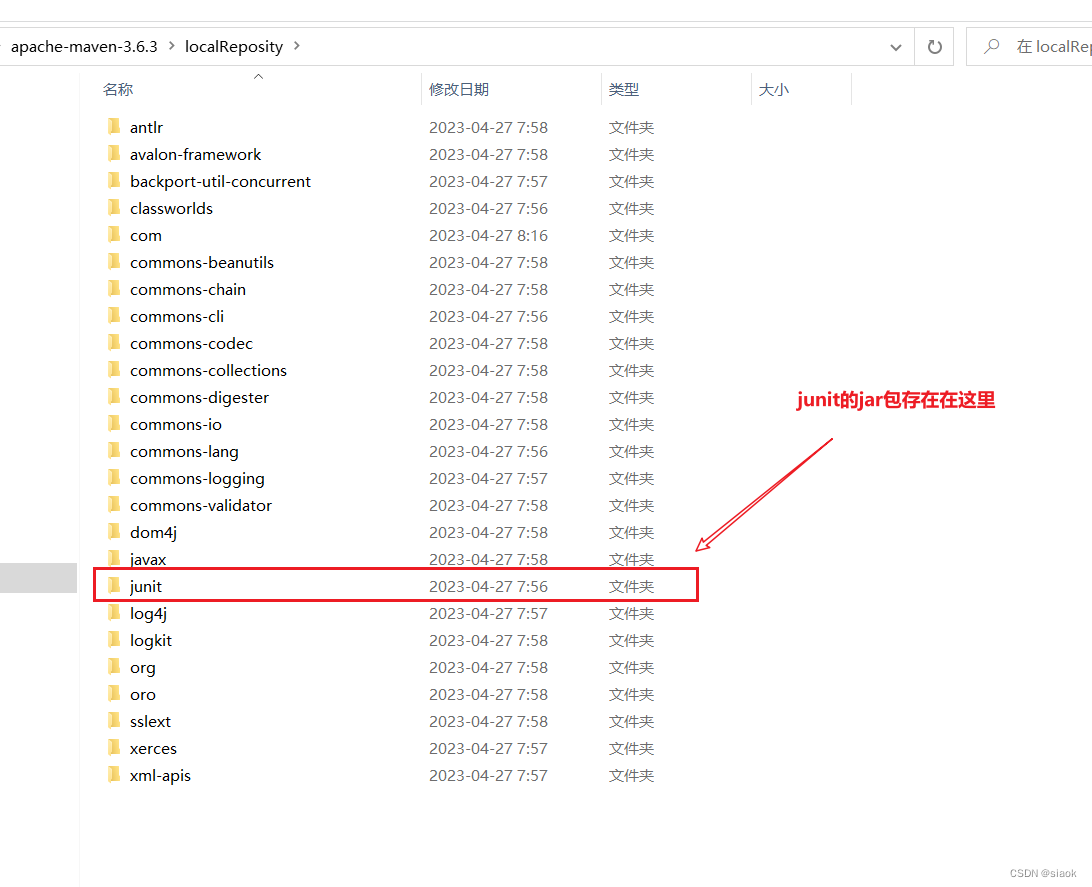
仓库中存放的文件类型(以jar包为主):
- Maven的插件
- 第三方框架或工具的jar包
- 自己研发的项目或模块
1.6 Maven的坐标
作用:
使用坐标引入jar包
坐标是如何构成?
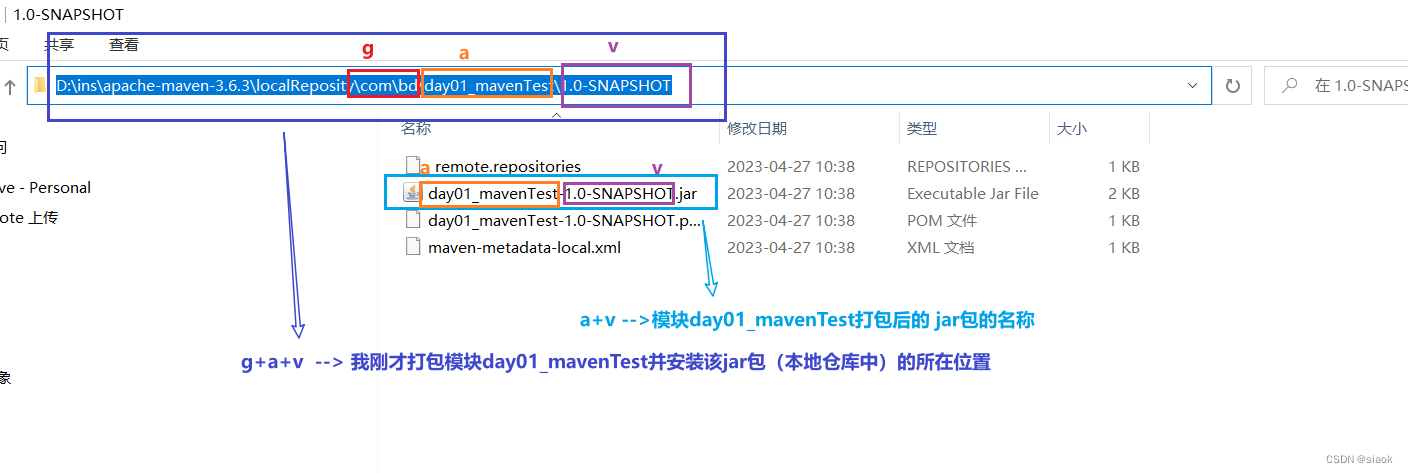
由g-a-v构成
g --> groupld:公司或组织的域名倒序+当前项目名称
a --> artifactld:当前项目的模块名称
v --> version:当前模块的版本
pom.xml中相关代码示例如下:
<parent>
    <artifactId>maven_demo</artifactId>
    <groupId>com.bd</groupId>
    <version>1.0-SNAPSHOT</version>
</parent>
注意:
g-a-v:本地仓库jar包的位置
a-v:jar包的全名
如何寻找相应jar包的坐标?
自己一个个在网上搜索?不不,效率太低了!
我们可以到 https://mvnrepository.com 或 https://central.sonatype.com 去查找相应jar包的坐标
如何使用上述两个网站去搜索?
以 https://mvnrepository.com中搜索junit 的jar包的坐标为例
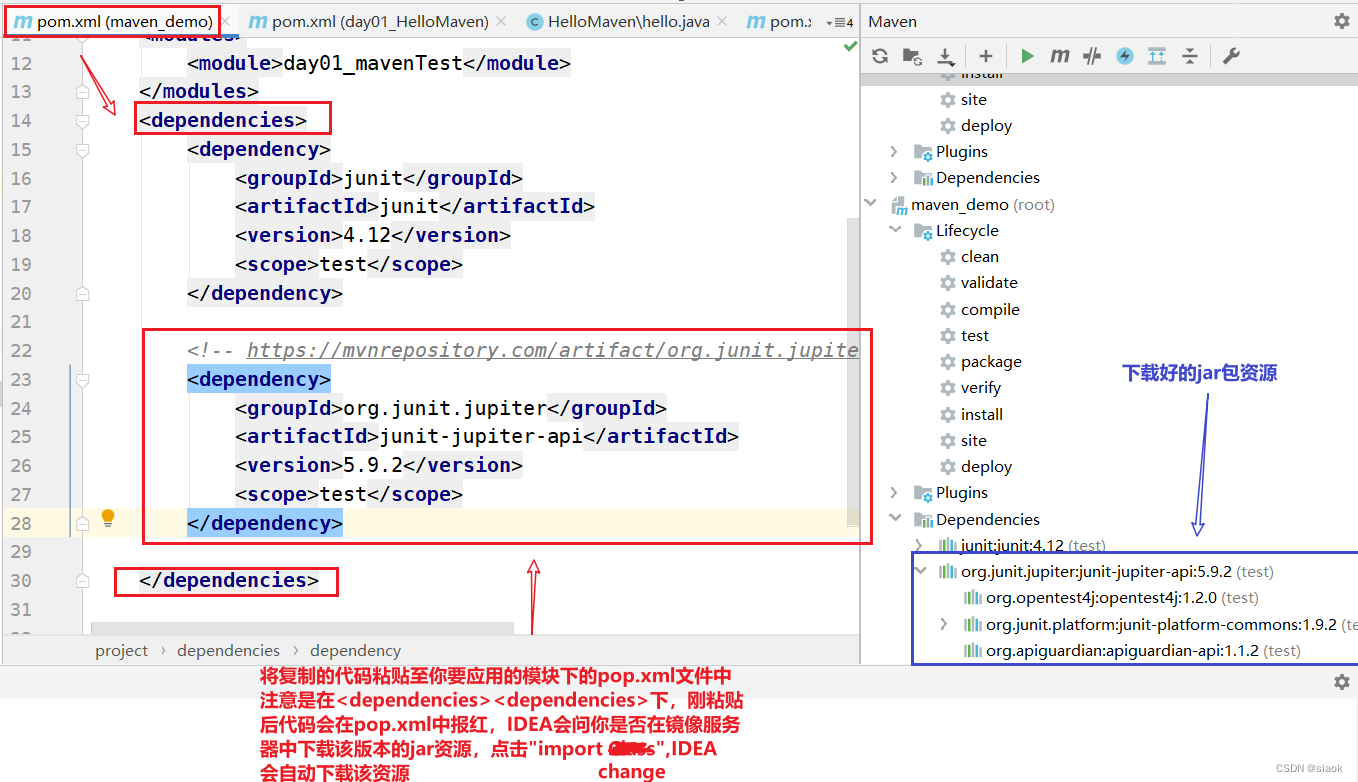
①在搜素栏输入你要找的jar包名称,然后点击”Search“,在搜索结果找 ”usages“
最多的那一栏(往往有我们需要的资源),然后点击访问它
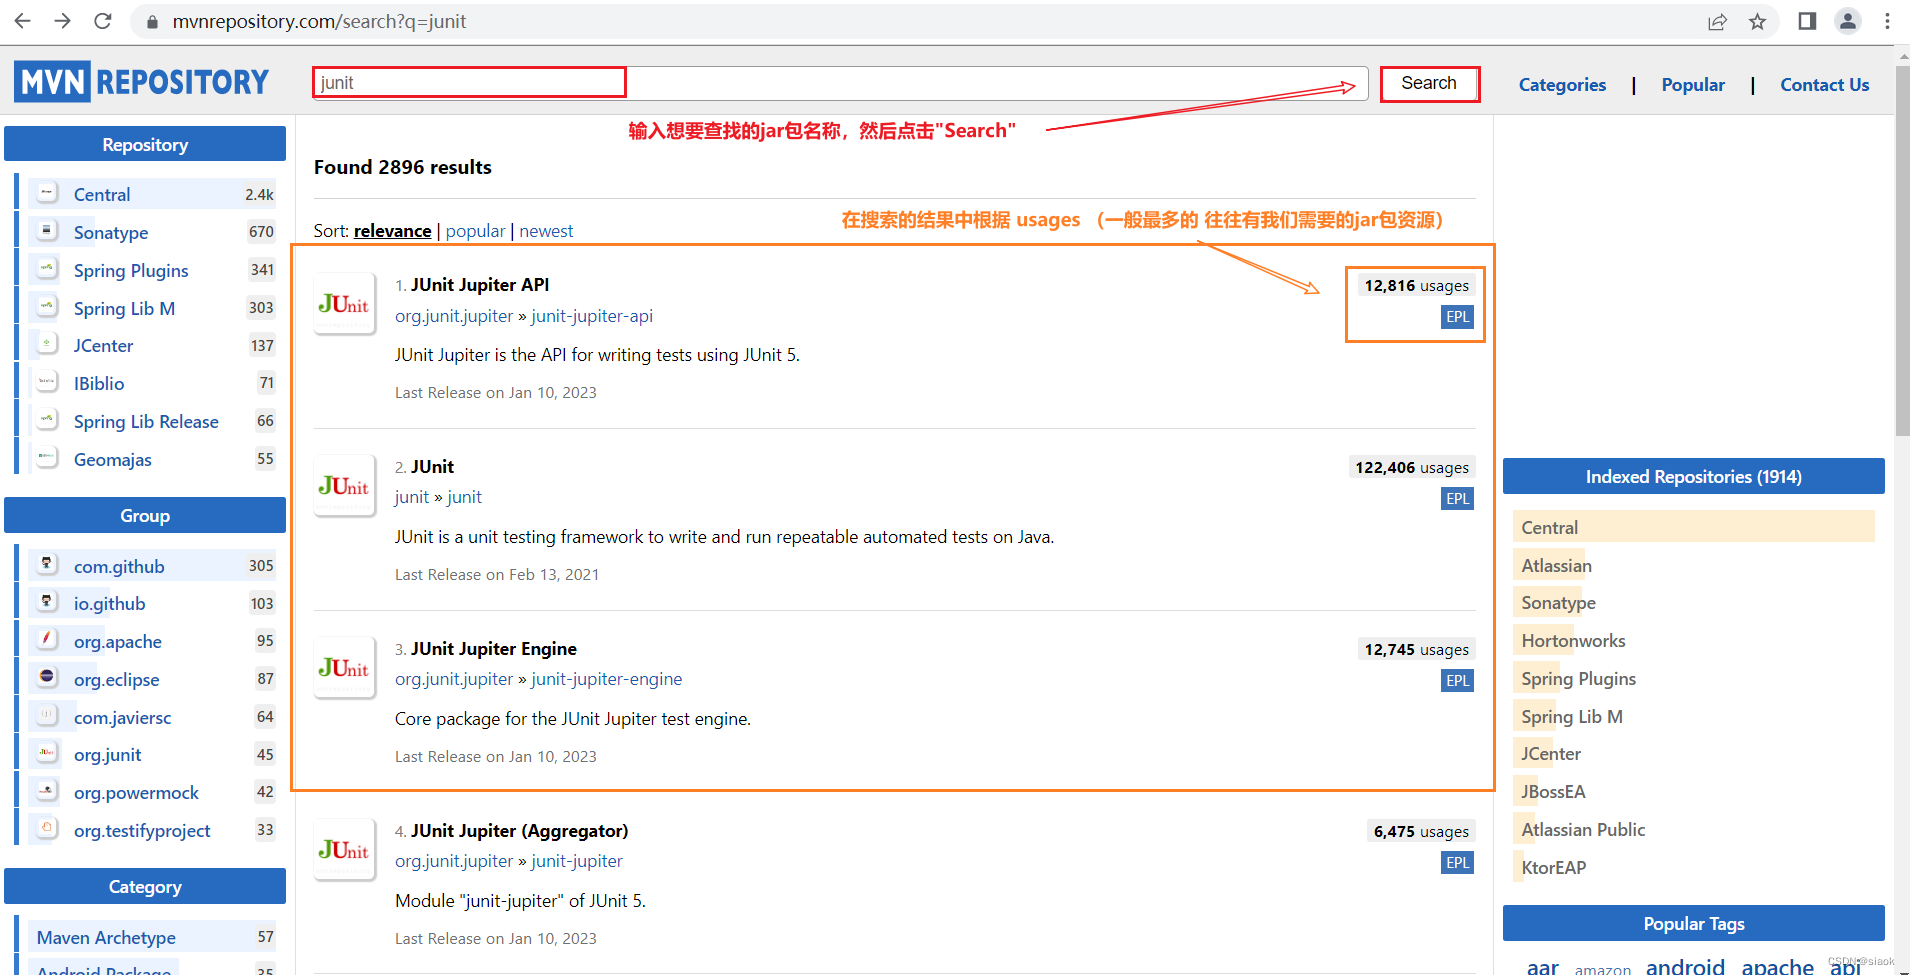
②找对应版本的jar包的坐标引用资源,没有找到的话就回退第①步找下一个”usages“对应的资源栏
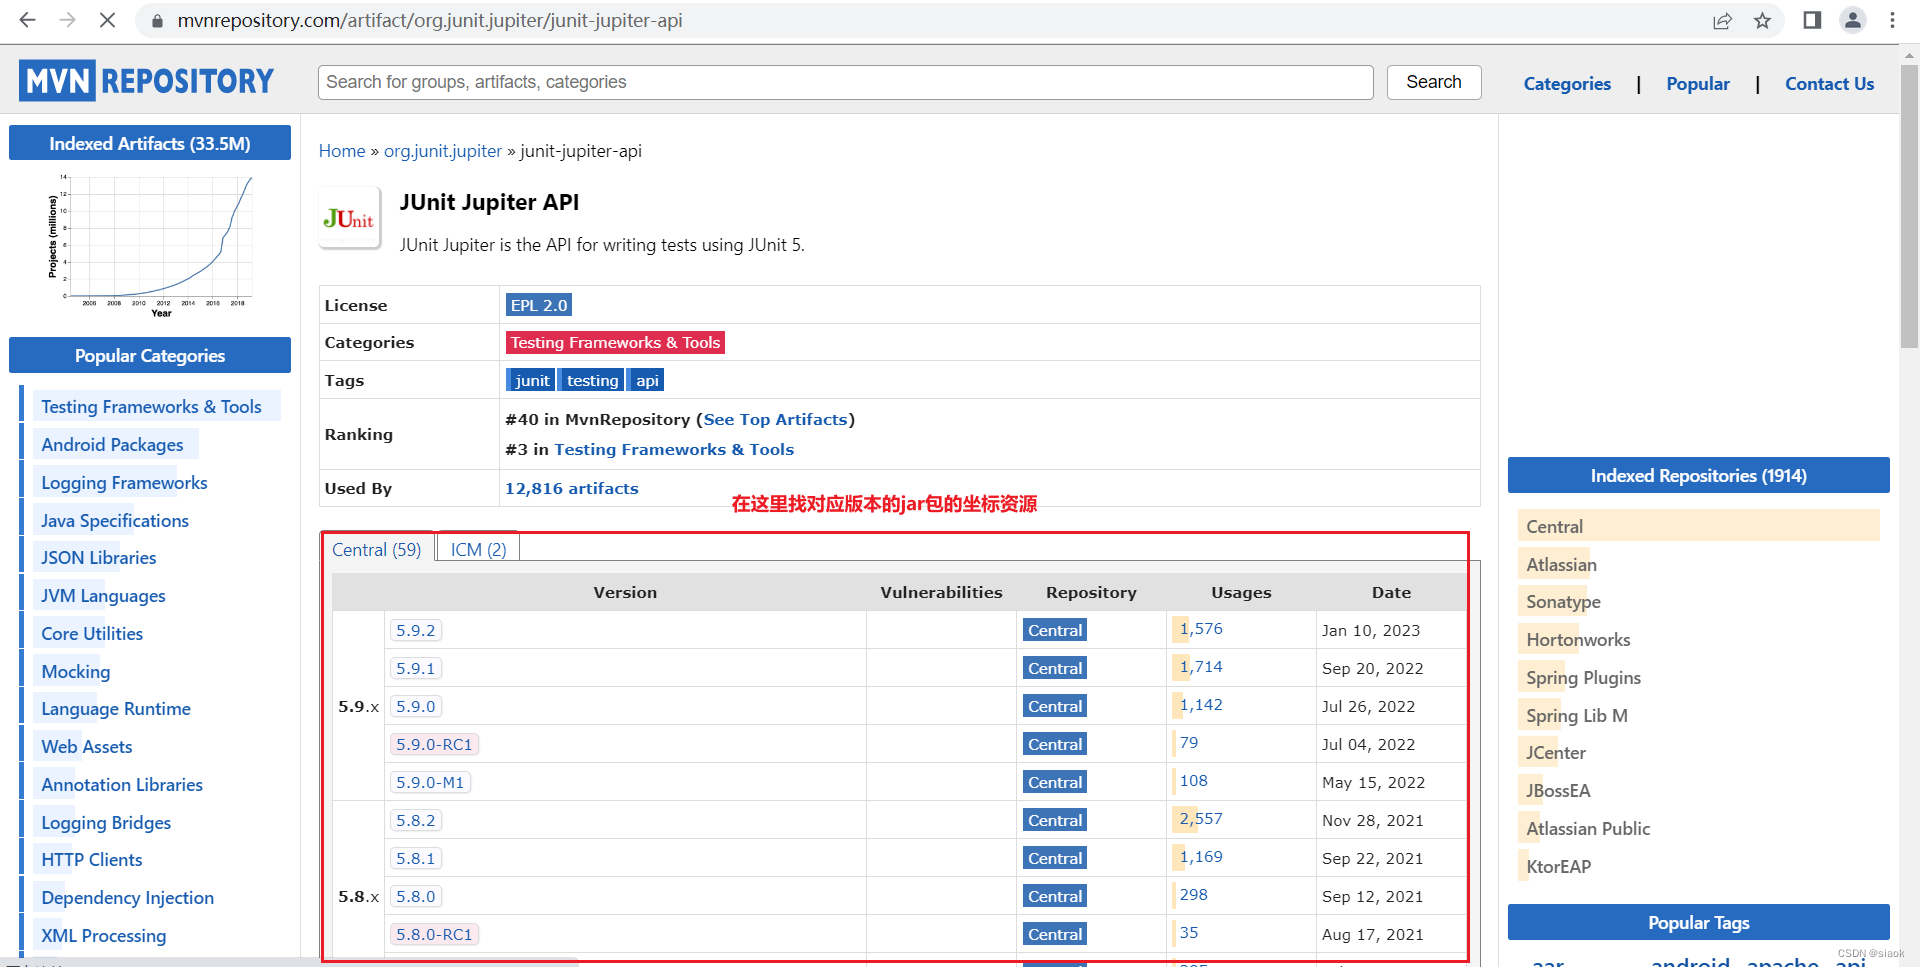
③找到对应版本的jar包名称,以然后点进去(我这里以 junit 5.9.2版本为例),复制Maven栏下的代码(坐标引用内容)
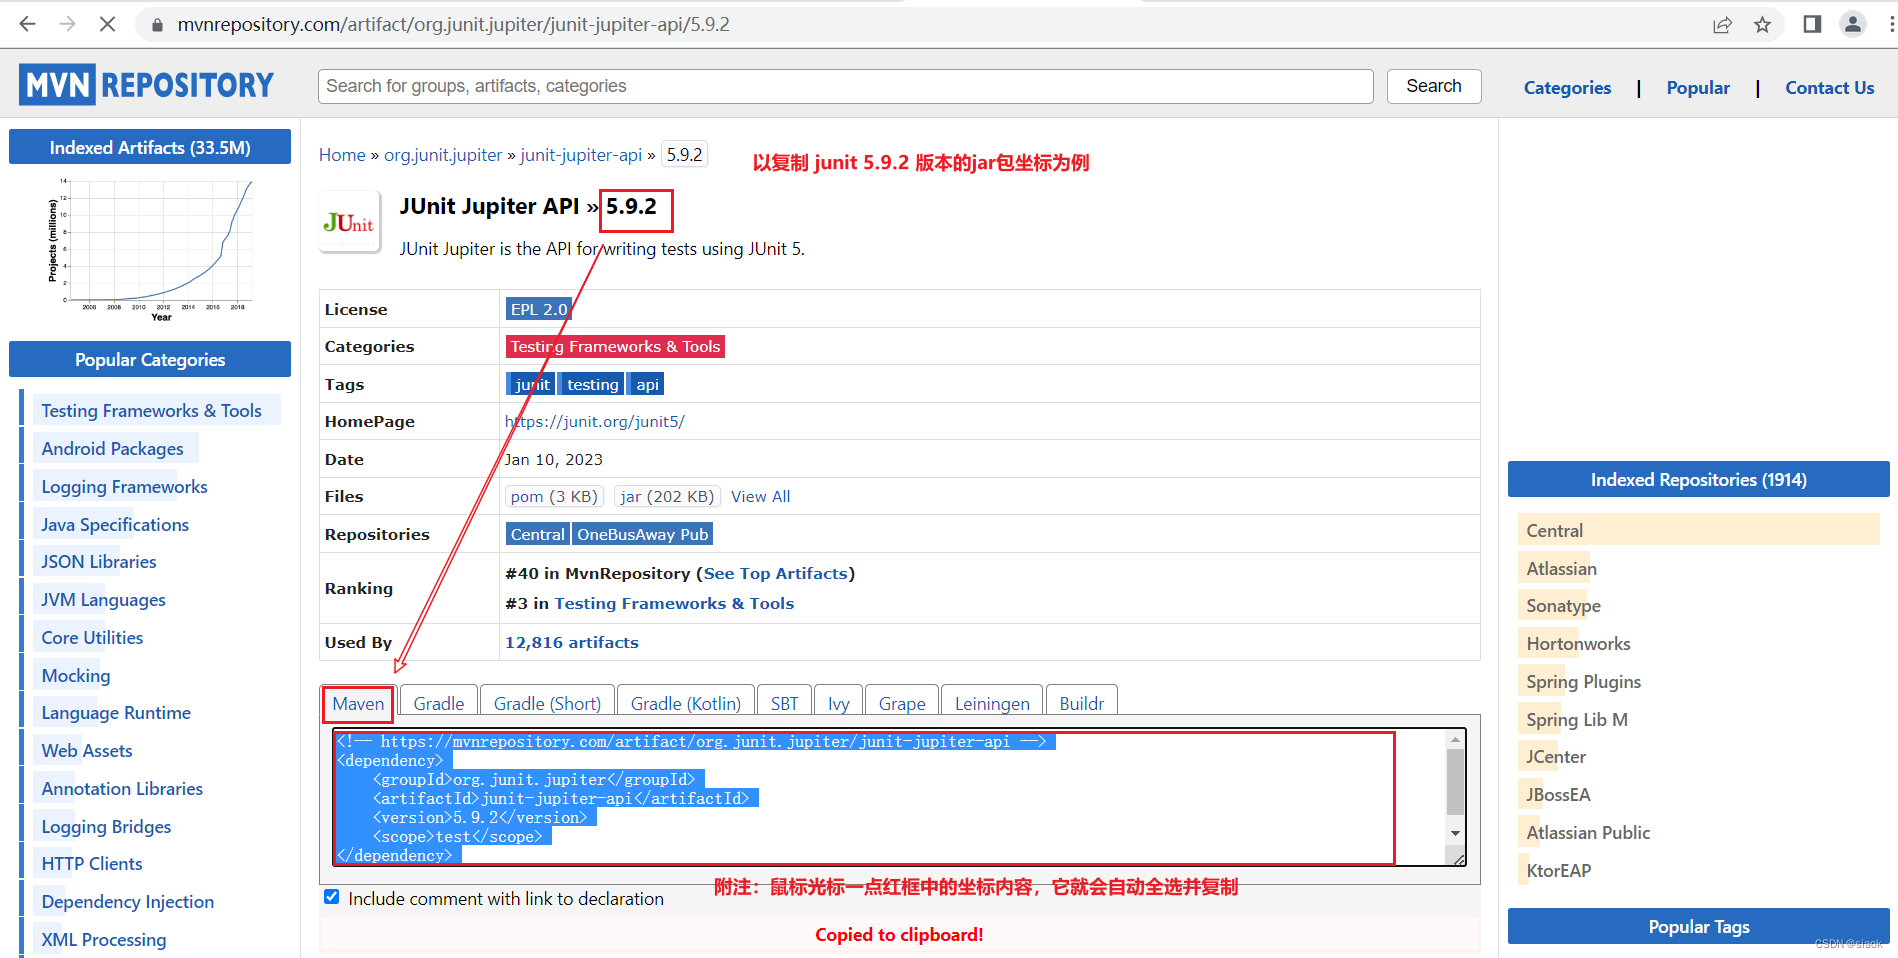
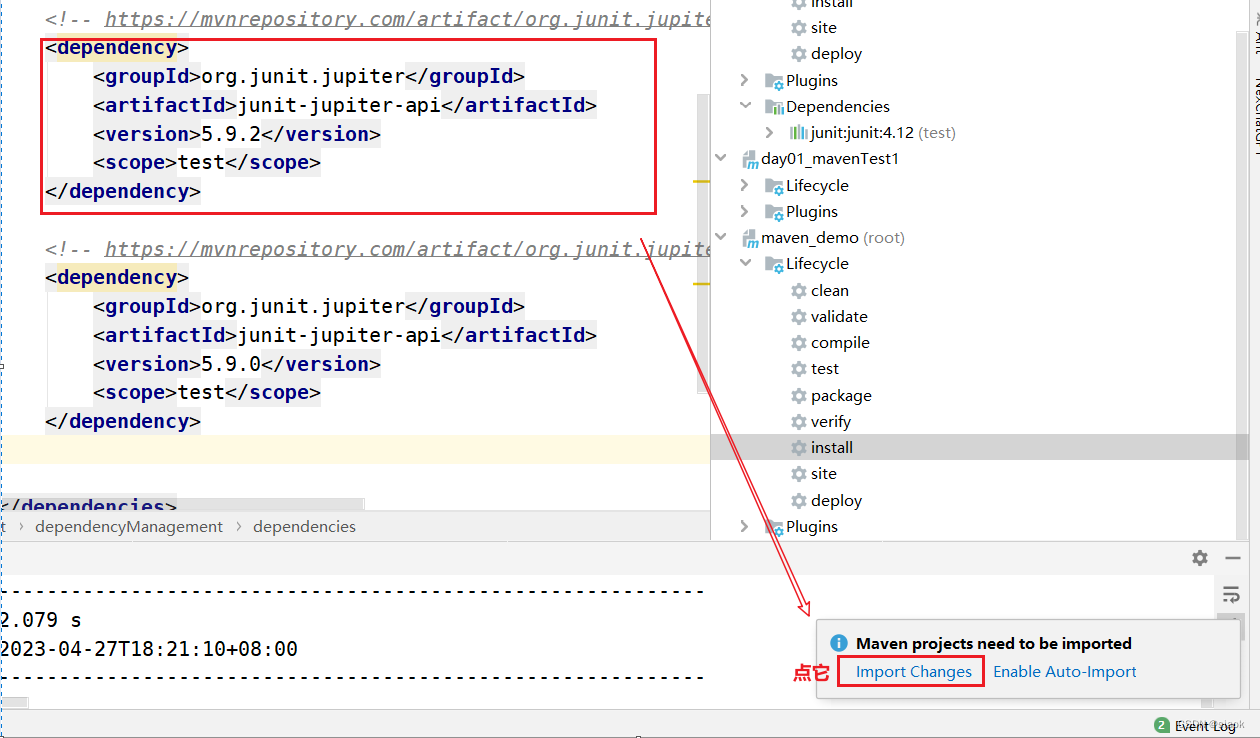
④将复制的代码粘贴到你要应用的模块中的pop.xml文件里的
<dependencies></dependencies>标签内,IEDA会自动在镜像服务器中下载该版本的jar包资源
二. Maven的依赖管理是什么?
Maven中的依赖是什么?
在 Maven 中,依赖(Dependency)是指项目需要的外部 JAR 文件或其他库。而依赖管理就是指在 Maven 中为项目定义和管理依赖关系的过程。
为什么要进行依赖管理?
通过使用依赖管理,Maven可以管理所有需要的 JAR和其他库,并确保它们可以正确下载并与本地项目一起工作。可能会存在多个依赖项依赖同一个第三方库的不同版本的场景,这时候需要根据项目需要的版本来选择合适的依赖项版本,避免因版本冲突导致的问题。
2.1 依赖范围
依赖语法:
<scope></scope>
可以在 <scope> 元素中使用以下值:
compile:默认值,表示依赖项在编译、测试和运行期间都可用。provided:表示依赖项在编译和测试期间可用,但是在运行时由容器或环境提供。runtime:表示依赖项在运行时可用,但不需要在编译时和测试时可用。test:表示依赖项仅在测试代码和源代码(即 src/test/ 目录)中使用,而不包括主要应用程序代码和资源。system:表示依赖项类似于 provided,但从本地系统文件系统中获得依赖项,而不是从 Maven 仓库下载。 需要通过<systemPath>指定依赖项的路径。
常用compile,test,provided的作用域范围:
compile:在main目录下、test目录下、Tomcat【服务器】下均有效。test:只能在test目录下有效。provided:在main、test目录下均有效,Tomcat【服务器】无效。
2.2 依赖的传递性
什么是依赖的传递性?
当多个项目导入依赖时,Maven会自动处理依赖项之间的关系并保证项目的顺利构建。当定义项目中的依赖项时,它会自动查找依赖项的依赖项,并将其添加到 build path 中。这就是所谓的依赖项传递性,因为它涉及到一系列相互依赖的库之间的自动传递。
例如,如果你在项目中使用 Spring 框架,而Spring Framework 本身就有多个依赖项,如 Spring Core,Spring Beans 和 Spring Context 等。但是,你不需要在 Maven 文件中分别指定所有这些依赖项 - 只需仅提供对 Spring Framework 依赖的声明即可。然后,Maven 就会自动解决 Spring Framework 以及其所有依赖项的传递性,将它们引入到项目构建路径中。
那么Maven是如何查找项目中依赖项的依赖项,进而自动引入到项目构建路径?或者说根据什么原则来处理依赖项之间的关系去构建项目?
有两条原则:
- 路径最短者优先【就近原则】
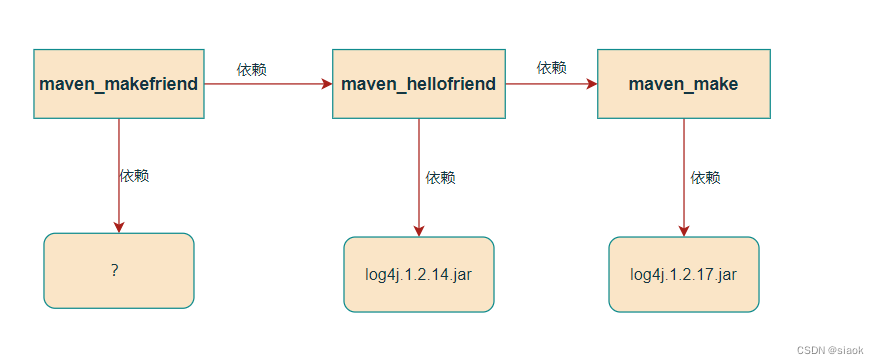
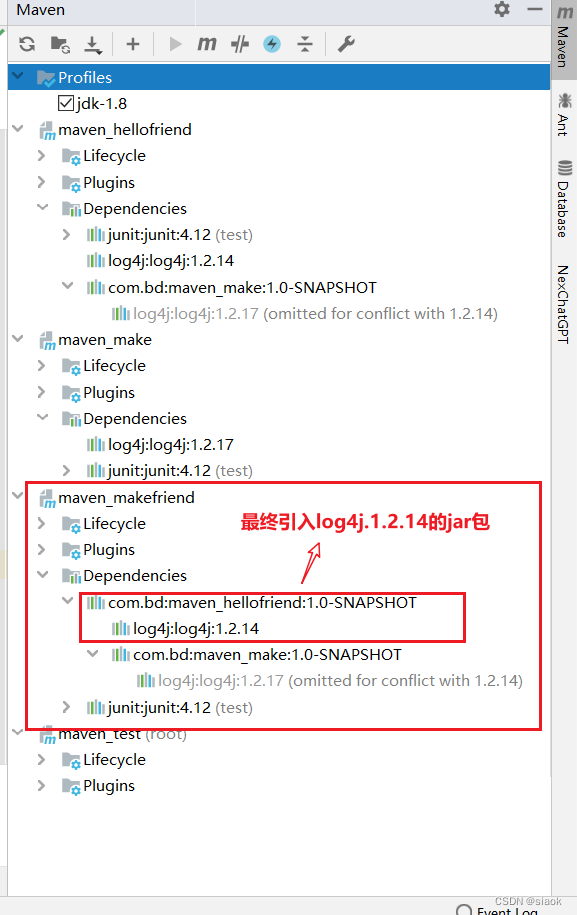
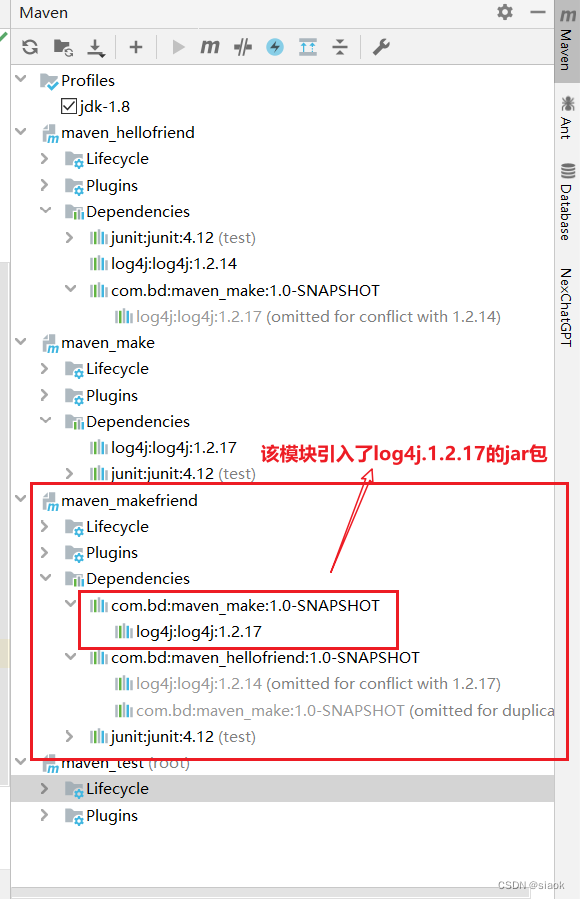
案例:在maven_test项目中定义三个maven模块(maven_makefriend,maven_make与maven_hellofriend),其中模块maven_hellofriend引入log4j 1.2.14的jar包,maven_make引入log4j 1.2.17的jar包,maven_makefriend模块不引入log4j 的jar包;另外,模块maven_hellofriend要依赖于模块maven_make,模块maven_makefriend依赖于模块maven_hellofriend,观察思考模块maven_makefriend会应用哪个版本的log4j
的jar包?
①模块maven_make引入log4j 1.2.17的jar包并install至Maven的本地仓库中 代码示例如下:
<?xml version="1.0" encoding="UTF-8"?>
<project xmlns="http://maven.apache.org/POM/4.0.0"
         xmlns:xsi="http://www.w3.org/2001/XMLSchema-instance"
         xsi:schemaLocation="http://maven.apache.org/POM/4.0.0 http://maven.apache.org/xsd/maven-4.0.0.xsd">
    <parent>
        <artifactId>maven_test</artifactId>
        <groupId>com.bd</groupId>
        <version>1.0-SNAPSHOT</version>
    </parent>
    <modelVersion>4.0.0</modelVersion>

    <artifactId>maven_make</artifactId>
    <dependencies>

        <!-- https://mvnrepository.com/artifact/log4j/log4j -->
        <dependency>
            <groupId>log4j</groupId>
            <artifactId>log4j</artifactId>
            <version>1.2.17</version>
        </dependency>


        <dependency>
            <groupId>junit</groupId>
            <artifactId>junit</artifactId>
            <version>4.12</version>
            <scope>test</scope>
        </dependency>
    </dependencies>

</project>
②在模块maven_hellofriend引入log4j 1.2.14的jar包以及模块maven_make的jar包
代码示例如下:
<?xml version="1.0" encoding="UTF-8"?>
<project xmlns="http://maven.apache.org/POM/4.0.0"
         xmlns:xsi="http://www.w3.org/2001/XMLSchema-instance"
         xsi:schemaLocation="http://maven.apache.org/POM/4.0.0 http://maven.apache.org/xsd/maven-4.0.0.xsd">
    <parent>
        <artifactId>maven_test</artifactId>
        <groupId>com.bd</groupId>
        <version>1.0-SNAPSHOT</version>
    </parent>
    <modelVersion>4.0.0</modelVersion>

    <artifactId>maven_hellofriend</artifactId>
    <dependencies>

        <dependency>
            <groupId>junit</groupId>
            <artifactId>junit</artifactId>
            <version>4.12</version>
            <scope>test</scope>
        </dependency>

        <!-- https://mvnrepository.com/artifact/log4j/log4j -->
        <dependency>
            <groupId>log4j</groupId>
            <artifactId>log4j</artifactId>
            <version>1.2.14</version>
        </dependency>

		//引入模块maven_make的jar包
        <dependency>
            <groupId>com.bd</groupId>
            <artifactId>maven_make</artifactId>
            <version>1.0-SNAPSHOT</version>
        </dependency>


    </dependencies>
③ 模块maven_makefriend依赖于模块maven_hellofriend,在pop.xml中引入其jar包
<?xml version="1.0" encoding="UTF-8"?>
<project xmlns="http://maven.apache.org/POM/4.0.0"
         xmlns:xsi="http://www.w3.org/2001/XMLSchema-instance"
         xsi:schemaLocation="http://maven.apache.org/POM/4.0.0 http://maven.apache.org/xsd/maven-4.0.0.xsd">
    <parent>
        <artifactId>maven_test</artifactId>
        <groupId>com.bd</groupId>
        <version>1.0-SNAPSHOT</version>
    </parent>
    <modelVersion>4.0.0</modelVersion>

    <artifactId>maven_makefriend</artifactId>

    <dependencies>
		//引入模块maven_hellofriend的jar包
        <dependency>
            <groupId>com.bd</groupId>
            <artifactId>maven_hellofriend</artifactId>
            <version>1.0-SNAPSHOT</version>
        </dependency>

        <dependency>
            <groupId>junit</groupId>
            <artifactId>junit</artifactId>
            <version>4.12</version>
            <scope>test</scope>
        </dependency>

    </dependencies>


</project>
- 先声明者优先
案例:根据上述案例场景,其他代码不变,假如模块maven_makefriend在pop.xml中同时引入模块maven_make与maven_hellofriend的jar包,那它会用哪个版本的log4j的jar包?
模块maven_makefriend在pop.xml中同时引入模块maven_make与maven_hellofriend的jar包
代码示例如下:
<?xml version="1.0" encoding="UTF-8"?>
<project xmlns="http://maven.apache.org/POM/4.0.0"
         xmlns:xsi="http://www.w3.org/2001/XMLSchema-instance"
         xsi:schemaLocation="http://maven.apache.org/POM/4.0.0 http://maven.apache.org/xsd/maven-4.0.0.xsd">
    <parent>
        <artifactId>maven_test</artifactId>
        <groupId>com.bd</groupId>
        <version>1.0-SNAPSHOT</version>
    </parent>
    <modelVersion>4.0.0</modelVersion>

    <artifactId>maven_makefriend</artifactId>

    <dependencies>
		//同时引入模块maven_make与maven_hellofriend的jar包
        <dependency>
            <groupId>com.bd</groupId>
            <artifactId>maven_make</artifactId>
            <version>1.0-SNAPSHOT</version>
        </dependency>

        <dependency>
            <groupId>com.bd</groupId>
            <artifactId>maven_hellofriend</artifactId>
            <version>1.0-SNAPSHOT</version>
        </dependency>


        <dependency>
            <groupId>junit</groupId>
            <artifactId>junit</artifactId>
            <version>4.12</version>
            <scope>test</scope>
        </dependency>

    </dependencies>


</project>
三. 在Maven中如何统一管理依赖的版本号?
语法:
示例代码如下
<properties>
    <spring-version>5.3.17</spring-version>
</properties>

<dependencies>
    <dependency>
        <groupId>org.springframework</groupId>
        <artifactId>spring-beans</artifactId>
        <version>${spring-version]</version>
    </dependency>
</dependencies>
ps:
这样做的好处是只需要修改一处,即
<properties></properties>内的版本号,就可以修改多处的值,即<dependencies></dependencies>内所有应用
${spring-version} 的值。在外面定义版本号,里面使用,然后统一管理,统一修改相关jar包的版本号,进而提高编码效率。
四. Maven中的继承是什么?
4.1 为什么需要继承?
原因:
如果有多个子工程都使用同一个jar包,则可以将该jar包提取到父工程中,使用【继承原理】在子工程中使用,类似于Java中的子类继承父类
注意:
父工程的打包方式【jar/war/pom】,必须是pom方式
4.2 Maven的继承方式一
用法:
只需要在父工程中的pop.xml中引入指定jar包的坐标,那么它所有的子工程都默认强制引入父工程中的所有jar包
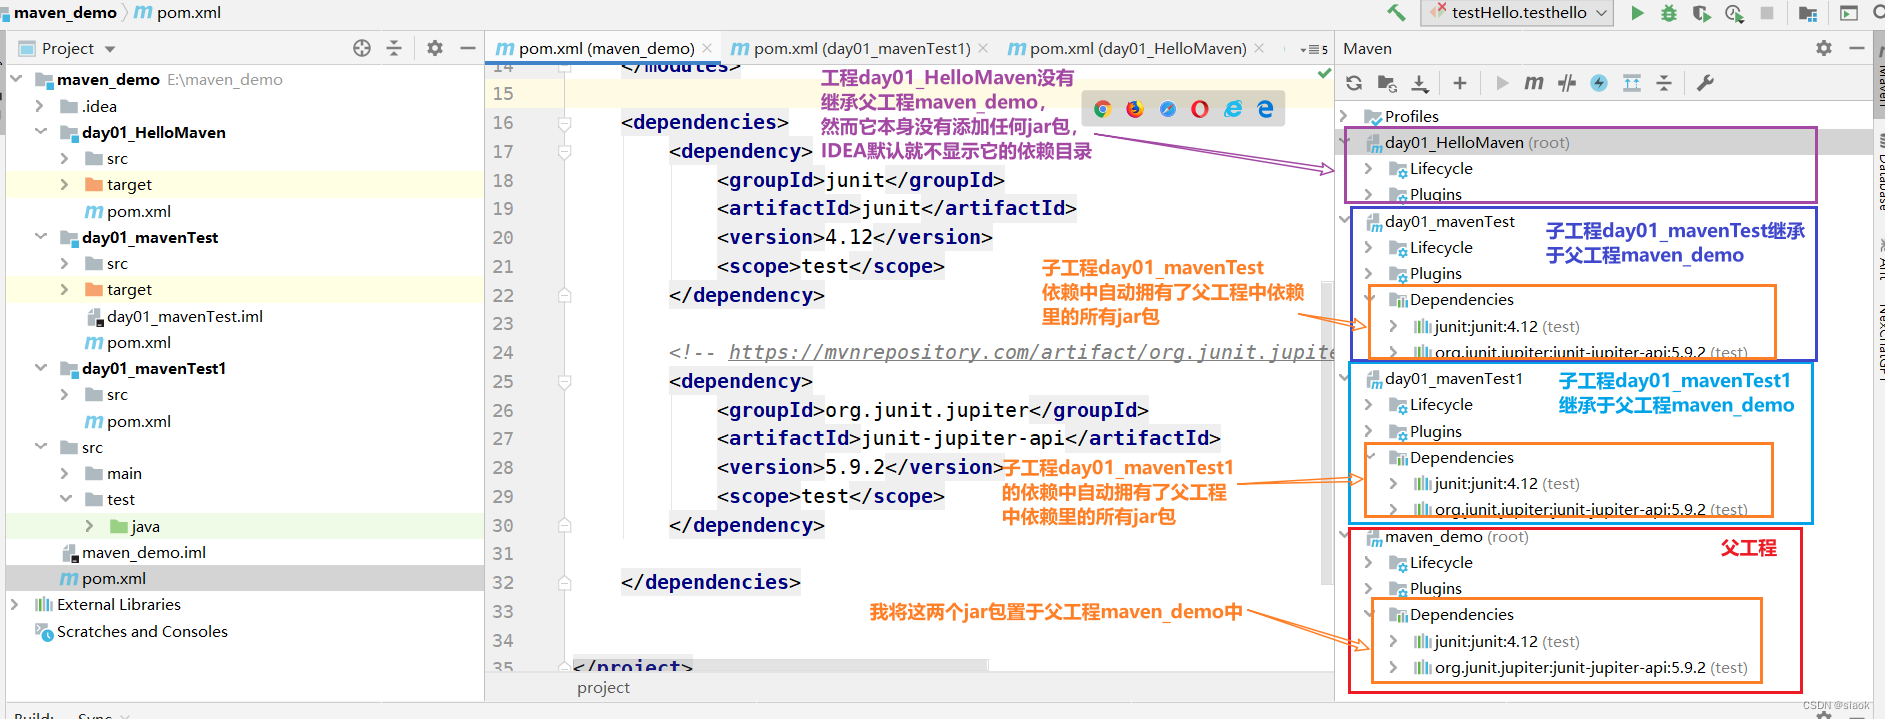
案例:在父工程maven_demo内创建两个子工程(day01_mavenTest与day01_mavenTest1)与一个工程day01_mavenHello,在父工程内的pop.xml里引入两个jar包(junit
4.12和junit-jupiter-api 5.9.2),其他工程内pop.xml不做任何jar包的坐标引入,演示观察继承效果
示例代码如下:
在父工程的pop.xml 引入两个jar包的坐标(junit 4.12和junit-jupiter-api 5.9.2)
//父工程的pop.xml 引入两个jar包的坐标(junit  4.12和junit-jupiter-api 5.9.2)
<?xml version="1.0" encoding="UTF-8"?>
<project xmlns="http://maven.apache.org/POM/4.0.0"
         xmlns:xsi="http://www.w3.org/2001/XMLSchema-instance"
         xsi:schemaLocation="http://maven.apache.org/POM/4.0.0 http://maven.apache.org/xsd/maven-4.0.0.xsd">
    <modelVersion>4.0.0</modelVersion>

    <groupId>com.bd</groupId>
    <artifactId>maven_demo</artifactId>
    <packaging>pom</packaging>
    <version>1.0-SNAPSHOT</version>
    <modules>
        <module>day01_mavenTest</module>
        <module>day01_mavenTest1</module>
    </modules>

    <dependencies>
        <dependency>
            <groupId>junit</groupId>
            <artifactId>junit</artifactId>
            <version>4.12</version>
            <scope>test</scope>
        </dependency>

        <!-- https://mvnrepository.com/artifact/org.junit.jupiter/junit-jupiter-api -->
        <dependency>
            <groupId>org.junit.jupiter</groupId>
            <artifactId>junit-jupiter-api</artifactId>
            <version>5.9.2</version>
            <scope>test</scope>
        </dependency>

    </dependencies>


</project>
有一个问题?
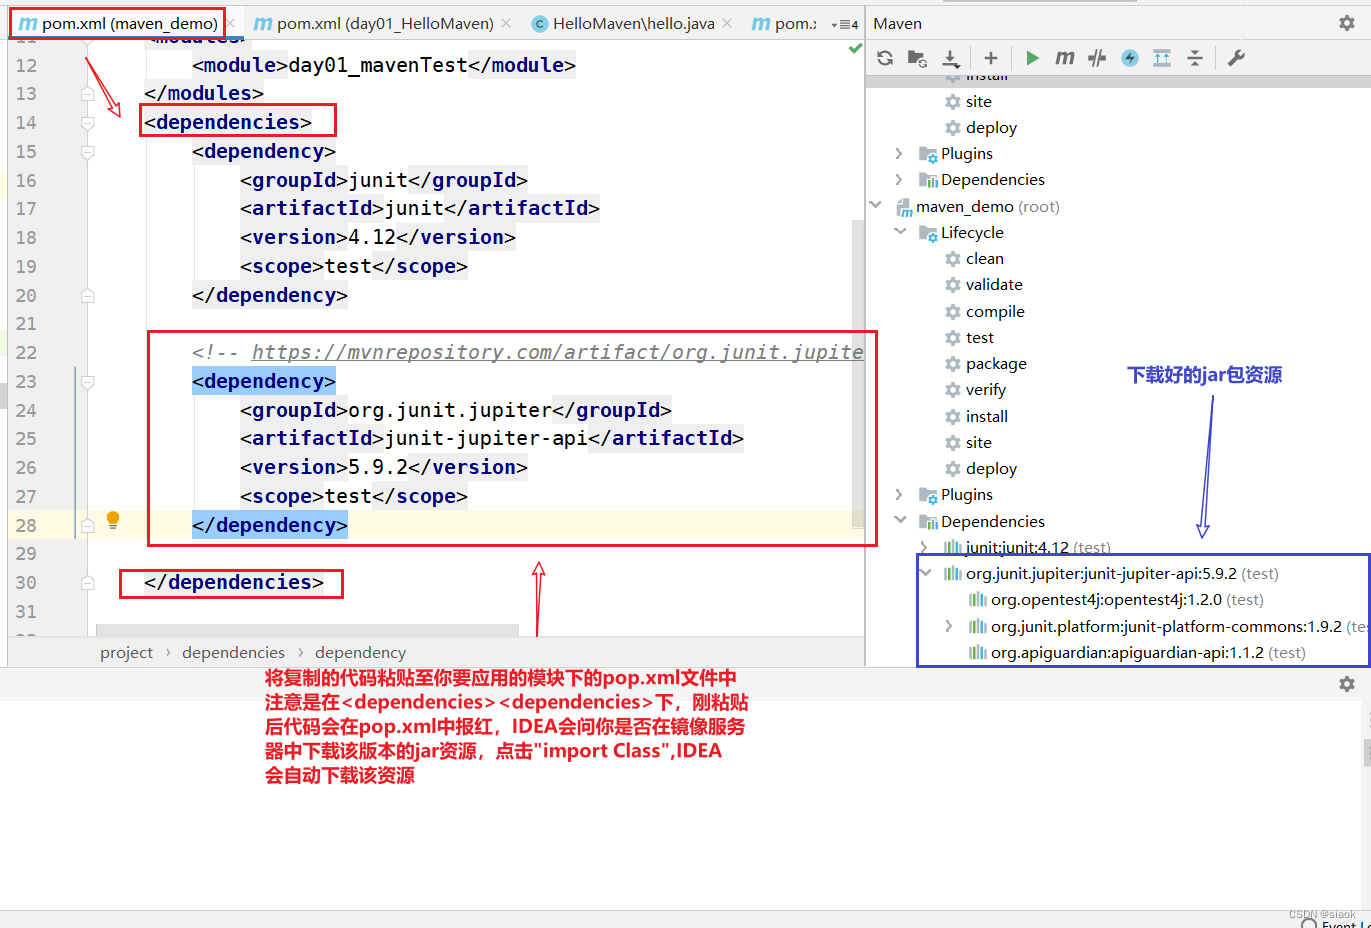
假设在上述案例场景中,子工程day01_mavenTest1的pop.xml内想要引入junit 4.11的jar包坐标,那么它的依赖目录下会应用从父工程继承的junit 4.12 的jar包,还是在pop.xml中准备引入的junit 4.11的jar包?
答案:子工程day01_mavenTest1的依赖中会应用pop.xml中准备引入的junit 4.11的jar包,原因是根据依赖的传递性规则中最短路径者优先【就近原则】。
如下所示:
4.3 Maven的继承方式二
在该继承方式中,子工程可以自由选择应用从父工程继承的jar包资源
用法:
①在父工程中的pop.xml将导入的jar包放入
<dependencyManagement></dependencyManagement>内。
示例代码如下:
//在父工程中的pop.xml里导入junit 4.12 的jar包,不过是放在
//dependencyManagement</dependencyManagement>内
<dependencyManagement>
    <dependencies>
        <dependency>
            <groupId>junit</groupId>
            <artifactId>junit</artifactId>
            <version>4.12</version>
            <scope>test</scope>
        </dependency>
    </dependencies>
</dependencyManagement>
②在子工程中的pop.xml中引入父工程的相关jar包,要这样写(如下所示)
示例代码如下:
<parent>
    <artifactId>maven_demo</artifactId>
    <groupId>com.atguigu</groupId>
    <version>1.0-SNAPSHOT</version>
    //加入下面的代码,要写父工程pop.xml的相对路径
    <relativePath>../pom.xml</relativePath>
</parent>
//注意不能加要引入jar包的版本号
 <dependencies>
        <dependency>
            <groupId>junit</groupId>
            <artifactId>junit</artifactId>
        </dependency>
</dependencies>
注意: 绝对不能添加指定导入的jar包的版本号
案例:在父工程maven_demo内创建两个子工程(day01_mavenTest与day01_mavenTest1)与一个工程day01_mavenHello,在父工程内的pop.xml里引入两个jar包(junit
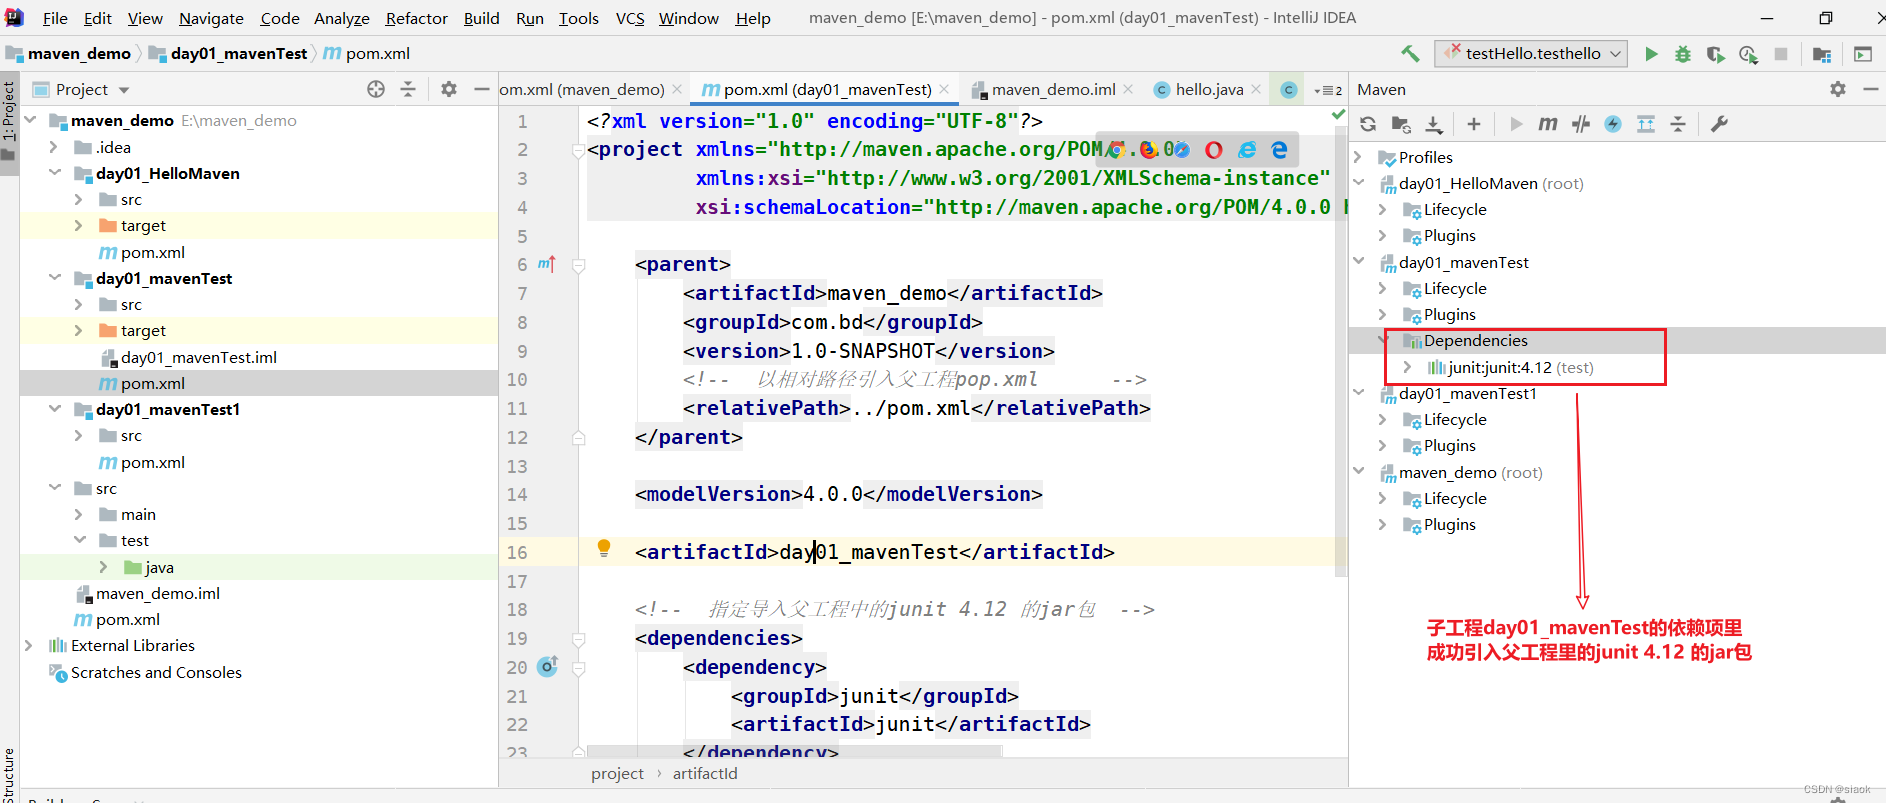
4.12和junit-jupiter-api 5.9.2),使用上述语法引入,子工程day01_mavenTest内的pop.xml使用继承方式二的语法引入父工程junit 4.12 的jar包的坐标引,演示观察继承效果
①父工程maven_demo内pop.xml中导入相关jar包
示例代码如下:
<?xml version="1.0" encoding="UTF-8"?>
<project xmlns="http://maven.apache.org/POM/4.0.0"
         xmlns:xsi="http://www.w3.org/2001/XMLSchema-instance"
         xsi:schemaLocation="http://maven.apache.org/POM/4.0.0 http://maven.apache.org/xsd/maven-4.0.0.xsd">
    <modelVersion>4.0.0</modelVersion>

    <groupId>com.bd</groupId>
    <artifactId>maven_demo</artifactId>
    //规定父工程的打包方式必须是pom
    <packaging>pom</packaging>
    <version>1.0-SNAPSHOT</version>
    <modules>
        <module>day01_mavenTest</module>
        <module>day01_mavenTest1</module>
    </modules>

    <dependencyManagement>
    <dependencies>
        <dependency>
            <groupId>junit</groupId>
            <artifactId>junit</artifactId>
            <version>4.12</version>
            <scope>test</scope>
        </dependency>

        <!-- https://mvnrepository.com/artifact/org.junit.jupiter/junit-jupiter-api -->
        <dependency>
            <groupId>org.junit.jupiter</groupId>
            <artifactId>junit-jupiter-api</artifactId>
            <version>5.9.2</version>
            <scope>test</scope>
        </dependency>

    </dependencies>

    </dependencyManagement>
</project>
②子工程day01_mavenTest的pop.xml内指定引入夫父工程中junit 4.12 的jar包
示例代码如下:
<?xml version="1.0" encoding="UTF-8"?>
<project xmlns="http://maven.apache.org/POM/4.0.0"
         xmlns:xsi="http://www.w3.org/2001/XMLSchema-instance"
         xsi:schemaLocation="http://maven.apache.org/POM/4.0.0 http://maven.apache.org/xsd/maven-4.0.0.xsd">

    <parent>
        <artifactId>maven_demo</artifactId>
        <groupId>com.bd</groupId>
        <version>1.0-SNAPSHOT</version>
        <!--  以相对路径引入父工程pop.xml      -->
        <relativePath>../pom.xml</relativePath>
    </parent>

    <modelVersion>4.0.0</modelVersion>

    <artifactId>day01_mavenTest</artifactId>

    <!--  指定导入父工程中的junit 4.12 的jar包  -->
    <dependencies>
        <dependency>
            <groupId>junit</groupId>
            <artifactId>junit</artifactId>
        </dependency>
    </dependencies>

</project>
五. Maven 的聚合是什么?
释义:
在 Maven 中,聚合(Aggregation)是将多个项目组织在一起构建的一种特殊方式。这可以使多个项目成为单个构建,在一个命令下执行所有构建步骤。
聚合通常用于处理具有相同构建要求的多个项目。例如,大型应用程序可能由多个模块组成,每个模块都需要编译、测试、打包和部署成独立的库或组件。在这种情况下,可以将所有模块配置为使用 Maven 聚合进行构建,并使用一个父级 pom.xml 文件来定义它们之间的关系。
5.1 如果不使用Maven的聚合,会发生什么?
如果不使用聚合功能,在项目中就不能管理多个子模块,也不能一次性构建整个代码库。此外,没有聚合,每个模块都需要单独编译、测试和部署,增加了工作量和复杂度。因此,使用Maven的聚合功能可以极大的简化项目的管理并提高开发的效率。
5.2 使用Maven聚合的好处
好处:
只要将子工程聚合到父工程中,就可以实现效果(安装或清除父工程时,子工程会进行同步操作)。换而言之,就是在点击父工程的install 或 clean,安装父工程的同时,它的子工程也会同时安装,clean时 一起 clean。
5.3 如何使用Maven的聚合?
Maven 使用
<modules>元素管理所有相关的子工程(子模块)。该元素包含一系列<module>子元素,其中每个子元素指定要聚合的 Maven 项目的目录名称
语法:
代码示例如下
<modules>
    <module>day01_mavenTest</module>
    <module>day01_mavenTest1</module>
</modules>
<modules> 元素下包含了两个子元素,即 day01_mavenTest、day01_mavenTest1。这意味着 该pop.xml所在的Maven项目 将聚合这两个项目,并在一个命令下一起执行它们的构建。
注意是在要将某一个Maven项目作为聚合的“容器”,它负责聚合容纳其他要聚合的Maven项目,是身为“聚合容器”的Maven项目下的pop.xml里写,类似Java中的抽象类与接口的概念
案例:演示Maven聚合的功能(点击”install“功能 安装父工程时,则同时安装它子工程)
安装之前:
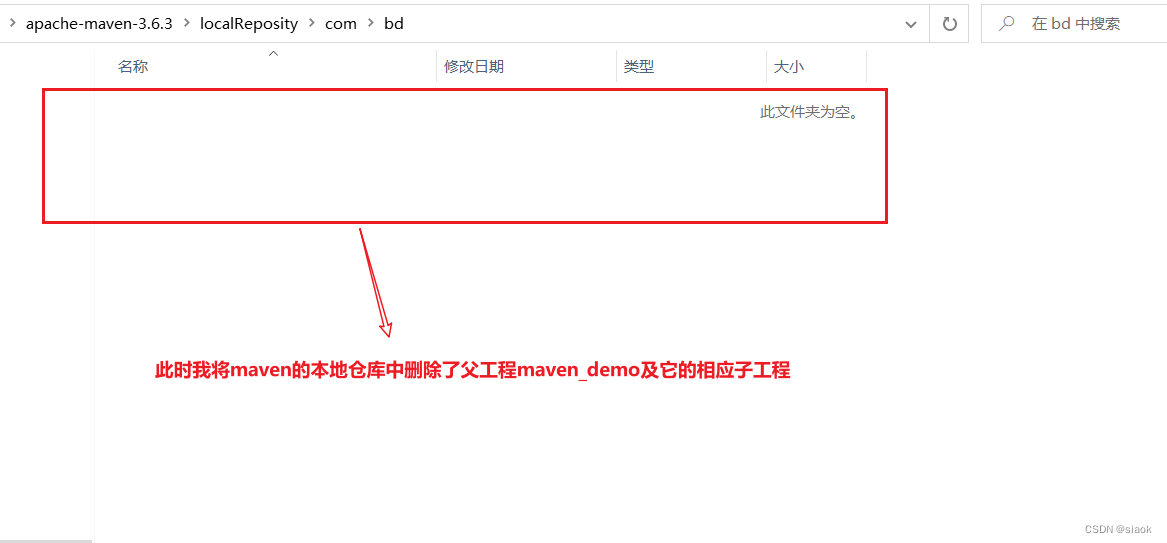
安装之后:


注意:
Maven会按照依赖顺序自动安装子工程


 QT多线程的5种用法,通过使用线程解决UI主界面的耗时操作代码,防止界面卡死。...
 U8W/U8W-Mini使用与常见问题解决
 stm32使用HAL库配置串口中断收发数据(保姆级教程)
 分享几个国内免费的ChatGPT镜像网址(亲测有效)
 Allegro16.6差分等长设置及走线总结