您现在的位置是:首页 >学无止境 >Spring网站首页学无止境
Spring
目录
🐼今日良言:道阻且长,行则将至

🐇一、Spring介绍
在介绍spring之前,先来就介绍一下为什么要学习框架?
1.学习框架相当于从“小作坊”到“工厂”的升级,小作坊什么都要⾃⼰做,⼯⼚是组件式装配,特点就是⾼效。
2.框架更加易⽤、简单且⾼效。
那么框架的高效和简单体现在哪里呢?
对比 SpringBoot 和 Servlet:
SpringBoot相比于Servlet的优点:
1. 添加外部 jar 更容易,不易出错(版本问题⽆需关注);
2. 调试项⽬更加⽅便,⽆需配置 Tomcat;
3. 发布项⽬更加⽅便,⽆需配置 Tomcat;
4. 添加路由更加⽅便,⽆需每个访问地址都添加⼀个类
框架对于企业而言无疑是举足轻重的,因此对于开发人员而言,对于框架的掌握框架就是一项必备技能.
那么,该如何学习框架呢?
先从基础框架 Spring 开始.
通常所说的 Spring 指的是 Spring Framework(Spring 框架),它是⼀个开源框架,有着活跃⽽庞⼤的社区,这就是它之所以能⻓久不衰的原因。Spring ⽀持⼴泛的应⽤场景,它可以让 Java 企业级的应⽤程序开发起来更简单。
如何理解 Spring?
一言以蔽之: Spring 是包含众多工具方法的 IoC 容器.
简单理解 Spring 可以当做是一个容器,主要是用来存取东西的.
在之前的学习中,我们已经接触过一些容器,如: List/Map 这些是数据存储容器.
IoC (Inversion of Control)
Inversion of Control 是"控制翻转"的意思,也就是说: Spring 是一个"控制翻转"的容器.
通过下面造汽车的例子来加深对这句话的理解.
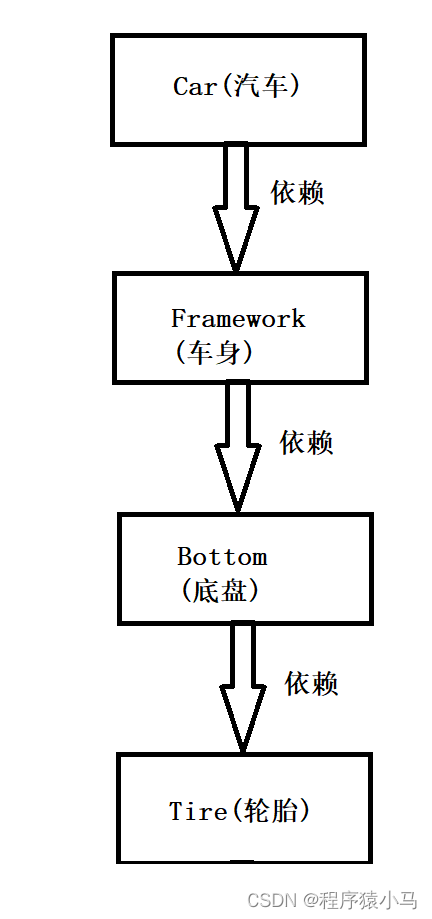
在之前我们的学习中,假设传统程序实现造一辆车的流程如下:
构造一辆车(Car),就需要依赖其车身(Framework),构造车身就需要依赖底盘(Bottom),构造底盘就需要依赖轮胎(Tire),实现代码如下:
public class NewCarExample {
    public static void main(String[] args) {
        Car car = new Car();
        car.init();
    }
    /**
     * 汽⻋对象
     */
    static class Car {
        public void init() {
              // 依赖⻋身
            Framework framework = new Framework();
            framework.init();
        }
    }
    /**
     * ⻋身类
     */
    static class Framework {
        public void init() {
            // 依赖底盘
            Bottom bottom = new Bottom();
            bottom.init();
        }
    }
    /**
     * 底盘类
     */
    static class Bottom {
        public void init() {
             // 依赖轮胎
            Tire tire = new Tire();
            tire.init();
        }
    }
    /**
     * 轮胎类
     */
    static class Tire {
      // 尺⼨
       private int size = 25;
       public void init() {
        System.out.println("轮胎尺⼨:" + size);
       }
   }
}
在以上的程序中,轮胎的尺寸是固定的,但是随着用户需求的不同(比如张三想要30尺寸的轮胎,李四想要35尺寸的轮胎....),此时,就需要加工不同尺寸的轮胎,因此,对上述程序进行修改,修改后的代码如下:
public class NewCarUpdateExample {
    public static void main(String[] args) {
        Car car = new Car(30);
        car.run();
    }
    /**
     * 汽⻋对象
     */
    static class Car {
        private Framework framework;
        public Car(int size) {
            framework = new Framework(size);
        }
        public void run() {
            // 依赖⻋身
            framework.init();
        }
    }
    /**
     * ⻋身类
     */
    static class Framework {
        private Bottom bottom;
        public Framework(int size) {
            bottom = new Bottom(size);
        }
        public void init() {
            // 依赖底盘
            bottom.init();
        }
    }
    /**
     * 底盘类
     */
    static class Bottom {
        private Tire tire;
        public Bottom(int size) {
            tire = new Tire(size);
        }
        public void init() {
            // 依赖轮胎
            tire.init();
        }
    }
    /**
     * 轮胎类
     */
    static class Tire {
        // 尺⼨
        private int size;
        public Tire(int size) {
            this.size = size;
        }
        public void init() {
            System.out.println("轮胎尺⼨:" + size);
        }
    }
}
通过对程序的修改,会发现,如果修改最底层的代码,那么整个程序的调用代码都要进行修改.
那么,如何解决上述问题呢?
最关键的核心思想是:解耦.
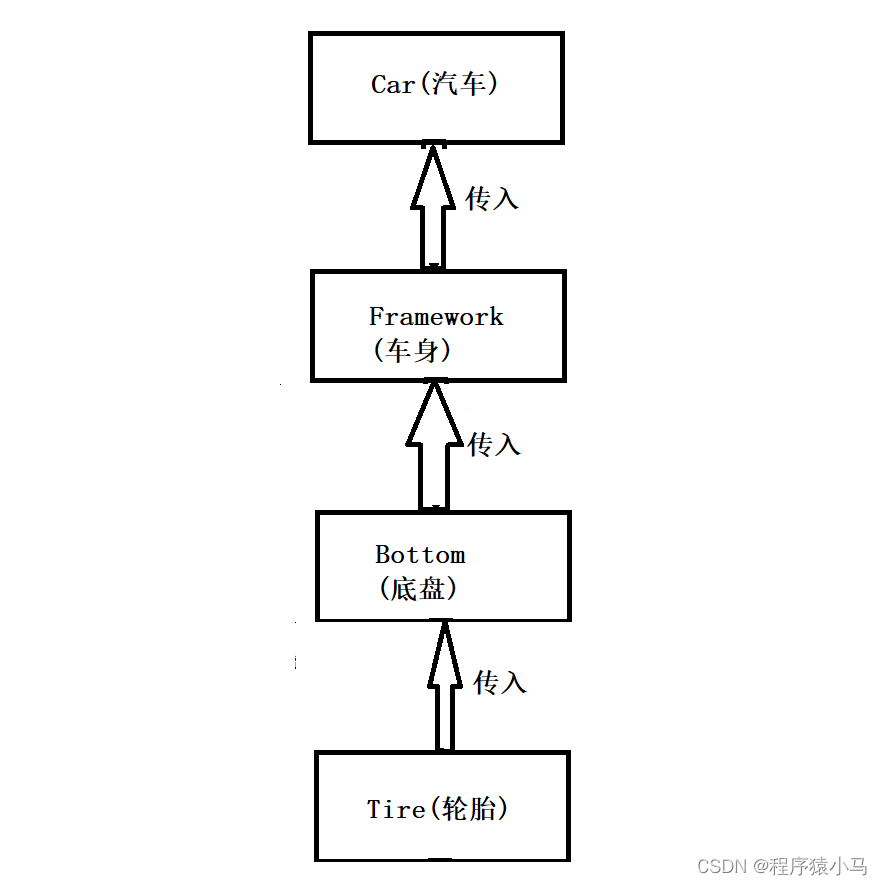
也就是说,可以将原来自己创建的下级类(轮胎、底盘、车身),改为传递的方式(注入).
这样带来的结果就是:不需要在当前类中创建下级类了,所以,即使下级类发送各种变化(如:创建或者修改参数),当前类也无需修改任何代码,这样就可以实现解耦.
基于上述思想,把创建⼦类的⽅式,改为注⼊传递的⽅式,修改实现一辆车的流程:
实现代码如下:
public class IocCarExample {
    public static void main(String[] args) {
        Tire tire = new Tire(20);
        Bottom bottom = new Bottom(tire);
        Framework framework = new Framework(bottom);
        Car car = new Car(framework);
        car.run();
    }
    static class Car {
        private Framework framework;
        public Car(Framework framework) {
            this.framework = framework;
        }
        public void run() {
            framework.init();
        }
    }
    static class Framework {
        private Bottom bottom;
        public Framework(Bottom bottom) {
            this.bottom = bottom;
        }
        public void init() {
            bottom.init();
        }
    }
    static class Bottom {
        private Tire tire;
        public Bottom(Tire tire) {
            this.tire = tire;
        }
        public void init() {
            tire.init();
        }
    }
    static class Tire {
        private int size;
        public Tire(int size) {
            this.size = size;
        }
        public void init() {
            System.out.println("轮胎:" + size);
        }
    }
}
通过上述流程的实现,即使底层代码发生改变,整个调用代码也不会发生任何改变,这样就完成了程序的解耦,实现了更灵活、通用的程序设计了.
对比传统程序开发和控制反转程序开发:
传统程序开发: 汽车 ->车身->底盘->轮胎
控制反转程序开发: 轮胎->底盘->车身->汽车
传统代码是Car(汽车)控制并创建了Framework(车身),Framework(车身)控制并创建了Bottom(底盘)..... 而修改后的代码的控制权发生了反转,不再是传统的上级对象创建并控制下级对象了,而是将下级对象注入到当前对象中,下级的控制权不再由上级控制了,即使下级类发生任何变化,当前类都不受影响,这就是典型的控制反转,也就是 IoC 的实现思想.
简化上述思想:
假设现在有两个类:A和B,最初的代码是在类A中 new B(),也就是对B进行实例化,此时,A对象就掌握了 B 对象的控制权,可以对 B 进行操作.
控制反转的意思就是:让 A 对象交出控制权,不在 A中new B(),而是采用 注入的方式,也就是将B对象传入A 中.
而Spring 正是存放 众多控制反转(IoC) 的容器. 也就是让A对象交出B的控制权给 Spring ,让Spring去控制 B 对象.
以上就是对 "Spring 是包含众多工具方法的 IoC 容器" 这句话的解释.
Spring 包含中多工具方法这一点在以后的使用中会慢慢学习到.
Spring 是一个IoC 容器的体现: Spring 具备两个最基本的功能:
将对象存入到容器.(存对象)
从容器中取出对象.(取对象)
将对象存储到容器中的好处:
每次使用到对象的时候,从容器中取出即可,用完以后放回容器,而不是每次使用的时候都需要new,用完就释放掉,下次再次使用的时候需要重新new.
说到 IOC 不得不提的一个词是: DI (Dependency Injection):
Dependency Injection 是"依赖注入"的意思,也就是由 IOC容器 在运行期间,动态地将某种依赖关系注入到对象之中.
所以,依 赖注⼊(DI)和控制反转(IoC)是从不同的⻆度的描述的同⼀件事情,就是指通过引⼊ IoC 容器,利⽤依赖关系注⼊的⽅式,实现对象之间的解耦.IoC 是一种思想和目标,而 DI 是具体的实现.通过下面例子来加深理解:博主今天写了一篇博客,于是打算奖励自己吃顿好的. 那么"吃顿好的"是思想和目标(IoC),而最后博主选择吃火锅还是海底捞,这就是具体的是实现(DI).
🐇二、Spring创建和使用
接下来,介绍一下如何创建以及使用 Spring:
在前面已经介绍过了,Spring 最基本的两个功能是:存对象和取对象.
在Java 语⾔中对象也叫做 Bean,所以在后面的介绍中将对象称作 Bean.
创建 Spring 项目:
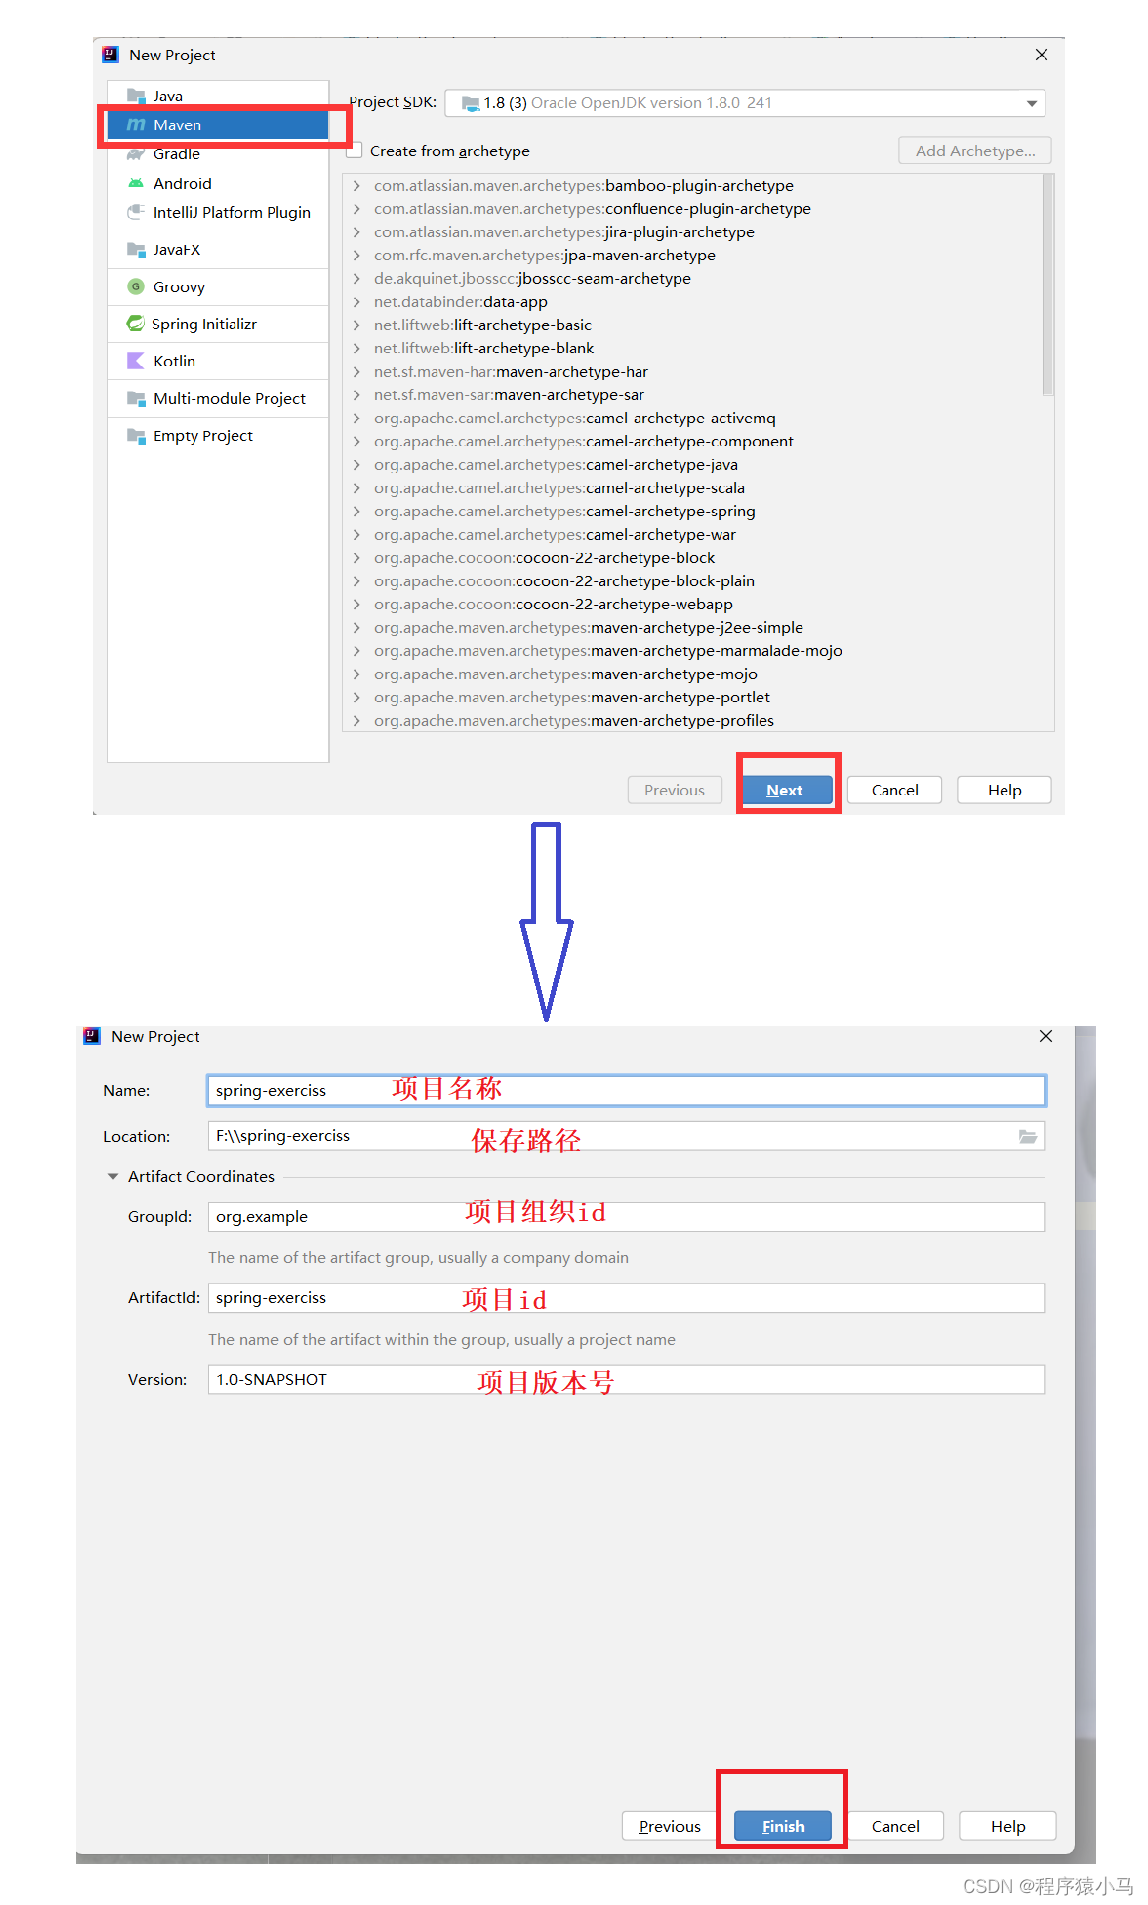
使用 Maven 方式来创建一个 Spring 项目,创建 Spring 项目和 Servlet 项目类似,总共可以分为三步:
1.创建一个普通的Maven项目
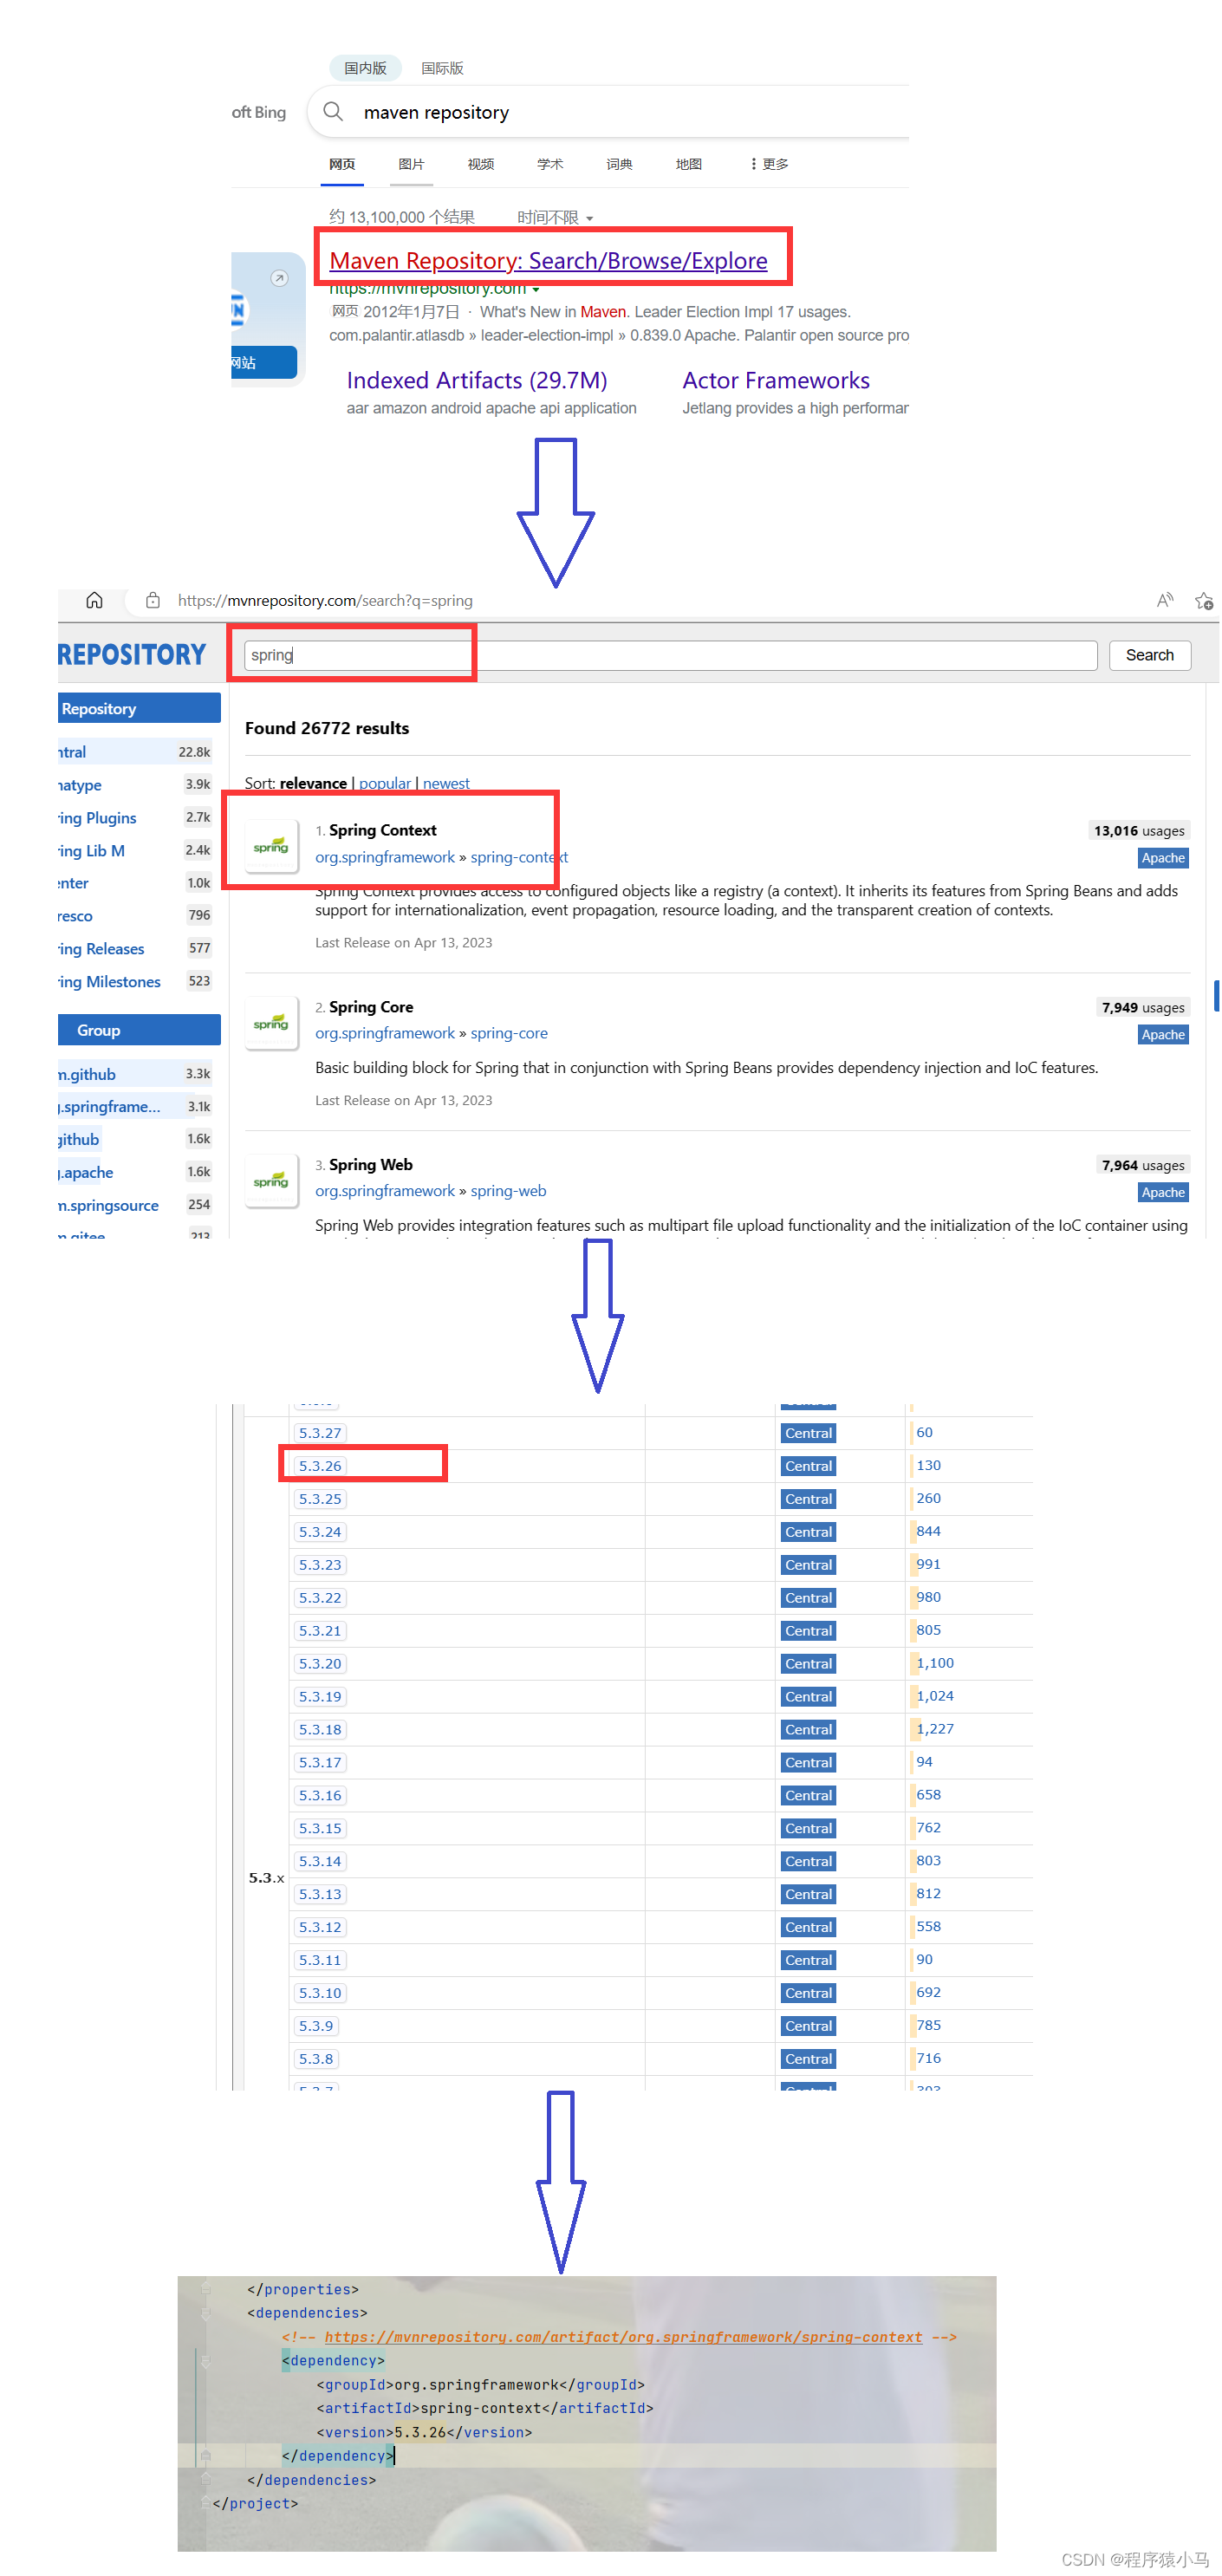
2.添加 Spring 框架支持(spring-context、spring-beans)
3.添加启动类.
1.创建一个普通的Maven项目:
2.添加 Spring 框架支持
spring 需要配置国内源否则可能会出错,具体配置流程参考下面这篇博客:
项目中如何配置 Maven 为国内源_mvn 国内_Master_hl的博客-CSDN博客
配置完国内源以后,就可以从Maven仓库中找到 spring 依赖,然后进行添加.
注意,这里需要根据jdk版本选择,6.x.x要求最低的jdk版本是jdk17,
5.x.x是jdk8
博主是jdk8,因此这里选择5.3.26,然后复制依赖,添加到pom.xml文件中即可.
3.添加启动类.
最后在创建好的项⽬ java ⽂件夹下创建⼀个启动类,包含 main ⽅法即可:
以上就是 Spring 项目的创建.
Spring 的使用(对Bean的相关操作).
首先来看,如何将 Bean (对象) 存储到 Spring 容器中.
在存储 Bean 之前,需要先创建 Bean:

创建好Bean以后,需要将Bean存放到Spring 容器中:
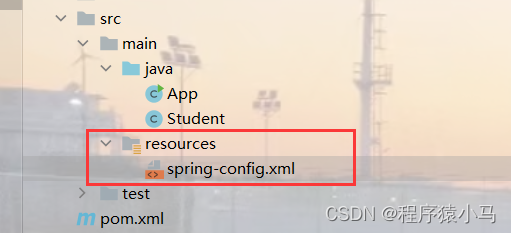
在创建好的项目中添加 Spring 配置文件 spring-config.xml,将这个文件放在resources 的根目录下:
然后配置文件内容如下(固定格式):
<?xml version="1.0" encoding="UTF-8"?>
<beans xmlns="http://www.springframework.org/schema/beans"
       xmlns:xsi="http://www.w3.org/2001/XMLSchema-instance"
       xmlns:content="http://www.springframework.org/schema/context"
       xsi:schemaLocation="http://www.springframework.org/schema/beans http://www.springframework.org/schema/beans/spring-beans.xsd http://www.springframework.org/schema/context https://www.springframework.org/schema/context/spring-context.xsd">
</beans>
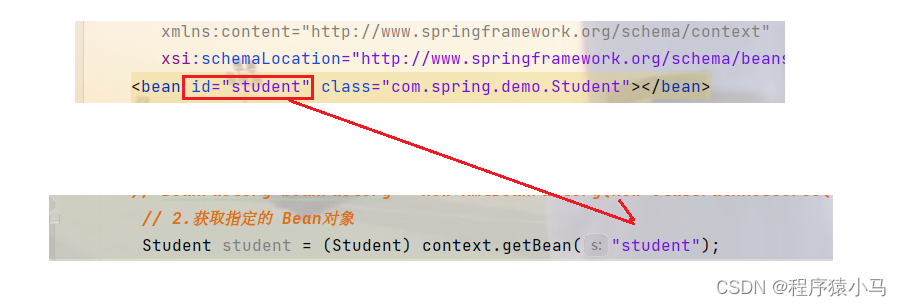
然后将 Student 对象添加到 Spring中就可以,具体操作如下:
这里的意思是:将bean(Student) 存到 Spring 容器中,它的名称叫做 student
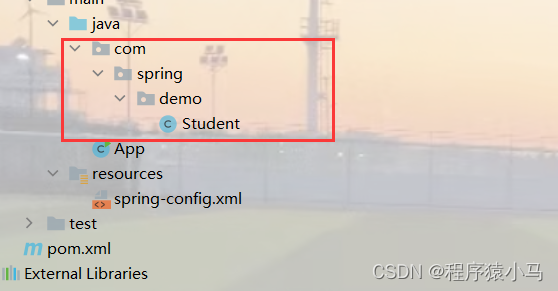
注:如果这个bean在一个包中,需要带上包名,比如:
此时将这个bean添加到 Spring 容器中时,需要带上包名:
此时已经将 Bean 存到了 Spring 容器中,接下来的操作就是,从 Spring 容器中获取并使用Bean:
这个步骤可以分为三步(在启动类App中):
1.创建 Spring 上下文
2.获取指定的 Bean 对象
3.使用bean
1.创建 Spring 上下文
因为对象都交给 Spring 管理了,所以获取对象要从 Spring 中获取,那么就得先得到 Spring 的上下⽂:
ApplicationContext context = new ClassPathXmlApplicationContext("spring-config.xml");除了使用 ApplicationContext 之外,我们还可以使用 BeanFactory 来作为 Spring 的上下文,代码如下:
BeanFactory beanFactory = new XmlBeanFactory(new ClassPathResource("spring-config.xml"));BeanFactory 和 ApplicationContext 效果是一样的,ApplicationContext 属于 BeanFactory 的子类,他们的区别主要如下:
继承关系和功能方面来说:
BeanFactory 提供了基础的访问容器的能力,而ApplicationContext 属于BeanFactory的子类,它除了继承了 BeanFactory 的所有功能之外,它还具有独特的特性,还添加了对国际化支持、资源访问支持等.
从性能方面来说:
Application 是一次性加载并初始化所有的 Bean 对象,而BeanFactory 是需要哪个才加载哪个,因此更加轻量.
ClassPathXmlApplicationContext 属于 ApplicationContext 的⼦类,拥有ApplicationContext 的所有功能,是通过 xml 的配置来获取所有的 Bean 容器的。
2.获取指定的 Bean 对象
从Spring 中获取指定的Bean对象,主要有如下三种方式:
1)使用存放时的id(名称)进行获取
Student student = (Student) context.getBean("student");
由于传入时是通过id名,此时 context.getBean() 返回的是一个 Object,所以需要强制类型转换:
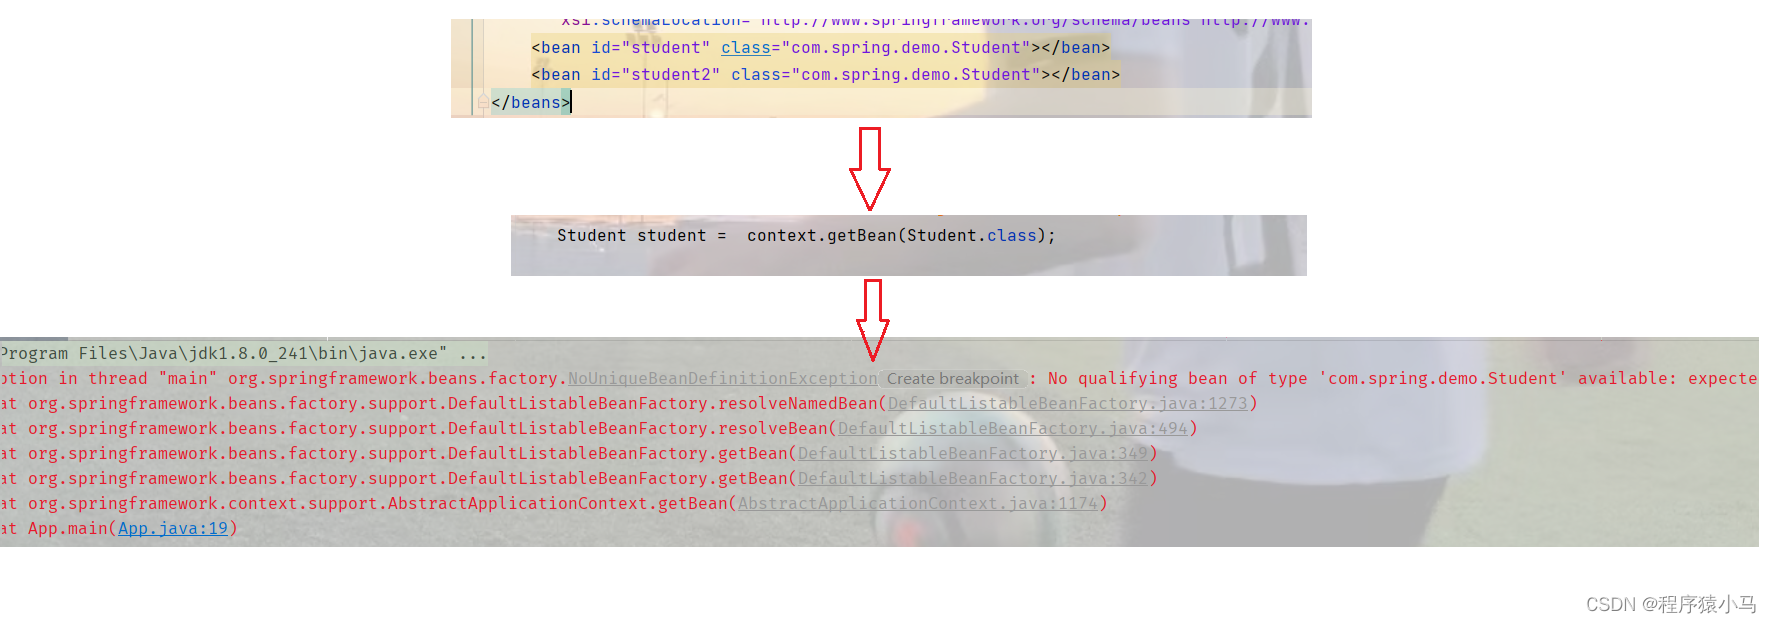
2)通过类型方式进行获取:
Student student = context.getBean(Student.class);此时就不需要类型转换了.
但是这种获取方式会出问题:如果 Spring 中一个类型存储了多个实例,那么使用类型获取Bean就会报错.
3)使用类型+名称的方式获取
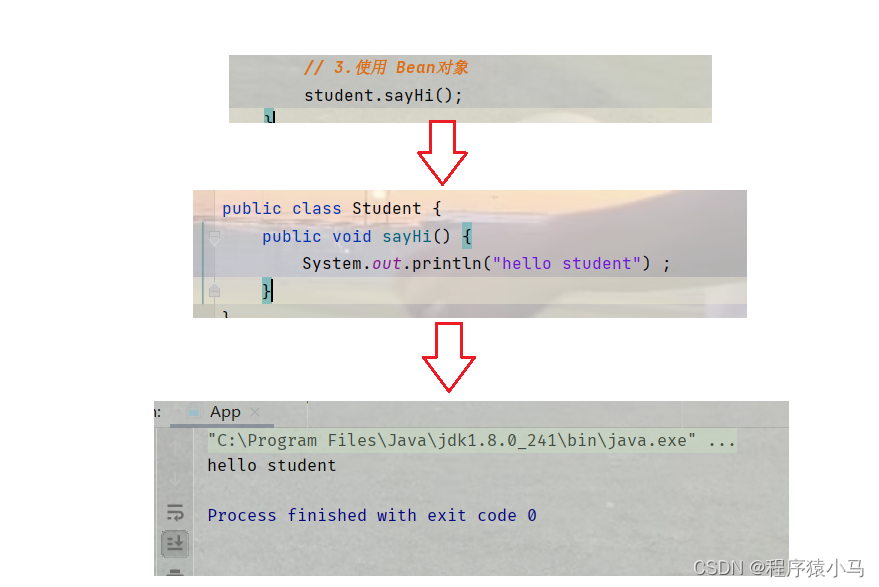
Student student = context.getBean("student",Student.class);3.使用bean
取出指定的 Bean 对象就可以进行使用了:
以上就是Spring的创建以及对Bean的存取和使用
🐇三、Spring读取和存储对象
这部分主要介绍如何更加简单的操作 Bean 对象.
在第二部分已经介绍过,在存储 Bean对象时,需要在 spring-config.xml中添加一行 bean 注册内容才行,如下图:

而现在,只需要一个注解就可以代替之前一行配置,在存储对象之前,需要在spring-config.xml 中添加如下配置:
<content:component-scan base-package="com.spring.demo"></content:component-scan>

这里的意思是:想要将对象成功的存储到 Spring 容器中,需要配置一下存储对象的扫描包路径,只有被配置的包下的所有类,添加了注解,才能被正确的识别并保存到 Spring 中.
注:即使添加了注解,如果不是在配置的扫描包下的类对象,也是不能被存储到 Spring 中的。
添加注解存储 Bean 对象:
通过两种类型的注解将对象存储在 Spring 中:
1.五大类注解:@Controller 、@Service 、@Repository 、@Component 、@Configuration
2.方法注解: @Bean
1.五大类注解:
@Controller
控制器,验证用户请求的数据正确性.(类似于安保系统)
@Service
编排和调度具体执行方法.(类似于客服中心)
@Repository
数据持久层:和数据库交互(执行者)
@Component
组件(工具类)
@Configuration
配置项(项目中的一些配置)
接下来,进行实际操作来观察如何使用上述五大类注解:
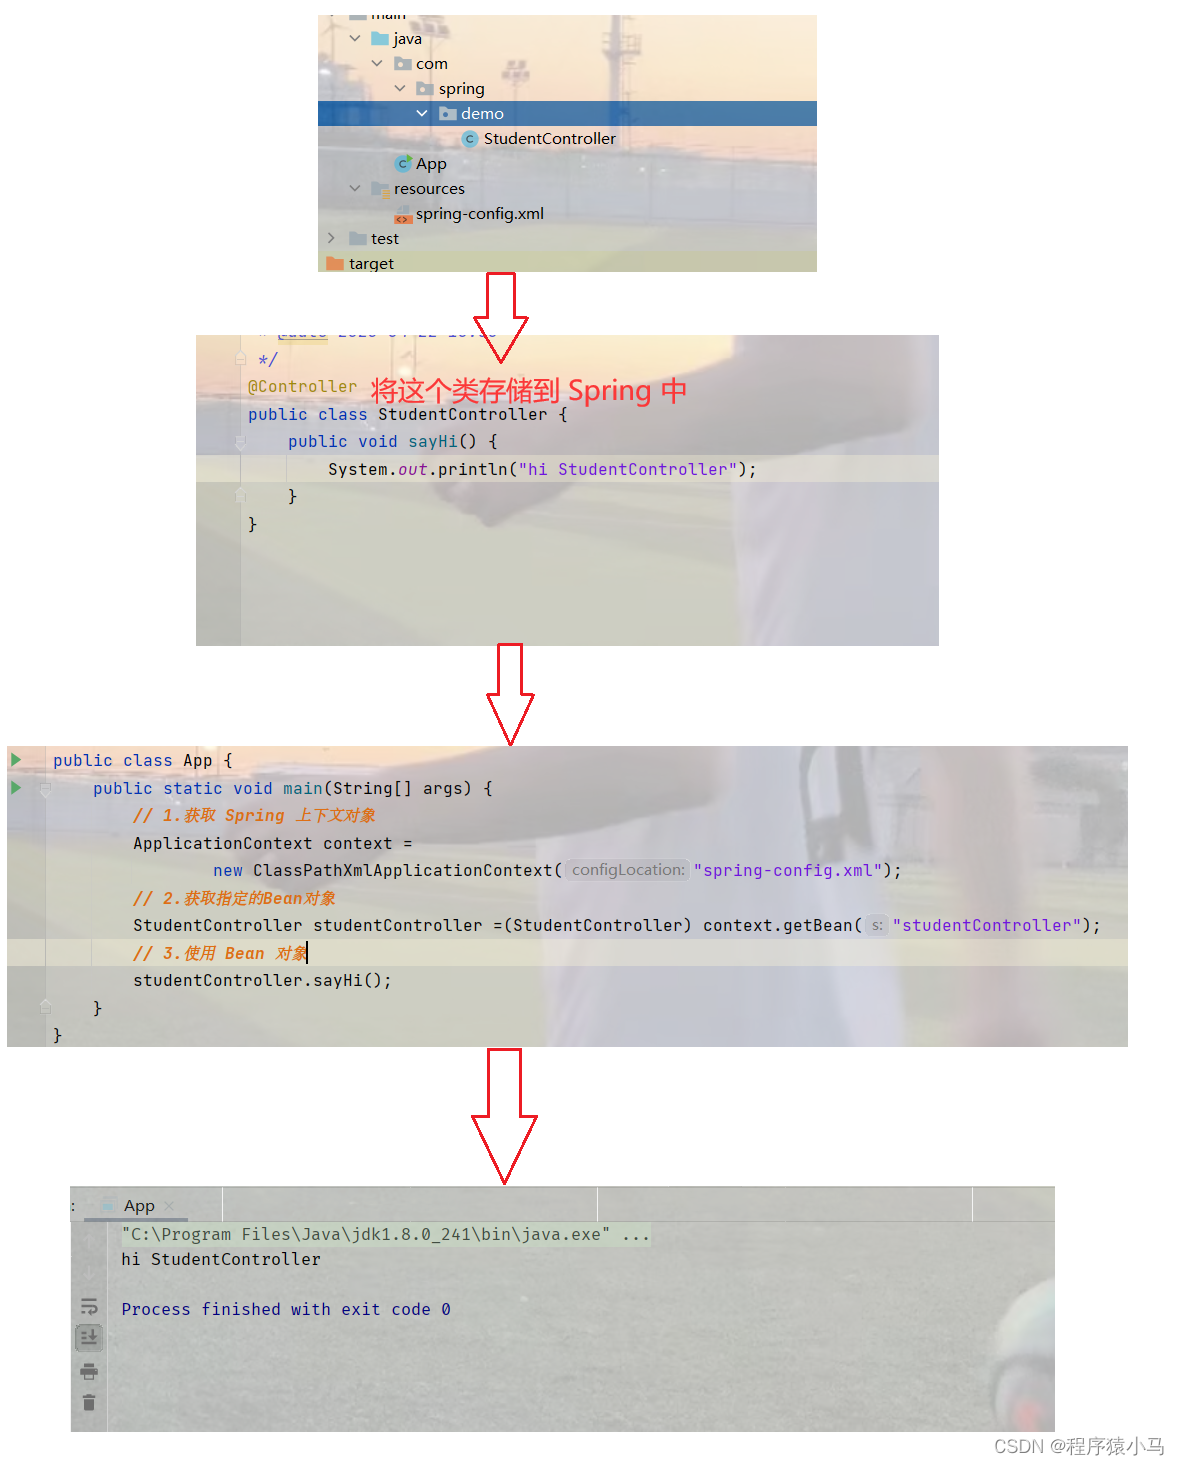
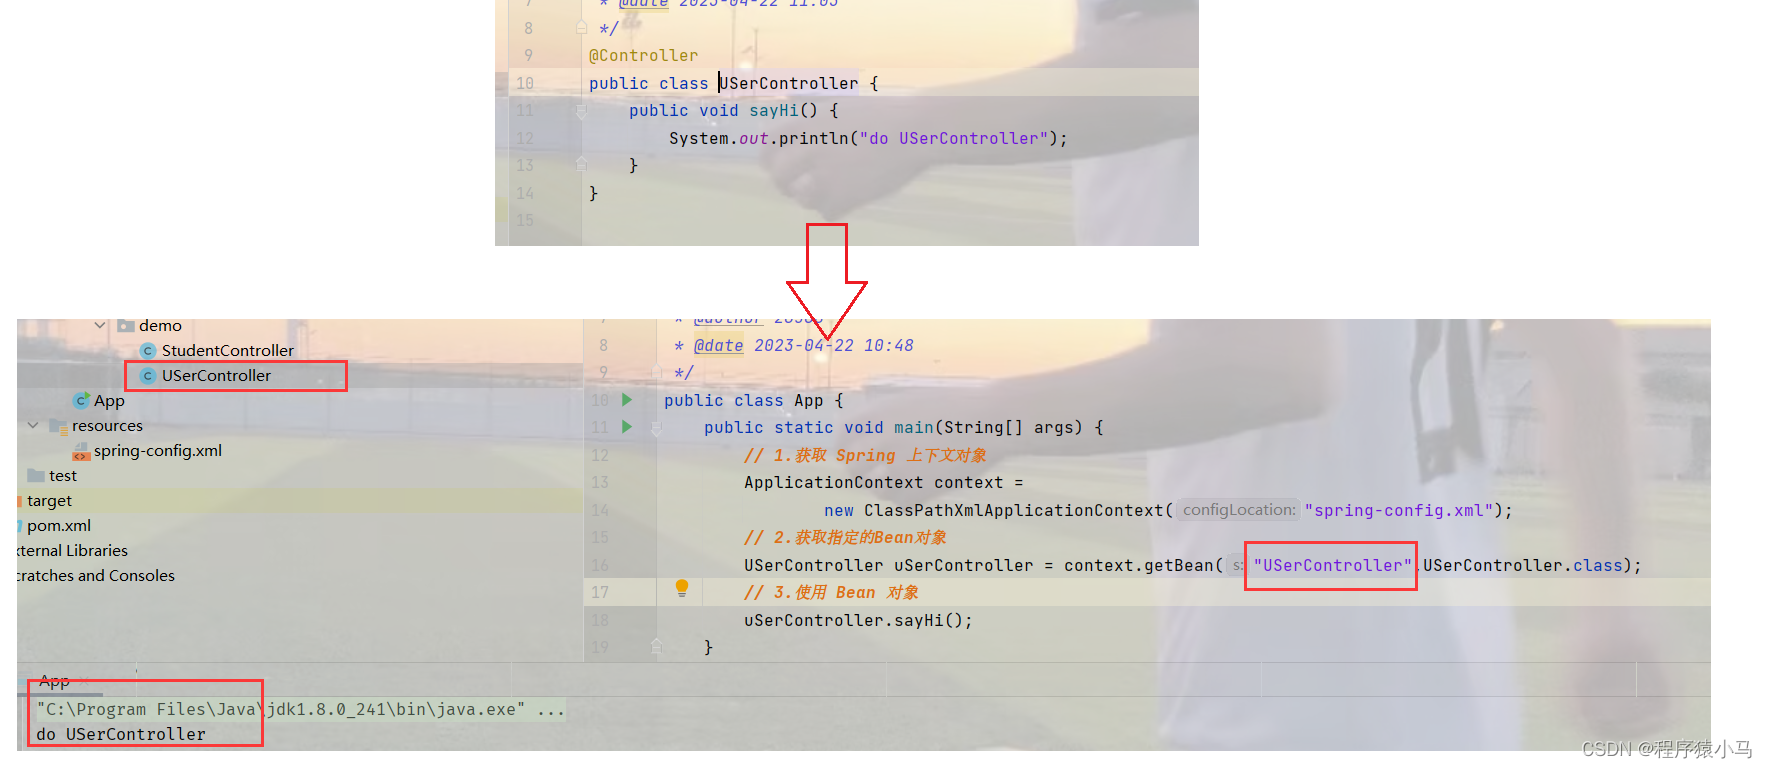
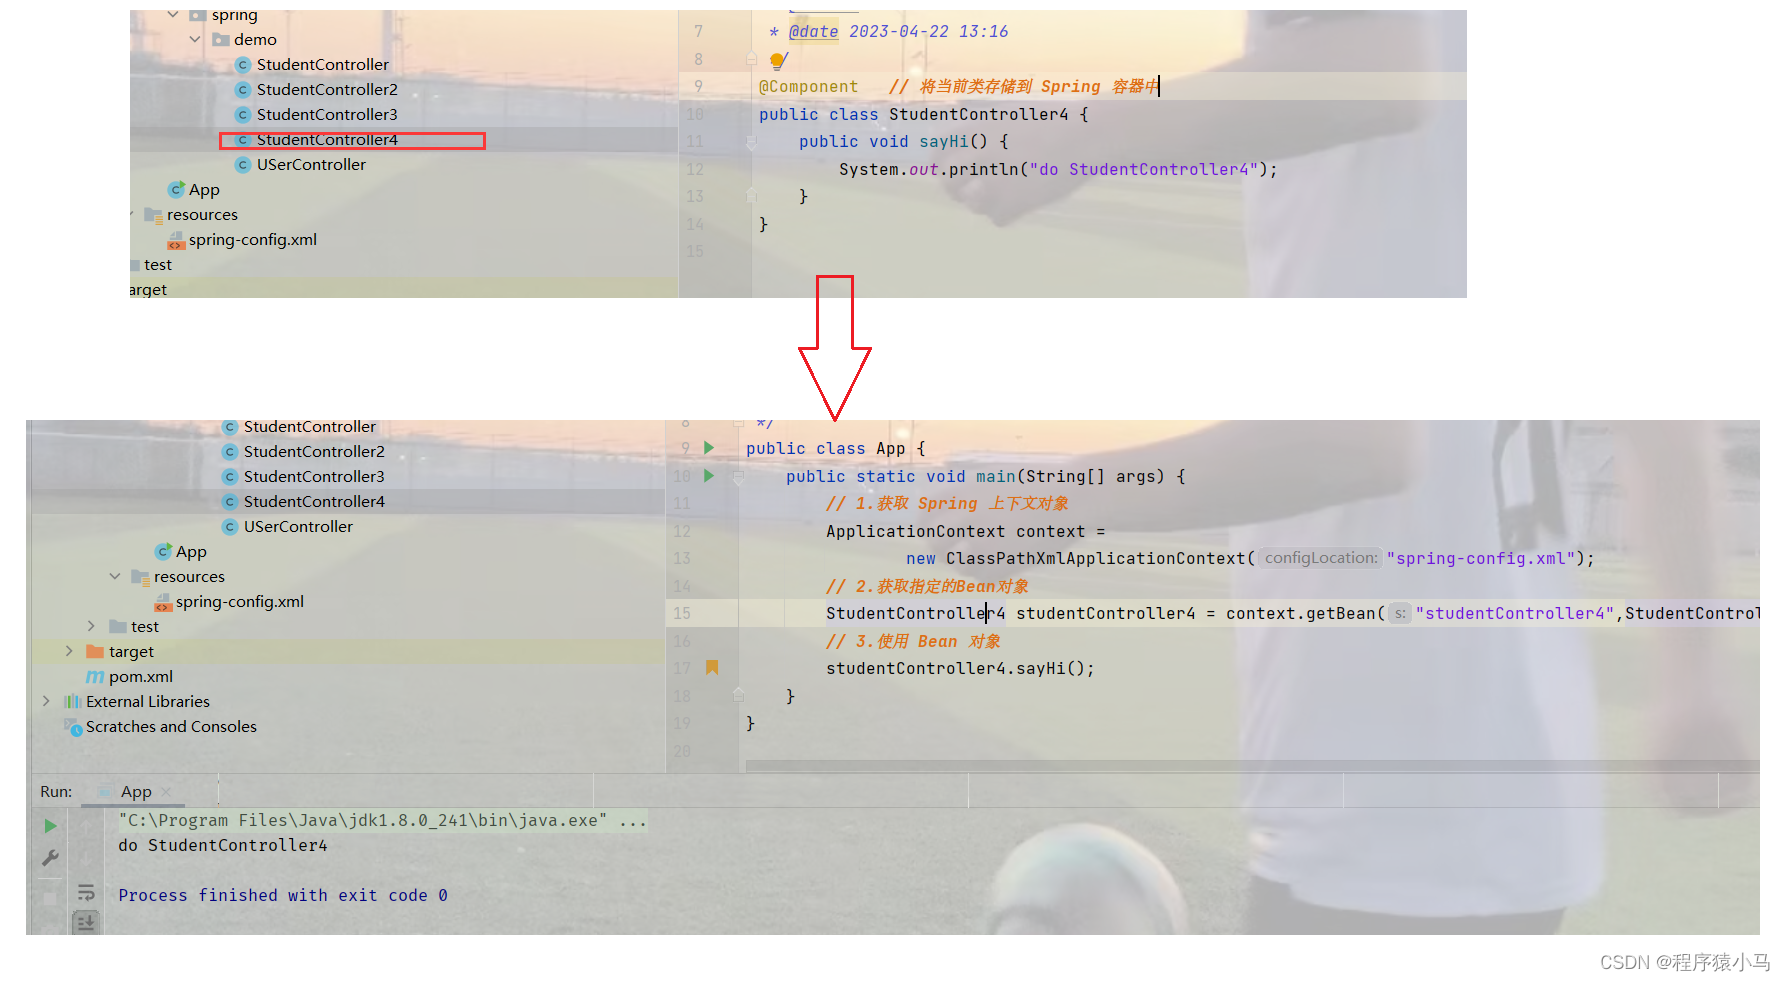
@Controller
注:一定注意在xml文件中的包路径下的类注解的Bean对象才会被存储到 Spring 中.
在第二部分获取指定Bean对象的时候,介绍了三种方式,但是,由于在xml配置文件中没有通过id来设置类对象存储到 Spring 容器中的名称,因此第一种(通过名称获取) 和 第三种(通过名称+类型)获取方式就无法使用了,第二种(通过类型)来获取是可行的,但是还有没有其它方式来获取Bean对象呢?或者说,我们能否知晓 通过类注解存储到Spring 容器中的Bean的名称呢?
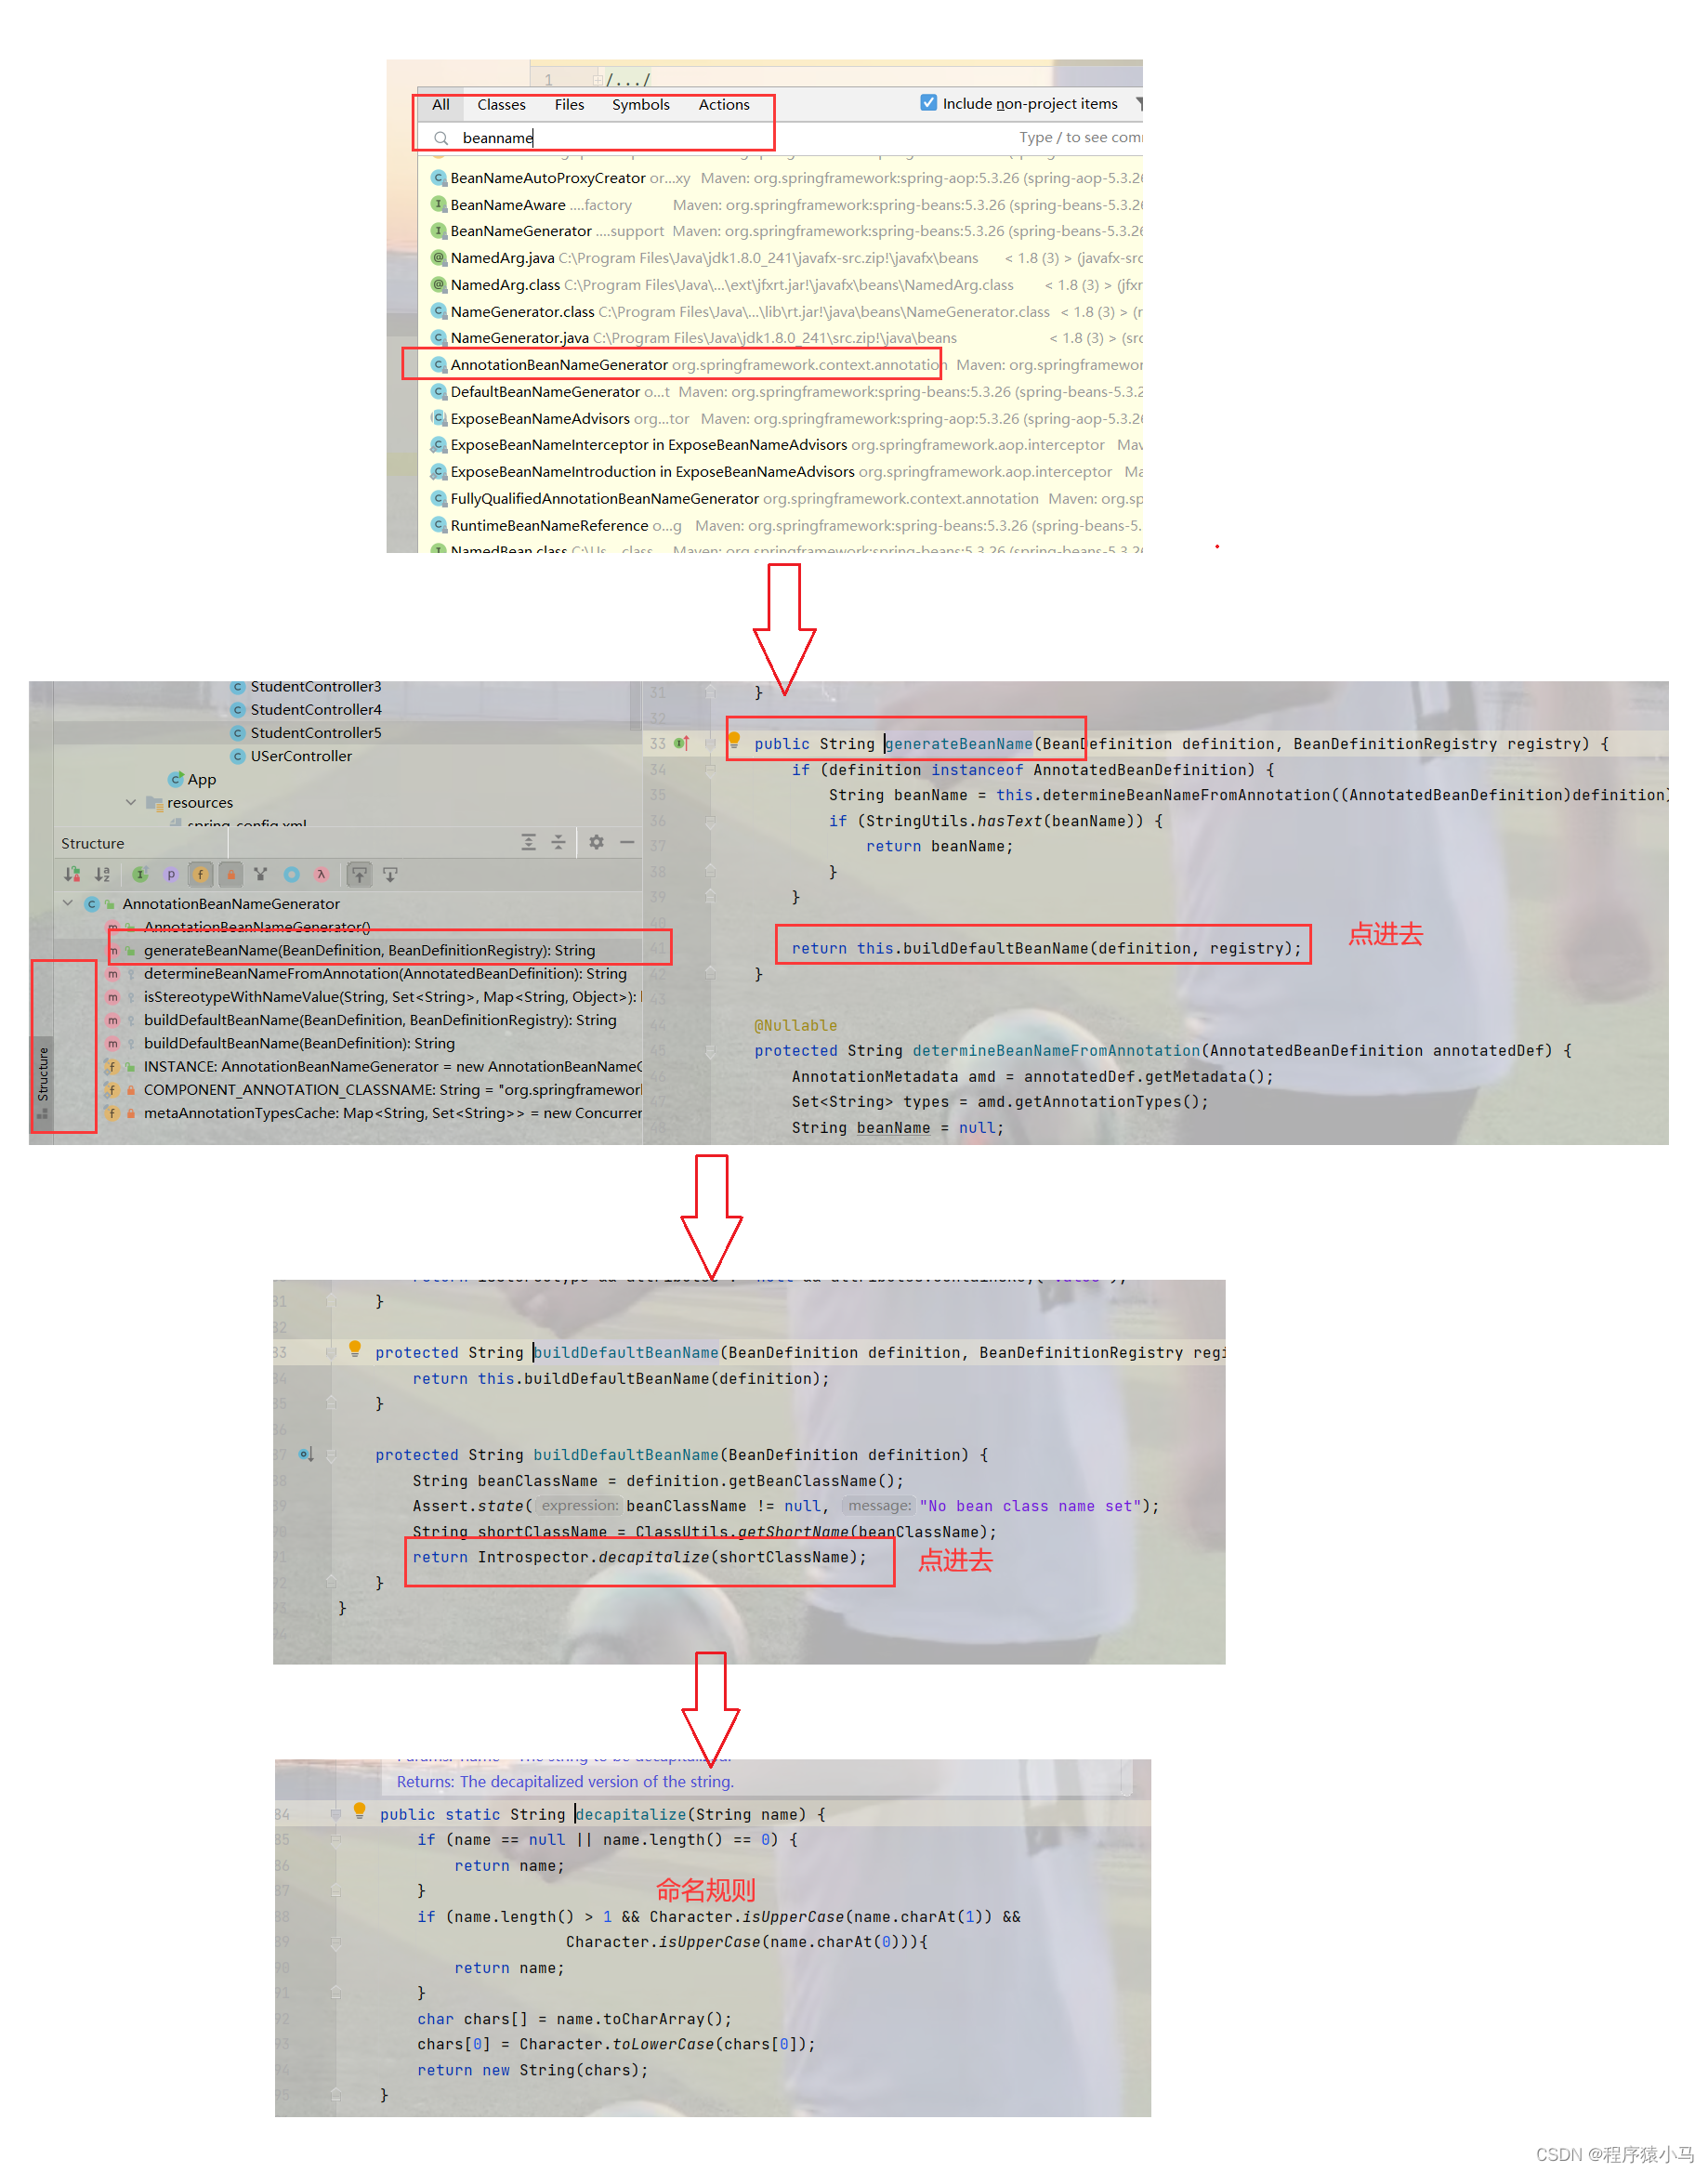
实际上,在这里有两套规则:
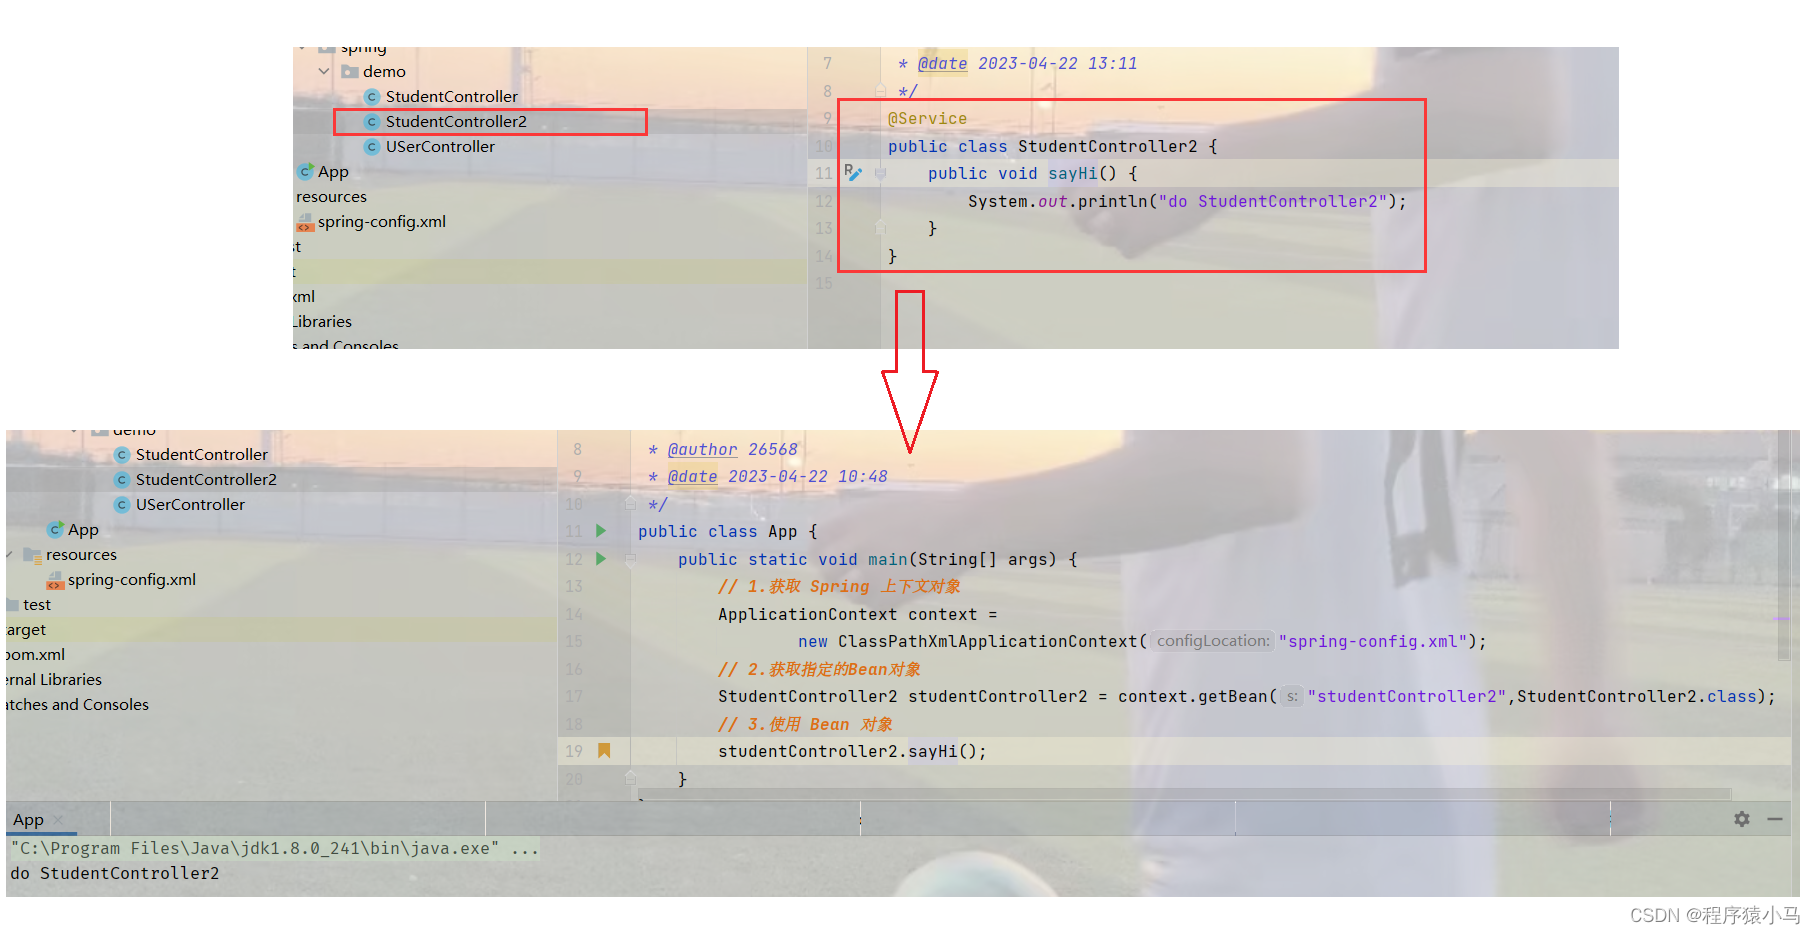
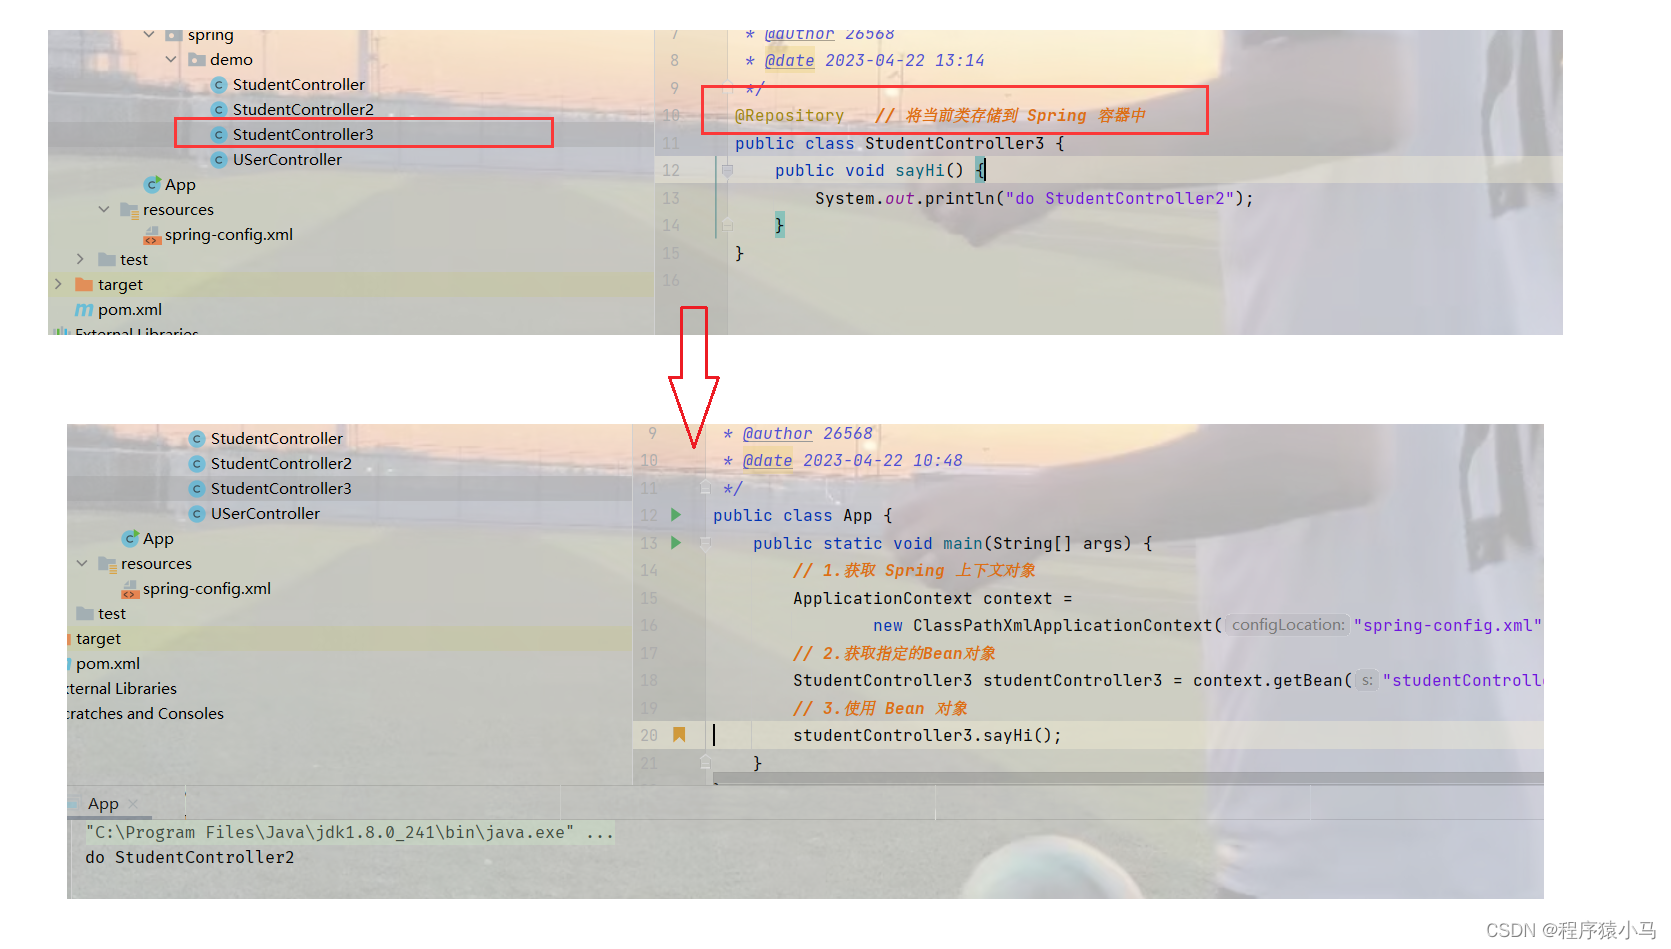
1) 如果类名的首字母大写,第二个字母不大写,那么这个类的实例存储到 Spring 中的名称是:
首字母小写后的名称.
如:
2) 如果类名的首字母和第二个字母都是大写,那么这个类的实例存储到 Spring 中的名称是:
原类名
如:
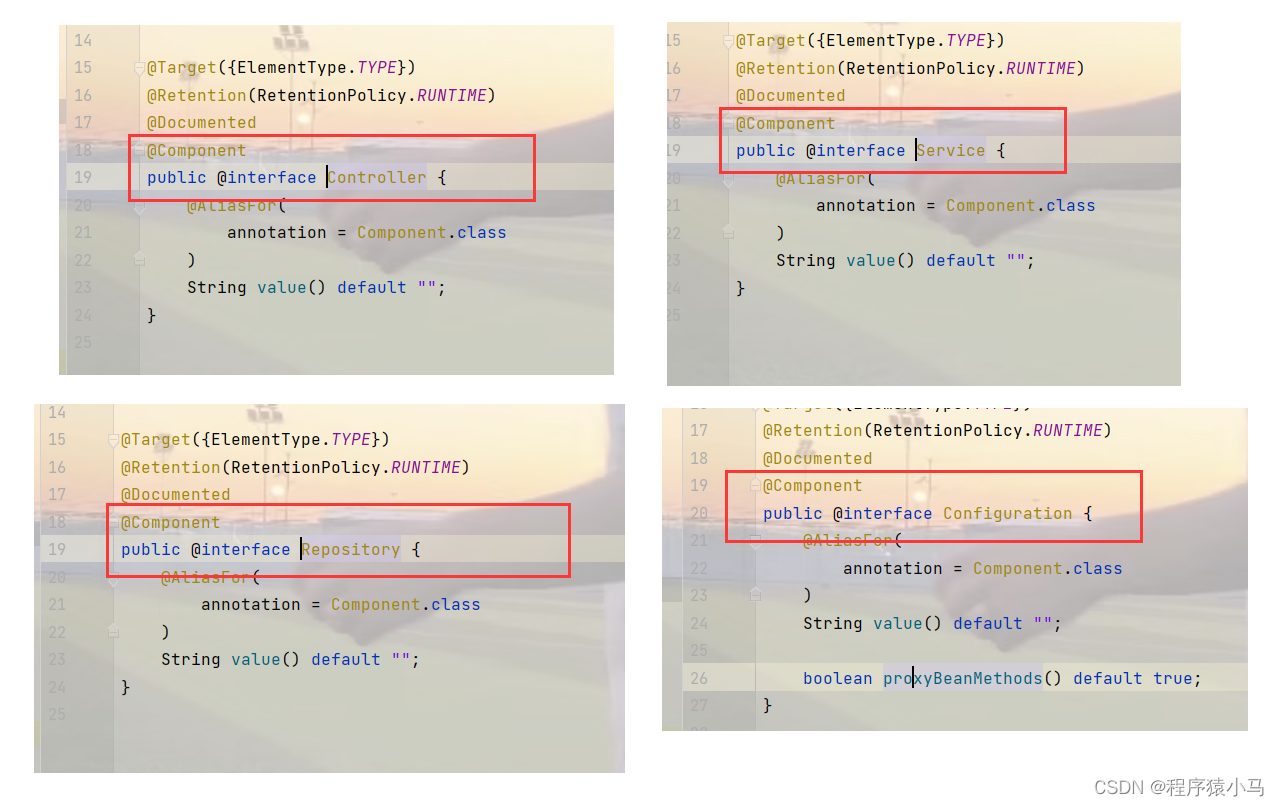
观察底层源码,可以更好的理解上述规则:
@Service
@Repository
@Component
@Configuration
这五种注解有什么关系呢?
观察源码:
通过观察会发现,注解⾥⾯都有⼀个注解 @Component,说明它们本身就是属于@Component 的“⼦类”。
既然功能是⼀样的,为什么需要这么多的类注解呢?
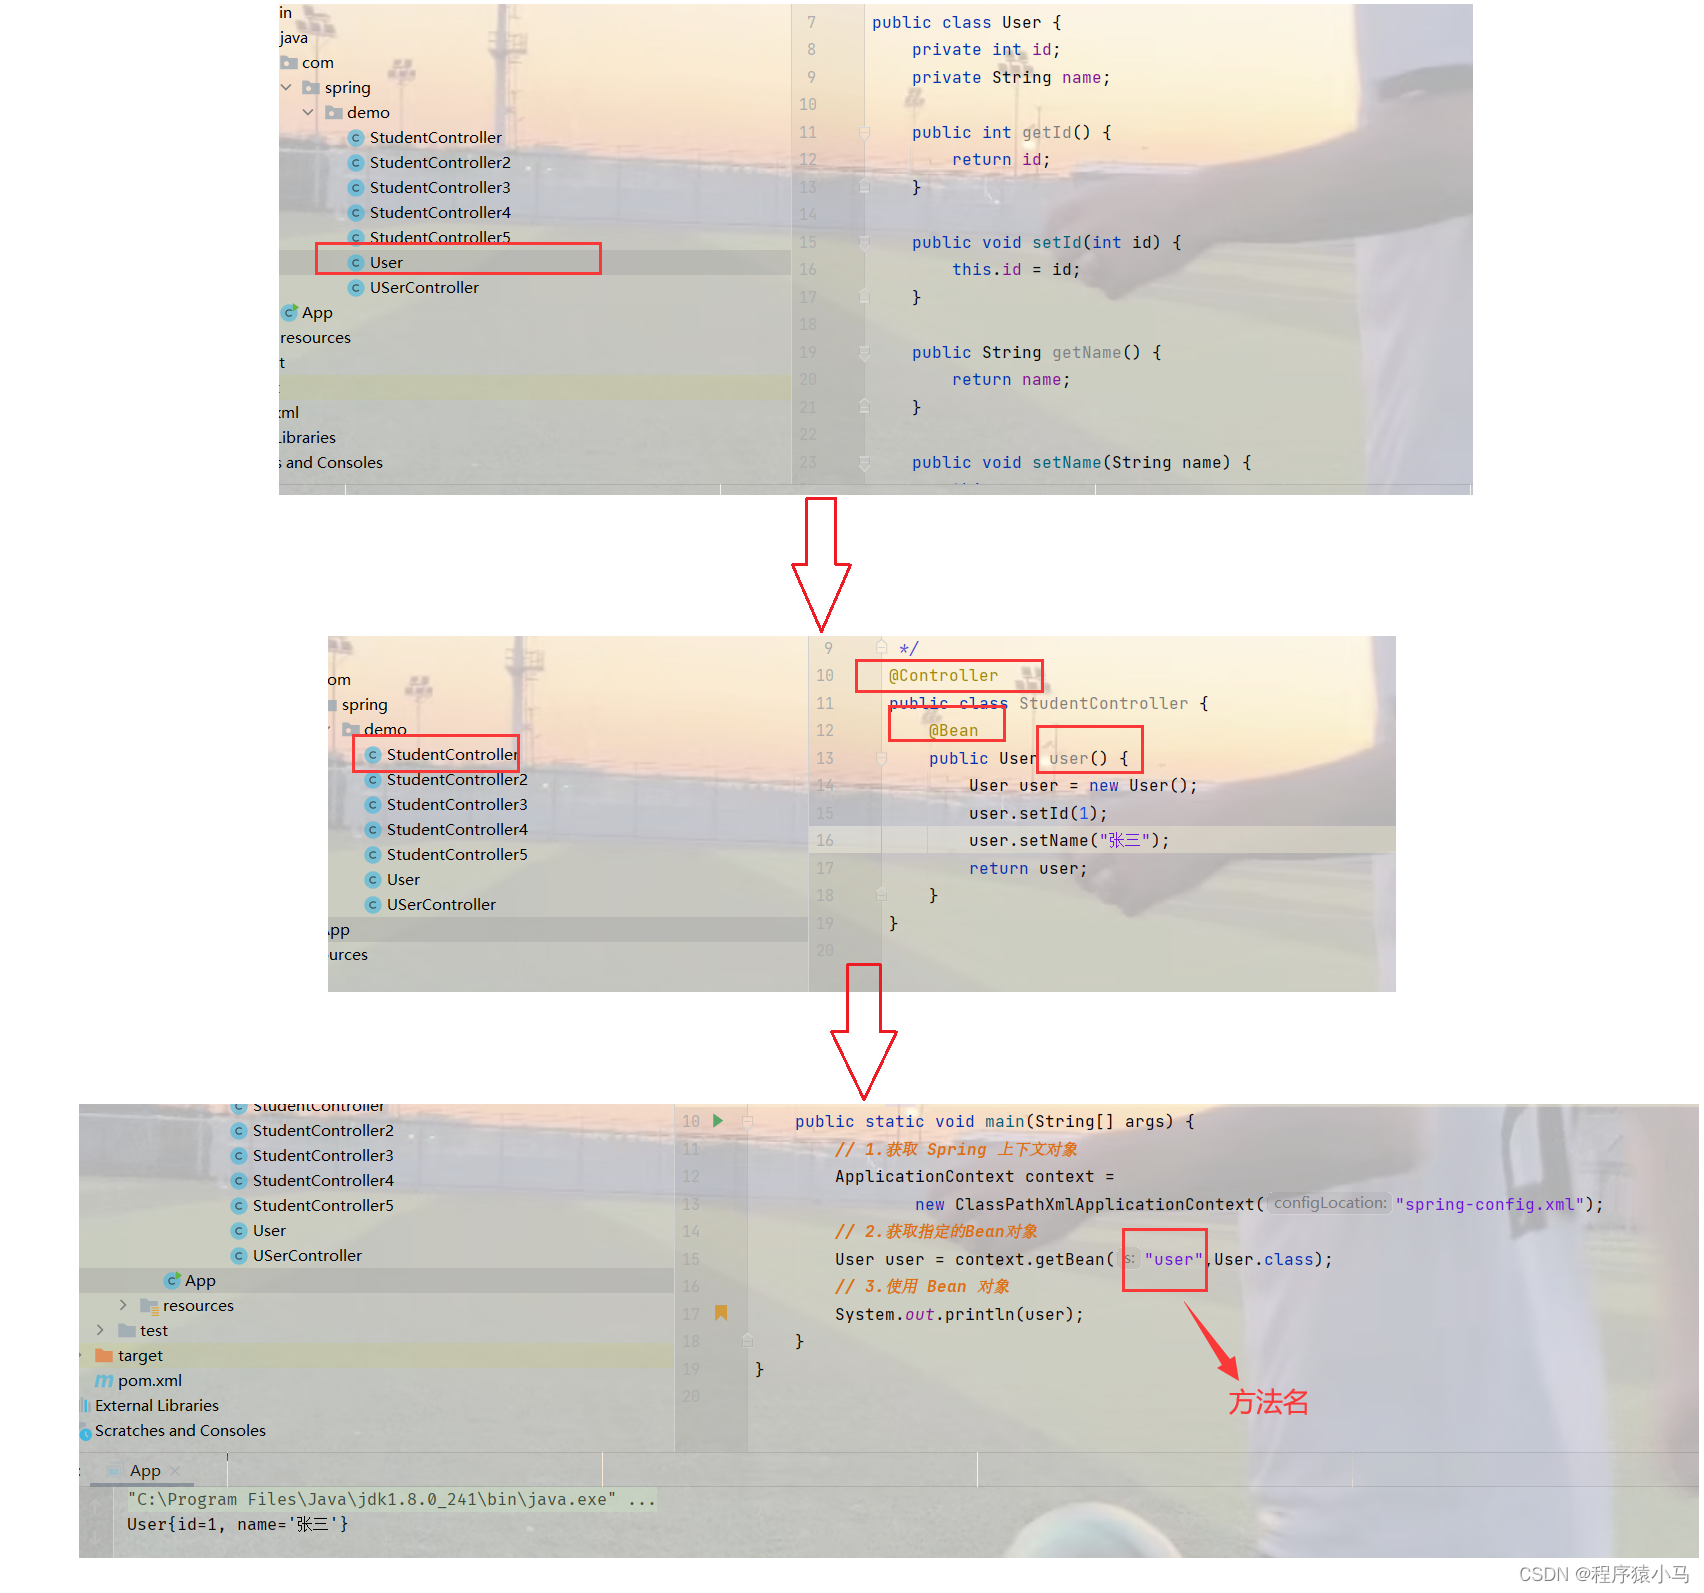
主要是让程序员看到类注解之后,就能直接了解当前类的⽤途(望文生义).2.@Bean注解类注解是添加到某个类上的,⽽⽅法注解是放到某个⽅法上的 , ⽅法注解要配合类注解使⽤@Bean 注解在使用的时候,要求当前方法必须要有返回值,是将当前方法的返回值存储到 Spring 中.
默认情况下@Bean 注解存储到 Spring 中的对象的 id(名称) 默认是方法名,
然后进行读取以及使用:
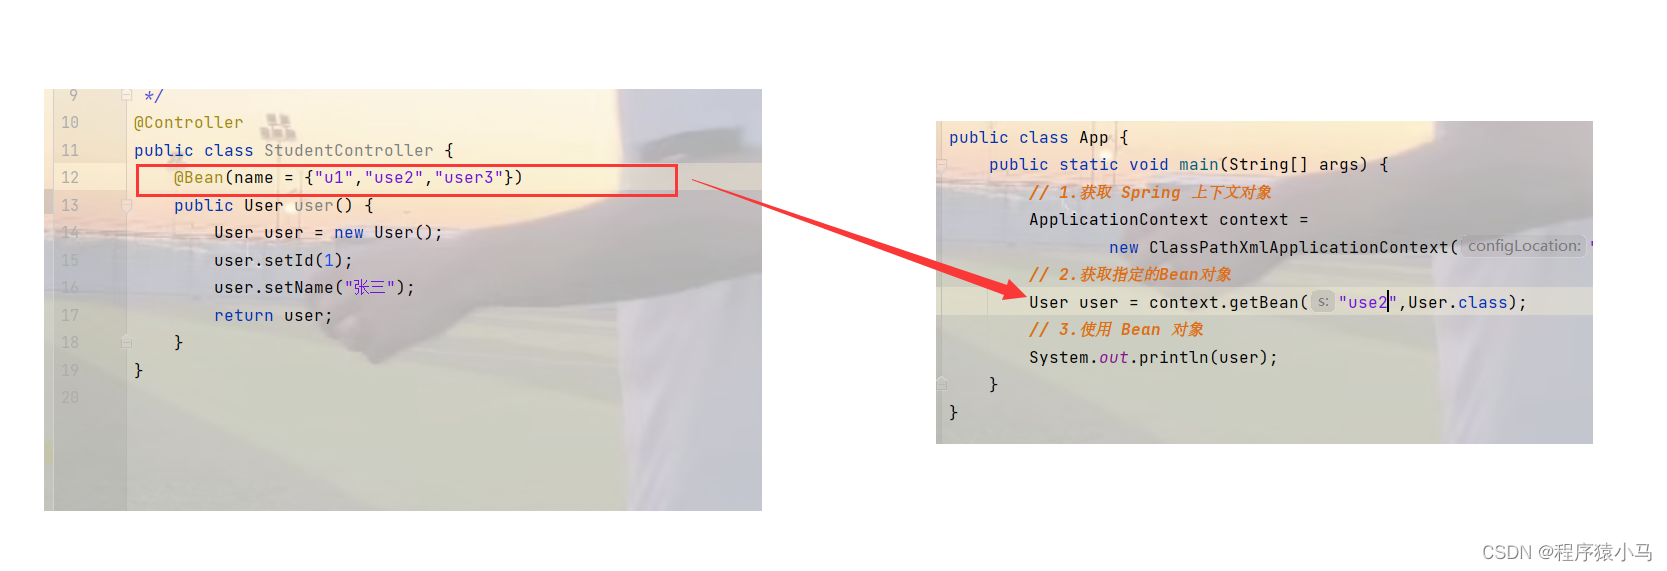
虽然通过方法名可以拿到 @Bean 注解存储到 Spring 中的对象,但是可以通过对存储的Bean对象进行重命名操作,可以更好地使用通过 @Bean 注解存储的对象.
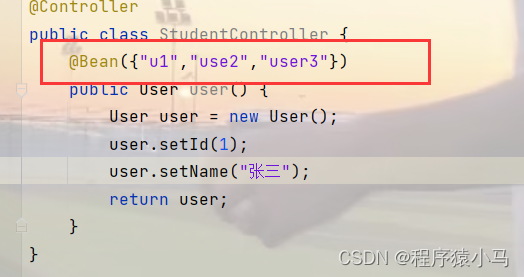
可以通过设置 name 属性给 Bean 对象进⾏重命名操作.
这个名字可以起多个,但是对应的都是同一个对象,此时,在获取指定的Bean对象时,就可以根据名称来获取了.
注:重命名以后,无法再次通过默认的方法名来获取对象了.
这里的 name= 可以省略:
获取Bean对象也叫做对象装配,是把对象取出来放到某个类中,有时候也叫对象注入.
对象装配(注入) 的实现方式有以下3种:
1)属性注入
2)Setter注入
3)构造方法注入
1)属性注入
属性注入是使用 Autowired 实现的,将 Service 类注入到 Controller 类中.
Service 类的实现代码如下:
@Service
public class UserService {
    public void sayHi() {
        System.out.println("do UserService");
    }
}
Controller 类的实现代码如下:
@Controller
public class USerController {
    @Autowired
    private UserService userService;
    public void sayHi() {
        System.out.println("do USerController");
        userService.sayHi();
    }
}
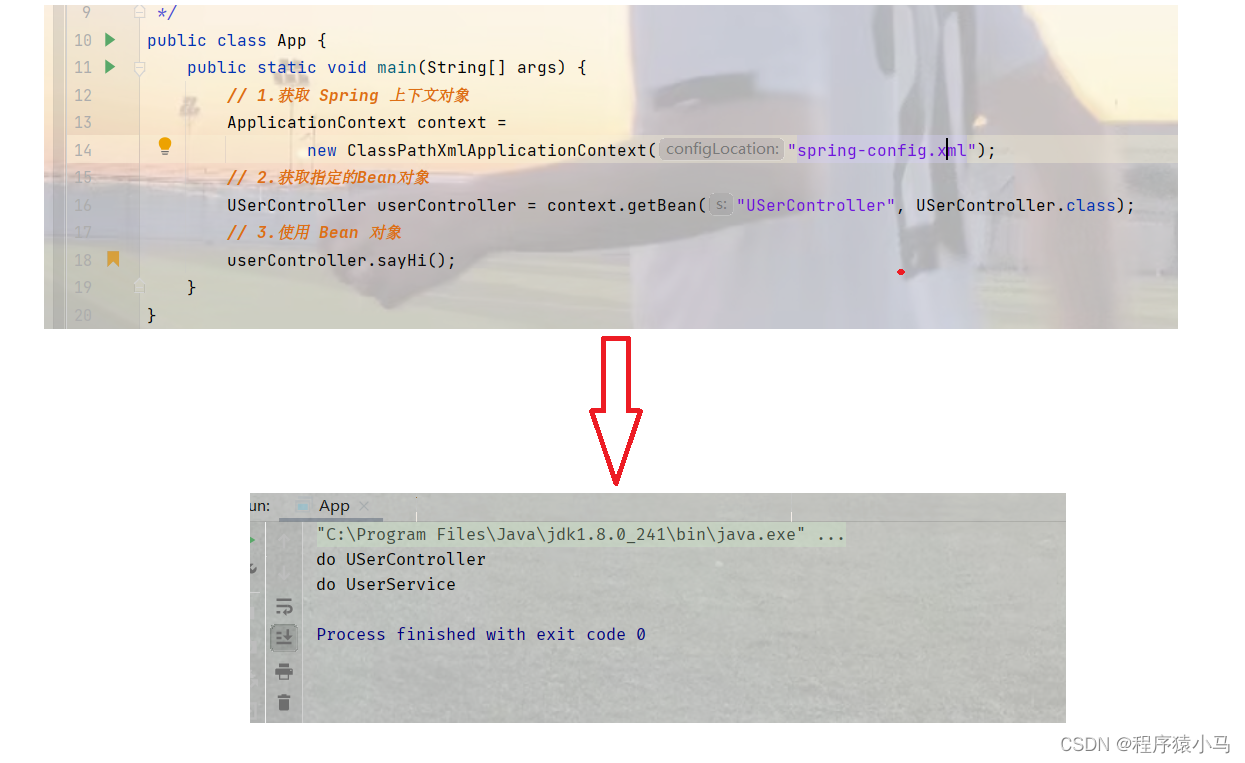
如果在打印结果有 "do UserService" 说明注入成功.
属性注入的优点: 简单
属性注入的缺点:
1)没办法实现final 修饰的变量的注入
2)兼容不好,只适用于IoC容器.
3)更容易违反单一设计原则
2)Setter注入
Service 类的代码不变
Controller 类的代码如下:
@Controller
public class USerController {
    private UserService userService;
    @Autowired
    public void setUserService(UserService userService) {
        this.userService = userService;
    }
    public void sayHi() {
        System.out.println("do USerController");
        userService.sayHi();
    }
}
查看执行结果:
Setter 注入的优点: 符合单一设计原则(每个方法只传递一个对象)
Setter 注入的缺点:
1) 不能注入不可变对象(final修饰的对象)
2)使用 Setter 注入的对象可能会被修改.
3)构造方法注入
Service 类的代码不变.
Controller 类的代码如下:
@Controller
public class USerController {
    private  UserService userService;
    @Autowired
    public USerController(UserService userService) {
        this.userService = userService;
    }
    public void sayHi() {
        System.out.println("do USerController");
        userService.sayHi();
    }
}
查看执行结果:
构造方法注入是 Spring 官方推荐的注入方法.
如果构造方法只有一个,还可以不加Autowired
构造方法注入的优点:
1)可以注入一个不可变的对象(使用final 修饰的对象)
2)注入的对象不会被改变(构造方法只能执行一次)
3)构造方法注入可以保证对象完全初始化.
4)通用性更好
除了使用 @Autowired 关键字注入以外,还可以使用 Resource 进行注入.
@Autowired 和 @Resource 的区别:
1)出身不同: @Autowired 来自于 Spring , @Resource 来自于 JDK 的注解
2)使用时设置的参数不同:相⽐于 @Autowired 来说,@Resource ⽀持更多的参数设置,例如 name 设置,根据名称获取 Bean.
3)@Autowired 可⽤于 Setter 注⼊、构造函数注⼊和属性注⼊,⽽ @Resource 只能⽤于 Setter 注⼊和属性注⼊,不能⽤于构造函数注⼊.
同一类型多个 @Bean 会报错:
创造一个User 类,代码如下:
public class User {
    private int id;
    private String name;

    public int getId() {
        return id;
    }

    public void setId(int id) {
        this.id = id;
    }

    public String getName() {
        return name;
    }

    public void setName(String name) {
        this.name = name;
    }
}
然后创建一个UserBeans 类,在这个类中,通过@Bean 注解的方式来将多个User 对象存入到 Spring 容器中,代码如下:
@Component
public class UserBeans {
    @Bean
    public User user() {
        User user = new User();
        user.setId(1);
        user.setName("张三");
        return user;
    }
    @Bean
    public User byUser() {
        User user = new User();
        user.setId(2);
        user.setName("李四");
        return user;
    }
}
然后再创建一个UserController 类,在这个类中通过属性注入的方式注入 User 对象时,会出现错误:
@Controller
public class USerController {
    @Autowired
    private User us;
    public void sayHi() {
        System.out.println("do USerController");
        System.out.println(us.getName());
    }
}
报错的原因是: 非唯一的 Bean 对象.
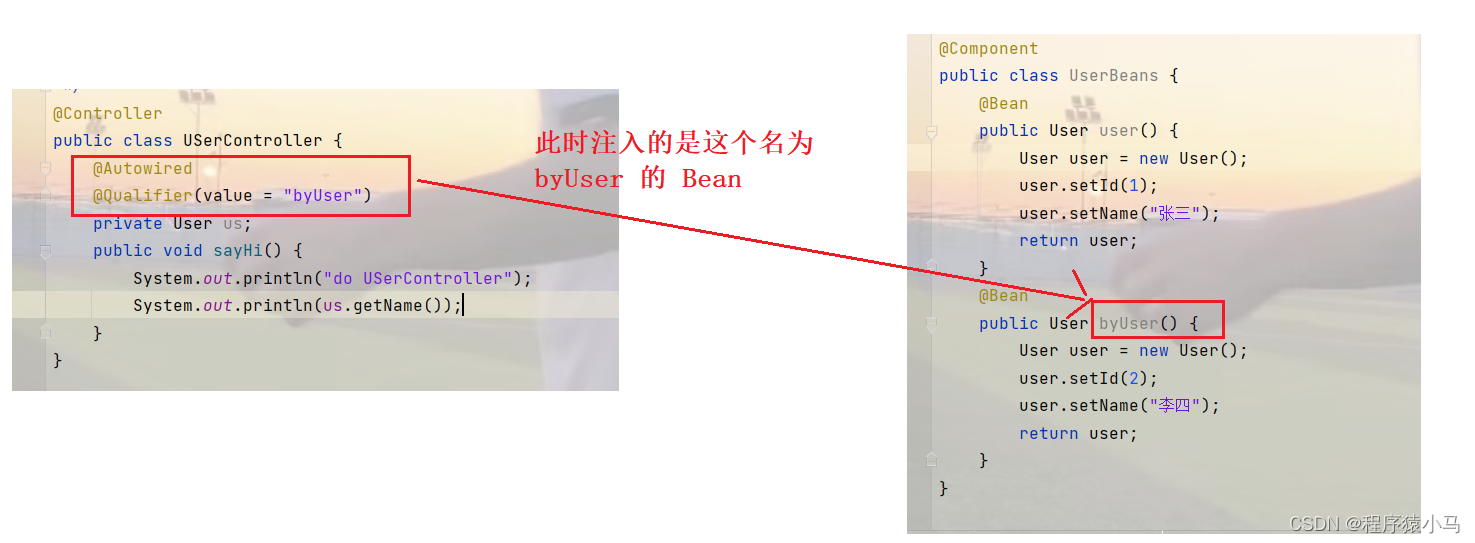
同一类型 多个 Bean 报错的解决方案主要有两个:
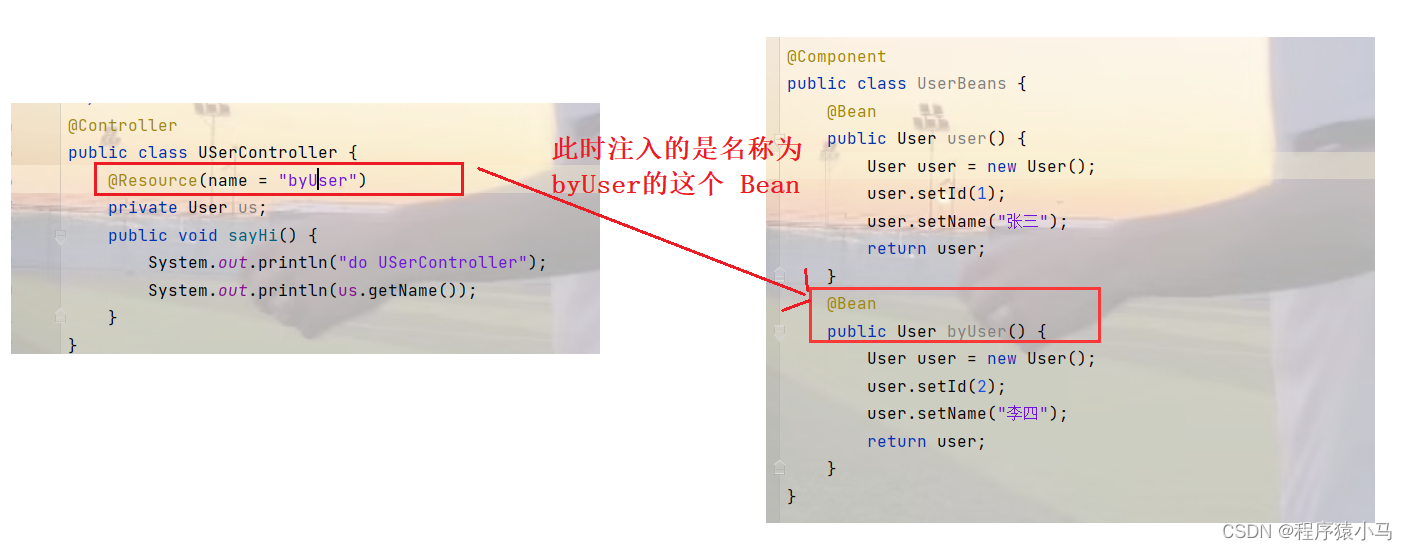
1)使⽤ @Resource(name="自定义名称") 定义.2)使⽤ @Qualifier 注解定义名称.1)使⽤ @Resource(name="自定义名称") 定义.
查看打印结果:
查看打印结果:
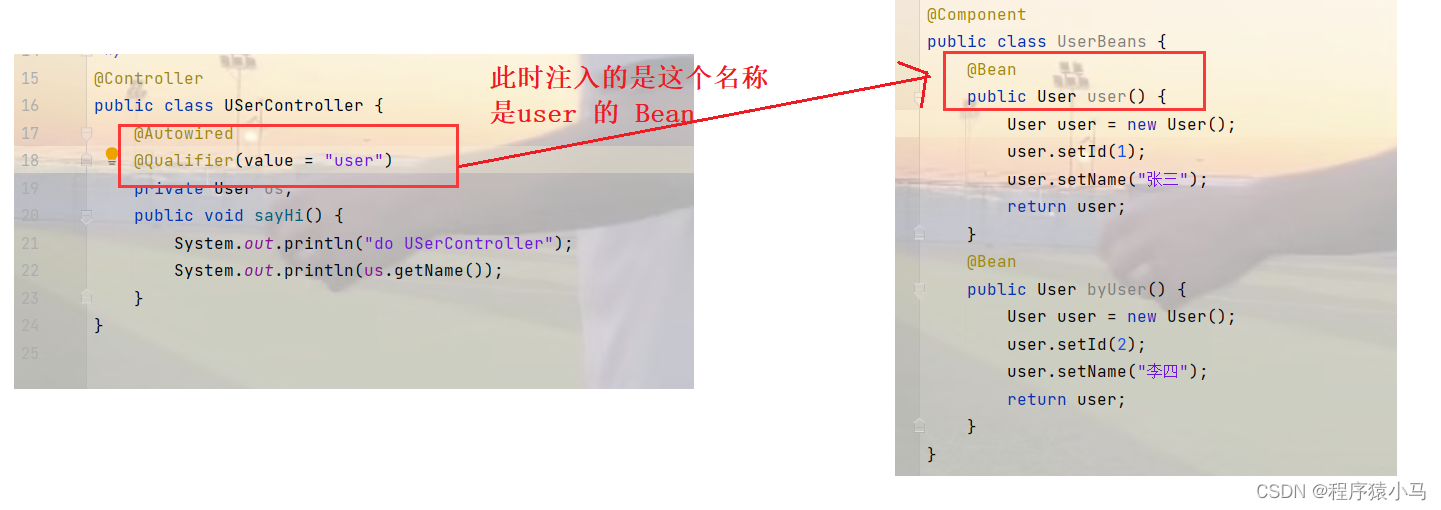
2)使⽤ @Qualifier 注解定义名称.
使用这个注解搭配 @Autowired:
查看打印结果:
查看打印结果:
以上就是更加简单的操作 Bean 对象.
🐇四、Bean作用域和生命周期
通过下面代码来理解 Bean 的作用域:
首先创建一个 User 类,代码如下:
public class User {
    private int id;
    private String name;

    public int getId() {
        return id;
    }

    public void setId(int id) {
        this.id = id;
    }

    public String getName() {
        return name;
    }

    public void setName(String name) {
        this.name = name;
    }

    @Override
    public String toString() {
        return "User{" +
                "id=" + id +
                ", name='" + name + ''' +
                '}';
    }
}
然后在一个类注解中通过 @Bean 方法注解 存入Spring 容器中,代码如下:
@Component
public class UserBeans {
    @Bean
    public User user() {
        User user = new User();
        user.setId(1);
        user.setName("西施");
        return user;
    }
}
然后创建两个类,在这两个类中通过 属性注入 的方式得到这个Bean 然后进行操作,代码如下:
@Controller
public class USerController {
    @Autowired
    private User user;
    public void println() {
        // 打印最开始的 user
        System.out.println(user);
        User myUser = user;
        myUser.setName("猪八戒");
        System.out.println("user->:"+user);
        System.out.println("myUser->"+myUser);
    }
@Controller
public class UserController2 {
@Autowired
private User user;
public void println() {
// 打印user
System.out.println(user);
}
}
启动类中代码如下:
public class App {
    public static void main(String[] args) {
        // 1.获取 Spring 上下文对象
        ApplicationContext context =
                new ClassPathXmlApplicationContext("spring-config.xml");
        // 2.获取指定的Bean对象
        USerController userController = context.getBean("USerController", USerController.class);
        UserController2 userController2 = context.getBean("userController2",UserController2.class);
        // 3.使用 Bean 对象
        userController.println();
        userController2.println();
    }
}
查看执行结果:
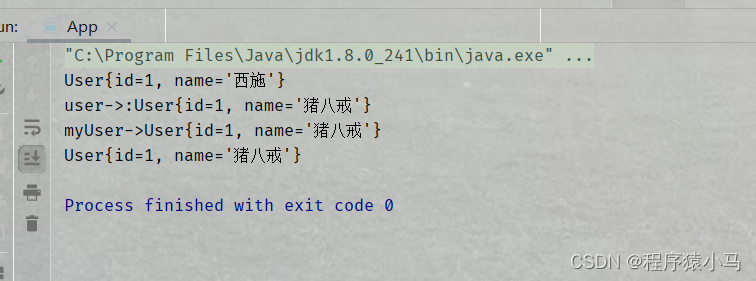
预期的结果是,在UserController 中修改自己的Bean,并不会去修改公共的Bean,但是实际上并没有达到预期值,为什么会出现这种情况呢?
以上问题的原因是因为 Bean 默认情况下是单例状态(singleton),也就是所有⼈的使⽤的都是同 ⼀个对象,之前我们学单例模式的时候都知道,使⽤单例可以很⼤程度上提⾼性能,所以在 Spring 中 Bean 的作⽤域默认也是 singleton 单例模式.
作用域定于如下:
限定程序中变量的可⽤范围叫做作⽤域, Bean 的作⽤域是指 Bean 在 Spring 整个框架中的某种⾏为模式,⽐如 singleton 单例作⽤域,就 表示 Bean 在整个 Spring 中只有⼀份,它是全局共享的,那么当其他⼈修改了这个值之后,那么另⼀ 个⼈读取到的就是被修改的值
Bean总共有6中作用域:
后 4 种状态是 Spring MVC 中的值,在普通的 Spring 项⽬中只有前两种.
- 单例模式:singleton(默认模式) ---->为了性能考虑
- 原型模式:prototype 每次对该作⽤域下的Bean的请求都会创建新的实例:获取Bean(即通过applicationContext.getBean等⽅法获取)及装配Bean(即通过@Autowired注⼊)都是新的对象实例。
- 请求作用域:request 每次Http请求,都会创建一个Bean对象[适用于 Spring MVC/Spring Web]
- 会话作用域: session, 每次session 会话共享一个Bean
- 全局作用域: application,一个httpservlet context 中共享一个bean.
- Websocket:网络长连接,只适用于 Spring WebSocket项目.
使用@Scope 关键字 设置作用域, @Scope 有两种设置方式:
1.直接设置值: @Scope("prototype")
2.使用枚举设置: @Scope(ConfigurableBeanFactory.SCOPE_PROTOTYPE)
当修改了存储到 Spring 容器中的 Bean 的作用域,此时再去查看执行结果,会发现,执行结果符合我们的预期值.
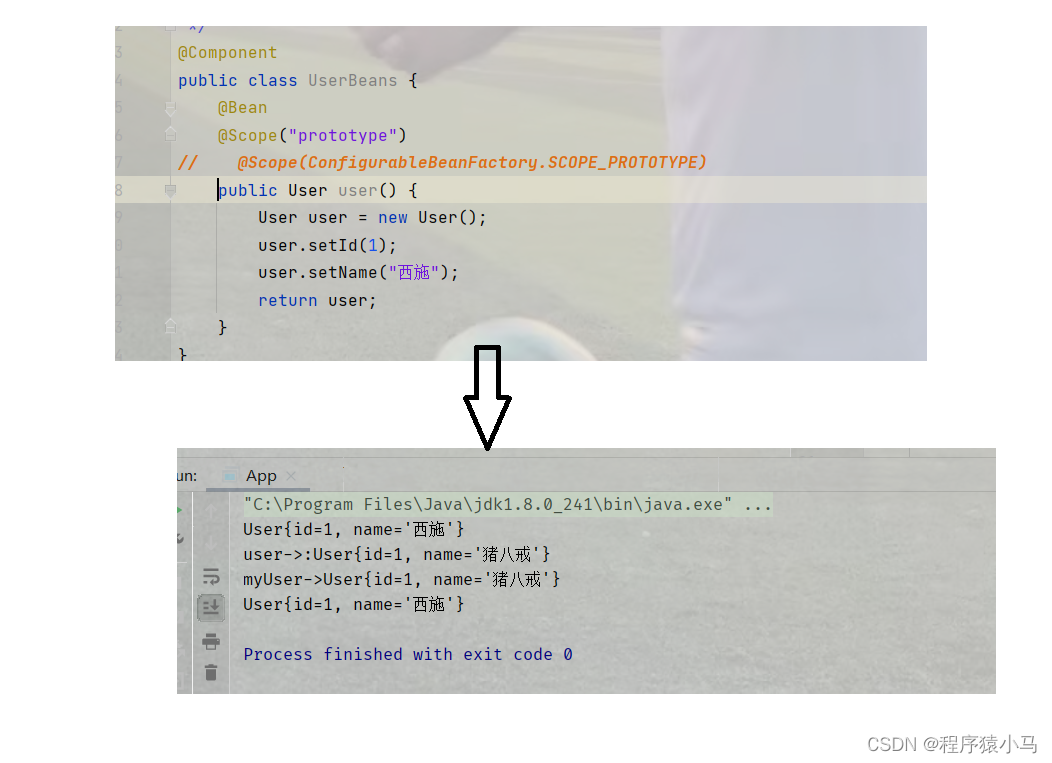
以上就是关于 Bean 的作用域的相关知识点,接下来介绍一下 Bean 的生命周期.
在介绍 Bean 的生命周期之前,先来整理一下 Spring 的执行流程:
Spring 的执行流程:

Bean 的生命周期:
生命周期指的是一个对象从诞生到销毁的整个过程.
Bean 的生命周期大致可以分为5个部分:
1.开辟内存空间(实例化Bean)
2.设置属性(注入属性)
3.初始化
3.1各种通知
如BeanNameAware、BeanFactoryAware、 ApplicationContextAware的接⼝⽅法
3.2初始化前置方法 (BeanPostProcessor ⽅法)
3.3初始化方法(两种实现:xml方式(init-method) 、注解方式(@PostConstruct ))
3.4初始化后置方法(BeanPostProcessor 方法)
4.使用 Bean
5.销毁 Bean
销毁容器的方法:如 @PreDestroy、DisposableBean 接⼝⽅法、destroy-method.
通过下面的代码来查看 Bean 生命周期相关的方法:
创建一个 类注解 BeanComponent
package com.spring.demo.component;

import org.springframework.beans.BeansException;
import org.springframework.beans.factory.BeanFactoryAware;
import org.springframework.beans.factory.BeanNameAware;
import org.springframework.beans.factory.config.BeanPostProcessor;
import org.springframework.stereotype.Component;

import javax.annotation.PostConstruct;
import javax.annotation.PreDestroy;

/**
 * @author 26568
 * @date 2023-04-23 14:18
 */

/**
 * 实现了 BeanNameAware 通知   BeanPostProcessor 为了实现 前置方法和后置方法
 */
@Component
public class BeanComponent implements BeanNameAware, BeanPostProcessor {

    @Override
    public void setBeanName(String s) {
        System.out.println("执行了通知 BeanName->:"+s);
    }
    /**
     *  注解方式的初始化
     */
    @PostConstruct
    public void doPostConstruct() {
        System.out.println("执行了注解的初始化方法");
    }
    public void sayHi() {
        System.out.println("执行普通方法");
    }
    /**
     * 使用注解的方式执行销毁方法
     */
    @PreDestroy
    public void doDestory() {
        System.out.println("执行了销毁方法");
    }
    // 前置方法
    @Override
    public Object postProcessBeforeInitialization(Object bean, String beanName) throws BeansException {
        System.out.println("执行前置方法");
        return bean;
    }
    // 后置方法
    @Override
    public Object postProcessAfterInitialization(Object bean, String beanName) throws BeansException {
        System.out.println("执行后置方法");
        return bean;
    }
}
启动类:
public class App {
    public static void main(String[] args) {
        // 使用 ClassPathXmlApplicationContext 原因是因为 ApplicationContext没有销毁方法
        // 1.获取 spring 上下文对象
        ClassPathXmlApplicationContext context =
                new ClassPathXmlApplicationContext("spring-config.xml");
        // 2.获取指定 Bean
        BeanComponent beanComponent = context.getBean("beanComponent",BeanComponent.class);
        // 3.使用 Bean
        beanComponent.sayHi();
        // 执行销毁方法
        context.destroy();
    }
}
.xml 文件相关配置:
<?xml version="1.0" encoding="UTF-8"?>
<beans xmlns="http://www.springframework.org/schema/beans"
       xmlns:xsi="http://www.w3.org/2001/XMLSchema-instance"
       xmlns:content="http://www.springframework.org/schema/context"
       xsi:schemaLocation="http://www.springframework.org/schema/beans http://www.springframework.org/schema/beans/spring-beans.xsd http://www.springframework.org/schema/context https://www.springframework.org/schema/context/spring-context.xsd">
    <content:component-scan base-package="com.spring.demo"></content:component-scan>
</beans>
执行结果:
以上就是这篇博客的所有内容了.












 U8W/U8W-Mini使用与常见问题解决
 QT多线程的5种用法,通过使用线程解决UI主界面的耗时操作代码,防止界面卡死。...
 stm32使用HAL库配置串口中断收发数据(保姆级教程)
 分享几个国内免费的ChatGPT镜像网址(亲测有效)
 Allegro16.6差分等长设置及走线总结