您现在的位置是:首页 >学无止境 >Windows_10_System_Programming_4,Jobs网站首页学无止境
Windows_10_System_Programming_4,Jobs
Windows_10_System_Programming_4,Jobs
Jobs
Job objects have been around since Windows 2000, being able to manage one or more processes. Most of their capability revolves around limiting the managed processes in some ways. Their usefulness has grown significantly since Windows 8. On Windows 7 and earlier, a process can be a member of a single job only, while in Windows 8 and later, a process can be associated with multiple jobs.
作业对象自Windows 2000以来就一直存在,能够管理一个或多个进程。他们的大部分能力都围绕着在某些方面限制被管理的进程。自Windows8以来,它们的实用性显著提高。在Windows 7及更早版本中,进程只能是单个作业的成员,而在Windows 8及更高版本中,一个进程可以与多个作业关联。
Introduction to Jobs
Job objects are visible indirectly in Process Explorer if a process is under a job. In that case, a Job tab appears in the process’ properties (this tab is absent if the process is under no job).
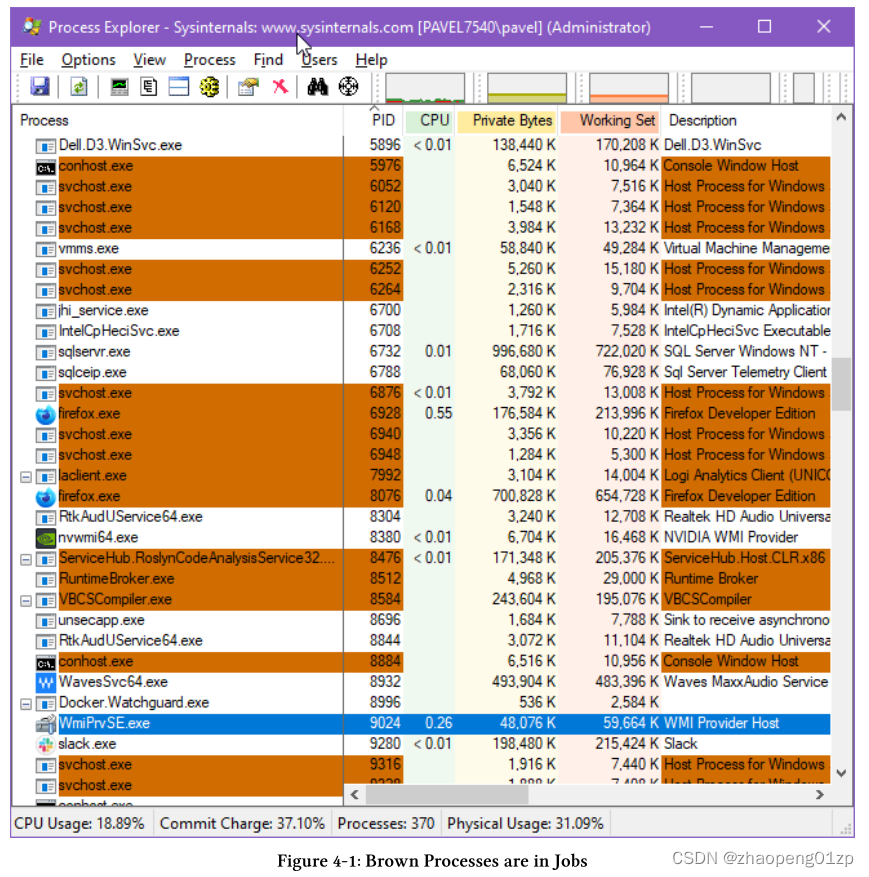
Another way to glean at the presence of jobs is to enable the Jobs color (brown by default) in Options / Configure Colors…. Figure 4-1 shows Process Explorer with the Jobs color visible with all other colors removed.
如果进程在作业下,则作业对象在Process Explorer中间接可见。在这种情况下,“作业”选项卡会出现在进程的属性中(如果进程没有作业,则不存在此选项卡)。
另一种收集作业的方法是在“选项/配置颜色…”中启用作业颜色(默认为棕色)…。图4-1显示了Process Explorer,去掉所有其他颜色后,Jobs颜色可见。
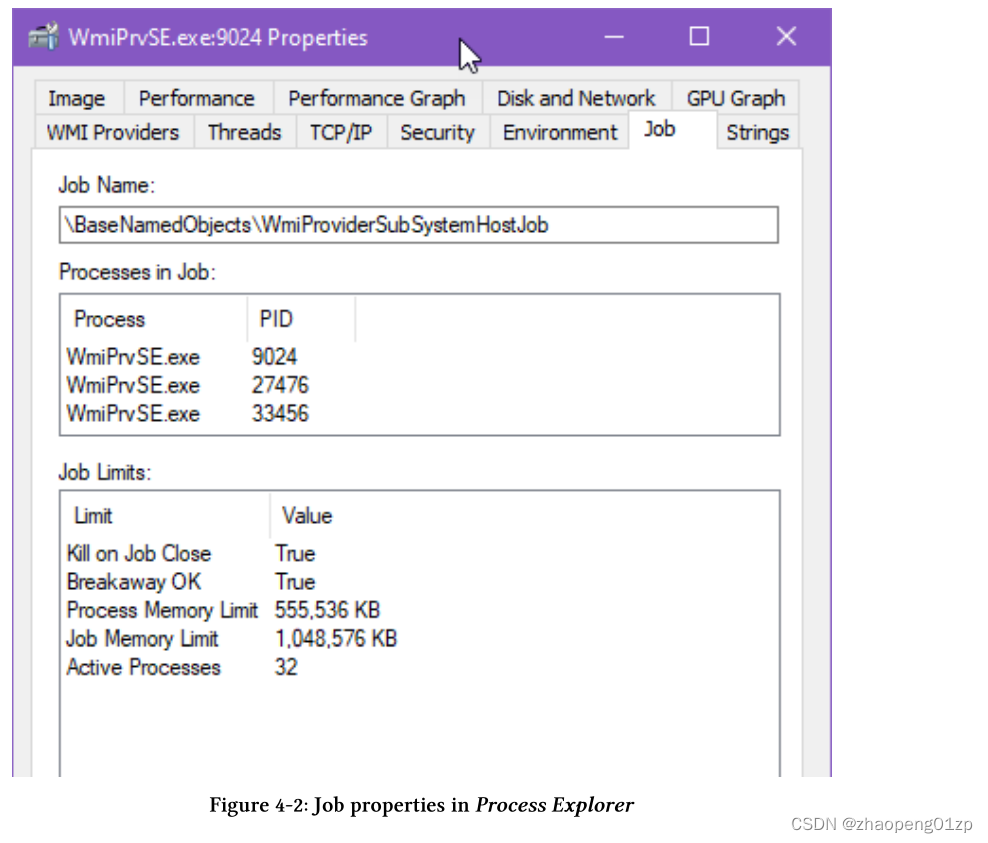
If a process is part of a job, its properties show a Job tab with details listing the job’s name (if any), the processes that are part of the job, and the limits imposed on the job (if any). Figure 4-2 shows a WMI Worker Process (wmiprvse.exe) that is part of a named job. Note the job’s limits.
如果进程是作业的一部分,则其属性将显示一个“作业”选项卡,其中详细列出了作业名称(如果有)、属于作业的进程以及对作业施加的限制(如果有的话)。图4-2显示了一个WMI工作进程(wmiprvse.exe),它是命名作业的一部分。注意作业的限制。
Once a process is associated with a job, it cannot get out. This makes sense, since if a process could be removed from a job, that would make jobs too weak to be useful in many cases.
一旦一个进程与一个作业相关联,它就无法退出。这是有道理的,因为如果一个进程可以从作业中删除,那么在许多情况下,这将使作业变得太弱而无法使用。
Creating Jobs
Creating or opening a job is similar to other create/open functions of other kernel object types. Here is the CreateJobObject function:
创建或打开作业类似于其他内核对象类型的其他create/open函数。这是 CreateJobObject 函数:

The first argument is the familiar SECURITY_ATTRIBUTES pointer, typically set to NULL. The second argument is an optional name to set for the new job object. As with other create functions, if a name is provided, and a job with that name exists, then (barring security restrictions), another handle to the existing job is returned. As usual, calling GetLastError can reveal whether the job is an existing one, by returning ERROR_ALREADY_EXISTS.
第一个参数是熟悉的 SECURITY_ATTRIBUTES 指针,通常设置为 NULL。第二个参数是为新作业对象设置的可选名称。与其他创建函数一样,如果提供了一个名称,并且存在具有该名称的作业,那么(除非有安全限制),将返回现有作业的另一个句柄。像往常一样,可以通过调用 GetLastError 返回 ERROR_ALREADY_EXISTS 来揭示该作业是否存在。
Opening an existing job object by name is possible with OpenJobObject, defined like so:
使用OpenJobObject可以按名称打开现有作业对象,定义如下:
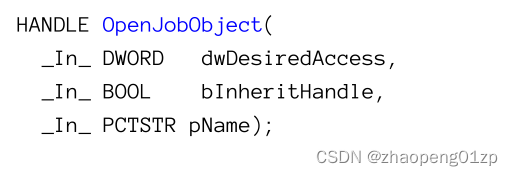
Most of the arguments should be self-explanatory by now. The first argument specifies the access mask required for the named job object. This access mask is checked against the security descriptor of the job object, returning success only if the security descriptor includes entries that allow the requested permissions. Table 4-1 shows the valid job access masks with a brief description.
到目前为止,大多数参数应该是不言自明的。第一个参数指定命名作业对象所需的访问掩码。此访问掩码将根据作业对象的安全描述符进行检查(LPSECURITY_ATTRIBUTES),只有在安全描述符中包含允许请求权限的条目时,才会返回成功。表4-1显示了有效的作业访问掩码,并进行了简要说明。

- JOB_OBJECT_QUERY (4)
Query operations against the job, such as QueryInformationJobObject
针对作业的查询操作,例如QueryInformationJobObject
- JOB_OBJECT_ASSIGN_PROCESS (1)
Allows adding processes to the job
允许向作业中添加进程
- JOB_OBJECT_SET_ATTRIBUTES (0x10)
Required to call SetInformationJobObject
调用SetInformationJobObject时需要
- JOB_OBJECT_ALL_ACCESS
All possible access to the job
作业的所有可能访问权限
With a job handle in hand, processes can be associated with a job by calling AssignProcessToJobObject:
有了作业句柄,进程可以通过调用AssignProcessToJobObject与作业关联:

The job handle must have the JOB_OBJECT_ASSIGN_PROCESS access mask, which is always the case when a new job is created, since the caller has full control of the job. The process handle to assign to the job must have the PROCESS_SET_QUOTA and PROCESS_TERMINATE access mask bits. This means that some processes can never be part of a job, such as protected processes, since this access mask cannot be obtained for such processes.
作业句柄必须具有JOB_OBJECT_ASSIGN_PROCESS访问掩码,创建新作业时总是这样,因为调用方完全控制该作业。要分配给作业的进程句柄必须具有PROCESS_SET_QUOTA和PROCESS_TERMINATE访问掩码位。这意味着某些进程永远不能成为作业的一部分,例如受保护的进程,因为这些进程无法获得此访问掩码。
The following example opens a process given its ID, and adds it into the provided job:
以下示例打开一个给定ID的进程,并将其添加到提供的作业中:

Once a process is associated with a job, it cannot break out. If that process creates a child process, the child process is created by default as part of the parent’s process job. There are two cases where a child process may be created outside of a job:
一旦一个进程与一个作业相关联,它就不能脱离。如果该进程创建了一个子进程,则默认情况下会将该子进程创建为父进程作业的一部分。有两种情况,子进程可以在作业之外被创建:
-
The CreateProcess call includes the CREATE_BREAKAWAY_FROM_JOB flag and the job allows breaking out of it (by setting the limit flag JOB_OBJECT_LIMIT_BREAKAWAY_OK (see the section “Setting Job Limits”, later in this chapter)
-
The job has the limit flag JOB_OBJECT_LIMIT_SILENT_BREAKAWAY_OK. In this case, any child process is created outside the job without requiring any special flags.
-
CreateProcess调用包括CREATE _ BREAKAWAY_ FROM _ JOB标志,作业允许脱离它(允许一个作业中的进程生成一个和作业无关的进程)(通过设置限制标志JOB _ OBJECT _ LIMIT _ BREAKAWAY _ OK(参见本章后面的“设置作业限制”一节)
-
作业具有限制标志JOB _ OBJECT _ LIMIT _ SILENT _ BREAKAWAY _ OK。在这种情况下,任何子进程都是在作业之外创建的,不需要任何特殊标志。
Nested Jobs
Windows 8 introduced the ability to associate a process with more than one job. This makes jobs much more useful than they used to, since if a process you wish to control with a job was already part of a job - there was no way to associate it with another job. A process that is assigned a second job, causes a job hierarchy to be created (if possible). The second job becomes a child of the first job. The basic rules are the following:
Windows 8引入了将进程与多个作业关联的功能。这使得作业比过去更有用,因为如果你想用作业控制的进程已经是作业的一部分,那么就无法将其与另一个作业关联起来。分配了第二个作业的进程会创建作业层次结构(如果可能的话)。第二份作业成为第一份作业的子项。基本规则如下:
-
A limit imposed by a parent job affects the job and all child jobs (and hence all processes in those jobs).
-
Any limit imposed by a parent job cannot be removed by a child job, but it can be more strict. For example, if a parent job sets a job-wide memory limit of 200 MB, a child job can set (for its processes) a limit of 150 MB, but not 250 MB.
-
父作业施加的限制会影响作业和所有子作业(因此也会影响这些作业中的所有流程)。
-
上级作业施加的任何限制都不能被下级作业取消,但可以更严格。例如,如果父作业将作业范围内存限制设置为200 MB,则子作业可以(为其进程)设置150 MB的限制,但不能设置250 MB。
Figure 4-3 shows a hierarchy of jobs created by invoking the following operations (in order):
图4-3显示了通过调用以下操作(按顺序)创建的作业层次结构:

The resulting process/job relationship is depicted in figure 4-3.
由此产生的进程/作业关系如图4-3所示。
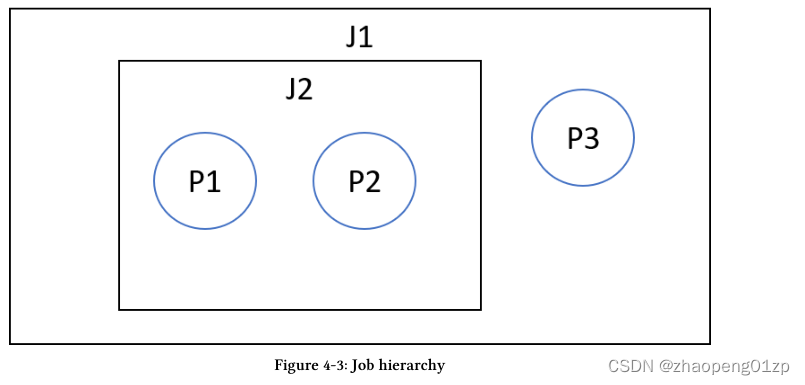
Viewing job hierarchies is not easy. Process Explorer, for example, showing a job’s details, includes information for the shown job and all child jobs (if any). For example, viewing the information for job J1 from figure 4-3, three processes would be listed: P1, P2 and P3. Also, since job access is indirect - a Job tab is available if a process is under a job - the job shown is the immediate job this process is part of. Any parent jobs are not shown.
查看作业层次结构并不容易。例如,Process Explorer显示作业的详细信息,其中包括显示的作业和所有子作业(如果有的话)的信息。例如,查看图4-3中作业J1的信息,将列出三个进程:P1、P2和P3。此外,由于作业访问是间接的——如果某个进程在作业下,则可以使用“作业”选项卡——显示的作业是该进程所属的直接作业。不会显示任何父作业。
The following code creates the hierarchy depicted in figure 4-3.
下面的代码创建了图4-3所示的层次结构。
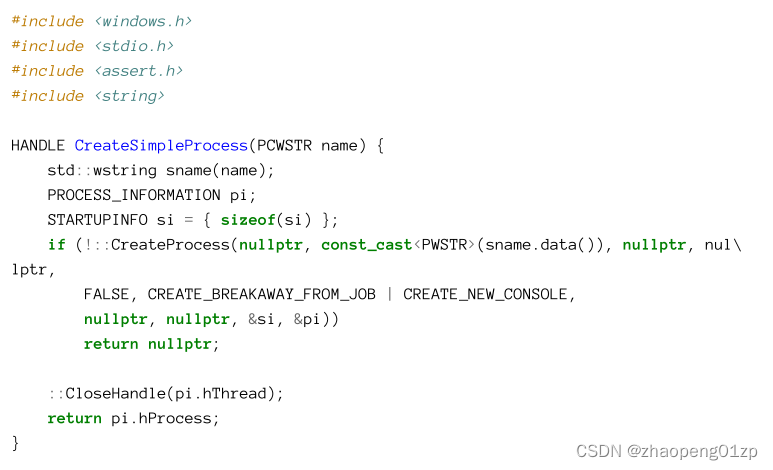
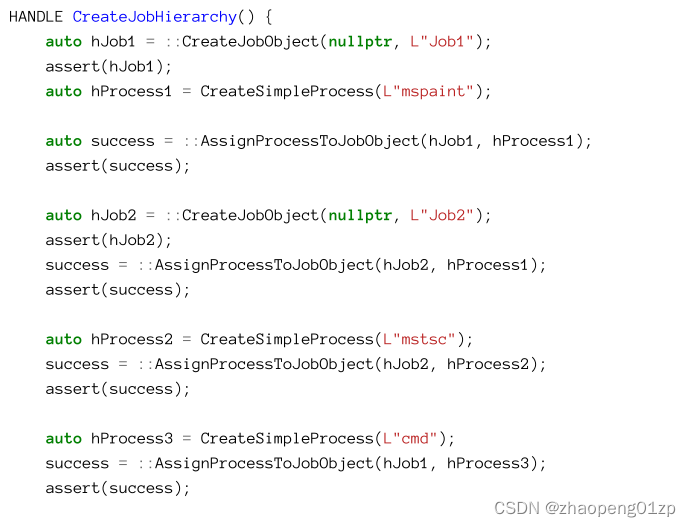
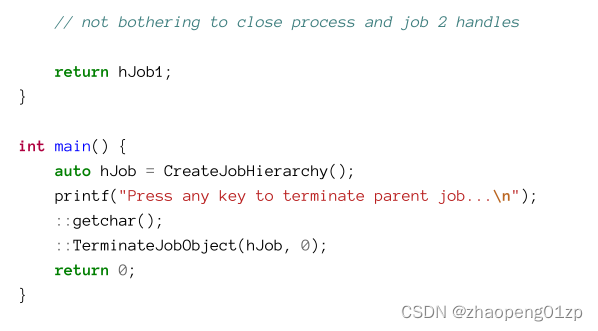
The code is available in the JobTree project in this chapter’s source code.
该代码在本章的源代码JobTree项目中可用。
The process image names are purposefully different, so they are easier to spot (P1=mspaint, P2=mstsc, P3=cmd). The jobs are named, also for easier identification.
进程映像名称有意不同,因此更容易识别(P1=mspaint,P2=mstsc,P3=cmd)。这些作业已命名(J1=Job1, J2=Job2, J3=Job3),也是为了更容易识别。
Each process is initially created outside of any job by specifying CREATE_BREAKAWAY_FROM_JOB in the CreateProcess call. Otherwise, running this application from a process that is already part of a job (such as Visual Studio) would complicate the job hierarchy.
通过在 CreateProcess 调用中指定 CREATE_BREAKAWAY_FROM_JOB,每个进程最初都是在任何作业之外创建的。否则,从已经是作业一部分的进程(例如 Visual Studio)运行此应用程序会使作业层次结构复杂化。
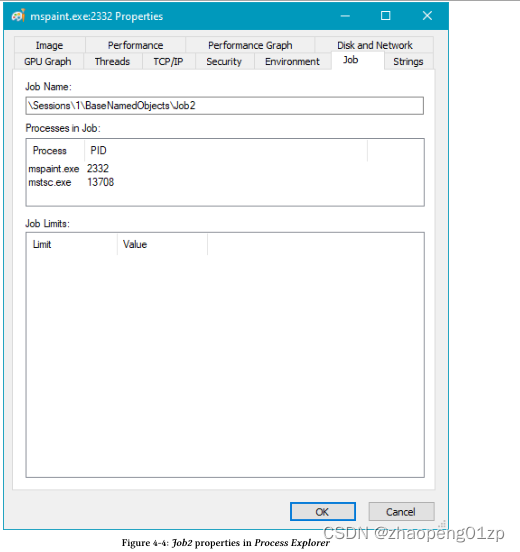
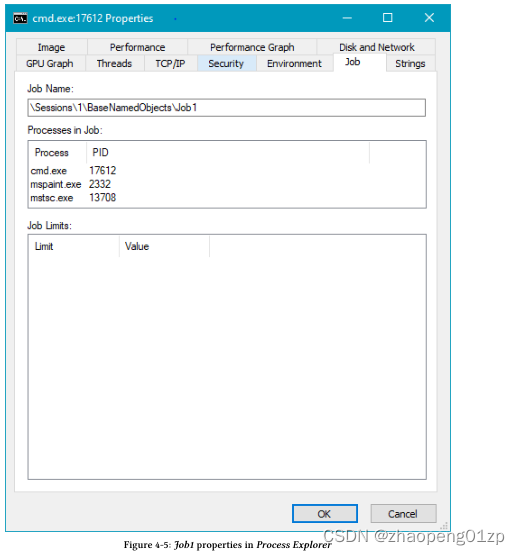
Figure 4-4 shows the job under which mspaint is running. Notice it’s Job2, although mspaint is also under Job1. Figure 4-5 shows the job under which cmd is running, showing the three processes. That’s because cmd is part of Job1, and Job1 shows all processes including those in child jobs.
图 4-4 显示了运行 mspaint 的作业。请注意它是 Job2,尽管 mspaint 也在 Job1 下。图 4-5 显示了运行 cmd 的作业,显示了三个进程。这是因为 cmd 是 Job1 的一部分,而 Job1 显示了所有进程,包括子作业中的进程。
Viewing job hierarchies is not easy, as there is no documented (or undocumented for that matter) API to enumerate jobs, let alone job hierarchies. A tool I created called Job Explorer tries to fill this gap. You can find it in my Github repository at https://github.com/zodiacon/ jobexplorer.
查看作业层次结构并不容易,因为没有文档化(或未文档化)的API 来枚举作业,更不用说作业层次结构了。我创建的一个名为 Job Explorer 的工具试图填补这一空白。您可以在我的 Github 存储库中找到它,网址为 https://github.com/zodiacon/jobexplorer。
Running Job Explorer while the JobTree application is waiting for a key press shows the screenshot in figure 4-6 when the “All Jobs” tree node is selected and the jobs are sorted by name.
在JobTree应用程序等待按键时运行Job Explorer,显示了图4-6中的屏幕截图,此时选择了“All Jobs”树节点,并按名称排序作业。

Double-clicking on Job1 expands the job hierarchy on the left and shows the job details on the right, as shown in figure 4-7.
双击Job1展开左侧的作业层次结构,并在右侧显示作业详细信息,如图4-7所示。
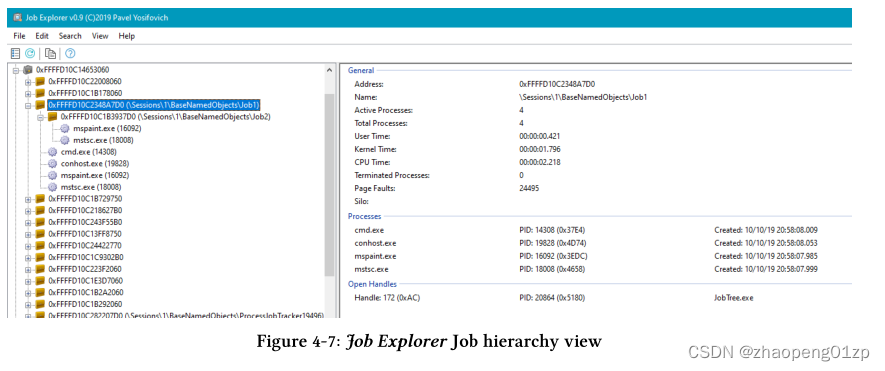
The job hierarchy is clearly visible in the tree view. Notice that conhost.exe process (which is always created when cmd.exe is launched) is also part of the same job.
作业层次结构在树状图中清晰可见。请注意,conhost.exe进程(总是在cmd.exe启动时创建)也是同一作业的一部分。
You may be wondering how Job Explorer works. I plan to write a blog post about that.
您可能想知道作业资源管理器是如何工作的。我计划写一篇关于这个的博客文章。
Querying Job Information
A job object keeps track of some basic job statistics even without any special settings. The primary API to query information about a job object is aptly named QueryInformationJobObject:
即使没有任何特殊设置,作业对象也会跟踪一些基本的作业统计信息。查询作业对象信息的主要API被恰当地命名为QueryInformationJobObject:
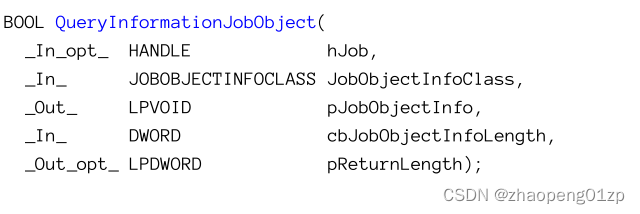
The hJob parameter is the handle to a job - which must have the JOB_QUERY access mask; however, as is hinted by the SAL annotation, a NULL value is a valid value, pointing to the job the calling process is under (if any). In this way, a process can query information that may be pertinent to its execution, such as any memory limits imposed by the job. If the job is nested, then the immediate job is the one queried. JOBOBJECTINFOCLASS is an enumeration of the various pieces of information that can be queried. For each type of information requested, an appropriately-sized buffer must be supplied in the pJobObjectInfo argument to be filled by the function. The last argument is an optional value containing the returned data size in the provided buffer, which is useful for some types of queries that return variable-sized data.
Finally, just as with most APIs, the function returns a non-FALSE value on success.
hJob参数是作业的句柄,该作业必须具有job_QUERY访问掩码;但是,正如SAL注释所暗示的那样,NULL值是一个有效值,它指向调用进程所在的作业(如果有的话)。通过这种方式,进程可以查询可能与其执行相关的信息,例如作业施加的任何内存限制。如果作业是嵌套的,那么直接作业就是被查询的作业。JOBOBJECTINFOCLASS是可以查询的各种信息的枚举。对于请求的每种类型的信息,必须在函数要填充的pJobObjectInfo参数中提供大小适当的缓冲区。最后一个参数是一个可选值,包含所提供缓冲区中返回的数据大小,这对于返回可变大小数据的某些类型的查询很有用。
最后,与大多数API一样,函数在成功时返回非FALSE值。
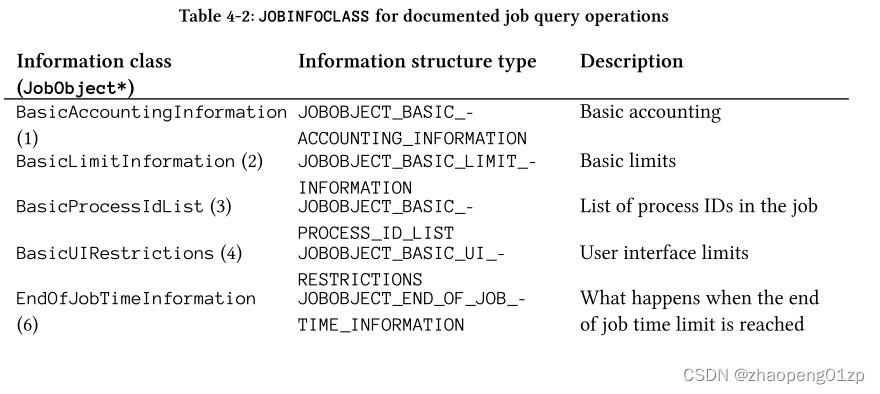
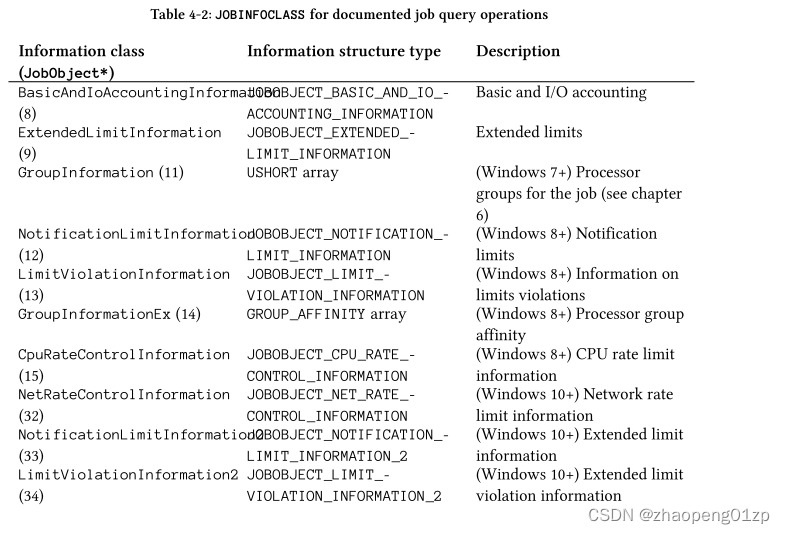
Table 4-2 summarizes the (documented) information classes available for jobs in query operations.
表4-2总结了查询操作中作业可用的(文档化的)信息类。
Job Accounting Information
As mentioned earlier, a job keeps track of some pieces of information, regardless of any limits imposed on the job. The basic accounting information is available with the JobObjectBasicAccountingInformation enumeration and the JOBOBJECT_BASIC_ACCOUNTING_INFORMATION structure defined like so:
如前所述,作业会跟踪一些信息,而不管对作业施加的任何限制。基本核算信息可以通过 JobObjectBasicAccountingInformation 枚举和 JOBOBJECT_BASIC_ACCOUNTING_INFORMATION 结构得到,其定义如下:
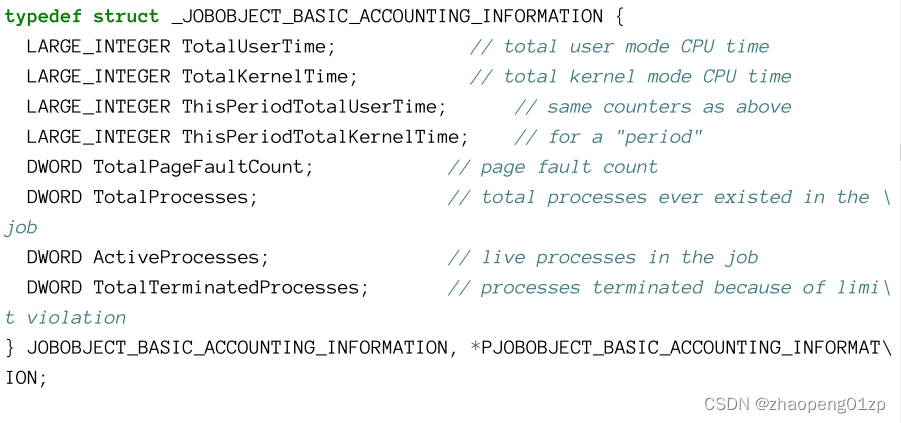
The various times are provided as LARGE_INTEGER structures, each holding a 64-bit value in 100 nanosecond units. The “this period” prefix reports times since the recent per-job user/kernel time limits that have been set (if any). These values are zeroed when the job is created and when a new per-job time limit is set.
各种时间以 LARGE_INTEGER 结构形式提供,每个结构以 100 纳秒为单位保存一个 64 位值。 “this period”前缀报告自最近设置的每个作业用户/内核时间限制(如果有的话)以来的时间。这些值在作业创建时和设置新的每个作业时间限制时被清零。
The following code snippet shows how to make a query call on a job object for basic accounting information:
以下代码片段显示了如何对作业对象进行查询调用以获取基本账户信息:

Similarly, using JobObjectBasicAndIoAccountingInformation and JOBOBJECT_BASIC_AND_IO_ACCOUNTING_INFORMATION provides extended accounting information for a job, that includes I/O operations count and sizes. This extended structure includes two structures, one of which is JOBOBJECT_BASIC_ACCOUNTING_INFORMATION:
类似地,使用JobObjectBasicAndIoAccountingInformation和JOBOBJECT_BASIC_and_IO_ACCOUNTING_INFORMATION为作业提供扩展的核算信息,其中包括I/O操作计数和大小。该扩展结构包括两个结构,其中一个是JOBOBJECT_BASIC_ACCOUNTING_INFORMATION:
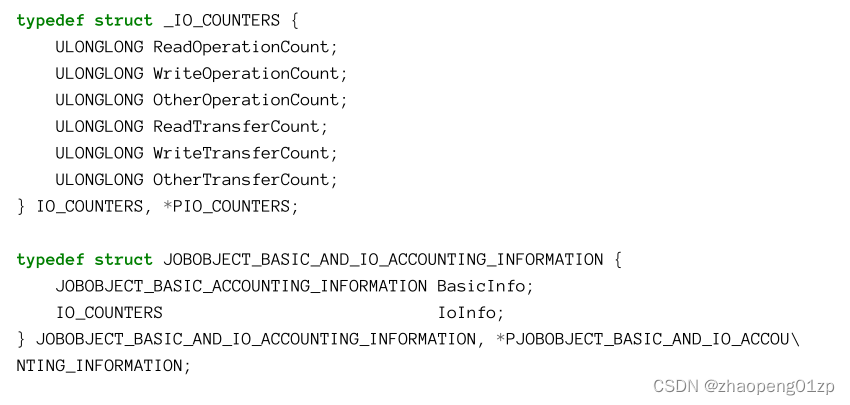
Read and write operations refer to ReadFile and WriteFile (and similar) APIs, which we look at later in this book. The “other” operations refers to usage of the DeviceIoControl API, that is issued in non-read/write operations, typically targeting devices rather than file system files.
读取和写入操作指的是 ReadFile 和 WriteFile(以及类似的)API,我们将在本书后面介绍这些 API。 “其他”操作是指在非读/写操作中发出的 DeviceIoControl API 的使用,通常针对设备而不是文件系统文件。
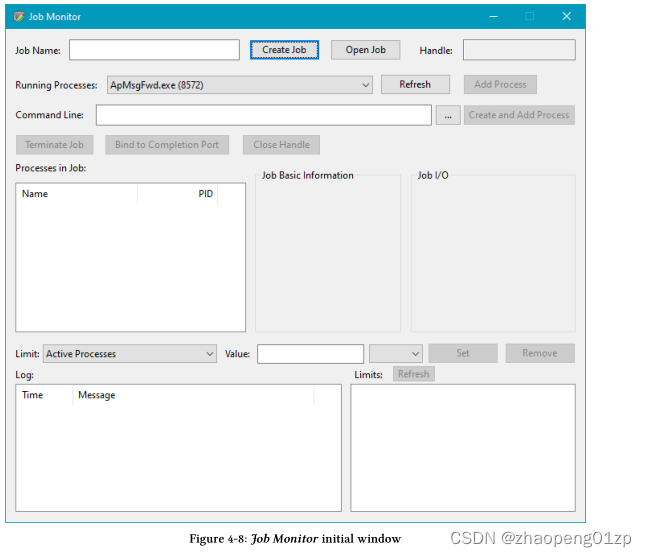
The JobMon project, part of this chapter’s source code includes many of the features of Jobs that we discuss in this chapter. Running it shows the window in figure 4-8.
JobMon 项目是本章源代码的一部分,其中包含我们在本章中讨论的 Jobs 的许多特性。运行显示如图 4-8 所示窗口。
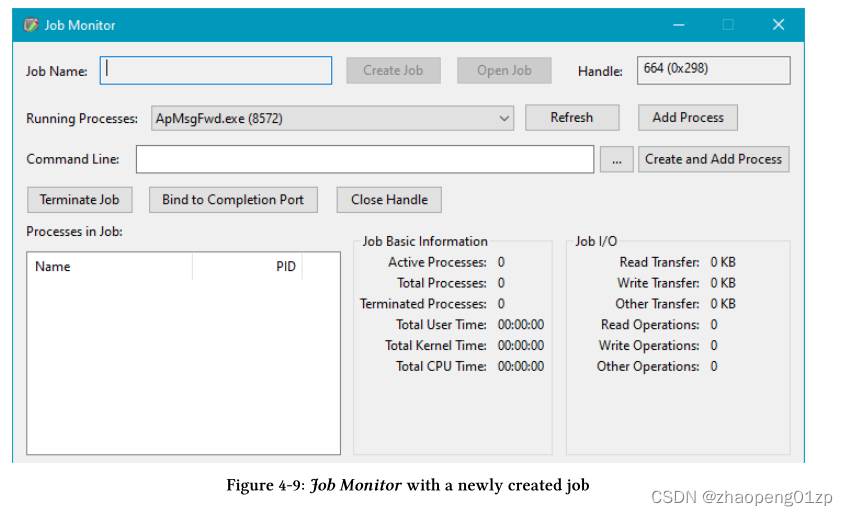
Click on the Create Job button to create an empty job. You can set a name for job before creating the job. The job is created with zero processes and shows the basic and I/O information (figure 4-9).
单击“创建作业”按钮以创建一个空作业。您可以在创建作业之前为作业设置名称。该作业是用零进程创建的,并显示基本信息和 I/O 信息(图 4-9)。
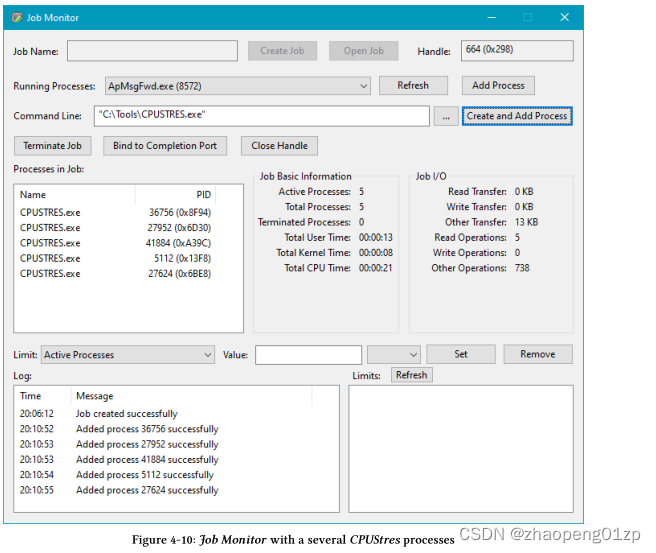
To see job accounting in action, download the CPUStres.exe tool from https://github.com/ zodiacon/AllTools. Click the three dots button to browse for CpuStres.exe. Then click Create and Add Process button several times to add instances of CPUStres to the job (figure 4-10).
Notice the accounting information is no longer zero.
要查看运行中的作业统计,请从 https://github.com/zodiacon/AllTools 下载 CPUStres.exe 工具。单击三个点的按钮以浏览 CpuStres.exe。然后多次单击“创建并添加进程”按钮,将 CPUStres 的实例添加到作业中(图 4-10)。
请注意记账信息不再为零。
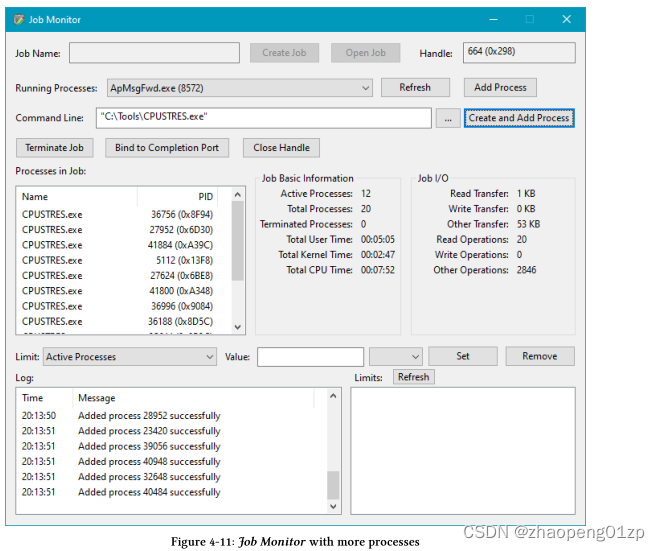
CPUStres is a CPU-eating utility, which is used more in the next chapter. The display is updated roughly every 1.5 seconds. You can add more processes to the job (either CPUStres or another image), and close processes. Figure 4-11 shows Job Monitor after more CPUStres are added with some closed.
CPUStres 是一个吃 CPU 的工具,下一章会用到更多。显示大约每 1.5 秒更新一次。您可以向作业添加更多进程(CPUStres 或其他映像),并关闭进程。图 4-11 显示了添加更多 CPUStres 并关闭了一些之后的 Job Monitor。
You can click Terminate Job to terminate all processes in the job in one stroke. This is achieved by calling TerminateJobObject:
您可以单击“终止作业”来一次性终止作业中的所有进程。这是通过调用 TerminateJobObject 实现的:

TerminateJobObject behaves as if every process active in the job is terminated with TerminateProcess where uExitCode is the exit code of all processes in the job.
At this point, new processes may be added to the job, with accounting information updated normally.
TerminateJobObject 的行为就好像作业中的每个活动进程都以 TerminateProcess 终止,其中 uExitCode 是作业中所有进程的退出代码。
此时,可能会向作业添加新进程,并正常更新记账信息。
Querying for Job Process List
The list of active (live) processes in a job can be retrieved by calling QueryInformationJobObject with the JobObjectBasicProcessIdList information class, returning an array of process IDs in the JOBOBJECT_BASIC_PROCESS_ID_LIST structure:
可以通过使用 JobObjectBasicProcessIdList 信息类调用 QueryInformationJobObject 来检索作业中的活动(活动)进程列表,返回 JOBOBJECT_BASIC_PROCESS_ID_LIST 结构中的进程 ID 数组:

The structure has a variable size because of the array of process IDs. This means a fixed size array should be large enough to include all process IDs and hope for the best. Alternatively, a dynamically-allocated buffer can be used and its size adjusted if it’s not large enough.
The following example shows how to retrieve the list of active processes while allocating large enough buffer as required.
由于进程ID的数组,该结构的大小可变。这意味着一个固定大小的数组应该足够大,以包括所有的进程ID,并希望有最好的结果。另外,如果缓冲区不够大,可以使用动态分配的缓冲区并调整其大小。
下面的例子显示了如何检索活动进程的列表,同时根据需要分配足够大的缓冲区。
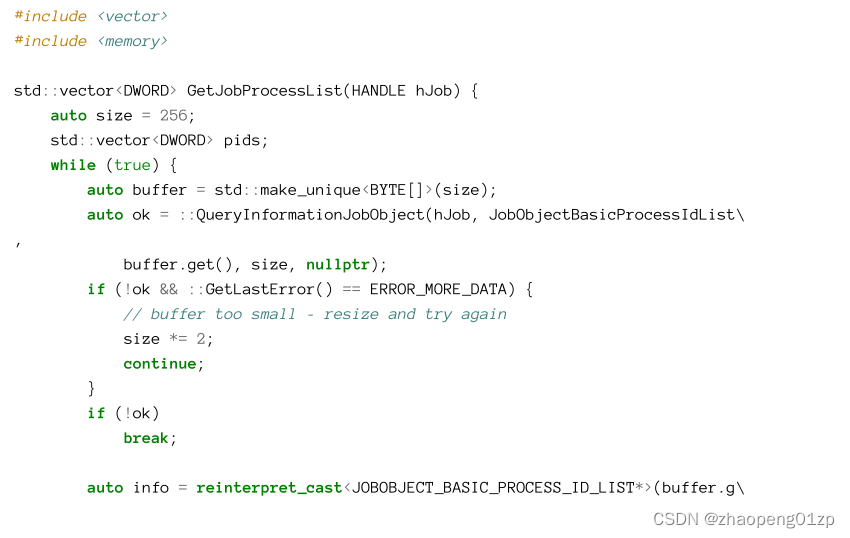

The code uses some C++ constructs to simplify memory management. The function itself returns a std::vector holding the process IDs in the job. In the most general case the number of processes is not known in advance, so the function allocates a buffer with std::make_unique[], which allocates a byte array with the given number of elements (size). The unique_ptr’s destructor frees the buffer when it goes out of scope.
该代码使用一些C++构造来简化内存管理。函数本身返回一个std::vector<DWORD>,其中包含作业中的进程ID。在最常见的情况下,进程的数量事先不知道,因此函数使用std::make_unique<BYTE>[]分配一个缓冲区,该缓冲区分配一个具有给定元素数量(大小)的字节数组。unique_ptr的析构函数在缓冲区超出范围时释放缓冲区。
Next, QueryInformationJobObject is called with the allocated byte buffer. If it returns FALSE and GetLastError returns ERROR_MORE_DATA, it means the allocated buffer is too small, so the function doubles size and tries again.
接下来,使用分配的字节缓冲区调用QueryInformationJobObject。如果返回FALSE,GetLastError返回ERROR_MORE_DATA,则表示分配的缓冲区太小,因此函数将大小加倍并重试。
Once the buffer is large enough, the pointer is cast to JOBOBJECT_BASIC_PROCESS_ID_LIST*, and the process IDs can be retrieved and placed into the std::vector. Curiously enough, the process IDs returned in this structure are typed as ULONG_PTR, which is means each one is 64 bit in a 64 bit process. This is unusual, as process IDs are normally 32 bit values (DWORD). This is why we cannot simply copy the entire array in one stroke to the vector (unless the vector is changed to hold ULONG_PTRs).
一旦缓冲区足够大,指针就会被转换为JOBOBJECT_BASIC_PROCESS_ID_- LIST*,进程ID就可以被检索出来并放入std::vector中。奇怪的是,在这个结构中返回的进程ID被类型化为ULONG_PTR,这意味着在一个64位的进程中,每一个都是64位的。这很不寻常,因为进程ID通常是32位的值(DWORD)。这就是为什么我们不能简单地将整个数组一举复制到向量中(除非向量被改变为容纳ULONG_PTRs)。
You may be curious why the process IDs are typed as ULONG_PTR. This is one of the very few cases in the Windows API where this occurs. Within the kernel, process (and thread) IDs are generated using a private handle table for just this purpose. And since handles on 64 bit systems are 64 bit values, it may be “naturally” easy to use them as is. Still, since handle tables are limited to about 16 million handles, 64 bit values are not currently needed (and not used for process IDs outside the kernel).
你可能很好奇为什么进程ID被打成ULONG_PTR。这这是Windows API中出现的极少数情况之一。在内核中,进程(和线程)的ID是通过一个私有的句柄表产生的,就是为了这个目的。因为64位系统的句柄是64位的值,所以使用它们是 "自然 "的。不过,由于句柄表限制在约1600万个句柄内,因此目前不需要64位值(也不用于内核外的进程ID)。
Setting Job Limits
The primary purpose of a job is to place limits on its processes. The function to use is the opposite of QueryInformationJobObject - SetInformationJobObject defined like so:
作业的主要目的是对其进程进行限制。要使用的函数与QueryInformationJobObject相反–SetInformationJobObject,定义如下:

The arguments should be self-explanatory at this point. The job handle must have the JOB_OBJECT_SET_ATTRIBUTES access mask, and cannot be NULL. Table 4-3 summarizes the (documented) information classes that can be used with SetInformationJobObject.
在这一点上,这些参数应该是不言自明的。作业句柄必须具有JOB_OBJECT_SET_ATTRIBUTES访问掩码,并且不能为NULL。表4-3总结了可与SetInformationJobObject一起使用的(文档化的)信息类。
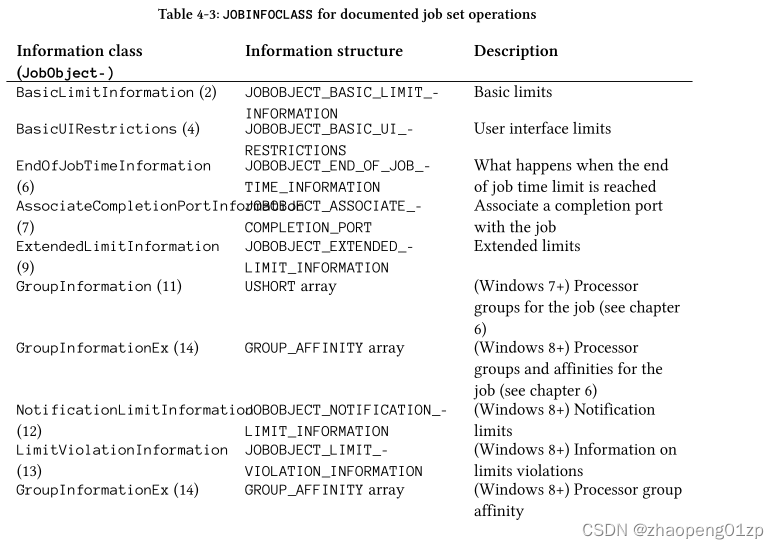
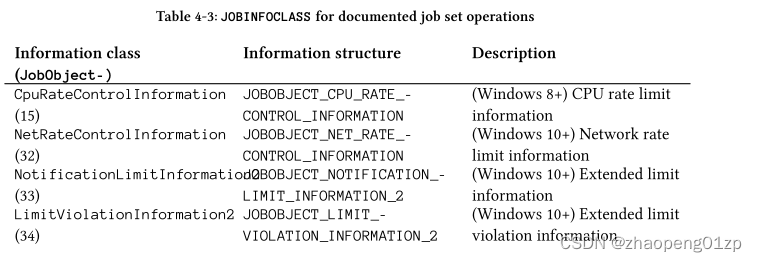
The most “fundamental” limits are specified with JobObjectBasicLimitInformation and JOBOBJECT_BASIC_LIMIT_INFORMATION, while extended limits are set with JobObjectExtendedLimitInformation and JOBOBJECT_EXTENDED_LIMIT_INFORMATION. These structures are defined like so:
最“基本”的限制由JobObjectBasicLimitInformation和JOBOBJECT_BASIC_LIMIT_INFORMATION指定的,而扩展的限制则由JobObjectExtendedLimitInformation和JOBOBJECT_EXTENDED_LIMIT_INFORMATION设置的。这些结构的定义如下:
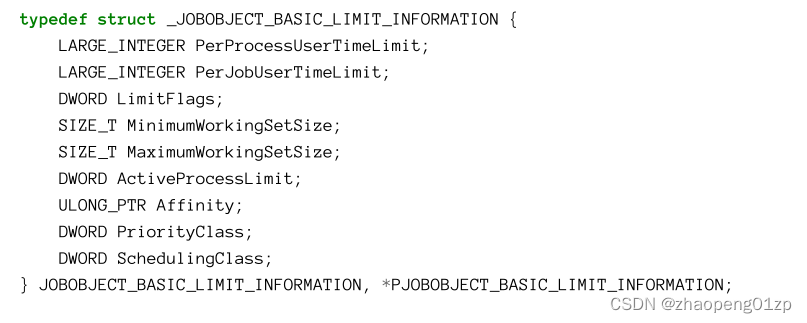

The various limits that can be set depend on the LimitFlags member in JOBOBJECT_BA- SIC_LIMIT_INFORMATION (whether standalone or part of JOBOBJECT_EXTENDED_LIMIT_INFORMATION). Some flags have no associated member, as these flags themselves are enough.
Others make the corresponding member’s value used by SetInformationJobObject. Table 4-4 summarizes the flags that have no corresponding member. Table 4-5 summarizes the flags that have associated member(s).
可以设置的各种限制取决于JOBOBJECT_BASIC_LIMIT_INFORMATION中的LimitFlags成员(无论是独立的还是JOBOBJECT_EXTENDED_LIMIT_INFORMATION的一部分)。有些标志没有关联成员,因为这些标志本身就足够了。
其他的则使相应成员的值被SetInformationJobObject使用。表4-4总结了没有相应成员的标志。表4-5总结了具有关联成员的标志。
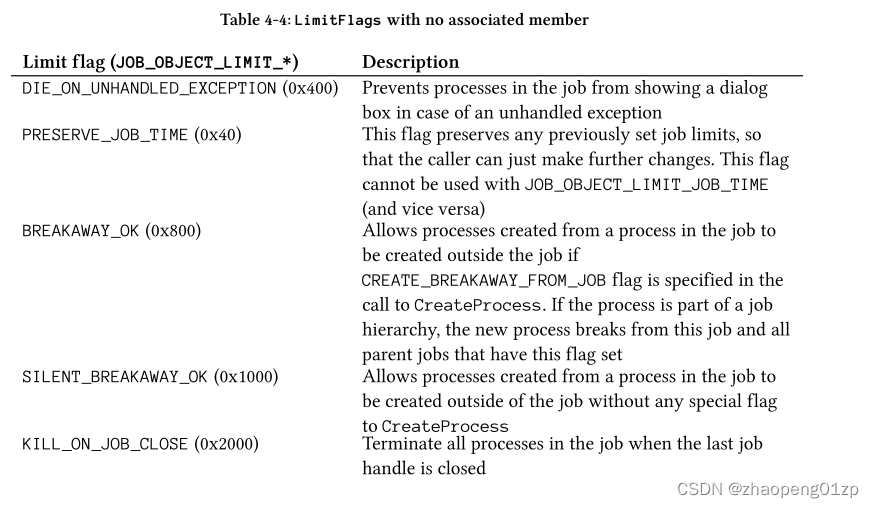
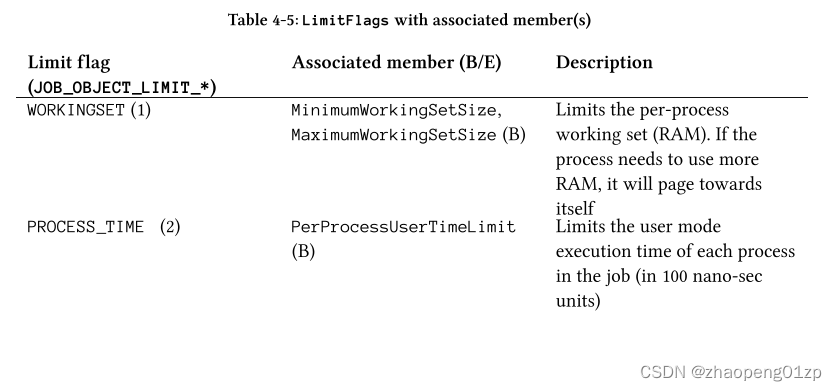
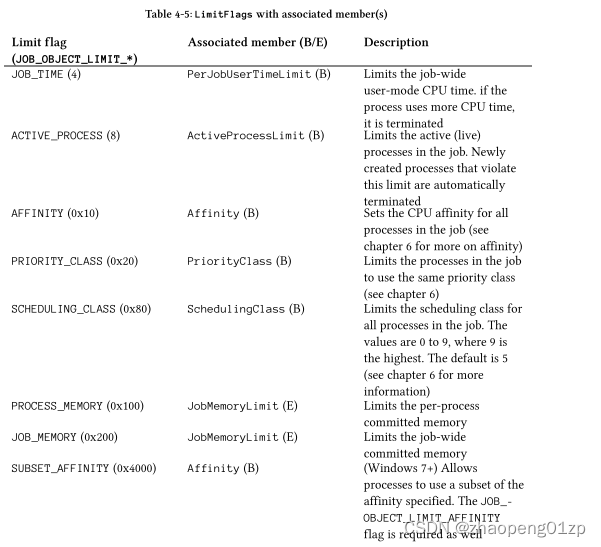
All the flags in table 4-4 must be used with the extended limits structure (JOBOBJECT_EXTENDED_LIMIT_INFORMATION), where the flags themselves are specified with the nested JOBOBJECT_BASIC_LIMIT_INFORMATION structures’s LimitFlags member. In table 4-5, B/E indicates whether this limit is specified with the basic (B) or the extended (E) structure.
表 4-4 中的所有标志必须与扩展限制结构(JOBOBJECT_EXTENDED_LIMIT_INFORMATION)一起使用,其中标志本身由嵌套的 JOBOBJECT_BASIC_LIMIT_INFORMATION 结构的 LimitFlags 成员指定。在表 4-5 中,B/E 表示此限制是用基本(B)结构还是扩展(E)结构指定的。
The following code sets a priority class of Below Normal for the given job:
以下代码为给定作业设置低于正常的优先级:

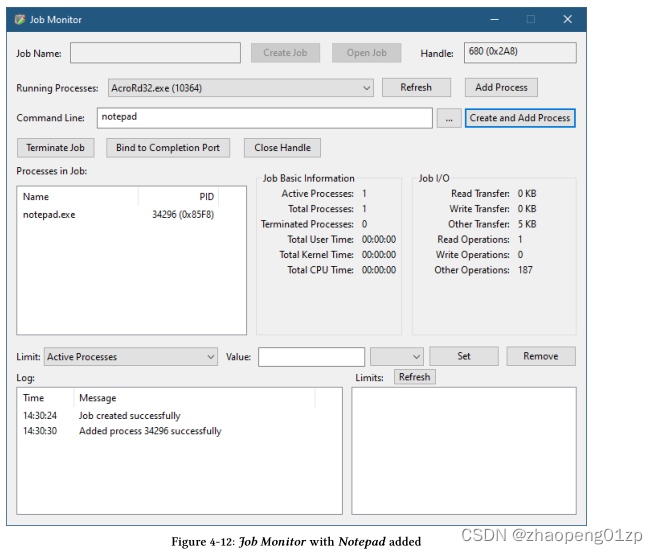
We can test this type of functionality with the Job Monitor application. Open Job Monitor, create a new job, and add a process to the job (Notepad in figure 4-12).
我们可以使用 Job Monitor 应用程序测试此类功能。打开Job Monitor,新建一个job,在job中添加一个进程(图4-12中的记事本)。
If you examine the Base Priority column in Task Manager for this Notepad process, you should see the value Normal (figure 4-13).
如果您检查此记事本进程在任务管理器中的基本优先级列,您应该看到值正常(图 4-13)。
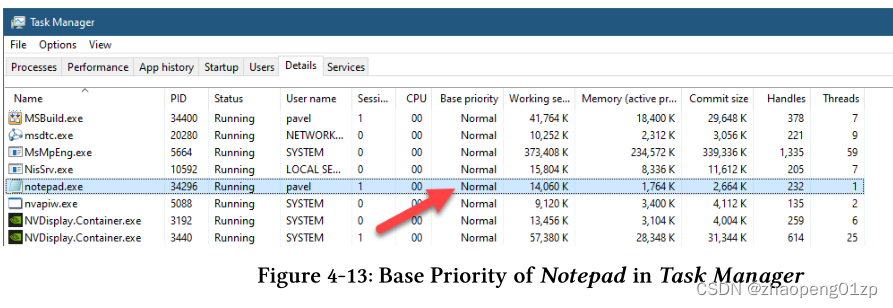
The exact meaning and effect of Base Priority (Priority Class) is discussed in chapter 6.
基本优先级(优先级等级)的确切含义和作用在第 6 章中讨论。
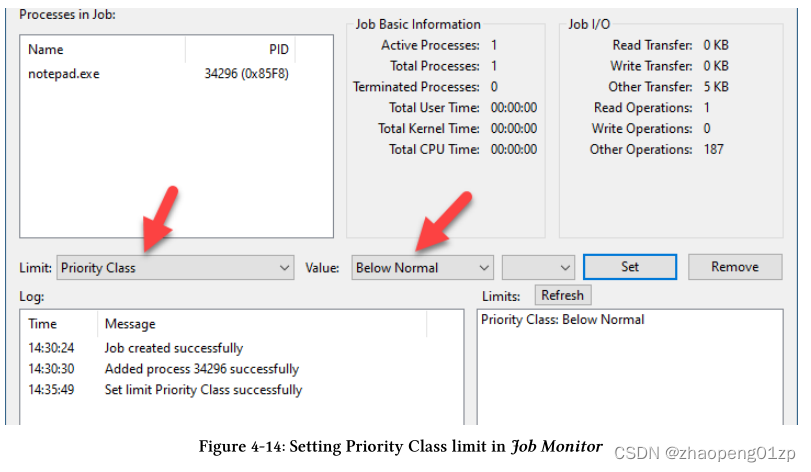
Now return to JOb Monitor, select the Priority Class limit and set its value to Below Normal and click Set (figure 4-14).
现在返回 JOb Monitor,选择 Priority Class 限制并将其值设置为 Below Normal,然后单击 Set(图 4-14)。
Now switch to Task Manager. Notepad’s base priority should now show Below Normal (figure 4-15).
现在切换到任务管理器。 Notepad 的基本优先级现在应该显示为 Below Normal(图 4-15)。

Trying to change the base priority with Task Manager by right-clicking Notepad and selecting Set Priority with any level (except Below Normal) will have no effect because of the job limit.
Going back to Job Monitor and clicking Remove on the priority class limit will re-allow base priority modifications.
由于作业限制,尝试通过右键单击记事本并选择设置任何级别的优先级(低于正常值除外)来更改任务管理器的基本优先级将无效。
返回 Job Monitor 并单击优先级类别限制上的 Remove 将重新允许修改基本优先级。
You can find the code to set/remove most of the available job limits in the JobMon project in the MainDlg.cpp file.
您可以在MainDlg.cpp文件中找到用于设置/删除JobMon项目中大多数可用作业限制的代码。
CPU Rate Limit
Windows 8 added a CPU rate limit to the available job limits, which is not set by the basic or extended limits, but rather uses its own job limit enumeration: JobObjectCpuRateControlInformation.
The associated structure is JOBOBJECT_CPU_RATE_CONTROL_INFORMATION defined like so:
Windows 8 为可用作业限制添加了 CPU 速率限制,这不是由基本或扩展限制设置的,而是使用它自己的作业限制枚举:JobObjectCpuRateControlInformation。
关联的结构是 JOBOBJECT_CPU_RATE_CONTROL_INFORMATION 定义如下:
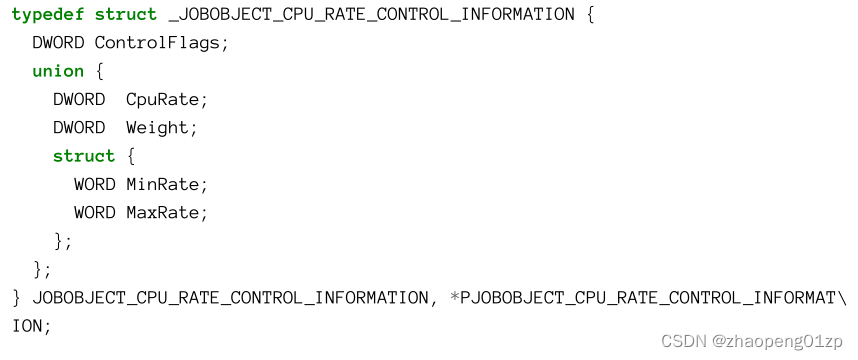
There are three different ways to set CPU rate limits, controlled by the ControlFlags field.
Its possible values are summarized in table 4-5.
有三种不同的方式来设置 CPU 速率限制,由 ControlFlags 字段控制。
其可能的值总结在表 4-5 中。

- ENABLE
Enable CPU rate control
启用 CPU 速率控制
- WEIGHT_BASED
CPU rate is based on relative weight (Weight member)
CPU rate是基于相对权重(Weight member)
- HARD_CAP
Sets a hard cap for CPU consumption
设置 CPU 消耗的硬上限
- NOTIFY
Notifies the I/O completion port associated with the job (if any) for rate violations
通知与作业关联的I/O完成端口(如果有)速率冲突
- MIN_MAX_RATE
Sets the CPU rate between minimum and maximum values (MinRate and MaxRate members)
将CPU速率设置在最小值和最大值之间(MinRate和MaxRate成员)
If CPU rate control is enabled, and neither JOB_OBJECT_CPU_RATE_CONTROL_WEIGHT_BASED nor JOB_OBJECT_CPU_RATE_CONTROL_MIN_MAX_RATE are specified, then the CpuRate member specifies the CPU limit percentage relative to 10000. For example, if 15 percent CPU is desired, the value should be set to 1500. This allows fractional CPU rates to be specified.
如果启用了CPU速率控制,并且既没有指定JOB_OBJECT_CPU_rate_control_WEIGHT_BASED也没有指定JOB_OBJECT_CPU _rate_control_MIN_MAX_rate,则CpuRate成员指定相对于10000的CPU限制百分比。例如,如果需要15%的CPU,则该值应设置为1500。这允许指定部分CPU速率。
If the JOB_OBJECT_CPU_RATE_CONTROL_HARD_CAP flag is also specified, the limit is a hard one - the job won’t get more CPU even if there are CPUs available. Without this flag, the job may get more CPU time if there are available processors.
如果还指定了JOB_OBJECT_CPU_RATE_CONTROL_HARD_CAP标志,则限制很严格——即使有可用的CPU,作业也不会获得更多的CPU。如果没有此标志,如果有可用的处理器,作业可能会获得更多的CPU时间。
Behind the scenes, the kernel applied these restrictions by measuring the CPU consumption of the job in 300 msec time intervals, allowing/preventing it to/from executing in the next interval(s).
在幕后,内核通过在300毫秒的时间间隔内测量作业的CPU消耗来应用这些限制,允许/阻止作业在下一个时间间隔内执行。
The CpuLimit project demonstrates using CPU rate control with the CpuRate member and a hard cap. The main function accepts an array of process IDs to put in a job, and a percentage to use as a hard CPU rate limit.
Here is the start of main:
CpuLimit项目演示了使用CpuRate成员和hard cap的CPU速率控制。主函数接受要放入作业中的进程ID数组,以及用作一个hard CPU速率限制的百分比。
这是main的开始:
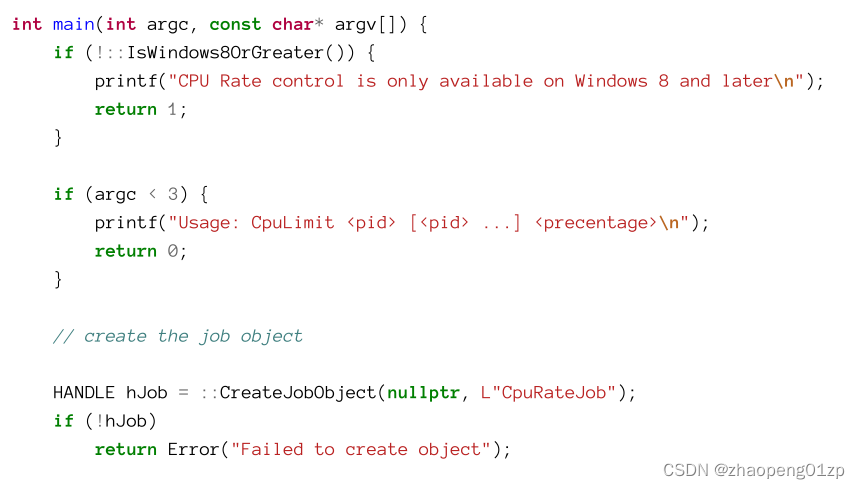
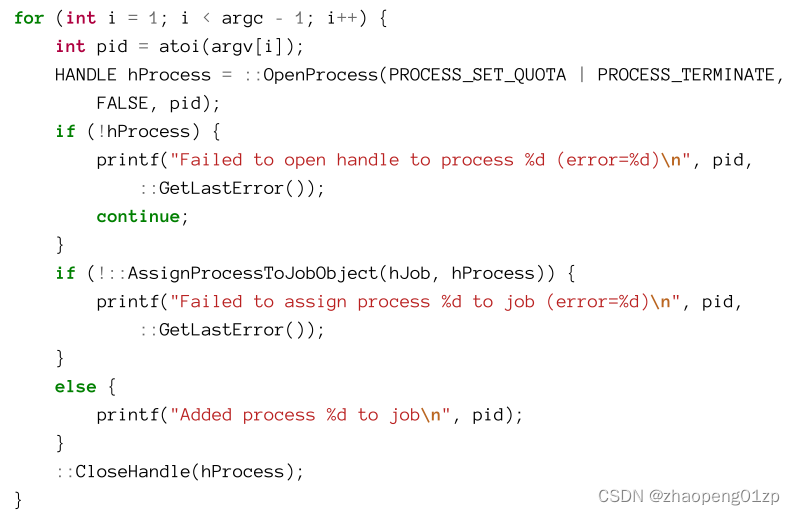
main starts by checking whether the application is executing on Windows 8 at least, as CPU rate control was not available in prior versions. Then, the program validates that there are at least one process ID and a CPU percentage by checking for at least 3 arguments (the program itself, PID, rate).
main首先检查应用程序是否至少在Windows8上执行,因为CPU速率控制在以前的版本中不可用。然后,程序通过检查至少3个参数(程序本身、PID、速率)来验证是否至少有一个进程ID和CPU百分比。
A job object is then created, with a name, so it’s easier to identify using tools. Each process is opened and assigned to the job, if possible.
然后创建一个带有名称的作业对象,这样使用工具的时候就会更容易识别。如果可能的话,每个进程都会被打开并分配给作业。
Now the program is ready to apply the CPU rate control:
现在,程序已准备好应用CPU速率控制:
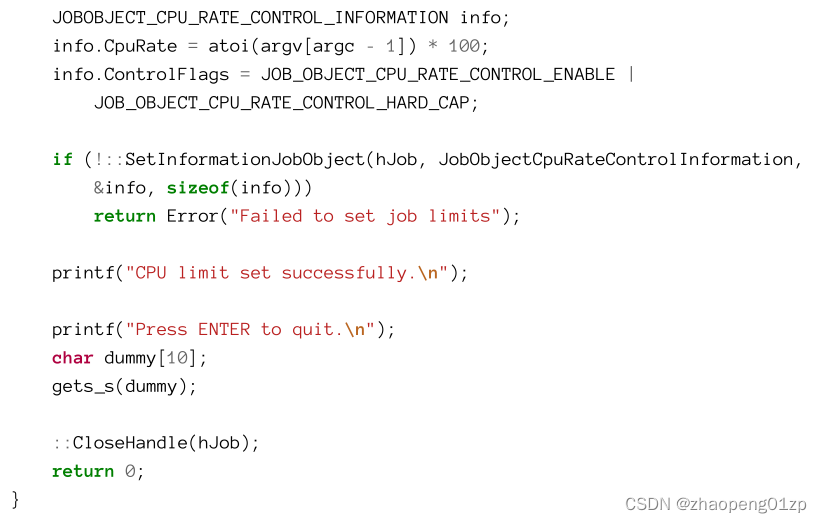
The CPU rate limit is calculated by taking the argument from the command line and multiplying it by 100. Finally, SetInformationJobObject is called to set the limit.
Before the program exits, it waits for the user to press ENTER. This allows the job object’s handle to be open, and so easier to spot with tools. Otherwise, the handle would have been closed, marking the job for deletion. The limits, however, are still applied, as long as there are processes active in the job.
CPU速率限制是通过从命令行获取参数并将其乘以100来计算的。最后,调用SetInformationJobObject来设置限制。
在程序退出之前,它将等待用户按ENTER键。这允许打开作业对象的句柄,从而更容易使用工具进行定位(因此更容易被工具发现)。否则,句柄将被关闭,从而标记要删除的作业。然而,只要作业中有活动的进程,这些限制就仍然适用。
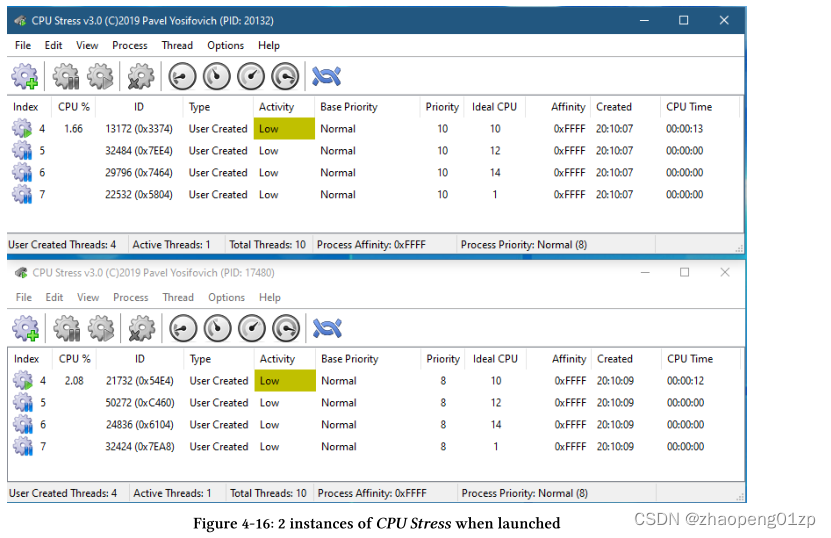
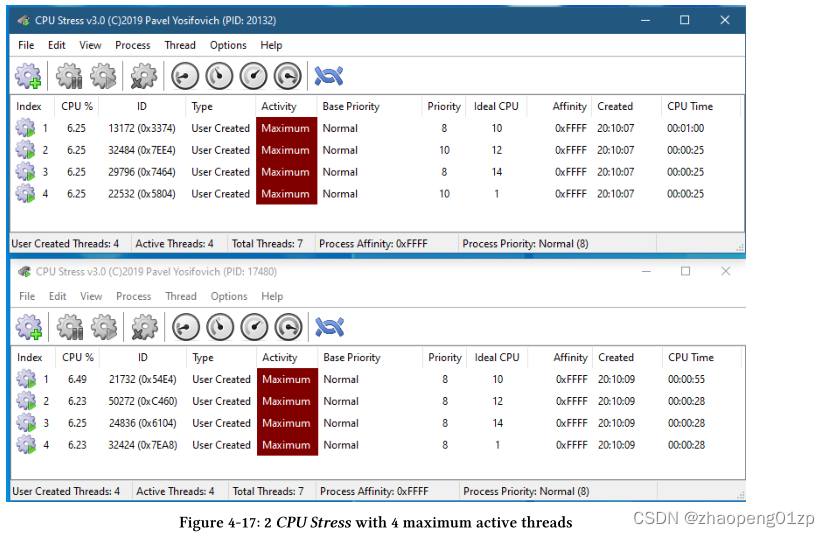
Let’s test this by launching two instances of the CpuStress application (figure 4-16). The system used here has 16 logical processors, so we’ll activate 4 threads with maximum activity in both of them. That should consume about 50% of all CPU time on the system (figure 4-17).
Task Manager shows this is indeed the case (figure 4-18).
让我们通过启动CpuStress应用程序的两个实例来测试这一点(图4-16)。这里使用的系统有16个逻辑处理器,所以我们将激活4个线程,在这两个实例中进行最大限度的活动。这应该消耗系统上所有CPU时间的50%左右(图4-17)(每个实例里面4个线程消耗25%左右)。
任务管理器显示事实确实如此(图4-18)。

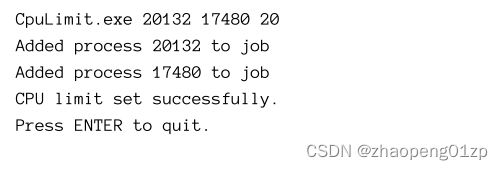
Now we execute CpuLimit with the process IDs and the required CPU rate limit (20% in this example):
现在,我们使用进程ID和所需的CPU速率限制(本例中为20%)执行CpuLimit:
cpulimit 38984 28760 20
You should see a set of success messages like so:
你应该看到这样一组成功的信息:
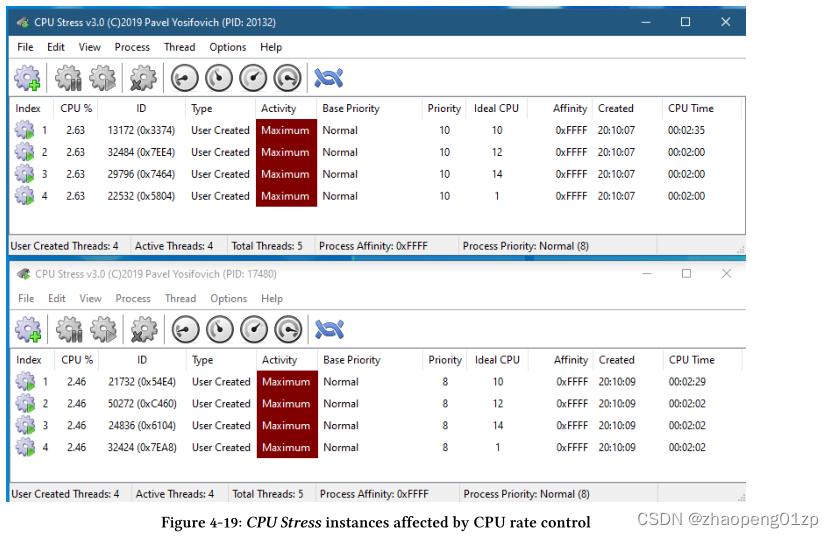
At this point, you should be able to see the CPU consumption drop in both CPUStress instances (figure 4-19). The total CPU both consume should be around 20%, viewable in Task Manager.
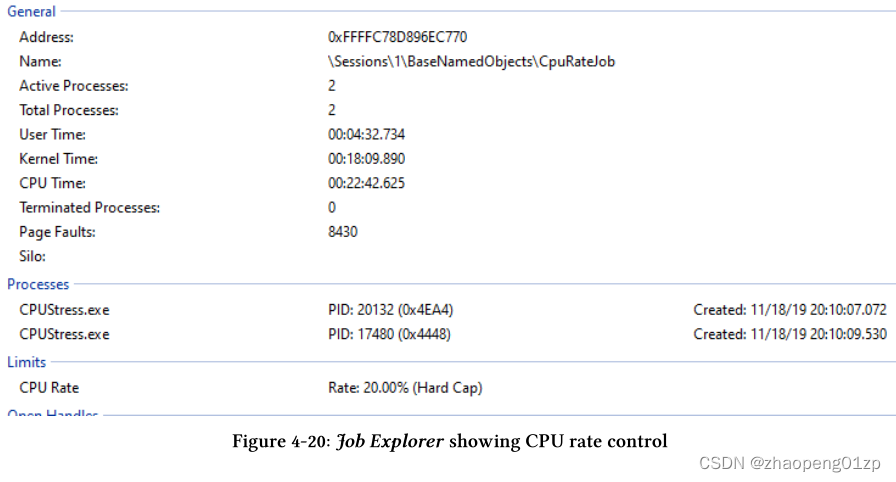
Opening Job Explorer and looking at the CpuRateJob job (this is the name given in the code for easy identification) should show the CPU rate limit (figure 4-20).
此时,您应该能够在两个CPUStress实例中看到CPU消耗的下降(图4-19)。两个实例消耗的CPU总量应在20%左右(每个实例中的4个线程消耗10%左右),可在任务管理器中查看。
打开作业浏览器并查看CpuRateJob作业(这是代码中给出的名称,以便于识别)应显示CPU速率限制(图4-20)。
Unfortunately, at the time of this writing, Process Explorer does not show CPU rate control information for jobs.
不幸的是,在撰写本文时,Process Explorer没有显示作业的CPU速率控制信息。
If CpuLimit fails to add the processes with error 5 (access denied), run CpuStress from a command window rather than through explorer. If you’re curious, investigate why this happens.
如果CpuLimit未能添加进程,并出现错误5(访问被拒绝),请从命令窗口而不是通过资源管理器运行CpuStress。如果你很好奇,调查一下为什么会发生这种情况。
User Interface Limits
Another set of job limits is available through the JobObjectBasicUIRestrictions information class for user interface related restrictions. These are represented by a single 32-bit value stored in a simple structure:
另一组作业限制是由JobObjectBasicUIRestrictions信息类提供的,用于用户界面相关的限制。这些由存储在一个简单结构中的单个32位值表示:

The available restrictions are bit flags listed in table 4-6.
可用的限制是表 4-6 中列出的位标志。
A job that uses UI restrictions cannot be part of a job hierarchy.
使用 UI 限制的作业不能成为作业层次结构的一部分。
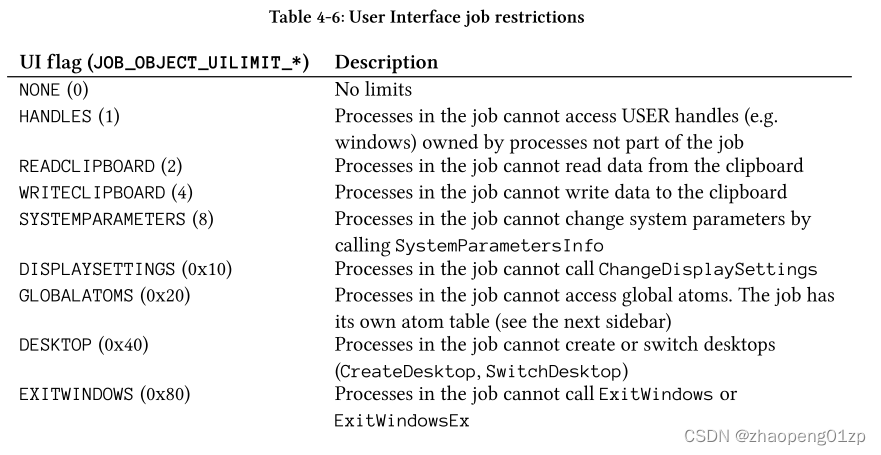
NONE
No limits
没有限制
- HANDLES
Processes in the job cannot access USER handles (e.g.
windows) owned by processes not part of the job
作业中的进程不能访问不属于作业的进程所拥有的用户句柄(如窗口、菜单或挂钩等)。
READCLIPBOARD
Processes in the job cannot read data from the clipboard
作业中的进程无法从剪贴板读取数据
WRITECLIPBOARD
Processes in the job cannot write data to the clipboard
作业中的进程无法将数据写入剪贴板
SYSTEMPARAMETERS
Processes in the job cannot change system parameters by calling SystemParametersInfo
作业中的进程不能通过调用 SystemParametersInfo 更改系统参数
DISPLAYSETTINGS
Processes in the job cannot call ChangeDisplaySettings
作业中的进程无法调用 ChangeDisplaySettings
GLOBALATOMS
Processes in the job cannot access global atoms. The job has its own atom table (see the next sidebar)
作业中的进程无法访问全局原子。作业有自己的原子表(见下边栏)
DESKTOP
Processes in the job cannot create or switch desktops (CreateDesktop, SwitchDesktop)
作业中的进程无法创建或切换桌面(CreateDesktop、SwitchDesktop)
EXITWINDOWS
Processes in the job cannot call ExitWindows or ExitWindowsEx
作业中的进程不能调用 ExitWindows 或 ExitWindowsEx
An Atom Table is a system-managed table that maps strings (or integers in a certain range) to integers. Each entry in the table is an atom. These atoms are used with user interface APIs, such as when registering a window class (RegisterClass / RegisterClassEx) or by manually manipulating an atom table (AddAtom, FindAtom, GlobalAddAtom and others). The Global atom table is available to all applications - this is the one that is not accessible in a job restricted with JOB_OBJECT_UILIMIT_GLOBALATOMS.
Atom 表(原子表)是一个系统管理的表,它将字符串(或一定范围内的整数)映射到整数。表中的每个条目都是一个原子。这些原子用于用户界面API,例如在注册窗口类(RegisterClass / RegisterClassEx)或通过手动操作原子表(AddAtom, FindAtom, GlobalAddAtom和其他)。全局原子表可用于所有应用程序–这是在受 JOB_OBJECT_UILIMIT_GLOBALATOMS 限制的作业中无法访问的表。
Here is a quick experiment to show one effect of UI restrictions. Open Job Monitor, create a new job and insert a Notepad instance into it. Then set a UI limit of Write Clipboard (figure 4-21).
这是一个显示 UI 限制效果的快速实验。打开 Job Monitor,创建一个新作业并将记事本实例插入其中。然后设置写入剪贴板的 UI 限制(图 4-21)。
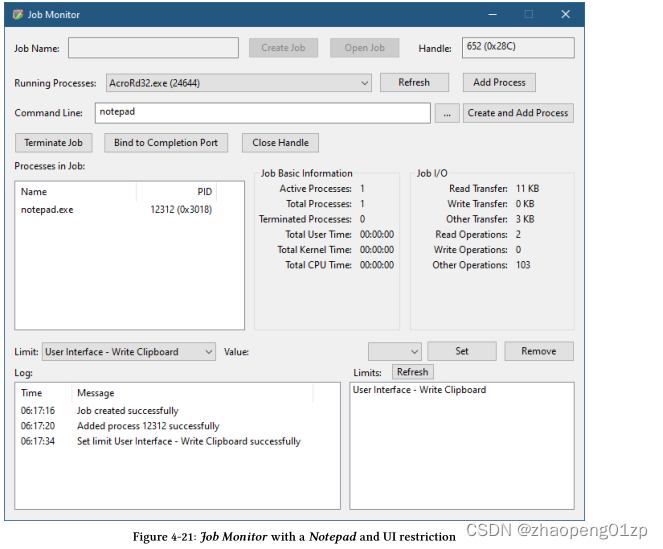
Now open another Notepad instance outside of the job (or use any other text editing application). Copy some text from the application and try to paste it into the Notepad instance that is in the job. The operation should fail, even though the Edit menu shows the Paste option is enabled.
现在在作业之外打开另一个记事本实例(或使用任何其他文本编辑应用程序)。从应用程序复制一些文本并尝试将其粘贴到作业中的记事本实例中。该操作应该会失败,即使“编辑”菜单显示“粘贴”选项已启用。
The JOB_OBJECT_UILIMIT_HANDLES flag prevents processes in the job from accessing other user interface objects (such as windows) outside the job. This means that calling functions such as PostMessage or SendMessage to windows outside the job fails. In some cases, there is a need to talk to a specific window outside the job from within the job. A process outside the job can grant (or remove) access to a window (or other USER object such as a menu or hook) by calling UserHandleGrantAccess:
JOB_OBJECT_UILIMIT_HANDLES 标志阻止作业中的进程访问作业外的其他用户界面对象(例如窗口)。这意味着在作业外部向窗口调用 PostMessage 或 SendMessage 等函数失败。在某些情况下,需要从作业内部与作业外部的特定窗口对话。作业外的进程可以通过调用 UserHandleGrantAccess 授予(或删除)对窗口(或其他 USER 对象,例如菜单或挂钩)的访问权限:

The “hook” referred to in the previous paragraph is one of those that can be installed with SetWindowsHookEx (discussed in a later chapter). With this restriction in place, a process in the job cannot hook threads that run in processes outside the job.
上一段中提到的“挂钩”是可以使用 SetWindowsHookEx 安装的挂钩之一(在后面的章节中讨论)。有了这个限制,作业中的进程就不能挂钩在作业外的进程中运行的线程。
Job Notifications
When job limits are violated, or when certain events occur, the job can notify an interested party via an I/O completion port, that can be associated with the job. I/O completion ports are typically used to handle completion of asynchronous I/O operations (which we’ll tackle in a later chapter), but in this special case are used as the mechanism of notifying when certain job events occur.
当违反作业限制或发生某些事件时,作业可以通过 I/O 完成端口通知相关方,该端口可以与作业相关联。 I/O 完成端口通常用于处理异步 I/O 操作的完成(我们将在后面的章节中处理),但在这种特殊情况下,用作某些作业事件发生时的通知机制。
The job is a dispatcher (waitable) object, that becomes signaled when CPU time violation occurs. For this simple case, a thread can wait with WaitForSingleObject (as a common example) and then handle the CPU time violation. Setting a new CPU time limit resets the job to the non-signaled state.
该作业是一个调度程序(可等待)对象,当发生 CPU 时间冲突时,它会发出信号。对于这种简单的情况,线程可以使用 WaitForSingleObject 等待(作为常见示例),然后处理 CPU 时间冲突。设置新的 CPU 时间限制会将作业重置为非信号状态。
The first step in getting notifications is to associate an I/O completion port with the job. Here is the relevant snippet from JobMon (OnBindIoCompletion function in MainDlg.cpp) (error handling omitted for clarity):
获取通知的第一步是将 I/O 完成端口与作业相关联。这是来自 JobMon 的相关片段(MainDlg.cpp 中的 OnBindIoCompletion 函数)(为清楚起见省略了错误处理):
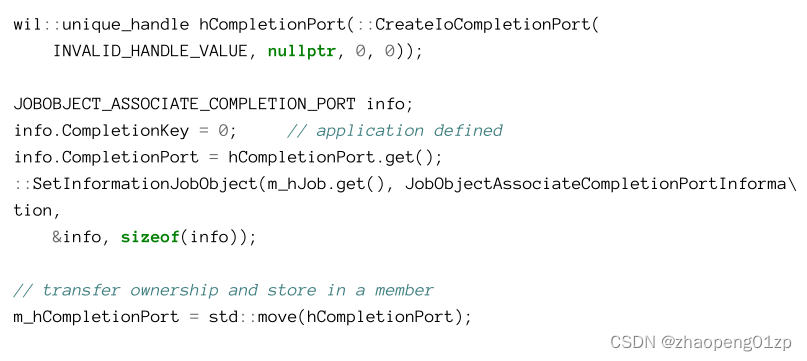
Normally the first argument to CreateIoCompletionPort is a file handle, but in this case it’s INVALID_HANDLE_VALUE, indicating no file is associated with the I/O completion port.
The next step is to wait for the completion port to fire by calling GetQueuedCompletionStatus defined like so:
通常 CreateIoCompletionPort 的第一个参数是文件句柄,但在这种情况下它是 INVALID_HANDLE_VALUE,表示没有文件与 I/O 完成端口相关联。
下一步是通过调用定义如下的 GetQueuedCompletionStatus 来等待完成端口触发:
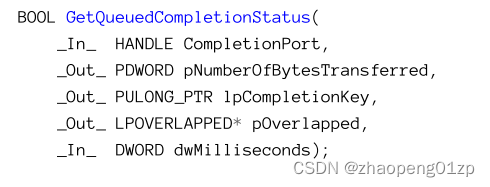
JobMon creates a thread and calls this function, waiting indefinitely until a notification arrives. A new thread is required in this case so that the UI thread of JobMon does not block, causing the UI to become unresponsive. Here is the relevant code from JobMon following the creation of the completion port:
JobMon 创建一个线程并调用此函数,无限期地等待直到通知到达。在这种情况下需要一个新线程,以便 JobMon 的 UI 线程不会阻塞,导致 UI 变得无响应。以下是创建完成端口后来自 JobMon 的相关代码:

Thread creation is explained in detail in the next chapter.
线程创建将在下一章详细解释。
The thread is passed the this pointer so that it can conveniently call a member function (DoMonitorJob). DoMonitorJob calls GetQueuedCompletionStatus and responds when the wait is over:
线程被传递给this指针,这样它就可以方便地调用一个成员函数(DoMonitorJob)。 DoMonitorJob 调用 GetQueuedCompletionStatus 并在等待结束时响应:
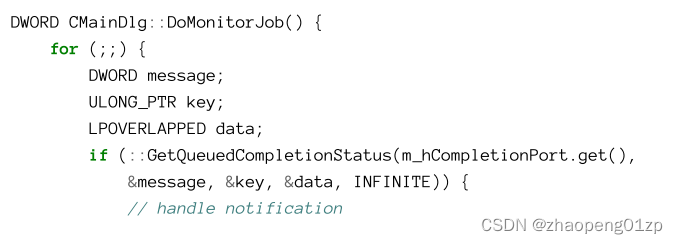
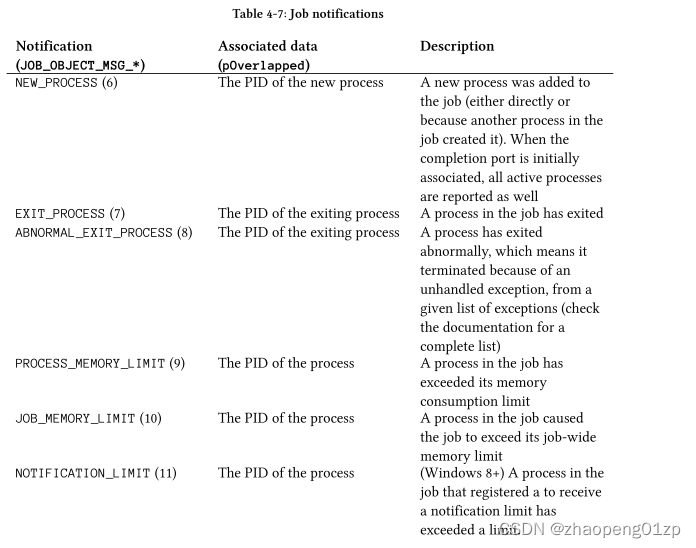
The meaning of the parameters to GetQueuedCompletionStatus are special when used with job notifications (as opposed to a file). pNumberOfBytesTransferred is the notification type, summarized in table 4-7. The CompletionKey parameter is the same one specified in CreateIoCompletionPort, and is application-defined. Finally, pOverlapped is extra information, whose format depends on the type of notification (table 4-7).
与作业通知(相对于文件)一起使用时,GetQueuedCompletionStatus 参数的含义是特殊的。 pNumberOfBytesTransferred 是通知类型,总结在表 4-7 中。 CompletionKey 参数与 CreateIoCompletionPort 中指定的参数相同,并且是应用程序定义的。最后,pOverlapped 是额外信息,其格式取决于通知的类型(表 4-7)。
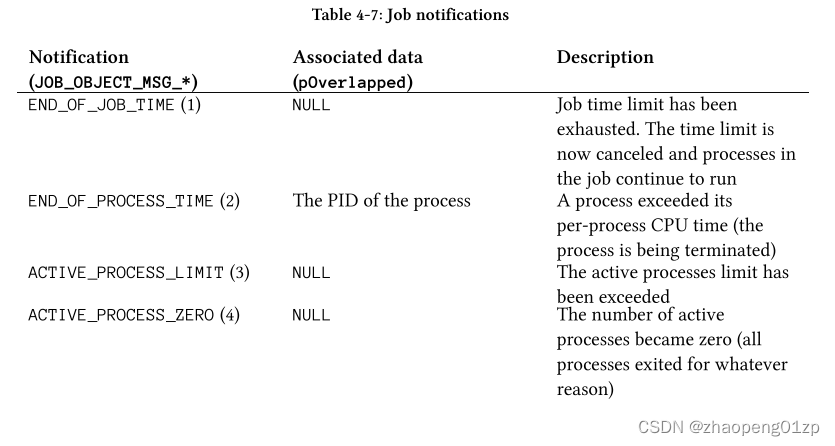
- END_OF_JOB_TIME
Job time limit has been exhausted. The time limit is now canceled and processes in the job continue to run
作业时间限制已用完。时间限制现已取消,作业中的进程继续运行
- END_OF_PROCESS_TIME
A process exceeded its per-process CPU time (the process is being terminated)
进程超出其每个进程的 CPU 时间(该进程正在终止)
- ACTIVE_PROCESS_LIMIT
The active processes limit has been exceeded
已超过活动进程限制
- ACTIVE_PROCESS_ZERO
The number of active processes became zero (all processes exited for whatever reason)
活动进程的数量变为零(所有进程都因某种原因退出)。
- NEW_PROCESS
A new process was added to the job (either directly or because another process in the job created it). When the completion port is initially associated, all active processes are reported as well
一个新进程被添加到作业中(直接或因为作业中的另一个进程创建了它)。最初关联完成端口时,也会报告所有活动进程
- EXIT_PROCESS
A process in the job has exited
作业中的一个进程已经退出
- ABNORMAL_EXIT_PROCESS
A process has exited abnormally, which means it terminated because of an unhandled exception, from a given list of exceptions (check the documentation for a complete list)
一个进程异常退出,这意味着它是由于一个未处理的异常而终止的,来自给定的异常列表(查看文档以获取完整列表)
PROCESS_MEMORY_LIMIT
A process in the job has exceeded its memory consumption limit
作业中的进程已超过其内存消耗限制
- JOB_MEMORY_LIMIT
A process in the job caused the job to exceed its job-wide memory limit
作业中的进程导致作业超出其作业范围的内存限制
- NOTIFICATION_LIMIT
(Windows 8+) A process in the job that registered a to receive a notification limit has exceeded a limit.
(Windows 8+) 作业中一个注册了接收通知限制的进程已经超过了一个限制
In case of a notification limit, call QueryInformationJobObject with JobObjectNotificationLimitInformation and/or JobObjectNotificationLimitInformation2 (Windows 10) to query for the limits being violated.
在通知限制的情况下,使用 JobObjectNotificationLimitInformation 和/或 JobObjectNotificationLimitInformation2 (Windows 10) 调用 QueryInformationJobObject 以查询正在违反的限制。
The following code snippet from JobMon shows how some of these notification codes are handled:
以下来自 JobMon 的代码片段显示了如何处理其中一些通知代码:
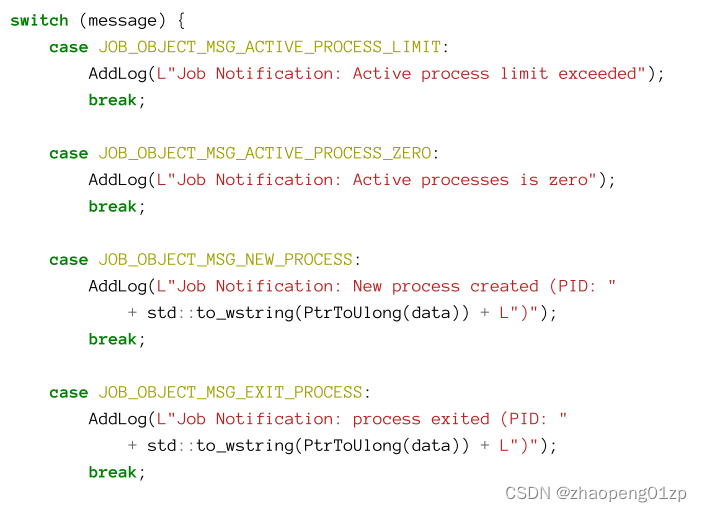
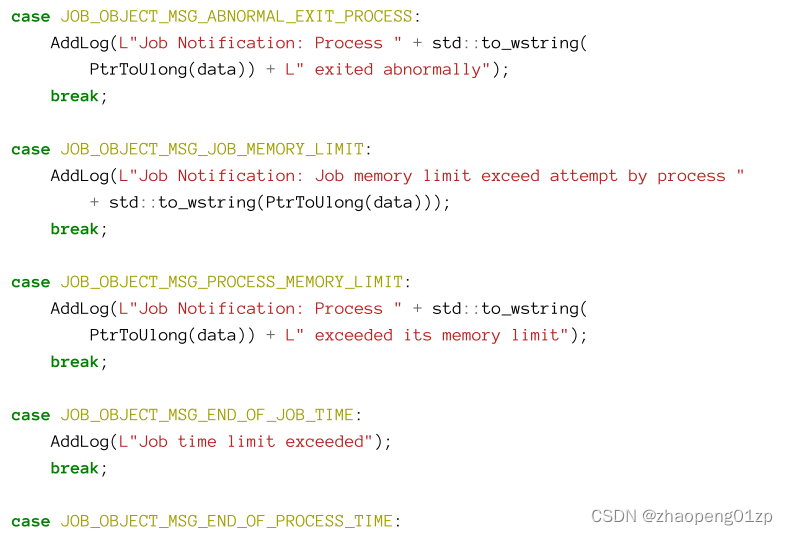

AddLog is a private function that adds the corresponding message to the bottom list view.
AddLog 是一个私有函数,用于将相应的消息添加到底部列表视图。
For end-of-job time limit violation, the default action taken is to terminate all processes in the job. Each process’ exit code is set to ERROR_NOT_ENOUGH_QUOTA (1816) and a notification is not sent. To change that, a call to SetInformationJobObject must be made beforehand to set a different end-of-job action with JobObjectEndOfJobTimeInformation information class, passing the following structure:
对于作业结束时间限制违规,默认采取的操作是终止作业中的所有进程。每个进程的退出代码都设置为 ERROR_NOT_ENOUGH_QUOTA (1816),并且不发送通知。要更改它,必须事先调用 SetInformationJobObject 以使用 JobObjectEndOfJobTimeInformation 信息类设置不同的作业结束操作,传递以下结构:

A value of JOB_OBJECT_TERMINATE_AT_END_OF_JOB is the default, while JOB_OBJECT_POST_AT_END_OF_JOB causes posting a notification message without terminating the processes. If a completion port is not associated with the job, this value has no effect and the termination protocol is used.
JOB_OBJECT_TERMINATE_AT_END_OF_JOB 的值是默认值,而 JOB_OBJECT_POST_AT_END_OF_JOB 导致发布通知消息而不终止进程。如果完成端口未与作业关联,则此值无效并使用终止协议。
Silos
Windows 10 version 1607 and Windows Server 2016 introduced an enhanced version of a job known as Silo. A silo always starts as a job, but it can be upgraded to a silo by using SetInformationJobObject with an undocumented information class, JobObjectCreateSilo (35), that appears in the Windows SDK headers, but is not documented. Some of the Silo APIs are documented in the Windows Driver Kit (WDK) for use by device driver writers. Since silos are mostly controllable from kernel mode, their programmatic usage is out of scope for this book.
Windows 10 版本 1607 和 Windows Server 2016 引入了称为 Silo 的作业的增强版本。筒仓始终作为作业启动,但可以通过使用带有未文档化信息类的 SetInformationJobObject 将其升级为筒仓,JobObjectCreateSilo (35) 出现在 Windows SDK 标头中,但未文档化。一些 Silo API 记录在 Windows 驱动程序工具包 (WDK) 中,供设备驱动程序编写者使用。由于 silos 大部分是可从内核模式控制的,因此它们的编程用法超出了本书的范围。
There are two variations to silos: Application Silos and Server Silos. Server silos are only supported on Windows server machines, starting with Server 2016. They are used today to implement Windows Containers, the ability to sandbox processes, creating a virtual environment that makes processes think they are on a machine of their own. This requires the redirection of file system, registry, and object namespace to be part of a particular silo, so the kernel had to go through significant changes internally to be silo-aware.
筒仓有两种变化:应用筒仓和服务器筒仓。从Server 2016开始,服务器筒仓只在Windows服务器机器上支持。它们如今用来实现Windows容器,即沙盒进程的能力,创建一个虚拟环境,使进程认为它们是在自己的机器上。这需要使文件系统、注册表和对象命名空间重定向为特定筒仓的一部分,因此内核必须在内部进行重大改变,以实现筒仓感知。

Notice silos have a silo ID, which is a unique job ID that is used internally to identify silos.
请注意,silo 有一个 silo ID,这是一个唯一的作业 ID,用于在内部识别 silo。
More detailed information on silos can be found in the “Windows Internals, 7th edition, Part 1” in chapter 3.
有关筒仓的更多详细信息,请参阅第 3 章的“Windows Internals,第 7 版,第 1 部分”。
Exercises
-
Write a tool called MemLimit that accepts a process ID and a number representing the maximum committed memory for the process and set that limit using a job.
-
编写一个名为 MemLimit 的工具,它接受一个进程 ID 和一个代表该进程的最大提交内存的数字,并使用作业设置该限制。
-
Extend JobMon to cover all remaining limits that are not currently implemented, such as I/O and network limits.
-
扩展 JobMon 以涵盖当前未实现的所有剩余限制,例如 I/O 和网络限制。


 U8W/U8W-Mini使用与常见问题解决
 QT多线程的5种用法,通过使用线程解决UI主界面的耗时操作代码,防止界面卡死。...
 stm32使用HAL库配置串口中断收发数据(保姆级教程)
 分享几个国内免费的ChatGPT镜像网址(亲测有效)
 Allegro16.6差分等长设置及走线总结