您现在的位置是:首页 >其他 >Kubernetes 二进制部署高可用集群网站首页其他
Kubernetes 二进制部署高可用集群
概述
在私有局域网内完成Kubernetes二进制高可用集群的部署
ETCD
Openssl ==> ca 证书
Haproxy
Keepalived
Kubernetes
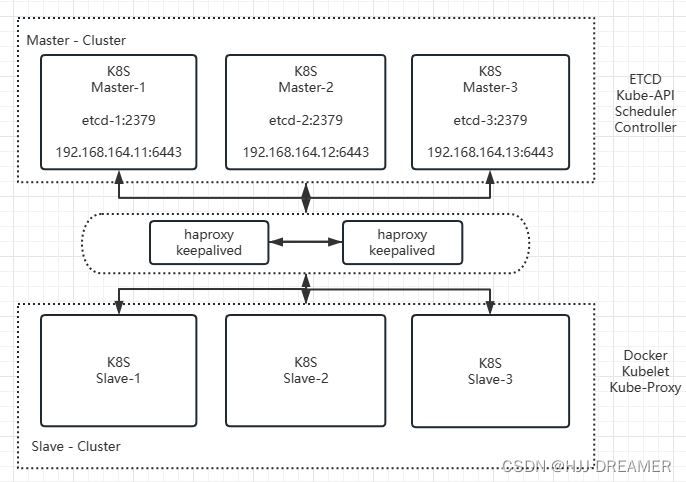
主机规划
| 序号 | 名字 | 功能 | VMNET 1 | 备注 + 1 | 备注 + 2 | 备注 +3 | 备注 + 4 | 备注 +5 |
| 0 | orgin | 界面 | 192.168.164.10 | haproxy | keepalived | |||
| 1 | reporsitory | 仓库 | 192.168.164.16 | yum 仓库 | registory | haproxy | keepalived | |
| 2 | master01 | H-K8S-1 | 192.168.164.11 | kube-api | controller | scheduler | etcd | |
| 3 | master02 | H-K8S-2 | 192.168.164.12 | kube-api | controller | scheduler | etcd | |
| 4 | master03 | H-K8S-3 | 192.168.164.13 | kube-api | controller | scheduler | etcd | |
| 5 | node04 | H-K8S-1 | 192.168.164.14 | kube-proxy | kubelet | docker | ||
| 6 | node05 | H-K8S-2 | 192.168.164.15 | kube-proxy | kubelet | docker | ||
| 7 | node07 | H-K8S-3 | 192.168.164.17 | kube-proxy | kubelet | docker |
图例

步骤
0. 前期环境准备 firewalld + selinux + 系统调优 + ansible安装
ansible 配置
配置主机清单
ansible]# cat hostlist
[k8s:children]
k8sm
k8ss

[lb:children]
origin
repo

[k8sm]
192.168.164.[11:13]

[k8ss]
192.168.164.[14:15]
192.168.164.17

[origin]
192.168.164.10

[repo]
192.168.164.16
配置ansible.cfg
hk8s]# cat ansible.cfg
[defaults]
inventory   = /root/ansible/hk8s/hostlist
roles_path  = /root/ansible/hk8s/roles
host_key_checking = False
firewalld + selinux
# 关闭selinux
setenforce 0
sed -i 's#SELINUX=enforcing#SELINUX=disabled#g' /etc/selinux/config

# 关闭防火墙
systemctl disable --now firewalld
系统调优
1. 创建CA根证书
(46条消息) 【k8s学习2】二进制文件方式安装 Kubernetes之etcd集群部署_etcd 二进制文件_温殿飞的博客-CSDN博客
创建CA根证书完成ETCD和K8S的安全认证与联通性
使用openssl创建CA根证书,使用同一套。私钥:ca.key + 证书:ca.crt
假如存在不同的CA根证书, 可以完成集群间的授权与规划管理。
# 创建私钥
openssl genrsa -out ca.key 2048

# 基于私钥,创建证书
openssl req -x509 -new -nodes -key ca.key -subj "/CN=192.168.164.11" -days 36500 -out ca.crt

# -subj "/CN=ip" 指定master主机
# -days 证书有效期

# 证书存放地址为 /etc/kubernetes/pki
mkdir -p /etc/kubernetes/ && mv ~/ca /etc/kubernetes/pki
ls /etc/kubernetes/pki
2. 部署ETCD高可用集群
Tags · etcd-io/etcd · GitHub 下载
Release v3.4.26 · etcd-io/etcd · GitHub
https://storage.googleapis.com/etcd/v3.4.26/etcd-v3.4.26-linux-amd64.tar.gz下载tar包

ansible unarchive
将tar包远程传递给各master节点
# tar包解压到 ~ 目录下
# ansible k8sm -m unarchive -a "src=/var/ftp/localrepo/etcd/etcd-3.4.26.tar.gz dest=~ copy=yes mode=0755"
ansible k8sm -m unarchive -a "src=/var/ftp/localrepo/etcd/etcd-v3.4.26-linux-amd64.tar.gz~ copy=yes mode=0755"

# 查看文件是否存在
ansible k8sm -m shell -a "ls -l ~"
# 错误则删除
ansible k8sm -m file -a "state=absent path=~/etcd*"

# 配置etcd etcdctl命令到/usr/bin
ansible k8sm -m shell -a "cp ~/etcd-v3.4.26-linux-amd64/etcd /usr/bin/"
ansible k8sm -m shell -a "cp ~/etcd-v3.4.26-linux-amd64/etcdctl /usr/bin/"

ansible k8sm -m shell -a "ls -l /usr/bin/etcd"
ansible k8sm -m shell -a "ls -l /usr/bin/etcdctl"

官方install etcd脚本分析 == 寻找正确的安装包下载路径
#!/bin/bash

# 定义一系列环境变量
ETCD_VER=v3.4.26
# choose either URL
GOOGLE_URL=https://storage.googleapis.com/etcd
GITHUB_URL=https://github.com/etcd-io/etcd/releases/download
DOWNLOAD_URL=${GOOGLE_URL}


# 在/tmp文件夹下删除关于etcd的tar包清空环境
rm -f /tmp/etcd-${ETCD_VER}-linux-amd64.tar.gz
rm -rf /tmp/etcd-download-test && mkdir -p /tmp/etcd-download-test

# 下载特定版本的tar包
curl -L ${DOWNLOAD_URL}/${ETCD_VER}/etcd-${ETCD_VER}-linux-amd64.tar.gz -o /tmp/etcd-${ETCD_VER}-linux-amd64.tar.gz

# 解压到指定文件
tar xzvf /tmp/etcd-${ETCD_VER}-linux-amd64.tar.gz -C /tmp/etcd-download-test --strip-components=1
# 删除tar包
# rm -f /tmp/etcd-${ETCD_VER}-linux-amd64.tar.gz

# 验证功能
/tmp/etcd-download-test/etcd --version
/tmp/etcd-download-test/etcdctl version
etcd.service 文件创建与配置
etcd/etcd.service at v3.4.26 · etcd-io/etcd · GitHub可查看到官方文件
etcd.service 将保存在/usr/lib/systemd/system/目录下方
/etc/etcd/配置文件夹 + /var/lib/etcd 需要创建
[Unit]
Description=etcd key-value store
Documentation=https://github.com/etcd-io/etcd
After=network.target

[Service]
Environment=ETCD_DATA_DIR=/var/lib/etcd
EnvironmentFile=/etc/etcd/etcd.conf
ExecStart=/usr/bin/etcd
Restart=always
RestartSec=10s
LimitNOFILE=40000

[Install]
WantedBy=multi-user.target
使用ansible转存文件 + 判断文件是否存在
Ansible 检查文件是否存在_harber_king的技术博客_51CTO博客
# 传输
ansible k8sm -m copy -a "src=/root/ansible/hk8s/etcd/etcd.service dest=/usr/lib/systemd/system/ mode=0644"
# 判断
ansible k8sm -m shell -a "ls -l /usr/lib/systemd/system/etcd.service"

# 创建文件夹
ansible k8sm -m shell -a "mkdir -p /etc/etcd"
ansible k8sm -m shell -a "mkdir -p /var/lib/etcd"
etcd-CA 证书创建
必须在一台master主机上面创建,不同主机创建的证书结果不同,创建完后将这个证书拷贝到其他节点的相同目录底下
将etcd_server.key + etcd_server.crt + etcd_server.csr + etcd_client.key + etcd_client.crt + etcd_client.csr 都保存在/etc/etcd/pki
本人将etcd_ssl.cnf也保存在/etc/etcd/pki内,一共产生7份文件
etcd_ssl.cnf
[ req ]
req_extensions = v3_req
distinguished_name = req_distinguished_name

[ req_distinguished_name ]

[ v3_req ]
basicConstraints = CA:FALSE
keyUsage = nonRepudiation, digitalSignature, keyEncipherment
subjectAltName = @alt_names

[ alt_names ]
IP.1 = 192.168.164.11
IP.2 = 192.168.164.12
IP.3 = 192.168.164.13
具体命令
# 进入指定目录
mkdir -p /etc/etcd/pki &&  cd /etc/etcd/pki

# 创建server密钥
openssl genrsa -out etcd_server.key 2048

openssl req -new -key etcd_server.key -config etcd_ssl.cnf -subj "/CN=etcd-server" -out etcd_server.csr

openssl x509 -req -in etcd_server.csr -CA /etc/kubernetes/pki/ca.crt -CAkey /etc/kubernetes/pki/ca.key -CAcreateserial -days 36500 -extensions v3_req -extfile etcd_ssl.cnf -out etcd_server.crt

# 创建客户端密钥
openssl genrsa -out etcd_client.key 2048

openssl req -new -key etcd_client.key -config etcd_ssl.cnf -subj "/CN=etcd-client" -out etcd_client.csr

openssl x509 -req -in etcd_client.csr -CA /etc/kubernetes/pki/ca.crt -CAkey /etc/kubernetes/pki/ca.key -CAcreateserial -days 36500 -extensions v3_req -extfile etcd_ssl.cnf -out etcd_client.crt
etcd.conf.yml.sample 参数配置
etcd/etcd.conf.yml.sample at v3.4.26 · etcd-io/etcd · GitHub
k8s-二进制安装v1.25.8 - du-z - 博客园 (cnblogs.com)
二进制安装Kubernetes(k8s) v1.25.0 IPv4/IPv6双栈-阿里云开发者社区 (aliyun.com)
使用ansible在所有节点中跟新配置文件,需要使用shell 或者 ansible的传参方式进行更新ip名称等
以master01为例子,master02和master03需要执行对应修改
| 参数 | 默认环境变量 | 变更值描述 | 实际计划值 | 备注 |
| name: | ETCD_NAME | hostname | master01 | |
| data-dir: | ETCD_DATA_DIR | /var/lib/etcd | /var/lib/etcd | |
| listen-peer-urls | ETCD_LISTEN_PEER_URLS | https://ip:2380 | https://192.168.164.11:2380 | |
| listen-client-urls | ETCD_LISTEN_CLIENT_URLS | http://ip:2379 https://ip:2379 | "http://192.168.164.11:2379,https://192.168.164.11:2380" | |
| initial-advertise-peer-urls | ETCD_INITIAL_ADVERTISE_PEER_URLS | https://ip:2380 | "https://192.168.164.11:2380" | |
| advertise-client-urls | ETCD_ADVERTISE_CLIENT_URLS | https://ip:2379 | https://192.168.164.11:2379 | |
| initial-cluster | ETCD_INITIAL_CLUSTER | 各节点=https://ip:2380 | 'master01=https://192.168.164.11:2380,master02=https://192.168.164.12:2380,master03=https://192.168.164.13:2380' | |
| initial-cluster-state | ETCD_INITIAL_CLUSTER_STATE | new 新建 + existing 加入已有 | new | |
| cert-file: | client-transport-security: | /etc/etcd/pki/etcd_server.crt | ||
| key-file: | client-transport-security: | /etc/etcd/pki/etcd_server.key | ||
| client-cert-auth: | false | true | ||
| trusted-ca-file | client-transport-security: | etc/kubernetes/pki/ca.crt | ||
| auto-tls | false | true | ||
| cert-file | peer-transport-security: | /etc/etcd/pki/etcd_server.crt | ||
| key-file | peer-transport-security: | /etc/etcd/pki/etcd_server.key | ||
| client-cert-auth | false | true | ||
| trusted-ca-file | peer-transport-security: | /etc/kubernetes/pki/ca.crt | ||
| auto-tls | false | true |
配置没有经过测试
# This is the configuration file for the etcd server.
# https://doczhcn.gitbook.io/etcd/index/index-1/configuration 参考文档

# Human-readable name for this member.
# 建议使用hostname, 唯一值,环境变量: ETCD_NAME
name: "master01"

# Path to the data directory.
# 数据存储地址,需要和etcd.service保持一致,环境变量: ETCD_DATA_DIR
data-dir: /var/lib/etcd

# Path to the dedicated wal directory.
# 环境变量: ETCD_WAL_DIR
wal-dir:

# Number of committed transactions to trigger a snapshot to disk.
# 触发快照到硬盘的已提交事务的数量.
snapshot-count: 10000

# Time (in milliseconds) of a heartbeat interval.
# 心跳间隔时间 (单位 毫秒),环境变量: ETCD_HEARTBEAT_INTERVAL
heartbeat-interval: 100

# Time (in milliseconds) for an election to timeout.
# 选举的超时时间(单位 毫秒),环境变量: ETCD_ELECTION_TIMEOUT
election-timeout: 1000

# Raise alarms when backend size exceeds the given quota. 0 means use the
# default quota.
quota-backend-bytes: 0

# List of comma separated URLs to listen on for peer traffic.
# 环境变量: ETCD_LISTEN_PEER_URLS
listen-peer-urls: "https://192.168.164.11:2380"

# List of comma separated URLs to listen on for client traffic.
# 环境变量: ETCD_LISTEN_CLIENT_URLS
listen-client-urls: "http://192.168.164.11:2379,https://192.168.164.11:2380"

# Maximum number of snapshot files to retain (0 is unlimited).
max-snapshots: 5

# Maximum number of wal files to retain (0 is unlimited).
max-wals: 5

# Comma-separated white list of origins for CORS (cross-origin resource sharing).
cors:

# List of this member's peer URLs to advertise to the rest of the cluster.
# The URLs needed to be a comma-separated list.
# 环境变量: ETCD_INITIAL_ADVERTISE_PEER_URLS
initial-advertise-peer-urls: "https://192.168.164.11:2380"

# List of this member's client URLs to advertise to the public.
# The URLs needed to be a comma-separated list.
advertise-client-urls: https://192.168.164.11:2379

# Discovery URL used to bootstrap the cluster.
discovery:

# Valid values include 'exit', 'proxy'
discovery-fallback: "proxy"

# HTTP proxy to use for traffic to discovery service.
discovery-proxy:

# DNS domain used to bootstrap initial cluster.
discovery-srv:

# Initial cluster configuration for bootstrapping.
# 为启动初始化集群配置, 环境变量: ETCD_INITIAL_CLUSTER
initial-cluster: "master01=https://192.168.164.11:2380,master02=https://192.168.164.12:2380,master03=https://192.168.164.13:2380"

# Initial cluster token for the etcd cluster during bootstrap.
# 在启动期间用于 etcd 集群的初始化集群记号(cluster token)。环境变量: ETCD_INITIAL_CLUSTER_TOKEN
initial-cluster-token: "etcd-cluster"

# Initial cluster state ('new' or 'existing').
# 环境变量: ETCD_INITIAL_CLUSTER_STATE。new 新建 + existing 加入已有
initial-cluster-state: "new"

# Reject reconfiguration requests that would cause quorum loss.
strict-reconfig-check: false

# Accept etcd V2 client requests
enable-v2: true

# Enable runtime profiling data via HTTP server
enable-pprof: true

# Valid values include 'on', 'readonly', 'off'
proxy: "off"

# Time (in milliseconds) an endpoint will be held in a failed state.
proxy-failure-wait: 5000

# Time (in milliseconds) of the endpoints refresh interval.
proxy-refresh-interval: 30000

# Time (in milliseconds) for a dial to timeout.
proxy-dial-timeout: 1000

# Time (in milliseconds) for a write to timeout.
proxy-write-timeout: 5000

# Time (in milliseconds) for a read to timeout.
proxy-read-timeout: 0

client-transport-security:
  # https://doczhcn.gitbook.io/etcd/index/index-1/security 参考
  # Path to the client server TLS cert file.
  cert-file: /etc/etcd/pki/etcd_server.crt

  # Path to the client server TLS key file.
  key-file: /etc/etcd/pki/etcd_server.key

  # Enable client cert authentication.
  client-cert-auth: true

  # Path to the client server TLS trusted CA cert file.
  trusted-ca-file: /etc/kubernetes/pki/ca.crt

  # Client TLS using generated certificates
  auto-tls: true

peer-transport-security:
  # Path to the peer server TLS cert file.
  cert-file: /etc/etcd/pki/etcd_server.crt

  # Path to the peer server TLS key file.
  key-file: /etc/etcd/pki/etcd_server.key

  # Enable peer client cert authentication.
  client-cert-auth: true

  # Path to the peer server TLS trusted CA cert file.
  trusted-ca-file: /etc/kubernetes/pki/ca.crt

  # Peer TLS using generated certificates.
  auto-tls: true

# Enable debug-level logging for etcd.
debug: false

logger: zap

# Specify 'stdout' or 'stderr' to skip journald logging even when running under systemd.
log-outputs: [stderr]

# Force to create a new one member cluster.
force-new-cluster: false

auto-compaction-mode: periodic
auto-compaction-retention: "1"
配置经过测试 /etc/etcd/etcd.conf
ETCD_NAME=master03
ETCD_DATA_DIR=/var/lib/etcd

# [Cluster Flags]
# ETCD_AUTO_COMPACTION_RETENTIO:N=0


ETCD_LISTEN_PEER_URLS=https://192.168.164.13:2380
ETCD_INITIAL_ADVERTISE_PEER_URLS=https://192.168.164.13:2380

ETCD_LISTEN_CLIENT_URLS=https://192.168.164.13:2379
ETCD_ADVERTISE_CLIENT_URLS=https://192.168.164.13:2379

ETCD_INITIAL_CLUSTER_TOKEN=etcd-cluster
ETCD_INITIAL_CLUSTER_STATE=new
ETCD_INITIAL_CLUSTER="master01=https://192.168.164.11:2380,master02=https://192.168.164.12:2380,master03=https://192.168.164.13:2380"

# [Proxy Flags]
ETCD_PROXY=off

# [Security flags]
# 指定etcd的公钥证书和私钥
ETCD_TRUSTED_CA_FILE=/etc/kubernetes/pki/ca.crt
ETCD_CERT_FILE=/etc/etcd/pki/etcd_server.crt
ETCD_KEY_FILE=/etc/etcd/pki/etcd_server.key
ETCD_CLIENT_CERT_AUTH=true

# 指定etcd的Peers通信的公钥证书和私钥
ETCD_PEER_TRUSTED_CA_FILE=/etc/kubernetes/pki/ca.crt
ETCD_PEER_CERT_FILE=/etc/etcd/pki/etcd_server.crt
ETCD_PEER_KEY_FILE=/etc/etcd/pki/etcd_server.key
所有节点同步文件kpi文件
| 名称 | 作用 | 子文件 | 备注 |
| /etc/kubernetes/pki | kubernetes ca根证书 | ca.crt ca.key | |
| /etc/etcd | etcd的配置文件和ca证书 | etcd.conf.yml pki | |
| /etc/etcd/pki | etcd的ca证书 | etcd_client.crt etcd_client.csr etcd_client.key etcd_server.crt etcd_server.csr etcd_server.key etcd_ssl.cnf | |
| /var/lib/etcd | 存放数据的文件 | ||
| /usr/bin/etcd | etcd命令 | ||
| /usr/bin/etcdctl | etcdctl命令 | ||
| /usr/lib/systemd/system/etcd.service | systemctl 管理etcd配置文件 |
启动服务
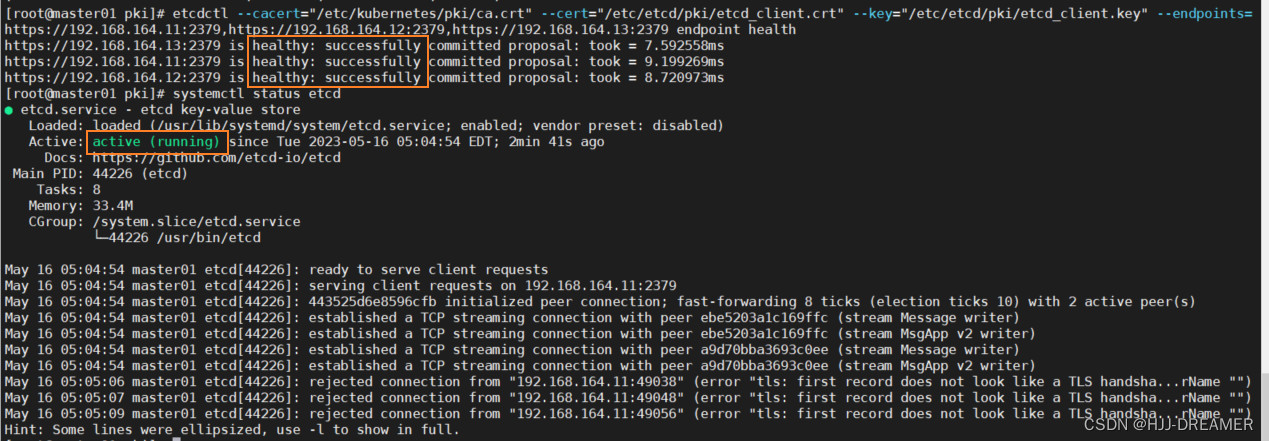
ansible k8sm -m systemd -a "name=etcd state=restarted enabled=yes"检测集群状态
etcdctl --cacert="/etc/kubernetes/pki/ca.crt"
--cert="/etc/etcd/pki/etcd_client.crt"
--key="/etc/etcd/pki/etcd_client.key"
--endpoints=https://192.168.164.11:2379,https://192.168.164.12:2379,https://192.168.164.13:2379 endpoint health -w table
报错:

排除
firewalld是否停止,为disabled?
selinux是否为permission,配置文件是否完成修改?
CA证书创建是否成功,是不是敲错命令,传递错误参数?
etcd_ssl.conf 配置文件,是否成功配置,IP.1 + IP.2 + IP.3 地址是否写全?
CA 证书是否为同一相同文件? 因为只在一台主机上面生成证书,接着传递给其他主机,所以是否成功传递,并保证相同
etcd.conf配置文件是否完成修改,并完成对应的编辑
验证命令是否敲错https非http
网页链接
Introduction - etcd官方文档中文版 (gitbook.io)
二进制安装Kubernetes(k8s) v1.25.0 IPv4/IPv6双栈-阿里云开发者社区 (aliyun.com)


 U8W/U8W-Mini使用与常见问题解决
 QT多线程的5种用法,通过使用线程解决UI主界面的耗时操作代码,防止界面卡死。...
 stm32使用HAL库配置串口中断收发数据(保姆级教程)
 分享几个国内免费的ChatGPT镜像网址(亲测有效)
 Allegro16.6差分等长设置及走线总结