您现在的位置是:首页 >其他 >c++ 常用总结(二)网站首页其他
c++ 常用总结(二)
1.
① 可变参数... 、__VA_ARGS__与##__VA_ARGS__
结论:##__VA_ARGS__中##的作用就是去掉前面多余的,号 ,在使用自定义打印的时候,推荐##__VA_ARGS__而不是__VA_ARGS__
C语言##__VA_ARGS__的用法_fengwang0301的博客-CSDN博客
例1 __VA_ARGS__
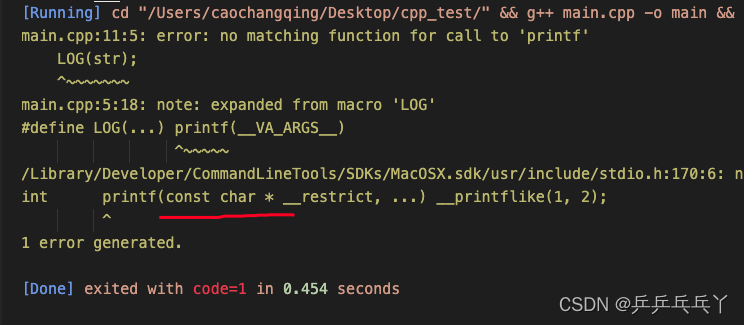
报错如下:
#include <stdio.h>
#include <iostream>

// ...表示可变参数,__VA_ARGS__就是将...的值复制到这里
#define LOG(...) printf(__VA_ARGS__)

int main(){
    std::string str = "BBBBBBBBBB";
    int num = 10086;
    LOG("AAAAAAAAAAAA
");
    LOG(str); // 错误

    return 0;
}
原因是printf()的传参只能是char*类型,我这里给的string类型无法默认转换
修改如下:
#include <stdio.h>
#include <iostream>

// ...表示可变参数,__VA_ARGS__就是将...的值复制到这里
#define LOG(...) printf(__VA_ARGS__)

int main(){
    std::string str = "BBBBBBBBBB";
    int num = 10086;
    LOG("AAAAAAAAAAAA
");
    LOG(str.c_str());

    return 0;
}
又如:
#include <stdio.h>
#include <iostream>

// ...表示可变参数,__VA_ARGS__就是将...的值复制到这里
#define LOG(...) printf(__VA_ARGS__)

int main(){
    std::string str = "BBBBBBBBBB";
    int num = 10086;
    LOG("AAAAAAAAAAAA
");
    LOG("this is test: %s, %d", str.c_str(), num);

    return 0;
}
例2 ##__VA_ARGS__
#include <stdio.h>
#include <iostream>

// <%s:%s> 对应 __FILE__, __FUNCTION__ , format 对应 ##__VA_ARGS__
#define LOG(format, ...) printf("<%s:%s>:" format, __FILE__, __FUNCTION__, ##__VA_ARGS__)

int main(){
    std::string str = "BBBBBBBBBB";
    int num = 10086;
    LOG("AAAAAAAAAAAA
");
    LOG("this is test: %s, %d
", str.c_str(), num);
    LOG();

    return 0;
}
② 智能指针std::shared_ptr
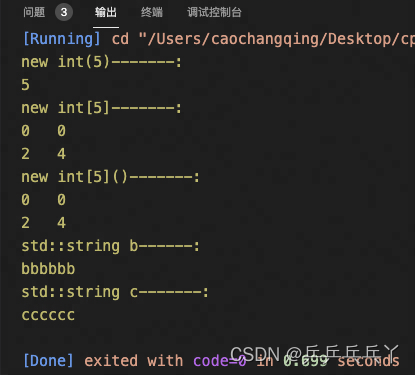
reset()就是把shared_ptr赋空,reset(new Tmp(10))就是把shared_ptr 指向new Tmp(10)。
#include <iostream>

int main(){
    int* a;
    std::cout << "new int(5)-------:
";
    a = new int(5); // 元素
    std::cout << *a << "
";

    std::cout << "new int[5]-------:
";
    a = new int[5]; // 数组(初始未赋值)
    std::cout << *a << "	";
    std::cout << *(a+1) << "
";
    a[0] = 2; // 赋值
    a[1] = 4;
    std::cout << *a << "	";
    std::cout << *(a+1) << "
";
    // a = new int()[5]; // 错,int是类型而不是类

    std::cout << "new int[5]()-------:
";
    a = new int[5](); // 数组(初始未赋值,括号里默认所有元素为0)
    std::cout << *a << "	";
    std::cout << *(a+1) << "
";
    // a = new int[5](2, 4, 6, 8, 10); // error: array 'new' cannot have initialization arguments
    a[0] = 2; // 赋值
    a[1] = 4;
    std::cout << *a << "	";
    std::cout << *(a+1) << "
";

    std::cout << "std::string b------:
";
    std::string b;
    // b = new std::string(); // error: no viable overloaded '='
    // b("aaaa"); // error: type 'std::string' (aka 'basic_string<char>') does not provide a call operator
    b = "bbbbbb";
    std::cout << b << "
";

    std::cout << "std::string c-------:
";
    std::string c("cccccc");
    std::cout << c << "
";

    return 0;
}
(1)智能指针std::shared_ptr 与普通指针的转换
std::shared_ptr 和普通指针的转换_指针转shared_ptr_HosannaX的博客-CSDN博客
 struct test{
      int num;
      string name;
 };

 test* pTest = new test();
 std::shared_ptr<test> ptr_test = std::shared_ptr<test>(pTest); //普通指针转shared_ptr

 std::shared_ptr<test> ptr_test2 = std::make_shared<test>();
 test* pTest2 = ptr_test2.get(); //shared_ptr转普通指针
例1
报错如下:
#include <stdio.h>
#include <iostream>

int main(){
    std::string a = "AAAAA";
    printf(a);

    return 0;
}
修改如下:
#include <stdio.h>
#include <iostream>

int main(){
    char* a = "AAAAA";
    printf(a);

    return 0;
}
例2
#include <stdio.h>
#include <iostream>

int main(){
    std::shared_ptr<char> cptr = std::make_shared<char>('A');
    printf(cptr.get());

    return 0;
}
#include <stdio.h>
#include <iostream>

int main(){
    // 或 std::shared_ptr<std::string> cptr = std::make_shared<std::string>(10, 'A');
    std::shared_ptr<std::string> cptr = std::make_shared<std::string>("AAAAAAAAAAA");
    // 或 std::cout << *cptr.get();
    printf(cptr.get()->c_str());

    return 0;
}
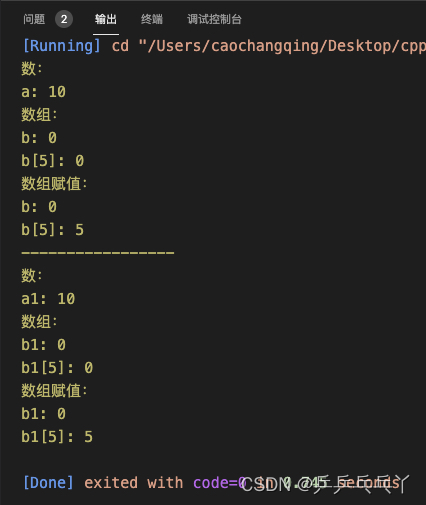
(2)智能指针std::shared_ptr 指向数组
5种创建指向数组的智能指针shared_ptr/unique_ptr的方法_智能指针创建数组_我不是萧海哇~~~~的博客-CSDN博客
#include <iostream>

int main(){
    std::cout << "数:
";
    int* a = new int(10);
    std::cout << "a: " << *a << "
";

    std::cout << "数组:
";
    int* b = new int[10];
    std::cout << "b: " << *b << "
";
    std::cout << "b[5]: " << b[5] << "
";

    std::cout << "数组赋值:
";
    b[0] = 0;
    b[5] = 5;
    std::cout << "b: " << *b << "
";
    std::cout << "b[5]: " << b[5] << "
";

    std::cout << "-----------------
";
    std::cout << "数:
";
    std::shared_ptr<int> a1 = std::make_shared<int>(10);
    std::cout << "a1: " << *a1 << "
";

    std::cout << "数组:
";
    // std::shared_ptr<int> b1 = std::make_shared<>(new int[10]); // 错误
    std::shared_ptr<int> b1(new int[10], std::default_delete<int[]>()); // 创建指向数组的智能指针
    std::cout << "b1: " << *b1 << "
";
    // std::cout << "b1[5]: " << b1[5]; // 错误
    std::cout << "b1[5]: " << b1.get()[5] << "
";

    std::cout << "数组赋值:
";
    b1.get()[0] = 0;
    b1.get()[5] = 5;
    std::cout << "b1: " << *b1 << "
";
    std::cout << "b1[5]: " << b1.get()[5] << "
";

    return 0;
}
#include <iostream>

int main(){
    std::shared_ptr<char> b1(new char[10], std::default_delete<char[]>()); // 创建指向数组的智能指针
    b1.get()[0] = 'h';
    b1.get()[1] = 'a';
    b1.get()[2] = 'p';
    b1.get()[3] = 'p';
    b1.get()[4] = 'y';
    std::cout << "b1: " << b1.get() << "
";

    return 0;
}
③ int main( ) 里的参数 int argc, char* argv[] 的作用
c++中int main ( int argc , char** argv )_c++ int main_啦啦大侠的博客-CSDN博客
- int main () 是一种对主函数的参数缺省的写法,也是我是在学习C++时主要用到的一种写法,自己也很习惯这种写法。
- int main ( int argc , char** argv ) 和 int main ( int argc , char* argv[] ) 是一样的效果和作用。其中argc是在运行编译的程序时:输入参数的个数+ 1(因为要包括程序名,程序名也算是一个参数)。argv则是指向这些参数的指针数组。
#include <iostream>

int main(int argc, char* argv[]){
    printf("argc: %d
", argc);
    for(int i = 0; i < argc; i++){
        printf("argv[%d]: %s
", i, argv[i]);
    }

    return 0;
}
当然,在不缺省参数下,如果用不到参数的话,不给参数也是可以运行的:
#include <iostream>

int main(int argc, char* argv[]){
    printf("test
");

    return 0;
}
④ char*、char[]、string之间的转换
char * 与char []区别总结_char*_bitcarmanlee的博客-CSDN博客
C++中的char,char*,char[]_c++ char*_NeoLy123的博客-CSDN博客
(1)char[]与char*进行转换
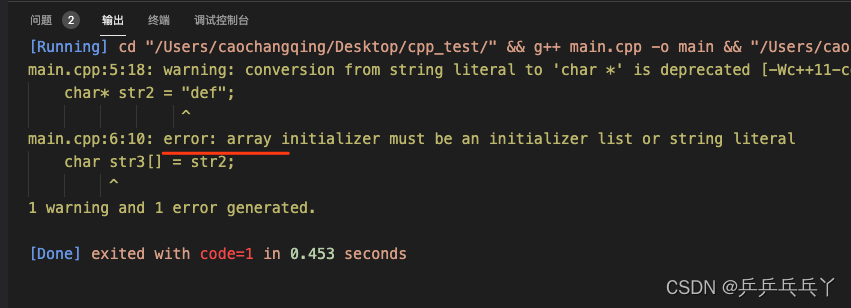
报错如下:
#include <iostream>

int main(){
    // char*转char[]: 字符拷贝实现,不能进行赋值操作
    char* str2 = "def";
    char str3[] = str2;
    printf("str2:%s	str3:%s
", str2, str3);
}
修改如下:
#include <iostream>

int main(){
    // char[]转char*: 直接赋值
    char str[] = "abc";
    char* str1 = str;
    printf("str:%s	str1:%s
", str, str1);

    // char*转char[]: 字符拷贝实现,不能进行赋值操作
    char* str2 = "def";
    char str3[] = "12345";
    std::strncpy(str3, str2, strlen(str2) + 1);  // 注意加1操作
    printf("str2:%s	str3:%s
", str2, str3);
}
(2)char*与string进行转换
#include <iostream>

int main(){
    // char*转string
    char* str = "hello";
    // 赋值转换
    std::string str1 = str;
    // 构造转换
    std::string str2(str, str + strlen(str));
    printf("str:%s	str1:%s	str2:%s
", str, str1.c_str(), str2.c_str());

    // string转char*:赋值转换
    std:: string str3 = "abc";
    // char* str4 = str3.c_str(); // 错误
    char* str4 = const_cast<char*>(str3.c_str());
    printf("str3:%s	str4:%s
", str3.c_str(), str4);
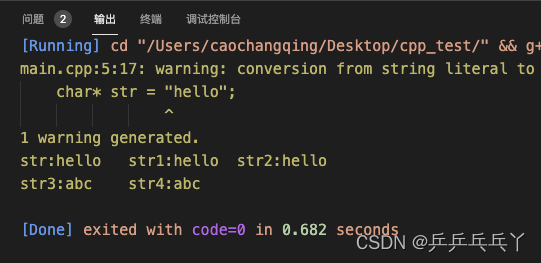
}
(3)char[]与string进行转换
#include <iostream>

int main(){
    // char[]转string
    // 直接赋值
    char str[] = "abc";
    std::string str1 = str;
    // 构造实现
    std::string str2(str, str + strlen(str));
    printf("str:%s	str1:%s	str2:%s
", str, str1.c_str(), str2.c_str());

    // string转char[]:构造实现
    std::string str3 = "12345";
    char str4[] = "qwerty";
    strncpy(str4, str3.c_str(), str3.length() + 1);
    printf("str3:%s	str4:%s
", str3.c_str(), str4);
}
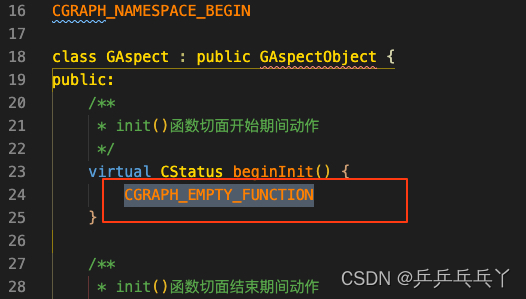
⑤ #define语句后面是否加分号
#define语句后面加分号(转载)_define后面加分号吗_斗转星移3的博客-CSDN博客
所谓#define语句后面一般没有分号的原因在于,将要替换的字符串还原之后,导致还原位置的语句出现问题,因此才使得后面不能有分号。
也就是说,如果替换之后,语法正常,其实是可以的(注意空格问题)。
例1

例2

⑥ 自定义拷贝构造函数
类名::类名 (const 类名 & 对象名)
{
	//拷贝构造函数的函数体
}
我们看到拷贝构造函数的参数有且只有一个:就是同类对象的引用。
这么做的原因有两个:
- 因为调用拷贝构造函数的时候是实参向形参传值,如果传进来的不是引用,那么就是值传递,那么就会在函数里又重新创建一个对象,而重新创建又是通过调用拷贝构造函数,所以如果不是引用的话,就会一直调用下去。
- 调用拷贝构造函数时不需要消耗另外的内存空间。
(1)左值引用T& 与 右值引用T&&
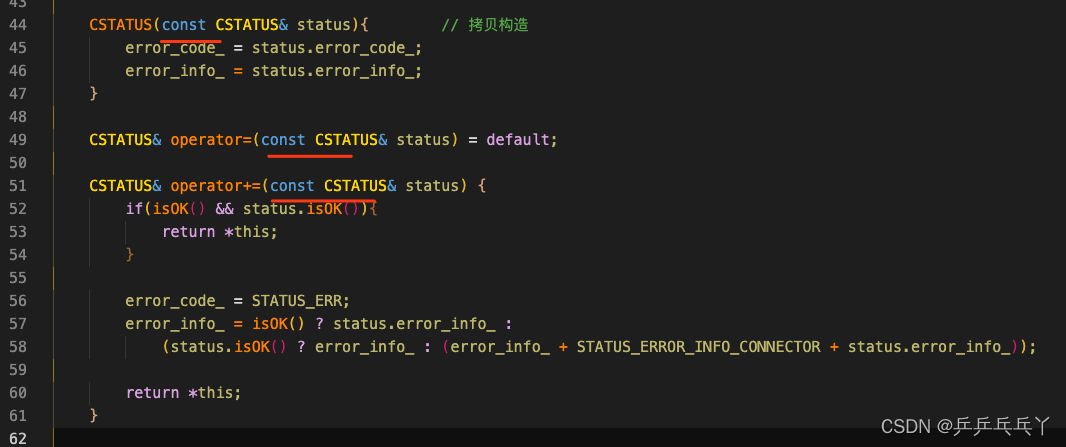
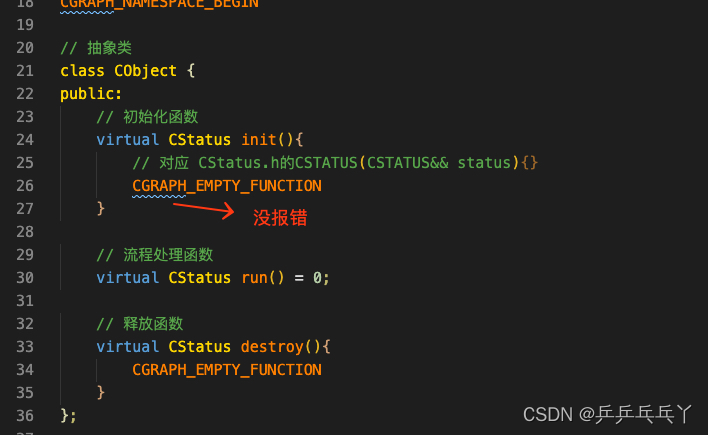
结论:const T& (const不能省略)等价于 T&&
- 左值 lvalue 是有标识符、可以取地址的表达式,最常见的情况有:变量、函数或数据成员的名字返回左值引用的表达式,如 ++x、x = 1、cout << ’ '字符串字面量如 "hello world"在函数调用时,左值可以绑定到左值引用的参数,如 T&。一个常量只能绑定到常左值引用,如 const T&。
- 反之,纯右值 prvalue 是没有标识符、不可以取地址的表达式,一般也称之为“临时对象”。最常见的情况有:返回非引用类型的表达式,如 x++、x + 1、make_shared(42)除字符串字面量之外的字面量,如 42、true。
引入右值引用,就是为了移动语义。移动语义就是为了减少拷贝。std::move就是将左值转为右值引用。这样就可以重载到移动构造函数了,移动构造函数将指针赋值一下就好了,不用深拷贝了,提高性能。
例1
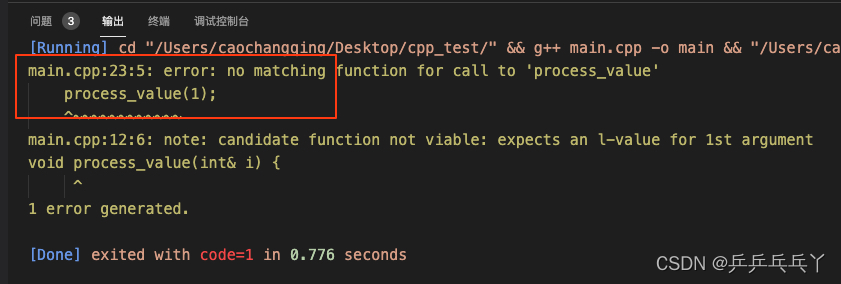
报错如下:
#include <iostream>

void process_value(int& i) {
    std::cout << "左值引用: " << i << std::endl;
}

int main() {
    int a = 0;
    process_value(a);
    process_value(1);  // 报错
}
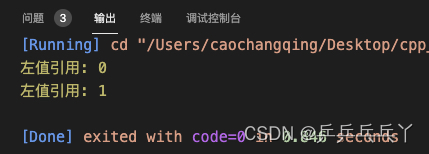
修改如下:
#include <iostream>

void process_value(const int& i) {
    std::cout << "左值引用: " << i << std::endl;
}

int main() {
    int a = 0;
    process_value(a);
    process_value(1);
}
也可修改如下:
#include <iostream>

void process_value(int& i) {
    std::cout << "左值引用: " << i << std::endl;
}

void process_value(int&& i) {
    std::cout << "右值引用: " << i << std::endl;
}

int main() {
    int a = 0;
    process_value(a);  // 左值引用: 0
    process_value(1);  // 右值引用: 1
}
例2
报错如下:
CStatus.h
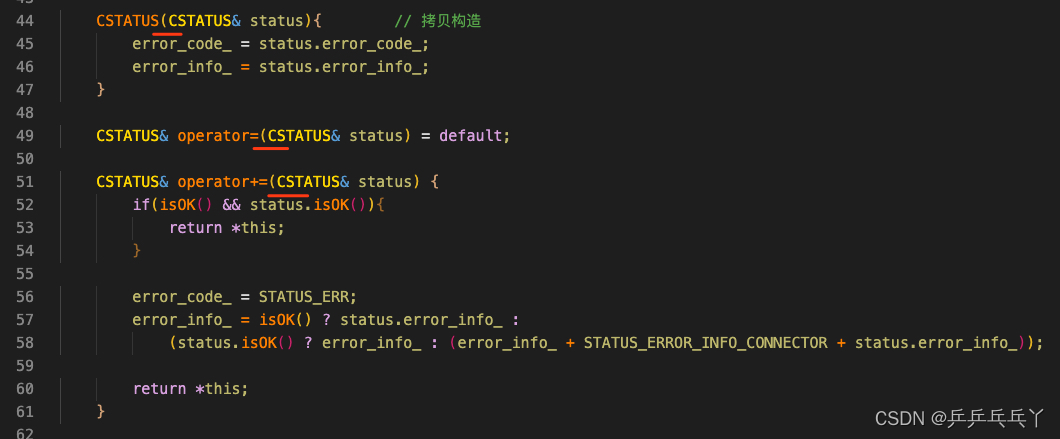
CFuncType.h

CObject.h
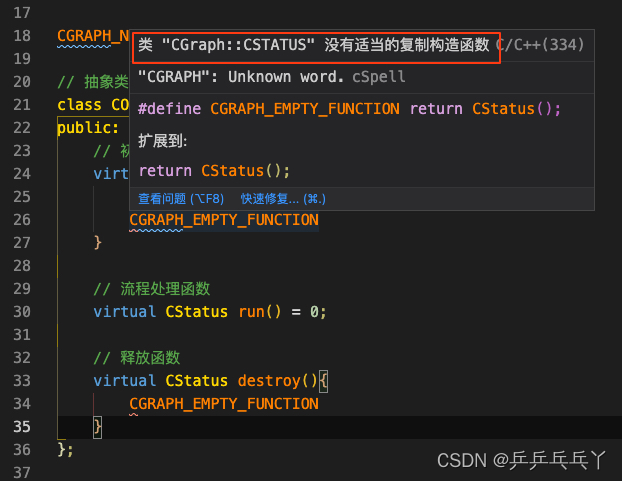
修改如下:
CStatus.h
CObject.h
也可修改如下:
CStatus.h

CObject.h

(2)const引发的报错
例1
对象含有与成员 函数 "CGraph::CSTATUS::isOK" 不兼容的类型限定符 -- 对象类型是: const CGraph::CSTATUS
报错如下:


修改如下:


例2
报错如下:

修改如下:

⑦ .inl文件在c++中的意义
.inl文件从不强制,对编译器没有特别的意义。 这只是一种构build代码的方式,可以为可能读取它的人提供提示。
在两种情况下我使用.inl文件:
- 有关内联函数的定义。
- 有关function模板的定义。
在这两种情况下,我把函数的声明放在一个头文件中,这个文件包含在其他文件中,然后我在头文件的底部包含.inl文件。
我喜欢它,因为它将接口从实现中分离出来,并使头文件更容易阅读。 如果你关心实现细节,你可以打开.inl文件并阅读它。 如果你不这样做,你不需要。
例1
UDistance.h
#ifndef CGRAPH_UDISTANCE_H
#define CGRAPH_UDISTANCE_H

#include "UDistanceObject.h"

CGRAPH_NAMESPACE_BEGIN

/** 传入的类型和计算结果的类型,可能不同。一般默认相同 */
template<typename TSrc, typename TRes = TSrc>
class UDistance : public UDistanceObject {
public:
    /**
     * 计算距离信息
     * @param v1 向量1
     * @param v2 向量2
     * @param dim1 向量1的维度
     * @param dim2 向量2的维度
     * @param result 结果信息
     * @param ext 可扩展信息
     * @return
     */
    virtual CStatus calc(const TSrc* v1, const TSrc* v2, CSize dim1, CSize dim2, TRes& result, CVoidPtr ext) = 0;

    /**
     * 判断入参信息是否符合
     * @param v1
     * @param v2
     * @param dim1
     * @param dim2
     * @param ext
     * @return
     */
    virtual CStatus check(const TSrc* v1, const TSrc* v2, CSize dim1, CSize dim2, CVoidPtr ext);

    /**
     * 将数据归一化
     * @param v
     * @param dim
     * @param ext
     * @return
     */
    virtual CStatus normalize(TSrc* v, CSize dim, CVoidPtr ext);
};

CGRAPH_NAMESPACE_END

#include "UDistance.inl"

#endif //CGRAPH_UDISTANCE_H
UDistance.inl
#ifndef CGRAPH_UDISTANCE_INL
#define CGRAPH_UDISTANCE_INL

#include <cmath>

#include "UDistance.h"

CGRAPH_NAMESPACE_BEGIN

template<typename TSrc, typename TRes>
CStatus UDistance<TSrc, TRes>::check(const TSrc* v1, const TSrc* v2, CSize dim1, CSize dim2, CVoidPtr ext) {
    CGRAPH_FUNCTION_BEGIN
    CGRAPH_ASSERT_NOT_NULL(v1)
    CGRAPH_ASSERT_NOT_NULL(v2)
    if (0 == dim1 * dim2) {
        // 理论上不应该传入 dim=0 向量
        CGRAPH_RETURN_ERROR_STATUS("input dim error")
    }

    CGRAPH_FUNCTION_END
}


template<typename TSrc, typename TRes>
CStatus UDistance<TSrc, TRes>::normalize(TSrc* v, CSize dim, CVoidPtr ext) {
    CGRAPH_FUNCTION_BEGIN

    /** 这里不需要判定v为空的情况,需要的话可以通过开启 needCheck 逻辑来判断 */
    TSrc val = 0;
    for (CSize i = 0; i < dim; i++) {
        val += (v[i] * v[i]);
    }

    const TSrc& denominator = 1 / std::sqrt(val);    // 分母信息
    for (CSize i = 0; i < dim; i++) {
        v[i] = v[i] * denominator;
    }

    CGRAPH_FUNCTION_END
}

CGRAPH_NAMESPACE_END

#endif //CGRAPH_UDISTANCE_INL
⑧ final
该关键字是用来标识虚函数不能在子类中被覆盖(override),或一个类不能被继承。
#include <iostream>

struct Base{
    virtual void foo();
};

struct A : public Base {
    void foo() final;       // Base::foo被覆盖 而 A::foo是最终的覆盖函数
    void bar1();
    // void bar2() final;   // error: only virtual member functions can be marked 'final'
};

struct B final : public A {
    // void foo() override; // error: declaration of 'foo' overrides a 'final' function
};

// struct C : public B {};  // error: base 'B' is marked 'final'

int main(){

    return 0;
}
⑨ 对象初始化 大括号'{ }',等号 '=' ,圆括号 '( )'
使用等号初始化经常会让C++初学者认为会进行一次赋值,但不是那样的。对于内置类型,例如int,初始化和赋值操作的差别是模糊的。但是对于用户定义的类,区分初始化和赋值操作是很重要的,因为这会导致不同的函数调用:
Widget w1;       // 调用默认构造函数

Widget w2 = w1;  // 不是赋值操作,调用拷贝构造函数( Widget w2(w1) )

w1 = w2; // 赋值操作(调用operator=函数)因为初始化的语法很混乱,而且有些情况无法实现,所以C++11提出了统一初始化语法:一种至少在概念上可以用于表达任何值的语法。它的实现基于大括号,所以我称之为大括号初始化。
使用大括号可以更容易的初始化容器列表初始化:std::vector<int> v{1, 3, 5};
大括号也可以用于类内成员的默认初始值,在C++11中,等号”=”也可以实现,但是圆括号 '( )' 则不可以:
class Widget {
  ...
private:
  int x{ 0 };   // x的默认初始值为0
  int y = 0;    // 同上
  int z( 0 );   // 报错
}另一方面,不可拷贝对象(例如,std::atomic)可以用大括号和圆括号初始化,但不能用等号:
std::atomic<int> ai1{ 0 };  // 可以

std::atomic<int> ai2( 0 );  // 可以

std::atomic<int> ai3 = 0; // 报错注意:当大括号初始化用于内置类型的变量时,如果我们初始值存在丢失信息的风险,则编译器将报错:
double ld = 3.14;
int a {ld};    // 报错,存在信息丢失风险
int b (ld); // 正确大括号初始化的另一个值得注意的特性是它会免疫C++中的最让人头痛的歧义。当开发者想要一个默认构造的对象时,程序会不经意地声明个函数而不是构造对象。
Widget w1(10); // 调用Widget的带参构造函数但当你尝试用类似的语法调用无参构造时,你声明了个函数,而不是创建对象:
Widget w2();// 最让人头痛的歧义,声明了一个名为w2,不接受任何参数,返回Widget类型的函数!
Widget w2;  // 正确:w2是个默认初始化的对象
使用大括号包含参数是无法声明为函数的,所以使用大括号默认构造对象不会出现这个问题:
Widget w2{}; // 无歧义我们讲了很多大括号初始化的内容,这种语法可以用于多种场景,还可以避免隐式范围窄化转换,又免疫C++的最让人头痛的歧义问题。一举多得,那么为什么这条款不起名为“用大括号初始化语法替代其他”呢?
大括号初始化的缺点是它有时会显现令人惊讶的的行为。这些行为的出现是因为与std::initializer_list混淆了。在构造函数中,只要形参不带有std::initializer_list,圆括号和大括号行为一致:
class Widget {
public:
  Widget(int i, bool b);
  Widget(int i, double d);
  ...
};

Widget w1(10, true);  // 调用第一个构造函数

Widget w2{10, true};  // 调用第一个构造函数

Widget w3(10, 5.0);   // 调用第二个构造函数

Widget w4{10, 5.0}; // 调用第二个构造函数但是,如果构造函数的形参带有std::initializer_list,调用构造函数时大括号初始化语法会强制使用带std::initializer_list参数的重载构造函数:
class Widget {
public:
  Widget(int i, bool b);
  Widget(int i, double d);
  Widget(std::initializer_list<long double> il);
  ...
};
Widget w1(10, true);   // 使用圆括号,调用第一个构造函数

Widget w2{10, true};   // 使用大括号,强制调用第三个构造函数,10和true被转换为long double

Widget w3(10, 5.0);    // 使用圆括号,调用第二个构造函数

Widget w4{10, 5.0}; // 使用大括号,强制调用第三个构造函数,10和5.0被转换为long double此时此刻,大括号初始化,std::initializer_list,构造函数重载之间的复杂关系在你的大脑中冒泡,你可能想要知道这些信息会在多大程度上关系到你的日常编程。可能比你想象中要多,因为std::vector就是一个被它们直接影响的类。std::vector中有一个可以指定容器的大小和容器内元素的初始值的不带std::initializer_list构造函数,但它也有一个可以指定容器中元素值的带std::initializer_list函数:
// 使用不带std::initializer_list的构造函数
// 创建10个元素的vector,每个元素的初始值为20
std::vector<int> v1(10, 20);

// 使用带std::initializer_list的构造函数
// 创建2个元素的vector,元素值为10和20
std::vector<int> v2 = {10, 20};
⑩ 头文件相互嵌套,提示没有这个类的问题解决方法
这样相互包含的问题,可以用前置声明解决。即:在头文件中声明该类,在实现文件中包含该类。
C++ 前置声明_c++ 前置声明 命名空间_HUSTER593的博客-CSDN博客
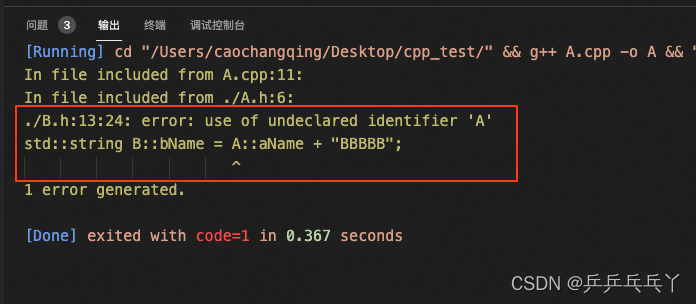
报错如下:
A.h
#ifndef A_H
#define A_H

#include <iostream>

#include "B.h"

class A{
public:
    static std::string aName;
    static std::shared_ptr<B> b;
};

std::string A::aName = "AAAAA";
std::shared_ptr<B> A::b = nullptr;

#endif
B.h
#ifndef B_H
#define B_H

#include <iostream>

#include "A.h"

class B{
public:
    static std::string bName;
};

std::string B::bName = A::aName + "BBBBB";

#endif
A.cpp
#include <iostream>

#include "A.h"

int main(){
    std::cout << A::b->bName;

    return 0;
}
修改如下:
A.h
#ifndef A_H
#define A_H

#include <iostream>

class B;

class A{
public:
    static std::string aName;
    static std::shared_ptr<B> b;
};

std::string A::aName = "AAAAA";
std::shared_ptr<B> A::b = nullptr;

#endif
B.h
#ifndef B_H
#define B_H

#include <iostream>

#include "A.h"

class B{
public:
    static std::string bName;
};

std::string B::bName = A::aName + "BBBBB";

#endif
A.cpp
#include <iostream>

#include "A.h"
#include "B.h"

int main(){
    std::cout << A::b->bName;

    return 0;
}
2.
① 互斥锁与条件变量的结合使用
互斥锁:在多个线程同时访问同一个变量的情况下,保证在某一个时刻只能有一个线程访问。每个线程在访问共享变量的时候,首先要先获得锁,然后才能访问共享变量,当一个线程成功获得锁时,其他变量都会block在获取锁这一步,这样就达到了保护共享变量的目的。
条件变量:用于多线程之间的线程同步。线程同步是指线程间需要按照预定的先后顺序进行的行为,比如我想要线程1完成了某个步骤之后,才允许线程2开始工作,这个时候就可以使用条件变量来达到目的。
(1)互斥锁需要条件变量的原因
以一个生产者消费者的例子来看,生产者和消费者通过一个队列连接,因为队列属于共享变量,所以在访问队列时需要加锁。生产者向队列中放入消息的时间是不一定的,因为消费者不知道队列什么时候有消息,所以只能不停循环判断或者sleep一段时间,不停循环会浪费cpu资源,如果sleep那么要sleep多久,sleep太短又会浪费资源,sleep太长又会导致消息消费不及时。
#include <iostream>
#include <sys/time.h>
#include <unistd.h>
#include <thread>
#include <mutex>
#include <condition_variable>
#include <queue>
#include <random>

uint64_t GetNowUs()
{
    struct timeval tv;
    gettimeofday(&tv, NULL);
    return tv.tv_sec * 1000000 + tv.tv_usec;
}

struct Message
{
    Message(int _id, const std::string& _msg)
        : id(_id), msg(_msg)
    {
        genTime = GetNowUs();
    }

    // 消费消息时打印消息产生时间和消费时间的间隔
    void Consume()
    {
        uint64_t dura = GetNowUs() - genTime;
        std::cout << "ID:" << id << "	dura:" << dura << "	" << msg << std::endl;
    }

    int id;
    uint64_t genTime;
    std::string msg;
};

std::mutex mtx; // 全局互斥锁.
std::queue<Message> msgQueue;

uint32_t GetSleepTime()
{
    static std::random_device rd;
    static std::default_random_engine engine(rd());
    static std::uniform_int_distribution<uint32_t> dist(1, 10);
    return dist(engine);
}

// 生产者每隔一个随机的时间(1~10秒),就会生产一条消息
void DoProduce(int id)
{
    while (true)
    {
        {
            std::unique_lock<std::mutex> lock(mtx);
            msgQueue.push(Message(id, "new message"));
        }
        sleep(GetSleepTime());
    }
}

// 当队列中的消息被消费完,消费者slepp 3秒
void DoConsume()
{
    while (true)
    {
        {
            std::unique_lock<std::mutex> lock(mtx);
            while (!msgQueue.empty())
            {
                msgQueue.front().Consume();
                msgQueue.pop();
            }
        }
        sleep(3);
    }
}

int main()
{
    int num = 4;
    std::thread producers[num];

    std::thread consumer(DoConsume);
    for (int i = 0; i < num; ++i)
    {
        producers[i] = std::thread(DoProduce, i);

    }

    for (int i = 0; i < num; ++i)
    {
        producers[i].join();
    }
    consumer.join();
    return 0;
}
这个时候运行程序的结果可以看出来,有的消息很快就会被消费,有的消息要等3秒才能被消费。这个时候其实我们想要的很简单,就是生产者生产完消息之后,通知一下消费者,这个时候就可以引入我们的条件变量了。
使用条件变量改进后的代码 :
#include <iostream>
#include <sys/time.h>
#include <unistd.h>
#include <thread>
#include <mutex>
#include <condition_variable>
#include <queue>
#include <random>

uint64_t GetNowUs()
{
    struct timeval tv;
    gettimeofday(&tv, NULL);
    return tv.tv_sec * 1000000 + tv.tv_usec;
}

struct Message
{
    Message(int _id, const std::string& _msg)
        : id(_id), msg(_msg)
    {
        genTime = GetNowUs();
    }

    // 消费消息时打印消息产生时间和消费时间的间隔
    void Consume()
    {
        uint64_t dura = GetNowUs() - genTime;
        std::cout << "ID:" << id << "	dura:" << dura << "	" << msg << std::endl;
    }

    int id;
    uint64_t genTime;
    std::string msg;
};

std::mutex mtx; // 全局互斥锁.
std::condition_variable cond; // 全局条件变量.
std::queue<Message> msgQueue;

uint32_t GetSleepTime()
{
    static std::random_device rd;
    static std::default_random_engine engine(rd());
    static std::uniform_int_distribution<uint32_t> dist(1, 10);
    return dist(engine);
}

// 生产者每隔一个随机的时间(1~10秒),就会生产一条消息,生产消息之后通知消费者
void DoProduce(int id)
{
    while (true)
    {
        {
            std::unique_lock<std::mutex> lock(mtx);
            msgQueue.push(Message(id, "new message"));
            cond.notify_one();
        }
        sleep(GetSleepTime());
    }
}

// 消费者消费完之后,等待生产者的通知
void DoConsume()
{
    while (true)
    {
        std::unique_lock<std::mutex> lock(mtx);
        while (!msgQueue.empty())
        {
            msgQueue.front().Consume();
            msgQueue.pop();
        }
        cond.wait(lock);
    }
}

int main()
{
    int num = 4;
    std::thread producers[num];

    std::thread consumer(DoConsume);
    for (int i = 0; i < num; ++i)
    {
        producers[i] = std::thread(DoProduce, i);
    }

    for (int i = 0; i < num; ++i)
    {
        producers[i].join();
    }
    consumer.join();
    return 0;
}
前后对比:
生产者从

到
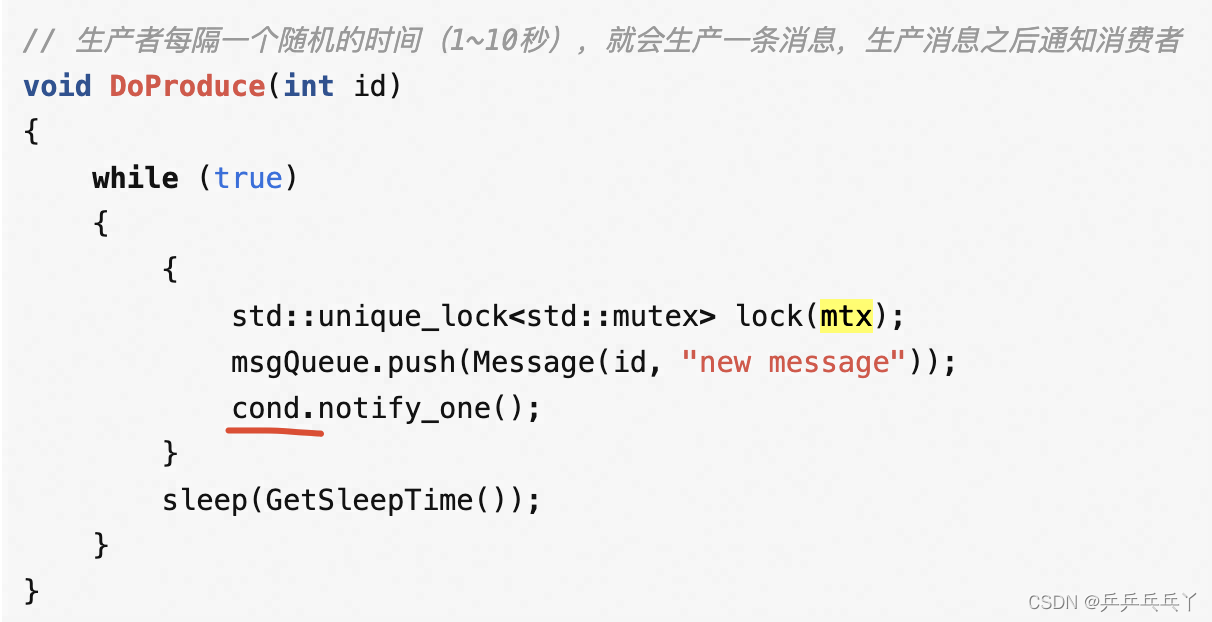
消费者从
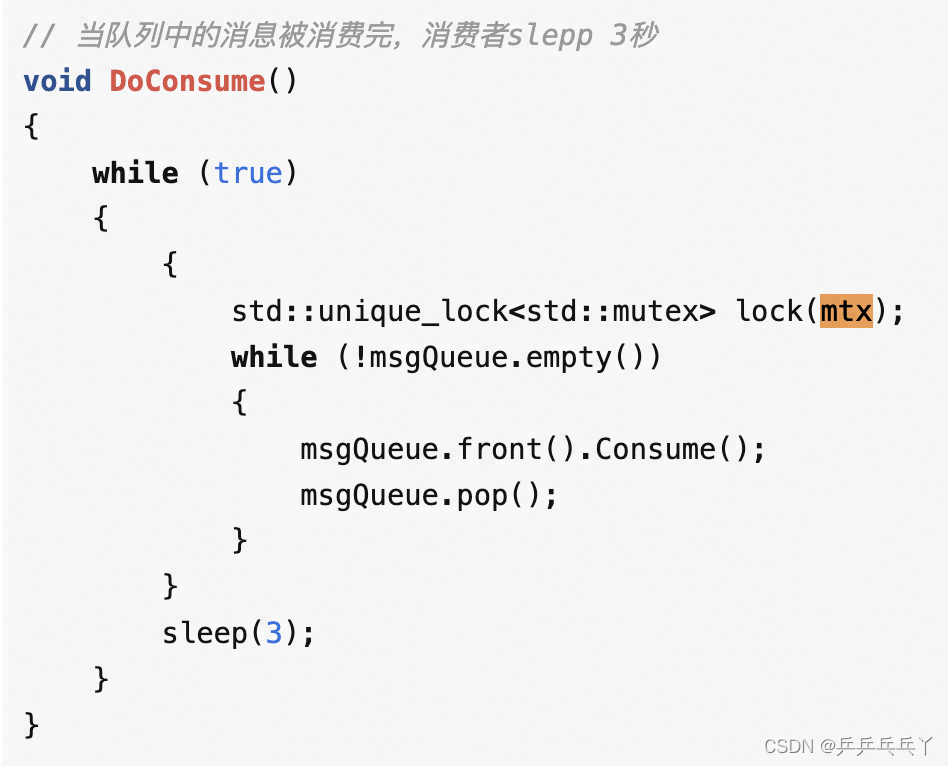
到

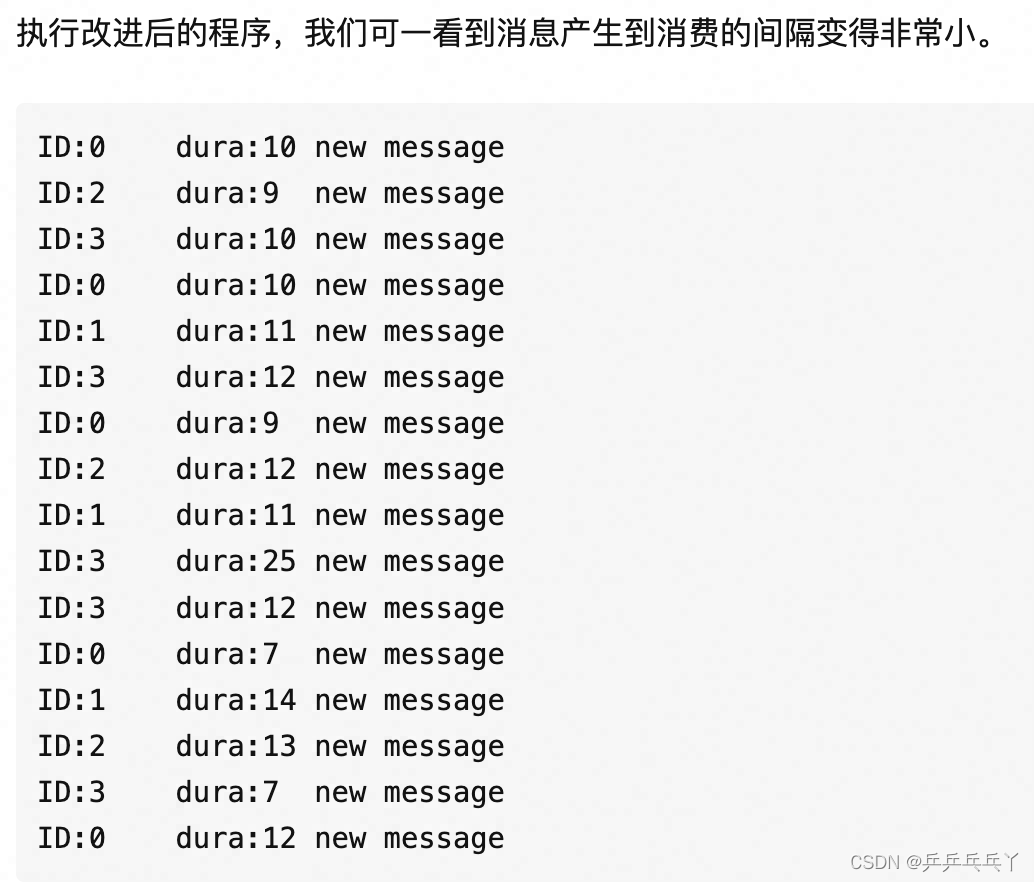
通过上面的示例,我们就可以知道,互斥锁只能保证线程之间的互斥,但是不能保证线程之间的执行顺序,而引入条件变量,就是控制线程之间的执行顺序,以生产者消费者为例,就是生产者生产完消息之后,消费者才去消费消息。而不是消费者盲目的去循环或者sleep。
(2)条件变量需要互斥锁的原因
既然条件变量可以线程之间进行同步,那为什么还要互斥锁呢?也就是为什么条件变量一定要和互斥锁一起使用呢?
就拿上面的例子来说,互斥锁是为了保证队列同一时刻只能被一个线程访问。如果队列换成无锁队列,是不是就不需要互斥锁了呢?
为了解释这个问题,我们假设程序使用的是无锁队列。消费者的逻辑 可以简单分为两步:
- 消费消息直至消费完;
- 执行cond.wait(lock)开始等待下一次通知。
如果有互斥锁的情况下,这两步是原子的,就是在这个过程中是不会有新的消息添加到队列中的。那如果没有互斥锁保护,那么这两步就不是原子的了,比如刚执行完步骤1,生产者在队列里添加了一个消息,生产者添加消息并发送通知之后消费者才开始执行步骤2,这个时候就会导致这个新添加的消息无法及时被消费者消费到。
② 多线程并发
以两个线程并发举例:
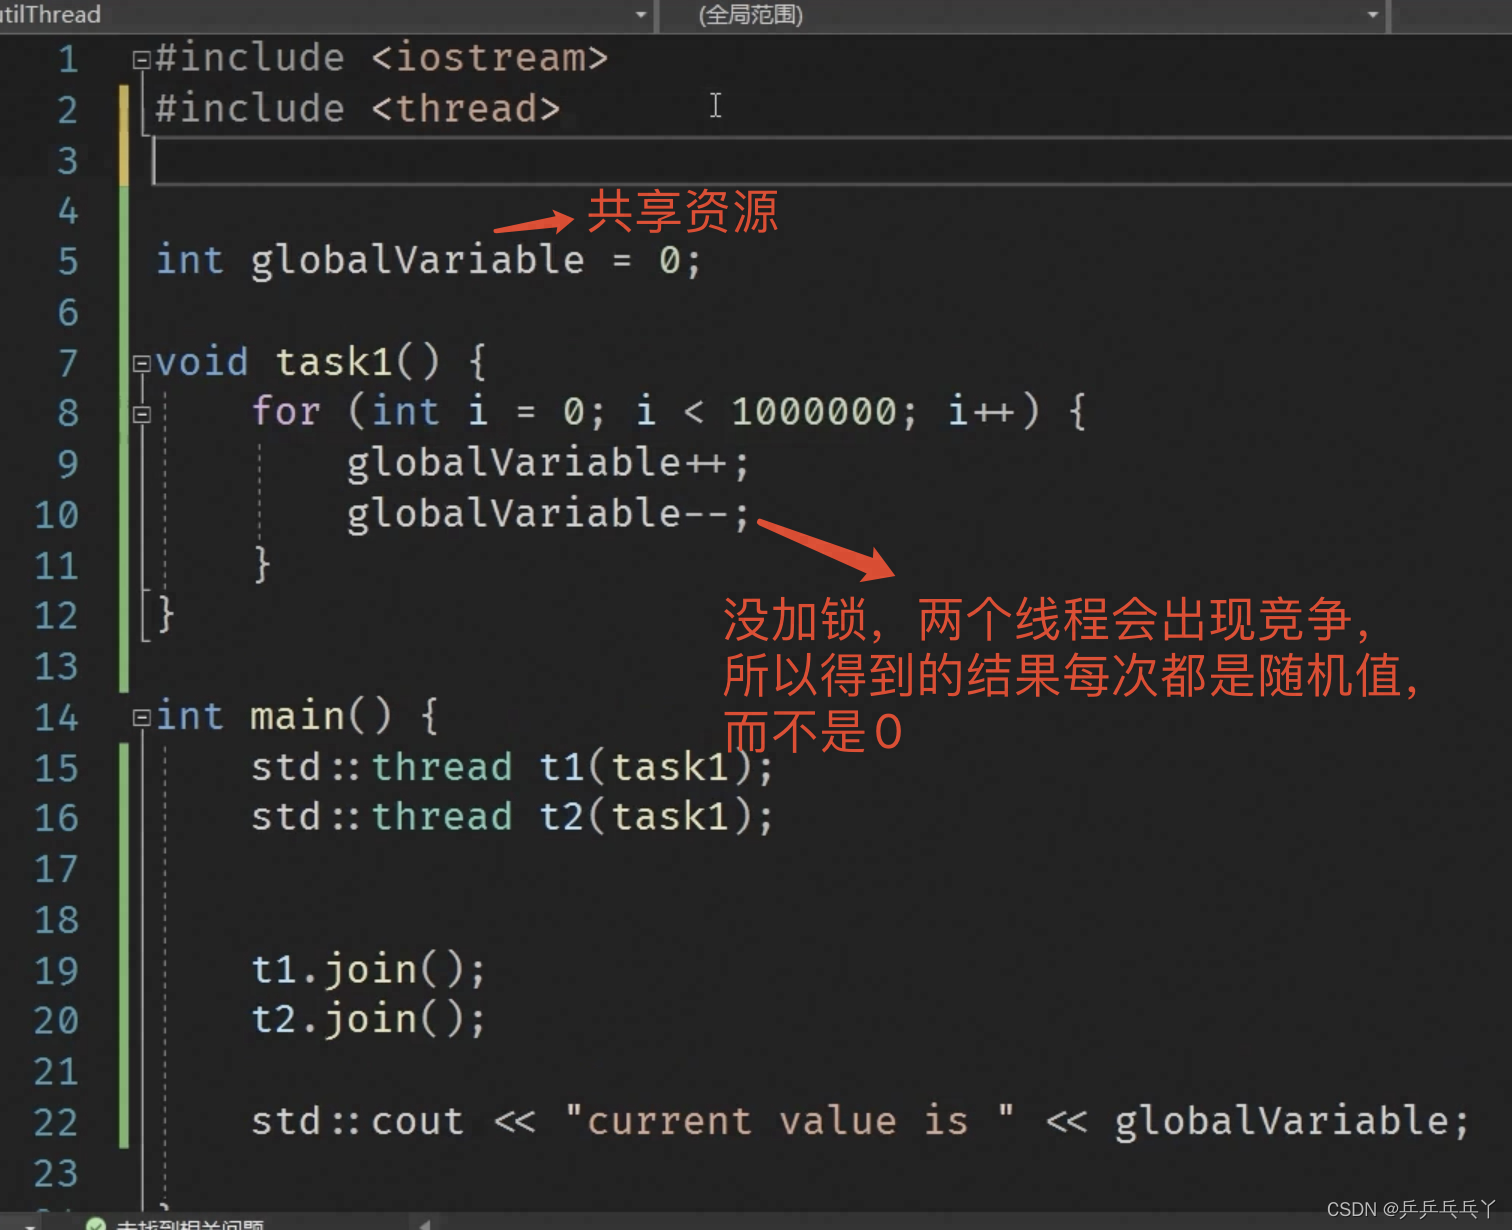
第1次运行结果:

第2次运行结果:

第3次运行结果:

所以想到给共享资源加锁。
(1)互斥量mutex与原子变量atomic
先说结论:mutex一般不单独使用,而是用模板类std::unique_lock()来管理。
#include <iostream>
#include <thread>
#include <mutex>

std::mutex mtx;

int globalV = 0;

void task(){
    for(int i = 0; i < 1000000; i++){
        mtx.lock();
        globalV++;
        globalV--;
        mtx.unlock();
    }
}

int main(){
    std::thread t1(task);
    std::thread t2(task);

    t1.join();
    t2.join();

    printf("globalV = %d", globalV);

    return 0;
}
如上直接加锁,虽然得到的值一直为0了,但是存在线程不安全的问题,如死锁。
以下是会发生死锁的第一种情况:
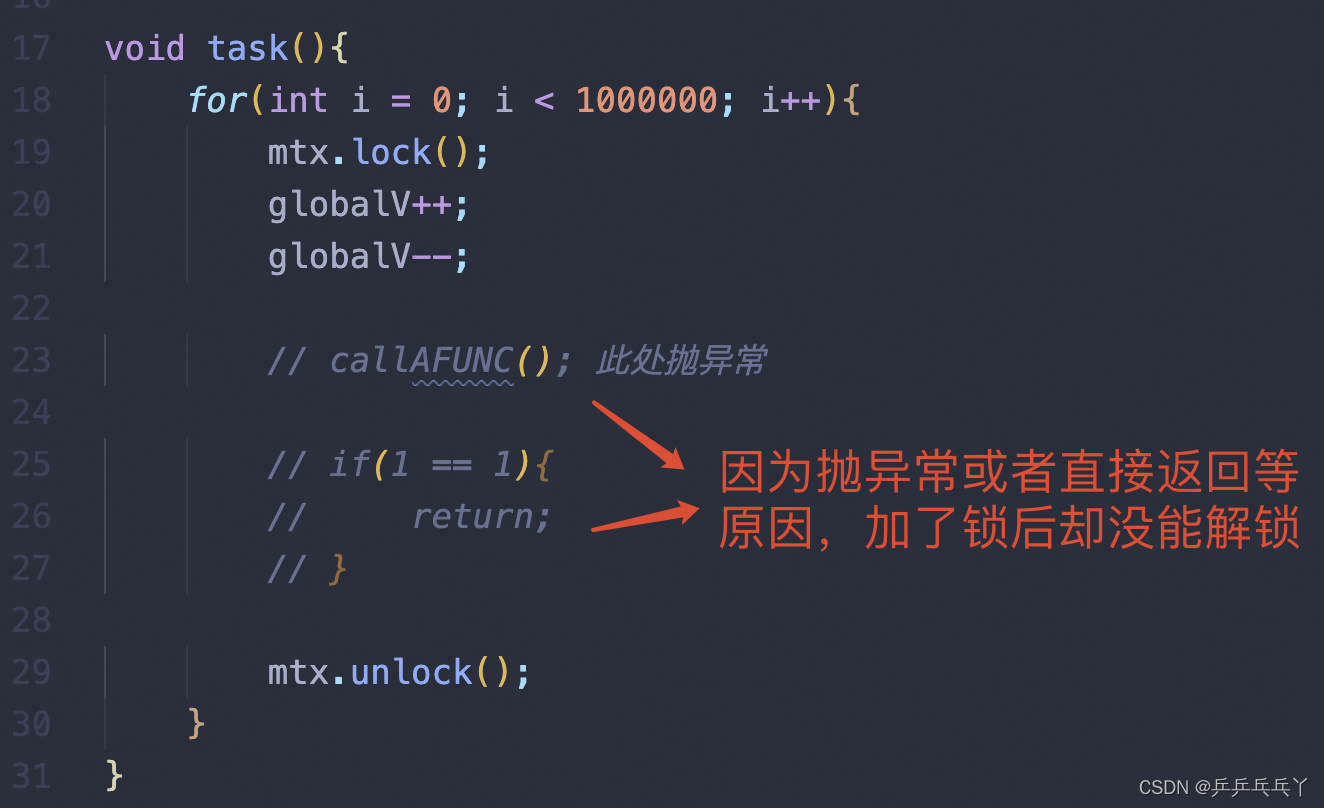
结果是一直运行,卡在那里不会结束。
以下是会出现死锁的第二种情况:
#include <iostream>
#include <thread>
#include <mutex>

std::mutex mtx1;
std::mutex mtx2;

int globalV = 0;

void task1(){
    for(int i = 0; i < 1000000; i++){
        mtx1.lock();
        mtx2.lock();
        globalV++;
        globalV--;
        mtx1.unlock();
        mtx2.unlock();
    }
}

void task2(){
    for(int i = 0; i < 1000000; i++){
        mtx2.lock();
        mtx1.lock();
        globalV++;
        globalV--;
        mtx2.unlock();
        mtx1.unlock();
    }
}

int main(){
    std::thread t1(task1);
    std::thread t2(task2);

    t1.join();
    t2.join();

    printf("globalV = %d", globalV);

    return 0;
}
任务1先申请锁1, 任务2先申请锁2。接着任务1申请锁2,但此时锁2已经任务2被占用着(任务2同理),就出现了死锁。
针对死锁的第一种情况,可以通过模板类std::lock_guard() 来解决(RAII的思想):
解决前:
#include <iostream>
#include <thread>
#include <mutex>

std::mutex mtx;

int globalV = 0;

void task(){
    for(int i = 0; i < 10000000; i++){
        // std::lock_guard<std::mutex> lock(mtx);

        globalV++;
        globalV--;

        if(i == 1000000){
            return;
        }
    }
}

int main(){
    std::thread t1(task);
    std::thread t2(task);

    t1.join();
    t2.join();

    printf("globalV = %d", globalV);

    return 0;
}
第1次运行结果:

第2次运行结果:

第3次运行结果:

解决后:
#include <iostream>
#include <thread>
#include <mutex>

std::mutex mtx;

int globalV = 0;

void task(){
    for(int i = 0; i < 10000000; i++){
        std::lock_guard<std::mutex> lock(mtx);

        globalV++;
        globalV--;

        if(i == 1000000){
            return;
        }
    }
}

int main(){
    std::thread t1(task);
    std::thread t2(task);

    t1.join();
    t2.join();

    printf("globalV = %d", globalV);

    return 0;
}

需注意,std::unique_lock() 比 std::lock_guard() 的优势是前者可以提前控制解锁,以达到控制作用域范围的目的,后者则不行,只能等待自行析构释放。
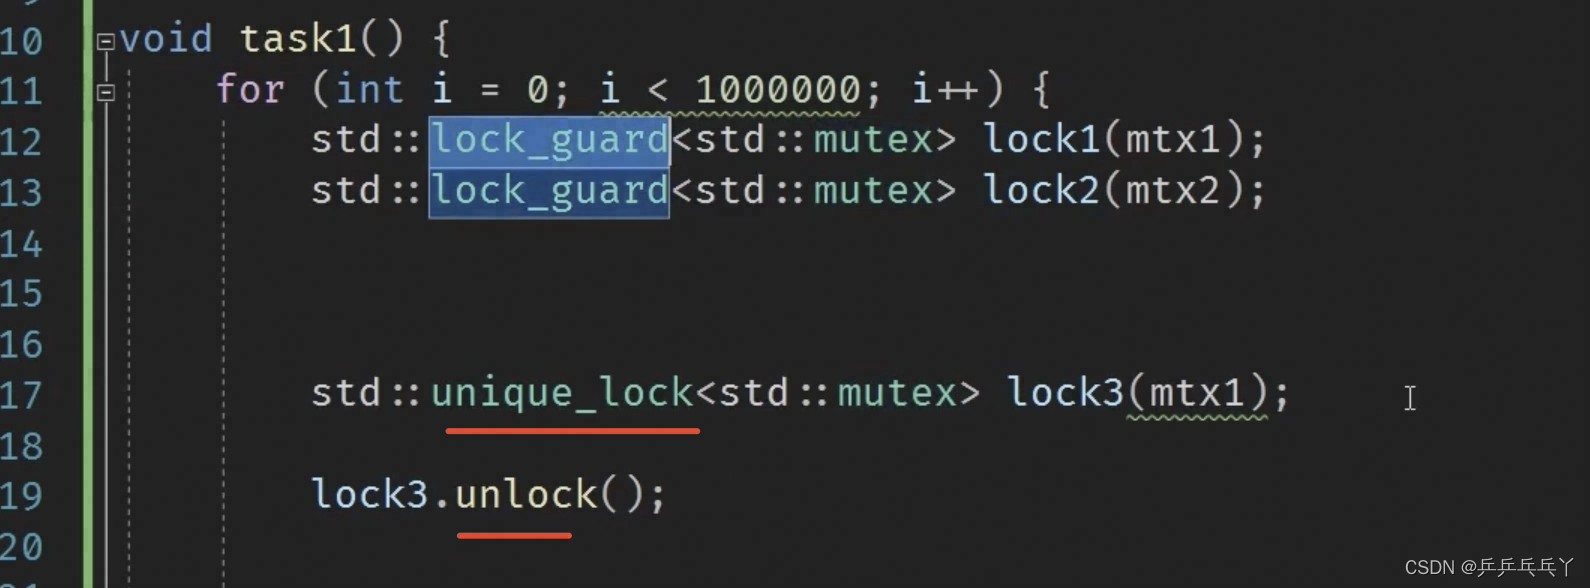
针对死锁的第二种情况,解决方法如下:
任务1与任务2的加锁解锁顺序保持一致
#include <iostream>
#include <thread>
#include <mutex>

std::mutex mtx1;
std::mutex mtx2;

int globalV = 0;

void task1(){
    for(int i = 0; i < 10000000; i++){
        mtx1.lock();
        mtx2.lock();

        globalV++;
        globalV--;

        mtx1.unlock();
        mtx2.unlock();
    }
}

void task2(){
    for(int i = 0; i < 10000000; i++){
        mtx1.lock();
        mtx2.lock();

        globalV++;
        globalV--;

        mtx1.unlock();
        mtx2.unlock();
    }
}

int main(){
    std::thread t1(task1);
    std::thread t2(task2);

    t1.join();
    t2.join();

    printf("globalV = %d", globalV);

    return 0;
}

或者通过std::lock()把多把锁都锁在一起:
#include <iostream>
#include <thread>
#include <mutex>

std::mutex mtx1;
std::mutex mtx2;

int globalV = 0;

void task1(){
    for(int i = 0; i < 10000000; i++){
        std::lock(mtx1, mtx2);

        globalV++;
        globalV--;

        mtx1.unlock();
        mtx2.unlock();
    }
}

void task2(){
    for(int i = 0; i < 10000000; i++){
        std::lock(mtx1, mtx2);

        globalV++;
        globalV--;

        mtx1.unlock();
        mtx2.unlock();
    }
}

int main(){
    std::thread t1(task1);
    std::thread t2(task2);

    t1.join();
    t2.join();

    printf("globalV = %d", globalV);

    return 0;
}

此外,也可以直接用原子操作std::atomic() 来代替 mutex:
#include <iostream>
#include <thread>
#include <atomic>

std::atomic<int> globalV; // 原子操作常用于计数
// std::atomic<int> globalV = 0; // 报错

void task(){
    for(int i = 0; i < 10000000; i++){
        globalV++;
        globalV--;
    }
}

int main(){
    std::thread t1(task);
    std::thread t2(task);

    t1.join();
    t2.join();

    std::cout << globalV;

    return 0;
}
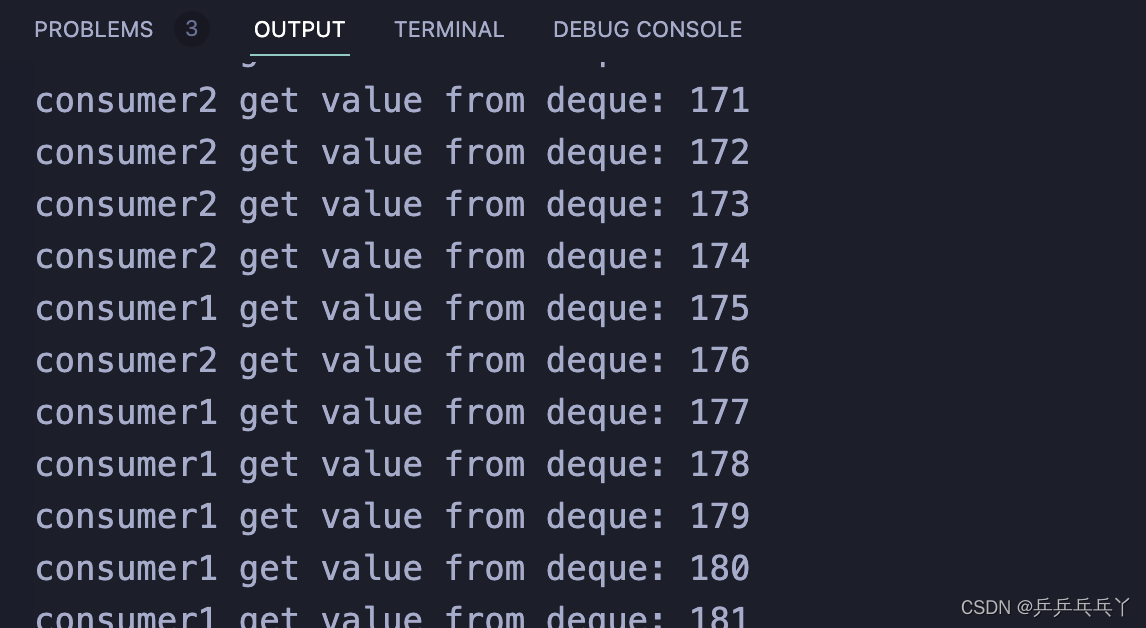
(2)条件变量condition_variable
#include <iostream>
#include <thread>
#include <mutex>
#include <deque>
#include <condition_variable>

std::mutex      mtx;
std::deque<int> dq;
std::condition_variable cv;

void producer(){
    int i = 0;
    while (1){
        std::unique_lock<std::mutex> lock(mtx);

        dq.push_back(i);
        cv.notify_one(); // 唤醒
        if(i < 999){
            i++;
        }else{
            i = 0;
        }
    }
}

void consumer1(){
    int data = 0;
    while (1){
        std::unique_lock<std::mutex> lock(mtx);

        // 用while来避免虚假唤醒
        while (dq.empty()){
            cv.wait(lock); // 休眠
        }
        data = dq.front();
        dq.pop_front();
        printf("consumer1 get value from deque: %d
", data);
    }
}

void consumer2(){
    int data = 0;
    while (1){
        std::unique_lock<std::mutex> lock(mtx);

        while (dq.empty()){
            cv.wait(lock);
        }
        data = dq.front();
        dq.pop_front();
        printf("consumer2 get value from deque: %d
", data);
    }
}

int main(){
    std::thread t1(producer);
    std::thread t2(consumer1);
    std::thread t3(consumer2);

    t1.join();
    t2.join();
    t3.join();

    return 0;
}
(3)future(shared_future)、promise
#include <iostream>
#include <thread>
#include <unistd.h>

void task(int a, int b, int& ret){
    ret = a*b;
}

int main(){
    int ret_ = 0;
    std::thread t(task, 3, 5, std::ref(ret_));

    // sleep(4); // do something
    // ret_是主线程与子线程的共享变量,在不加锁的时候会有问题
    printf("get value: %d
", ret_); // 若不加延时,至此的子线程还没来得及生效,所以ret_尚未改变
    t.join();
    printf("get value: %d
", ret_); // join后,子线程已执行完毕,所以ret_对应子线程的修改结果

    return 0;
}
对比如下:
#include <iostream>
#include <thread>
#include <unistd.h>

void task(int a, int b, int& ret){
    ret = a*b;
}

int main(){
    int ret_ = 0;
    std::thread t(task, 3, 5, std::ref(ret_));

    sleep(4); // do something
    // ret_是主线程与子线程的共享变量,在不加锁的时候会有问题
    printf("get value: %d
", ret_);
    t.join();
    printf("get value: %d
", ret_);

    return 0;
}
以上的ret_是主线程与子线程的共享变量,所以在不加锁的时候会有问题,现通过 mutex与condition_variable 修改如下:
#include <iostream>
#include <thread>
#include <unistd.h>
#include <mutex>
#include <condition_variable>

std::mutex mtx;
std::condition_variable cv;

void task(int a, int b, int& ret){
    std::unique_lock<std::mutex> lock(mtx);
    ret = a*b;
    cv.notify_one();
}

int main(){
    int ret_ = 0;
    std::thread t(task, 3, 5, std::ref(ret_));

    std::unique_lock<std::mutex> lock(mtx);
    cv.wait(lock); // 用条件变量确保子线程完成后,才会往下继续执行

    printf("get value: %d
", ret_);
    t.join();
    printf("get value: %d
", ret_);

    return 0;
}
以上的实现是正确的,也可以用future+promise来实现:
#include <iostream>
#include <thread>
#include <future>

void task(int a, int b, std::promise<int>& p){
    p.set_value(a*b);
}

int main(){
    std::promise<int> p_;
    std::thread t(task, 3, 5, std::ref(p_));

    std::future<int> f = p_.get_future();
    printf("get value: %d
", f.get()); // f.get()只能执行一次
    t.join();

    return 0;
}
再如:
#include <iostream>
#include <thread>
#include <future>
#include <unistd.h>

void task(int a, std::future<int>& b, std::promise<int>& p){
    p.set_value(a*b.get());
}

int main(){
    std::promise<int> p_ret, p_in;
    std::future<int> f_in = p_in.get_future();
    std::thread t(task, 3, std::ref(f_in), std::ref(p_ret));

    sleep(4); // do something
    p_in.set_value(8); // task()的第二个参数不是立即给出,而是等待一段操作后再传入

    std::future<int> f_ret = p_ret.get_future();
    printf("get value: %d
", f_ret.get());
    t.join();

    return 0;
}
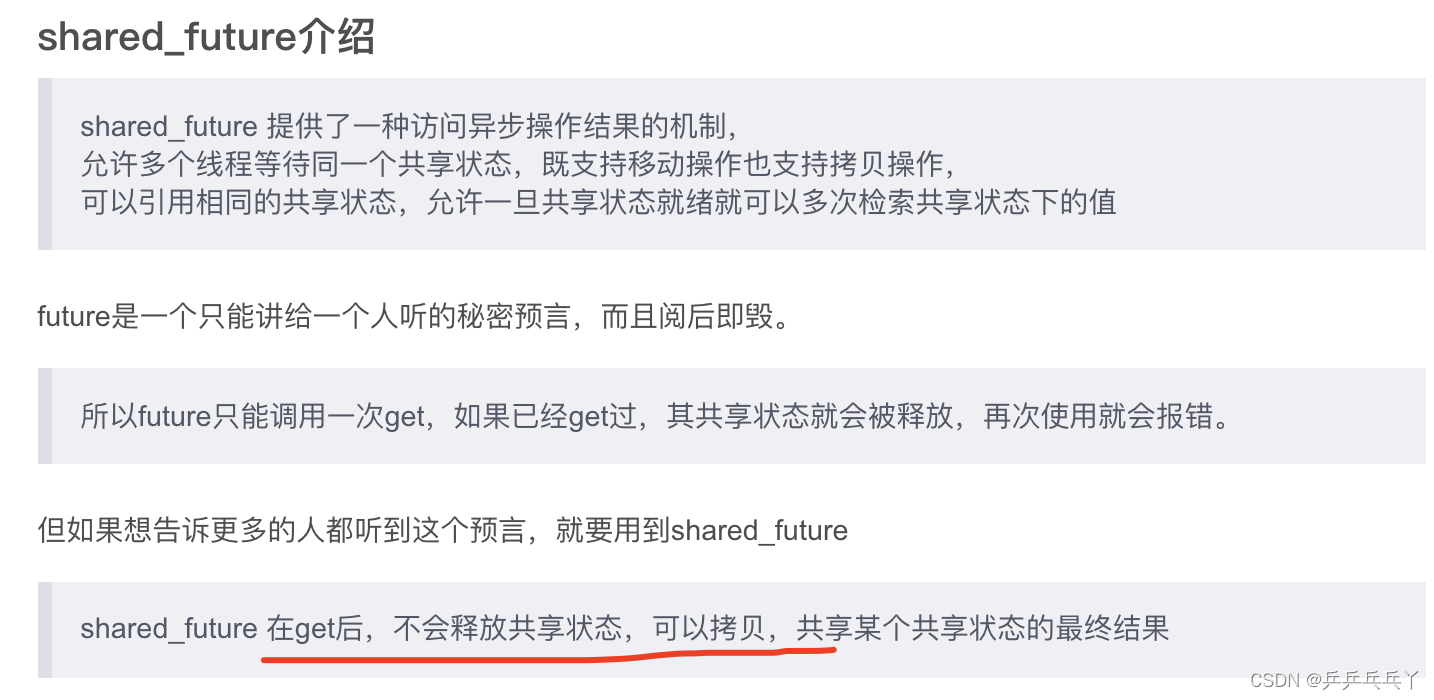
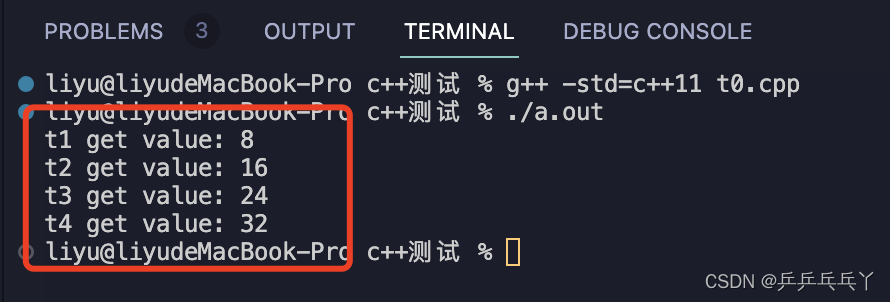
std::shared_future用法:
#include <iostream>
#include <thread>
#include <future>
#include <unistd.h>

void task(int a, std::shared_future<int> b, std::promise<int>& p){
    p.set_value(a*b.get());
}

int main(){
    std::promise<int> p_in, p_ret1, p_ret2, p_ret3, p_ret4;
    std::future<int> f_in = p_in.get_future();
    std::shared_future<int> s_f = f_in.share();

    std::thread t1(task, 1, s_f, std::ref(p_ret1));
    std::thread t2(task, 2, s_f, std::ref(p_ret2));
    std::thread t3(task, 3, s_f, std::ref(p_ret3));
    std::thread t4(task, 4, s_f, std::ref(p_ret4));

    sleep(4); // do something
    p_in.set_value(8); // task()的第二个参数不是立即给出,而是等待一段操作后再传入

    std::future<int> f_ret1 = p_ret1.get_future();
    std::future<int> f_ret2 = p_ret2.get_future();
    std::future<int> f_ret3 = p_ret3.get_future();
    std::future<int> f_ret4 = p_ret4.get_future();
    printf("t1 get value: %d
", f_ret1.get());
    printf("t2 get value: %d
", f_ret2.get());
    printf("t3 get value: %d
", f_ret3.get());
    printf("t4 get value: %d
", f_ret4.get());
    t1.join();
    t2.join();
    t3.join();
    t4.join();

    return 0;
}
(4)std::async
#include <iostream>
#include <thread>
#include <unistd.h>
#include <future>
#include <chrono>

int task(int a, int& b){
    sleep(2);
    b = 8;
    return a*b;
}

int main(){
    auto begin = std::chrono::high_resolution_clock::now();
    int ret = 4;
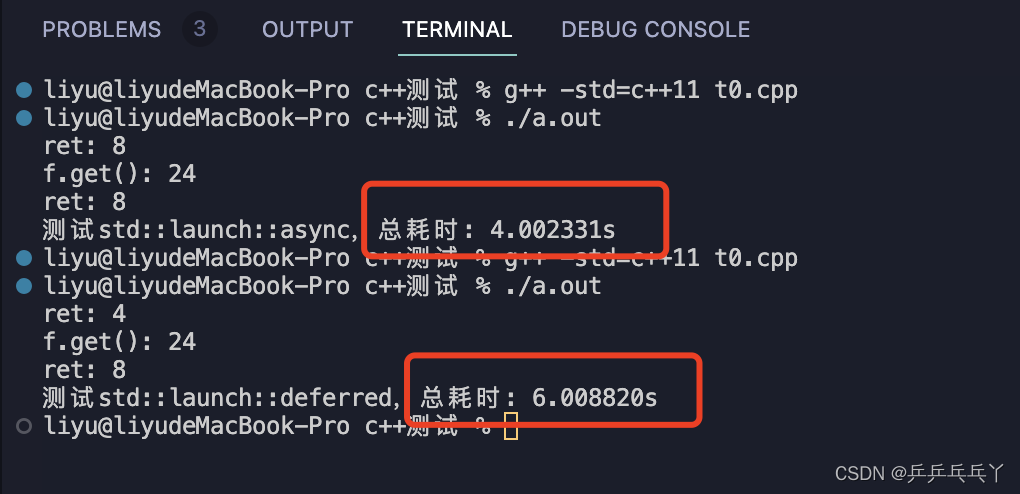
    // std::launch::async会另起线程;std::launch::deferred延迟执行,不会另起线程
    // std::future<int> f = std::async(std::launch::async, task, 3, std::ref(ret));
    std::future<int> f = std::async(std::launch::deferred, task, 3, std::ref(ret));
    sleep(4);
    printf("ret: %d
", ret);
    printf("f.get(): %d
", f.get()); // 阻塞至get()才会执行
    printf("ret: %d
", ret);
    auto end = std::chrono::high_resolution_clock::now();
    std::chrono::duration<float> duration = end - begin;
    // printf("测试std::launch::async,总耗时: %fs
", duration.count());
    printf("测试std::launch::deferred,总耗时: %fs
", duration.count());

    return 0;
}


 U8W/U8W-Mini使用与常见问题解决
 QT多线程的5种用法,通过使用线程解决UI主界面的耗时操作代码,防止界面卡死。...
 stm32使用HAL库配置串口中断收发数据(保姆级教程)
 分享几个国内免费的ChatGPT镜像网址(亲测有效)
 Allegro16.6差分等长设置及走线总结