您现在的位置是:首页 >技术交流 >如何将ASP.NET Core Web API(.net8) 部署为 Windows 服务网站首页技术交流
如何将ASP.NET Core Web API(.net8) 部署为 Windows 服务
在现代企业级应用中,ASP.NET Core Web API常常被部署在Windows服务器上,以提供高效、稳定的Web服务。为了确保Web API能够自动启动、长期运行并在系统重启后能够自启动,将其部署为Windows服务是非常必要的。
本文将详细介绍如何将一个ASP.NET Core Web API应用程序部署为Windows服务,并解决在部署过程中可能遇到的问题。
1. 前提条件
在开始部署之前,确保你的开发环境满足以下要求:
- .NET 8.0 SDK:确保你已经安装了 .NET 8.0 SDK。如果没有安装,可以从 官方站点 下载。
- Visual Studio 2022 或更高版本:用于开发ASP.NET Core应用程序,支持调试、构建以及部署功能。
- Windows Server:我们将在Windows操作系统上进行部署,确保目标机器的Windows版本支持服务部署(Windows 2016及更高版本)。
- WebApi项目:我们假设你已经有一个编写好的ASP.NET Core Web API项目并准备好发布。
2. 修改项目以支持Windows服务
为了让ASP.NET Core应用能够作为Windows服务运行,我们需要做以下几步修改:
2.1 安装必要的NuGet包
首先,需要通过NuGet包管理器安装 Microsoft.Extensions.Hosting.WindowsServices,这个包提供了Windows服务支持。
在项目中打开 NuGet包管理器,搜索并安装如下包:
Microsoft.Extensions.Hosting.WindowsServices或者,你也可以通过命令行来安装:
dotnet add package Microsoft.Extensions.Hosting.WindowsServices2.2 修改 Program.cs 文件
接下来,我们需要在 Program.cs 文件中修改程序的启动代码,以支持将Web API作为Windows服务运行。确保在 CreateHostBuilder 方法中添加对 Windows 服务的支持。
修改后的 Program.cs 文件代码如下:
var builder = WebApplication.CreateBuilder(args);
//添加本地路径获取支持
builder.Services.AddSingleton(new AppSettings(builder.Environment.ContentRootPath));
// 配置端口
builder.WebHost.ConfigureKestrel(options =>
{
    var port = builder.Configuration.GetValue<int>("AppSettings:Port");
    options.ListenAnyIP(port); // 配置程序监听所有 IP 地址的指定端口
});
//配置日志
builder.Logging.AddLog4Net("Log4net.config");
//全局异常过滤
builder.Services.AddControllers(o =>
{
    o.Filters.Add(typeof(GlobalExceptionsFilter));
})
.AddNewtonsoftJson(options =>
{
    options.SerializerSettings.ReferenceLoopHandling = ReferenceLoopHandling.Ignore;
    options.SerializerSettings.ContractResolver = new DefaultContractResolver();
    options.SerializerSettings.DateFormatString = "yyyy-MM-dd HH:mm:ss";
    //options.SerializerSettings.NullValueHandling = NullValueHandling.Ignore;
    options.SerializerSettings.DateTimeZoneHandling = DateTimeZoneHandling.Local;
    options.SerializerSettings.Converters.Add(new StringEnumConverter());
    //将long类型转为string
    //options.SerializerSettings.Converters.Add(new NumberConverter(NumberConverterShip.Int64));
});

// 添加 Windows 服务支持
builder.Host.UseWindowsService();

//添加数据库连接SqlSugar注入支持
builder.Services.AddSqlSugarSetup();
builder.Services.AddSwaggerGen();
builder.Services.AddCorsSetup();//添加 CORS 服务
builder.Services.AddRedisSetup();//注册Redis服务
builder.Host.AddAutofacSetup();//添加Autofac支持
// 配置 HttpClient 服务
builder.Services.AddHttpClient<FileService>(); // 注册 FileDownloadService 并自动注入 HttpClient

#region 启用 Swagger,并加载 XML 注释
builder.Services.AddSwaggerGen(options =>
{
    var xmlFile = $"{Assembly.GetExecutingAssembly().GetName().Name}.xml";
    var xmlPath = Path.Combine(AppContext.BaseDirectory, xmlFile);
    options.IncludeXmlComments(xmlPath, includeControllerXmlComments: true);
});
#endregion

var app = builder.Build();
app.UseSwagger();
app.UseSwaggerUI();
if (app.Environment.IsDevelopment())
{
    app.UseDeveloperExceptionPage();
}
else
{
    app.UseExceptionHandler("/Error");
}

DefaultFilesOptions defaultFilesOptions = new DefaultFilesOptions();
defaultFilesOptions.DefaultFileNames.Clear();
defaultFilesOptions.DefaultFileNames.Add("index.html");
// 启用默认文件(index.html)
app.UseDefaultFiles(defaultFilesOptions);
app.UseStaticFiles();

// 使用 CORS - 必须在其他中间件之前调用
app.UseCors(AppSettings.GetContent("AppSettings", "Cors", "PolicyName"));
app.UseAuthorization();
app.MapControllers();
app.Run();
// 添加 Windows 服务支持
builder.Host.UseWindowsService();
在这个修改中,我们添加了 .UseWindowsService() 方法,这样就能将应用程序作为Windows服务运行。
3. 创建服务安装脚本 (install-service.ps1)
为了方便将Web API应用程序安装为Windows服务,我们可以编写一个 PowerShell 脚本来完成安装过程。
install-service.ps1 脚本内容如下:
# 创建服务安装脚本 install-service.ps1

# 自定义发布路径配置
$customPublishPath = "D:WorkFilepetrelFile"  #需要修改发布路径
$projectName ="PetrelParseFile.Api"  # 替换为你的项目名称
$serviceName  = $projectName
$serviceDescription = "Petrel Web API Service" # 自定义描述信息
# 构建完整的发布路径
$publishPath = Join-Path $customPublishPath "$projectName.exe"

# 确保发布路径存在
if (-not (Test-Path $customPublishPath)) {
    Write-Error "项目路径不存在: $customPublishPath"
    exit 1
}

# 确保发布文件存在
if (-not (Test-Path $publishPath)) {
    Write-Error "发布文件不存在: $publishPath"
    Write-Error "请先运行发布后,在执行此操作:"
    exit 1
}

# 检查服务是否已存在
$existingService = Get-Service -Name $serviceName -ErrorAction SilentlyContinue
if ($existingService) {
    Write-Warning "服务 '$serviceName' 已存在。正在删除..."
    Stop-Service -Name $serviceName -Force -ErrorAction SilentlyContinue
    Remove-Service -Name $serviceName -ErrorAction SilentlyContinue
    Start-Sleep -Seconds 2  # 等待服务完全停止
}

# 创建新服务
try {
    New-Service -Name $serviceName `
                -BinaryPathName $publishPath `
                -DisplayName $serviceName `
                -Description $serviceDescription `
                -StartupType Automatic

    Write-Host "服务 '$serviceName' 安装成功!" -ForegroundColor Green
    Write-Host "发布路径: $publishPath" -ForegroundColor Yellow
    Write-Host "`n可以通过以下命令启动服务:" -ForegroundColor Cyan
    Write-Host "Start-Service $serviceName"
} catch {
    Write-Error "安装服务时出错: $_"
    exit 1
}
在脚本中,你需要根据实际情况替换应用程序的路径。执行这个脚本将把应用程序注册为Windows服务并设置为自动启动。
4. 创建服务卸载脚本 (uninstall-service.ps1)
如果你需要卸载这个服务,可以使用一个卸载脚本来移除服务。
uninstall-service.ps1 脚本内容如下:
 # 创建服务卸载脚本 uninstall-service.ps1
$serviceName = "PetrelParseFile.Api"  #注意 需要修改这个名称

# 检查服务是否存在
$service = Get-Service -Name $serviceName -ErrorAction SilentlyContinue
if ($service) {
    Write-Host "正在停止服务 '$serviceName'..." -ForegroundColor Yellow

    try {
        # 停止服务(如果正在运行)
        if ($service.Status -eq 'Running') {
            Stop-Service -Name $serviceName -Force -ErrorAction Stop
            Write-Host "服务已停止" -ForegroundColor Green
        }

        # 等待服务完全停止
        Start-Sleep -Seconds 2

        # 使用 sc.exe 删除服务
        $result = sc.exe delete $serviceName
        if ($LASTEXITCODE -eq 0) {
            Write-Host "服务 '$serviceName' 已成功卸载!" -ForegroundColor Green
        } else {
            Write-Error "删除服务失败: $result"
            exit 1
        }
    } catch {
        Write-Error "卸载服务时出错: $_"
        exit 1
    }
} else {
    Write-Warning "服务 '$serviceName' 不存在,无需卸载。"
}

# 检查服务是否已经完全删除
$checkService = Get-Service -Name $serviceName -ErrorAction SilentlyContinue
if (-not $checkService) {
    Write-Host "`n卸载完成!" -ForegroundColor Green
} else {
    Write-Error "服务可能未完全删除,请手动检查服务状态。"
}
执行该脚本将停止并删除已安装的服务。
5. 运行
以管理员身份运行 PowerShell,执行脚本:
安装服务脚本
.install-service.ps1 卸载服务脚本
.uninstall-service.ps16. 注意事项
- 权限:确保运行安装和卸载脚本的账户具有足够的权限来安装和管理Windows服务。通常需要管理员权限。
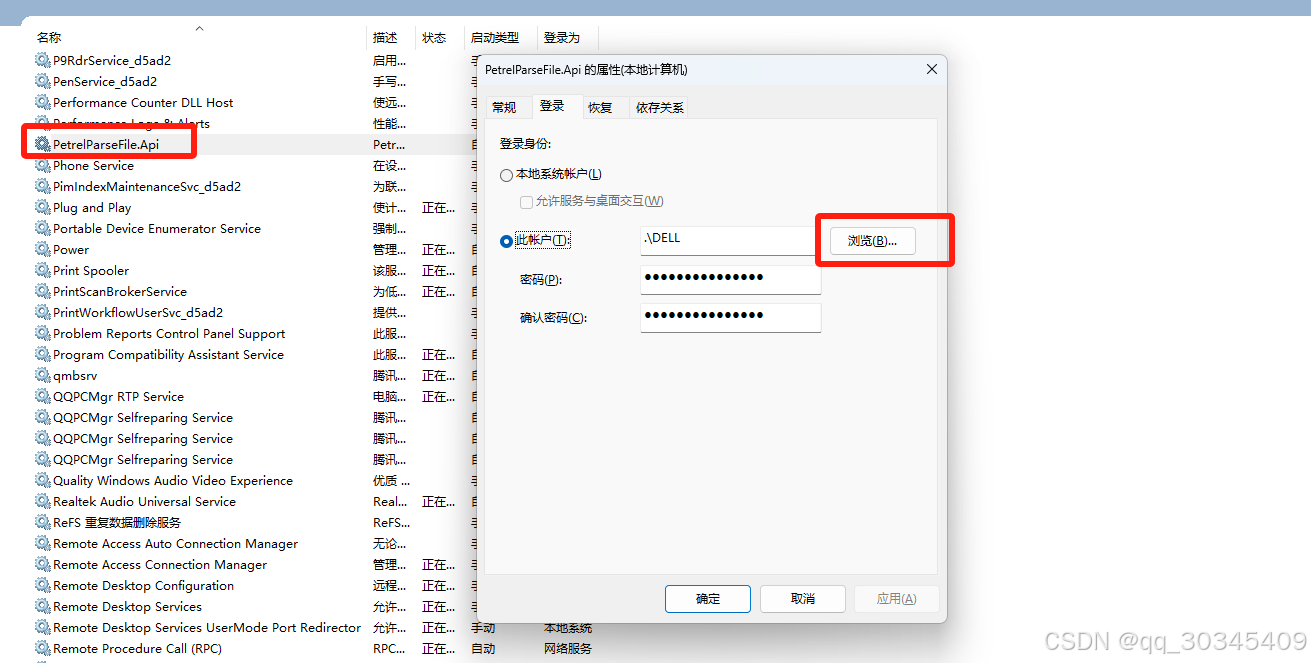
- 服务账户:服务运行时默认使用本地系统账户(LocalSystem),这对于大多数简单的应用程序足够。但是,如果需要更高权限(如访问网络资源),你可能需要指定一个具有相应权限的账户。
- 日志:Windows服务通常不直接输出日志到控制台,建议配置文件中使用日志记录库(例如
Serilog或NLog)将日志输出到文件或Windows事件日志,以便于后期排查问题。 - 防火墙设置:如果API暴露了HTTP端口,需要确保Windows防火墙允许相应端口的流量通过。
总结
将ASP.NET Core Web API部署为Windows服务,能够确保服务在系统重启后自动启动,并且长期稳定运行。通过上述步骤,你可以轻松地将Web API部署为Windows服务,并创建相应的脚本以便自动化部署和管理。
这种方法适用于生产环境中的服务部署,确保了服务的高可用性和稳定性。同时,利用ASP.NET Core的跨平台特性,你的应用也可以在Linux或容器中运行,具有更广泛的部署灵活性。


站长推荐
- QT多线程的5种用法,通过使用线程解决UI主界面的耗时操作代码,防止界面卡死。
 QT多线程的5种用法,通过使用线程解决UI主界面的耗时操作代码,防止界面卡死。...
 - U8W/U8W-Mini使用与常见问题解决
 U8W/U8W-Mini使用与常见问题解决
 - stm32使用HAL库配置串口中断收发数据(保姆级教程)
 stm32使用HAL库配置串口中断收发数据(保姆级教程)
 - 分享几个国内免费的ChatGPT镜像网址(亲测有效)
 分享几个国内免费的ChatGPT镜像网址(亲测有效)
 - Allegro16.6差分等长设置及走线总结
 Allegro16.6差分等长设置及走线总结