您现在的位置是:首页 >技术教程 >前端学习--Vue3.0(1)网站首页技术教程
前端学习--Vue3.0(1)
1使用create-vue搭建Vue3项目
1.1 认识create-vue
create-vue是Vue官方新的脚手架工具,底层切换到了 vite(下一代前端工具链),为开发提供极速响应
create-vue基于vite
vue-cli基于webpack
1.2 创建项目
需要16.0及以上的node.js
npm init vue@latest 创建项目
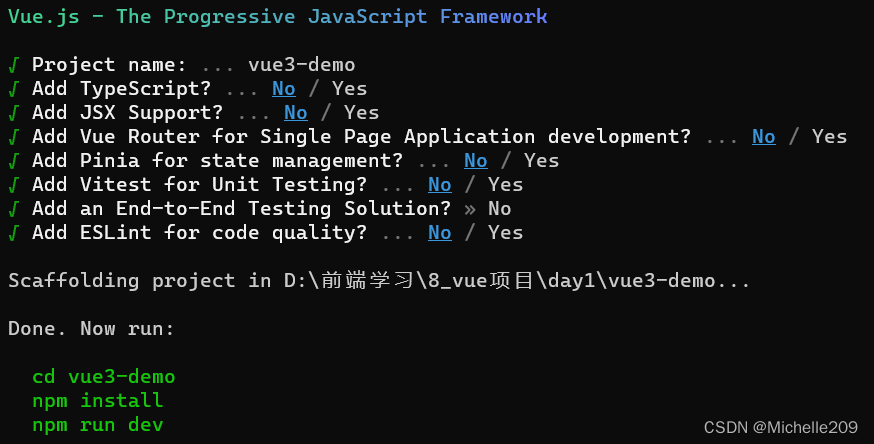
npm i 安装依赖包
npm run dev 运行项目
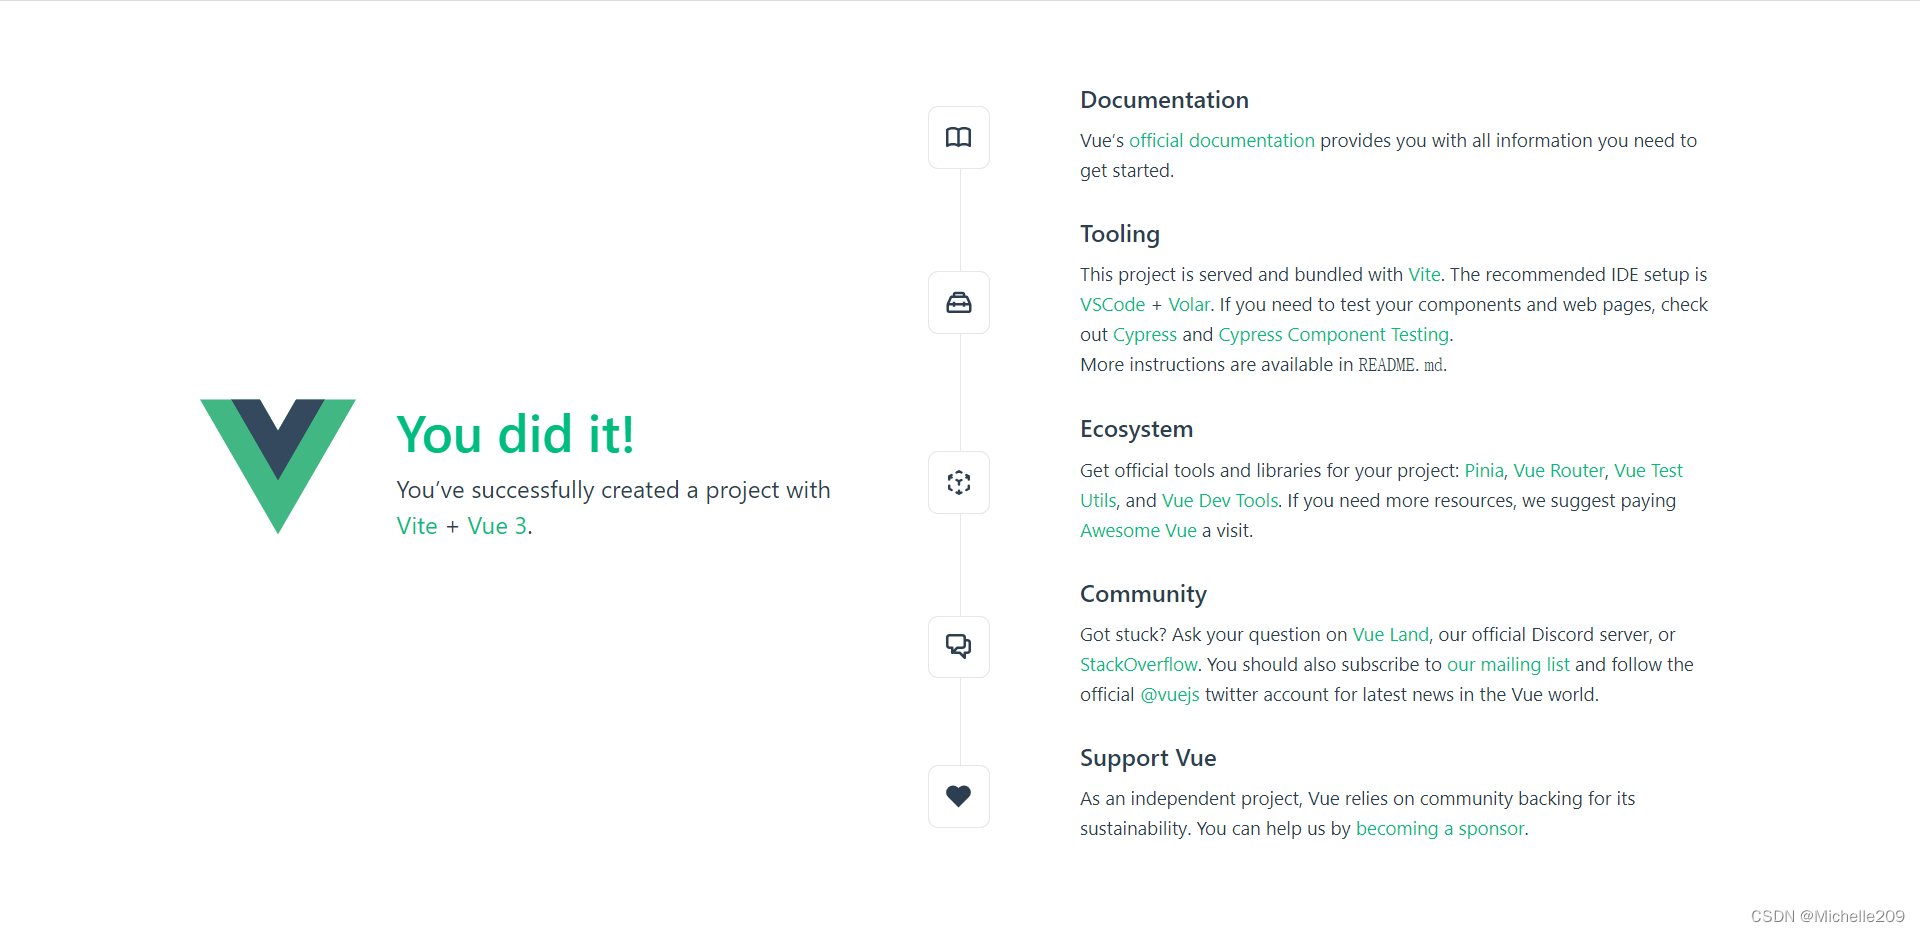
打开浏览器输入地址得到:
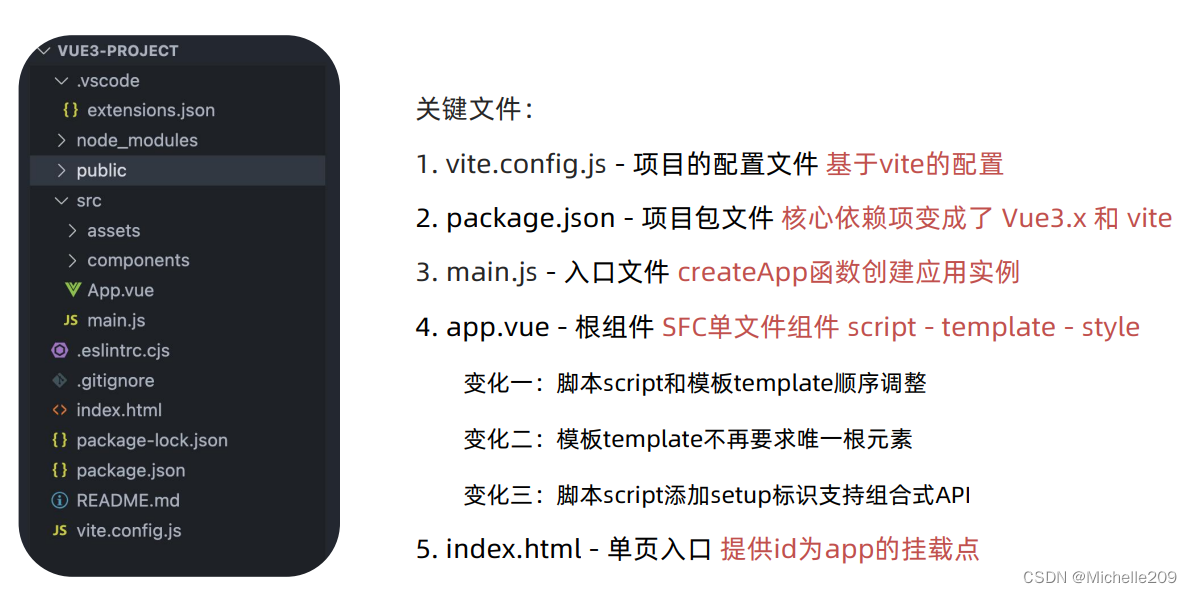
1.3 熟悉项目目录
2 组合式API
2.1 setup选项
--组合式API的入口
执行时机:优先于beforeCreate()
<script>
export default{
  setup(){
    const message = 'this is message'
    //vue3中没有this对象
    const logMessage = () => {
      console.log(message)
    }
    //如果要在模板中使用setup的数据 必须return
    return{
      message,
      logMessage
    }
  },
  beforeCreate(){
    console.log('beforeCreate')
  }
}
</script>

<template>
  <div>
    {{ message }}
    <button @click="logMessage"> log </button>
  </div>
</template>
setup语法糖
--更简易的写法
<script setup>
const message = 'this is message'
    const logMessage = () => {
      console.log(message)
    }
</script>
<template>
  <div>
    {{ message }}
    <button @click="logMessage"> log </button>
  </div>
</template>
2.2 reactive和ref
reactive()
接受对象类型数据的参数传入并返回一个响应式的对象
<script setup>
//导入reactive
import { reactive } from 'vue'

//reactive接收的参数必须是对象
const state = reactive({
  count:0
})

const setCount = () => {
  state.count++
}
</script>

<template>
  <div>
    <button @click="setCount">{{ state.count }}</button>
  </div>

</template>
ref()
接收简单类型或者对象类型的数据传入并返回一个响应式的对象
<script setup>
  import {ref} from 'vue'

  const count = ref(0)
  const setCount = () => {
    //脚本区域修改ref产生的响应式数据必须通过.value访问
    count.value ++
  }
</script>
<template>
  <div>
    <button @click="setCount">{{ count }}</button>
  </div>

</template>
2.3 计算属性函数computed()
<script setup>
import { ref, computed } from 'vue'
const list = ref([1, 2, 3, 4, 5, 6, 7])
const computedList = computed(() => {
  return list.value.filter(item => item > 2)
})

setTimeout(() => {
  list.value.push(9, 10)
},2000)
</script>

<template>
  <div>
    原始数组--{{ list }}
  </div>
  <div>
    计算属性数组-- {{ computedList }}
  </div>
</template>
2.4 watch函数
侦听单个数据
<script setup>
import { ref, watch } from 'vue'
const count = ref(0)
const setCount = () => {
  count.value ++
}

//侦听的数据源,该数据源发生变化时执行的回调函数
//这里ref对象不需要加.value
watch(count, (newVal, oldVal) => {
  console.log('count变化了',newVal, oldVal)
})
</script>

<template>
  <div>
    <button @click="setCount">{{ count }}</button>
  </div>
</template>
侦听多个数据变化
<script setup>
import { ref, watch } from 'vue'
const count = ref(0)
const setCount = () => {
  count.value ++
}

const name = ref('ab')
const setName = () => {
  name.value += 'c'
}

watch([count, name],
([newCount, newName], [oldCount, oldName]) => {
  console.log('变化了',newCount, newName, oldCount, oldName)
})
</script>

<template>
  <div>
    <button @click="setCount">修改{{ count }}</button>
    <button @click="setName">修改{{ name }}</button>
  </div>
</template>
immediate参数
数据创建时首先执行一次
watch(count, (newval, oldval) => {
  console.log('count变化了')
},{
  immediate:true
})
deep参数
watch监听的ref对象默认浅层侦听,直接修改嵌套的对象属性不会触发回调执行,需要开启deep选项
<script setup>
import { ref, watch, reactive } from 'vue'
const count = ref({
  age:0
})
const setCount = () => {
  count.value.age ++
}


watch(count, (newval, oldval) => {
  console.log('count变化了')
}, {
  deep:true
})
</script>

<template>
  <div>
    <button @click="setCount">修改{{ count.age }}</button>
  </div>
</template>
deep会产生性能损耗,不推荐开启
其实我觉得直接用reactive声明对象不就行了嘛...
精确侦听对象中某个属性变化
<script setup>
import { ref, watch, reactive } from 'vue'
const stu = ref({
  name:'zs',
  age:0
})
const addAge = () => {
  stu.value.age ++
}
const setName = () =>{
  stu.value.name = 'ls'
}


watch(
  () => stu.value.age ,
  () => {
  console.log('stu变化了') //只有当age变化才会执行
})
</script>

<template>
  <div>
    <button @click="addAge">修改age{{ stu.age }}</button>
    <button @click="setName">修改name{{ stu.name }}</button>
  </div>
</template>
3 生命周期函数
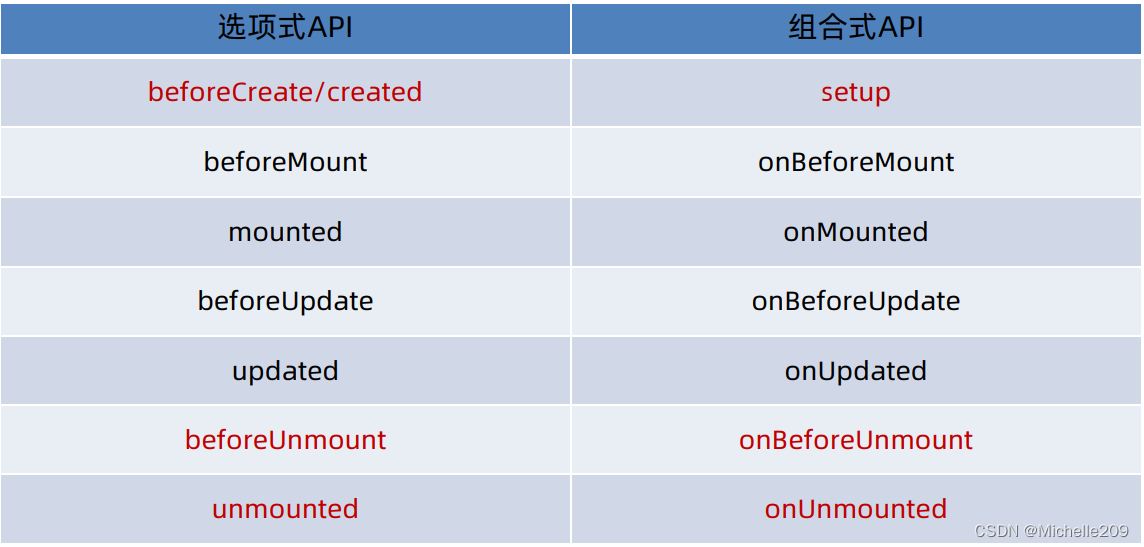
onBeforeMount()
beforeMount()
在这一步中,根元素还不存在。在选项API中,可以使用this.$els来访问
// 选项 API
export default {
   beforeMount() {
     console.log(this.$el)
   }
 }
onBeforeMount()
在组合API中,没有this,必须在根元素上使用ref,此时输出为null
// 组合 API
<template>
  <div ref='root'>
    home page
  </div>
</template>

<script>
import { ref, onBeforeMount } from 'vue'

export default {
  setup() {
     const root = ref(null)
     onBeforeMount(() => {
        console.log(root.value)
     })
     return {
        root
     }
   },
   beforeMount() {
     console.log(this.$el)
   }
}
</script>
onMounted()
在组件的第一次渲染后调用,该元素现在可用,允许直接DOM访问
在 选项API中,我们可以使用this.$el来访问我们的DOM,在组合API中,我们需要使用refs来访问Vue生命周期钩子中的DOM。
<template>
  <div ref='root'>
    home page
  </div>
</template>

<script>
import { ref, onMounted } from 'vue'
 export default {
   setup() {
     const root = ref(null)
     onMounted(() => {
       console.log(root.value)
     })
     return {
       root
     }
   },
   mounted() {
     console.log(this.$el)
   }
 }
</script>
onBeforeUpdate()&onUpdated()
beforeUpdate()&updated()
<template>
    <div>
      <p>{{val}} | edited {{ count }} times</p>
      <button @click='val = Math.random(0, 100)'>Click to Change</button>
    </div>
 </template>


<script>
export default {
   data() {
      return {
        val: 0
      }
   },
   beforeUpdate() {
      console.log("beforeUpdate() val: " + this.val)
   },
   updated() {
      console.log("updated() val: " + this.val
   }
 }
</script>
onBeforeUpdate()&onUpdated()
<template>
  <div>
    <p>{{val}} | edited {{ count }} times</p>
    <button @click='val = Math.random(0, 100)'>Click to Change</button>
  </div>
</template>
<script>
import { ref, onBeforeUpdate, onUpdated } from 'vue'

 export default {
   setup () {
     const count = ref(0)
     const val = ref(0)

     onBeforeUpdate(() => {
       count.value++;
       console.log("beforeUpdate");
     })

     onUpdated(() => {
       console.log("updated() val: " + val.value)
     })

     return {
       count, val
     }
   }
 }
</script>参考:(99条消息) Vue 3 生命周期完整指南_vue3生命周期_@大迁世界的博客-CSDN博客
4 父子通信
4.1 父传子
father.vue
<script setup>
//setup语法糖下导入组件不需要注册直接可以使用
import son from './son.vue'
import {ref} from 'vue'
const count = ref(100)
setTimeout(() => {
    count.value = 200
},3000)

</script>

<template>
  <div class="father">
    <h2>father组件</h2>
    <son :count="count" message="你爸爸的消息"></son>
  </div>
</template>
son.vue
<script setup>
const props = defineProps({
    message:String,
    count:Number
})
</script>

<template>
  <div class="son">
    <h2>son组件</h2>
    <div>
        这是fatherMessage -- {{ message }}--{{ count }}
    </div>
  </div>
</template>
4.2 子传父
son.vue
<script setup>
const emit = defineEmits(['get-message'])
const sendMsg = () =>{
    emit('get-message','this is son message')
}
</script>

<template>
  <div class="son">
    <h2>son组件</h2>
    <div>
        <button @click="sendMsg">发送消息</button>
    </div>
  </div>
</template>
father.vue
<script setup>
import son from './son.vue'
import {ref} from 'vue'
const fatherMsg = ref('')
const getMessage = (msg) => {
    fatherMsg.value = msg
}

</script>

<template>
  <div class="father">
    <h2>father组件--{{ fatherMsg }}</h2>
    <son @get-message="getMessage"></son>
  </div>
</template>
5 模板引用
通过ref标识获取真实的dom对象或者组件实例对象
<script setup>
import { onMounted, ref} from 'vue'
import test from './components/test.vue'

const title = ref(null)
const testcom = ref(null)

onMounted(() => {
  console.log(title.value)
  console.log(testcom.value)
})

</script>

<template>
  <h1 ref="title">我是h1</h1>
  <test ref="testcom"></test>
</template>
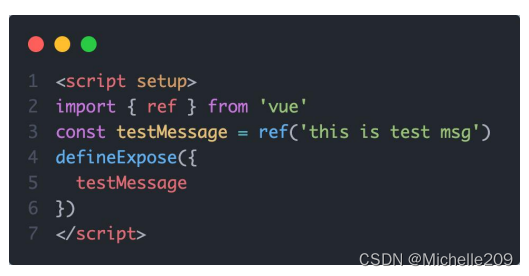
defineExpose()
默认情况下在<script setup>语法糖下组件内部的属性和方法不能被父组件直接获取
defineExpose()编译宏指定哪些属性和方法允许访问
6 provide和inject
顶层组件向任意的底层组件传递数据和方法,实现跨层组件通信
跨层传递数据
father.vue
<script setup>
import son from './son.vue'
import { provide, ref } from 'vue'

provide('data-key', 'this is father data')

//如果要传递响应式数据,把第二个参数改为ref对象即可
const count = ref(0)
provide('count-key', count)

const countAdd = () => {
  count.value ++
}
</script>

<template>
  <div class="father">
    <h2>father组件</h2>
    <button @click="countAdd">+count</button>
    <son></son>
  </div>
</template>
son.vue
<script setup>
import grandson from './grandson.vue'
</script>

<template>
  <div class="son">
    <h2>son组件</h2>
    <grandson></grandson>
  </div>
</template>
grandson.vue
<script setup>
import {inject} from 'vue'
const data = inject('data-key')
const count = inject('count-key')

</script>
<template>
  <h3>grandson组件</h3>
  <div>father来的数据为-- {{ data }} --{{ count }}</div>
</template>
跨层传递方法


 QT多线程的5种用法,通过使用线程解决UI主界面的耗时操作代码,防止界面卡死。...
 U8W/U8W-Mini使用与常见问题解决
 stm32使用HAL库配置串口中断收发数据(保姆级教程)
 分享几个国内免费的ChatGPT镜像网址(亲测有效)
 Allegro16.6差分等长设置及走线总结