您现在的位置是:首页 >技术杂谈 >Spring中Bean对象的作用域和生命周期详解网站首页技术杂谈
Spring中Bean对象的作用域和生命周期详解
Spring作为一个具有众多工具方法的IoC容器,其核心功能就是Bean对象的存储和取出,那么学习Bean对象的作用域和生命周期能让我们更清楚地了解Bean对象在Spring容器中的整个加载过程!
一,案例演示(Bean对象的修改)
假设现在有一个公共的Bean对象(用Student对象来表示),整个Bean对象需要给用户A和用户B使用,但是A在B使用之前对Student类中的属性进行了修改,那么此时B用户从Spring中拿到的Bean对象是否是预期的对象(期望拿到未被修改过的Bean对象)?
公共的Bean对象:
package com.java.demo.entity;

import lombok.Getter;
import lombok.Setter;
import lombok.ToString;

//加上lombok的相关注解减少相关代码量
@Setter
@Getter
@ToString
public class Student {
    //给学生赋予id name 的属性
    private int id;
    private String name;
}
使用Bean方法注解将Bean对象注册到Spring容器中:
package com.java.demo.component;

import com.java.demo.entity.Student;
import org.springframework.context.annotation.Bean;
import org.springframework.stereotype.Component;

/**
 * 使用该类将 Bean 对象注册到 Spring 容器中
 */

@Component
public class StudentBeans {
    @Bean   //使用方法注解将student对象注册到 Spring 容器中
    public Student student() {
        //给student对象相关属性初始化
        //注意这里是伪代码 不涉及与数据库之间的交互
        Student student = new Student();
        student.setId(1);
        student.setName("张三");
        return student;
    }
}
用户A使用并修改Bean对象:
package com.java.demo.controller;

import com.java.demo.entity.Student;
import org.springframework.beans.factory.annotation.Autowired;
import org.springframework.stereotype.Controller;

/**
 * StudentController1 代表用户A
 * A用户使用Bean对象的同时修改了Bean对象
 */

@Controller
public class StudentController1 {
    @Autowired  //使用属性注入的方式
    private Student student;

    public void printStudent1() {
        System.out.println(student);
        //这里对Bean对象进行修改
        Student myStudent = student;
        student.setName("李四");
        System.out.println("student -> " + student.getName());
        System.out.println("myStudent -> " + myStudent.getName());
    }
}
用户B使用Bean对象:
package com.java.demo.controller;

import com.java.demo.entity.Student;
import org.springframework.beans.factory.annotation.Autowired;
import org.springframework.stereotype.Controller;

/**
 * StudentController2 代表用户B
 * 用户B使用Bean对象
 */

@Controller
public class StudentController2 {
    @Autowired  //使用属性注入的方式
    private Student student;

    public void printStudent2() {
        System.out.println("B用户:student -> " + student.getName());
    }
}
创建启动类进行测试:
package com.java.demo;

import com.java.demo.controller.StudentController1;
import com.java.demo.controller.StudentController2;
import org.springframework.context.ApplicationContext;
import org.springframework.context.support.ClassPathXmlApplicationContext;

public class App {
    public static void main(String[] args) {
        //获取 Spring 上下文对象
        ApplicationContext context = new ClassPathXmlApplicationContext("spring-config.xml");

        //用户A
        //从 Spring 容器中获取 Bean 对象
        StudentController1 studentController1 = context.getBean("studentController1",StudentController1.class);
        //使用 Bean 对象
        studentController1.printStudent1();

        //用户B
        //从 Spring 容器中获取 Bean 对象
        StudentController2 studentController2 = context.getBean("studentController2",StudentController2.class);
        //使用 Bean 对象
        studentController2.printStudent2();
    }
}

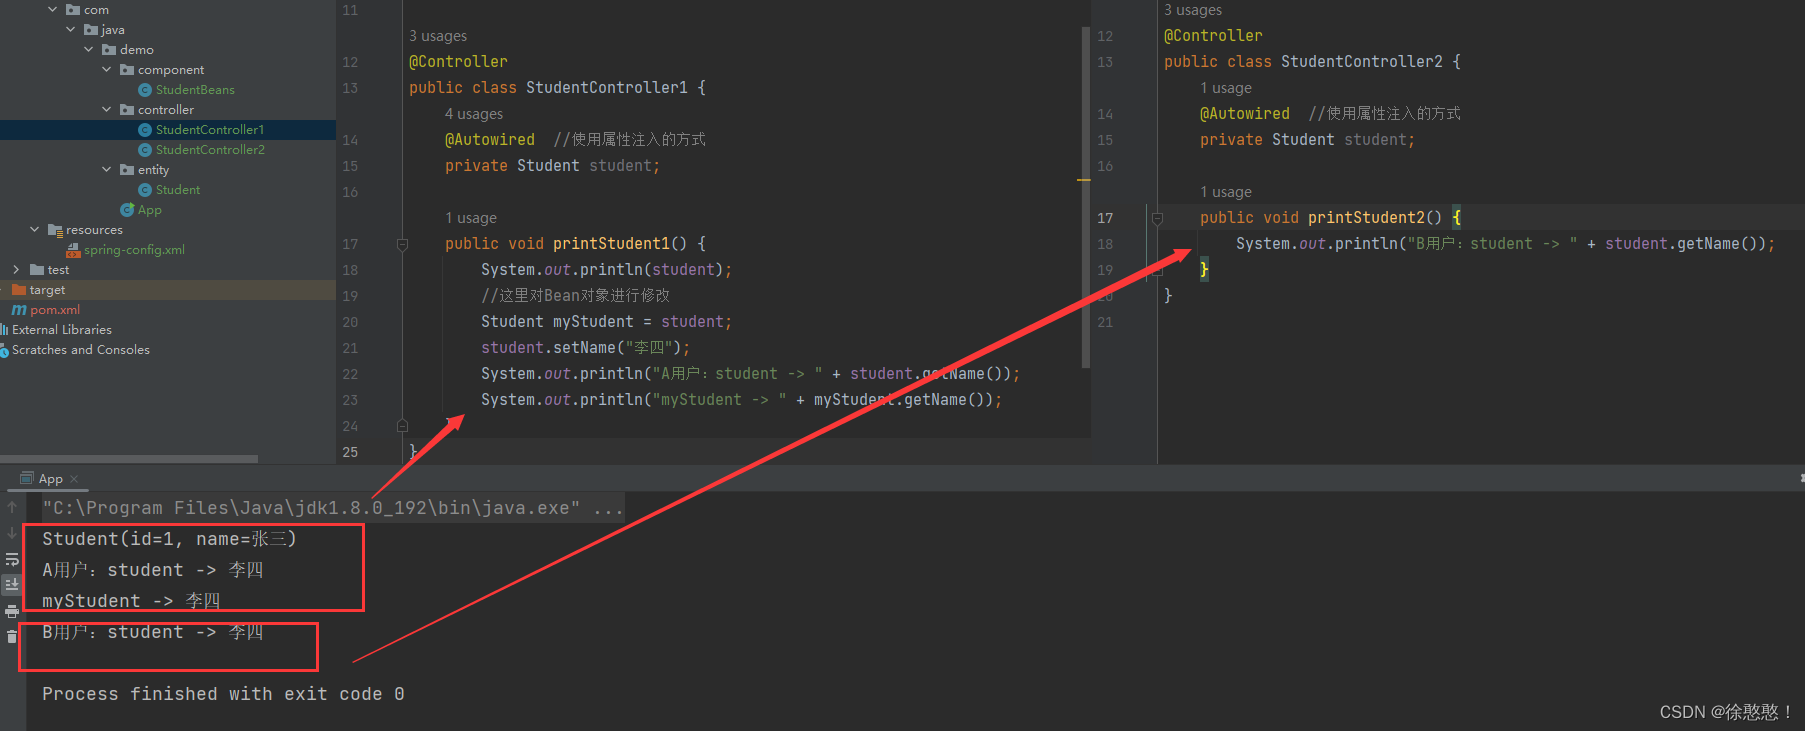
我们预期的结果用户B得到的结果应该是一开始注册到Spring容器中的Bean对象(即name应该是张三),但是结果打印的却是李四,说明此时用户B得到的Bean对象是用户A修改之后的;这是因为在默认不加任何条件控制的情况下,Spring认为Bean对象是一个单例的对象,只有一份,在这个工程中的任何操作都是对同一个Bean对象在操作,这也就是Bean对象作用域的一种——单例模式!
二,Bean对象的作用域
定义:限定程序中变量的可⽤范围叫做作⽤域,或者说在源代码中定义变量的某个区域就叫做作⽤域;⽽ Bean 的作⽤域是指 Bean 在 Spring 整个框架中的某种⾏为模式,⽐如 singleton 单例作⽤域,就 表示 Bean 在整个 Spring 中只有⼀份,它是全局共享的,那么当其他⼈修改了这个值之后,那么另⼀ 个⼈读取到的就是被修改的值。
Bean对象作用域的分类:
Spring容器在初始化一个Bean的实例时,同时会指定该实例的作用域;Spring有6中作用域,最后四种是基于Spring MVC生效的:
- singleton:单例作用域;
- prototype:原型作用域(多例作用域);
- request:请求作用域;
- session:会话作用域;
- application:全局作用域;
- webSocket:HTTP WebSocket作用域.
singleton 默认情况,出于对性能的考虑 prototype 与单例模式相对,俗称多例模式 request 每次HTTP请求都会创建一个 Bean 对象 session 每次Session会话就会共享一个 Bean 对象
application 一个http servlet context 中共享一个 Bean 对象 webSocket 网络长连接
三,设置作用域(@Scope)
Spring中一般使用@Scope 注解来声明Bean的作用域,对上述案例进行修改,将Bean对象的作用域改成prototype,使得用户B读取到的Bean对象是一开始注册到Spring容器中的未进行修改的对象
@Component
public class StudentBeans {
    @Bean   //使用方法注解将student对象注册到 Spring 容器中
    @Scope(ConfigurableBeanFactory.SCOPE_PROTOTYPE) //声明Bean对象的作用域
    public Student student() {
        //给student对象相关属性初始化
        //注意这里是伪代码 不涉及与数据库之间的交互
        Student student = new Student();
        student.setId(1);
        student.setName("张三");
        return student;
    }
}
这两种方法均可!

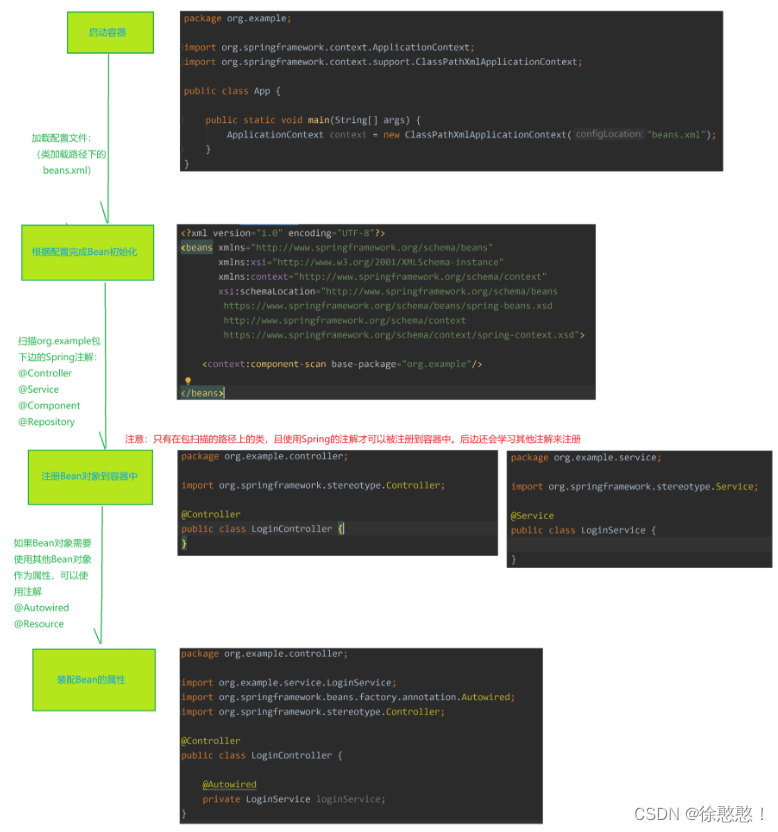
四,Spring(Bean)的执行流程

执行流程:spring的执行流程也是Bean的执行流程
- 启动 Spring 容器
- 实例化 Bean(分配内存空间,从无到有)
- 将 Bean 注册到 Spring 容器中(存操作)
- 将 Bean 装配到需要的类中(取操作)
五,Bean的生命周期
- 实例化 Bean(开辟内存空间)
- 设置属性(注入属性)
- 初始化
- 各种通知
- 初始化前置方法
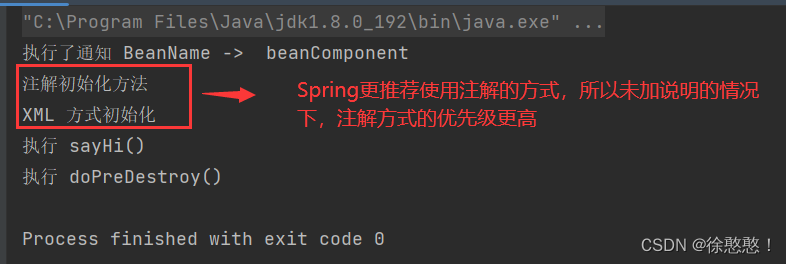
- 初始化方法(两种实现方式:XML方式,注解方式)
- 初始化后置方法
- 使用B ean 对象
- 销毁 Bean 对象
注意:这里的实例化并不等于初始化,实例化是操作系统完成的,操作过程不可人工干预和修改;而初始化是给开发者提供的,在实例化之后进行初始化!
生命周期的演示:
BeanCompoent:
package com.java.demo.component;

import org.springframework.beans.factory.BeanNameAware;

import javax.annotation.PostConstruct;
import javax.annotation.PreDestroy;

public class BeanComponent implements BeanNameAware {

    @Override
    public void setBeanName(String s) {
        System.out.println("执行了通知 BeanName ->  " + s);
    }

    public void myInit() {
        System.out.println("XML 方式初始化");
    }

    @PostConstruct
    public void doPostConstruct() {
        System.out.println("注解初始化方法");
    }

    public void sayHi() {
        System.out.println("执行 sayHi()");
    }

    @PreDestroy
    public void doPreDestroy() {
        System.out.println("执行 doPreDestroy()");
    }
}
启动类App:
package com.java.demo;

import com.java.demo.component.BeanComponent;
import org.springframework.context.support.ClassPathXmlApplicationContext;

public class App {
    public static void main(String[] args) {
        //1.获取 Spring 上下文对象
        ClassPathXmlApplicationContext context = new ClassPathXmlApplicationContext("spring-config.xml");
        //2.获取 Bean 对象
        BeanComponent beanComponent = context.getBean("beanComponent", BeanComponent.class);
        //3.使用 Bean 对象
        beanComponent.sayHi();
        context.destroy();
    }
}


 QT多线程的5种用法,通过使用线程解决UI主界面的耗时操作代码,防止界面卡死。...
 U8W/U8W-Mini使用与常见问题解决
 stm32使用HAL库配置串口中断收发数据(保姆级教程)
 分享几个国内免费的ChatGPT镜像网址(亲测有效)
 Allegro16.6差分等长设置及走线总结