您现在的位置是:首页 >技术交流 >SpringBoot手册网站首页技术交流
SpringBoot手册
简介SpringBoot手册
目录
依赖管理
- 每个刚创建的 SpringBoot 项目的 pom 文件都有
spring-boot-starter-parent依赖,然后它还有一个父依赖spring-boot-dependencies spring-boot-dependencies决定了 SpringBoot 项目的依赖版本,但是如果不遵循也是可以的,可以自己导入新的依赖版本- 如果遵循 SpringBoot 的版本,引入相应的依赖的时候,依赖的坐标就可以不标明版本号了
关于各种的 start 依赖
- 导入这些 start 依赖,就是导入了和这个 start 依赖 有关的组件的所有相关依赖,然后再通过 SpringBoot 的自动配置,做到开箱即用
关于自动配置
- 自动配置主要看 启动类 的注解
@SpringBootApplication,其中最主要的是注解@EnableAutoConfiguration,这个注解又包含@AutoConfigurationPackage、@Import(AutoConfigurationImportSelector.class) @AutoConfigurationPackage包含@Import(AutoConfigurationPackages.Registrar.class),其中AutoConfigurationPackages.Registrar.class的作用就是得到 启动类 所在的包路径,然后扫描包路径下的所有 类 ,该添加到容器的添加,不该添加的忽略@Import(AutoConfigurationImportSelector.class)的关键就是AutoConfigurationImportSelector.class,这个类是实现自动配置的主要入口,主要的逻辑顺序是org.springframework.boot.autoconfigure.AutoConfigurationImportSelector#getCandidateConfigurations>org.springframework.core.io.support.SpringFactoriesLoader#loadFactoryNames>org.springframework.core.io.support.SpringFactoriesLoader#loadSpringFactories- 经过上面的调用步骤,最终关键的就是
classLoader.getResources("META-INF/spring.factories"),所以实现自动配置,就是扫描引入依赖的类路径下的spring.factories中的内容,这个文件中的类容就是各种配置类
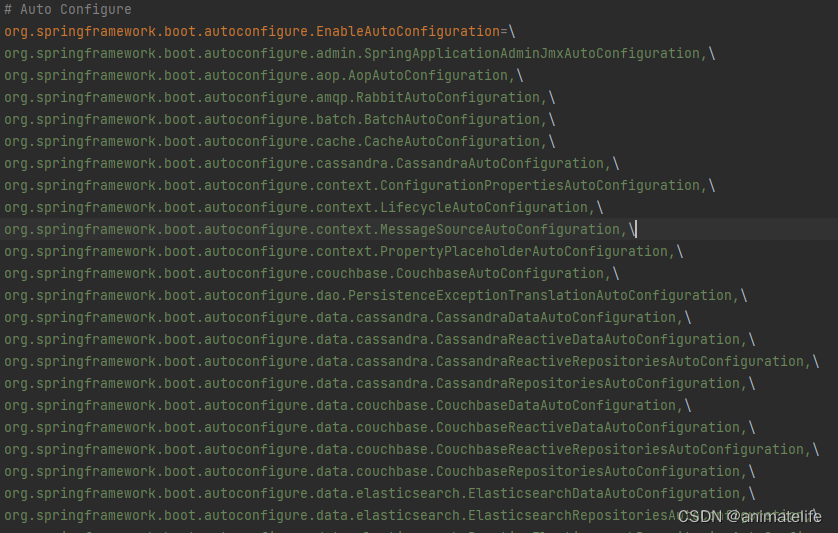
- 随便点开一个自动配置类,就会发现各种
@Bean、@Conditional、@EnableConfigurationProperties、@ConditionalOnMissingBean...,这些注解就是自动配置的关键,满足条件就会注册到容器中,并且还会带默认的配置,这就是开箱即用,约定大于配置
关于约定大于配置中的配置
- 前面已经知道自动配置的来源就是各种自动配置类,以 SpringMVC 的相关的自动配置类 WebMvcAutoConfiguration 为例,可以观察到类似
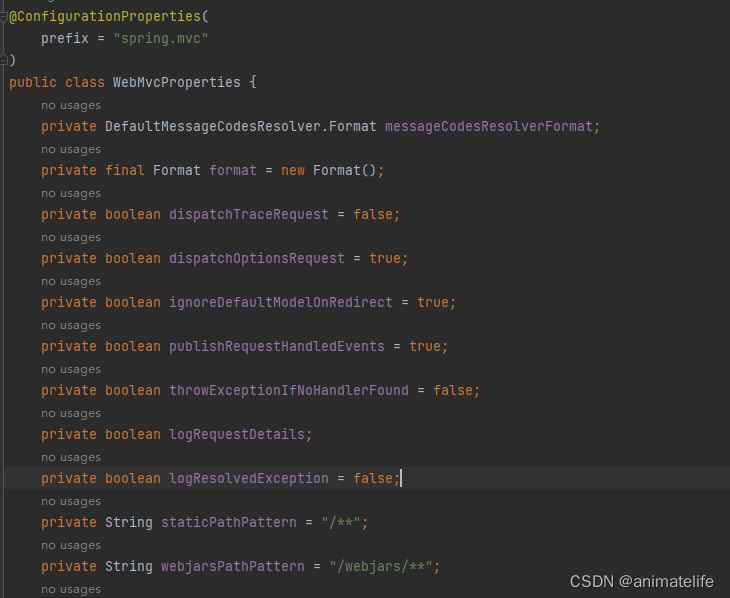
@EnableConfigurationProperties({WebProperties.class})、@ConditionalOnProperty( prefix = "spring.mvc.problemdetails", name = {"enabled"},havingValue = "true" )、@ConditionalOnProperty(prefix = "spring.mvc.formcontent.filter", name = {"enabled"},matchIfMissing = true)... - 通过这样带有配置关键字的注解,可以发现要么在注解上就标明了配置内容和默认值,要么就是通过 xxxProperties 这样的类,其中内容也大多是如图所示的内容,可以发现就是一些配置文件里面的内容,如果没有配置也会有默认值
SpringBoot 整合 SpringMVC
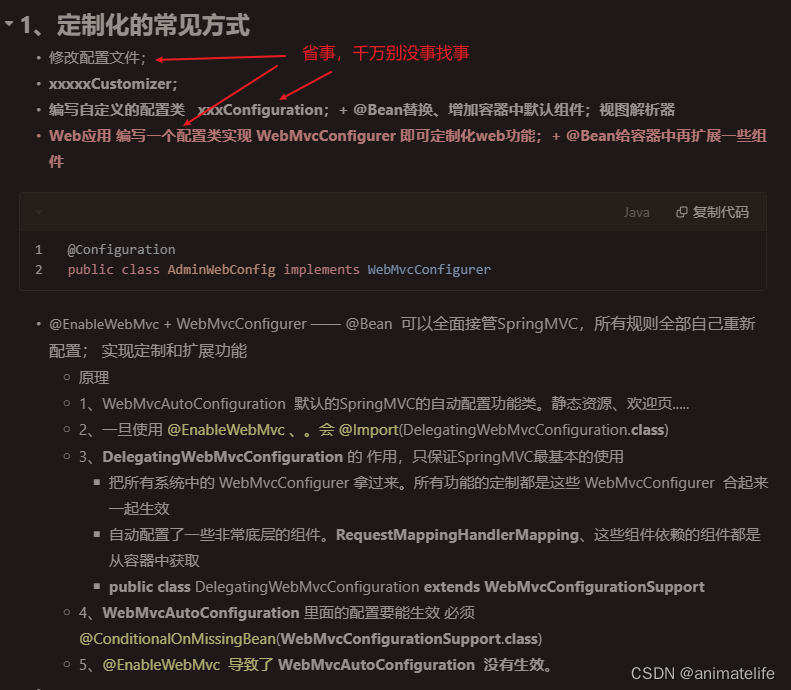
定制化 SpringMVC
- 定制化功能,主要通过观察 SpringMVC 的自动配置类
- 通过实现
WebMvcConfigurer接口作为配置类,添加自定义的功能

- 通过在配置类中 创建
HiddenHttpMethodFilter的实例到容器,自定义 HiddenHttpMethodFilter- 需要先开启配置
spring.mvc.hiddenmethod.filter.enabled=true
- 需要先开启配置
- 在配置类上使用
@EnableWebMvc意味着完全自定义 SpringMVC 相当于回到最原始的 web 程序开发
静态资源处理
- 静态资源处理,已经默认开启
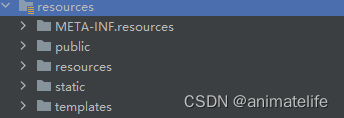
spring.resources.add-mappings=true - 默认的静态资源路径如下,参照 自动配置类
WebMvcAutoConfiguration引入了webMvcProperties的属性配置
- 自定义静态资源路径
spring.resources.static-locations={ "classpath:/META-INF/resources/","classpath:/resources/", "classpath:/static/", "classpath:/public/" } - 自定义静态资源请求路径映射
spring.mvc.static-path-pattern="/**",默认就是"/**" - 让客户端缓存静态资源
spring.resources.cache.period=10000单位是s
对上传文件的处理
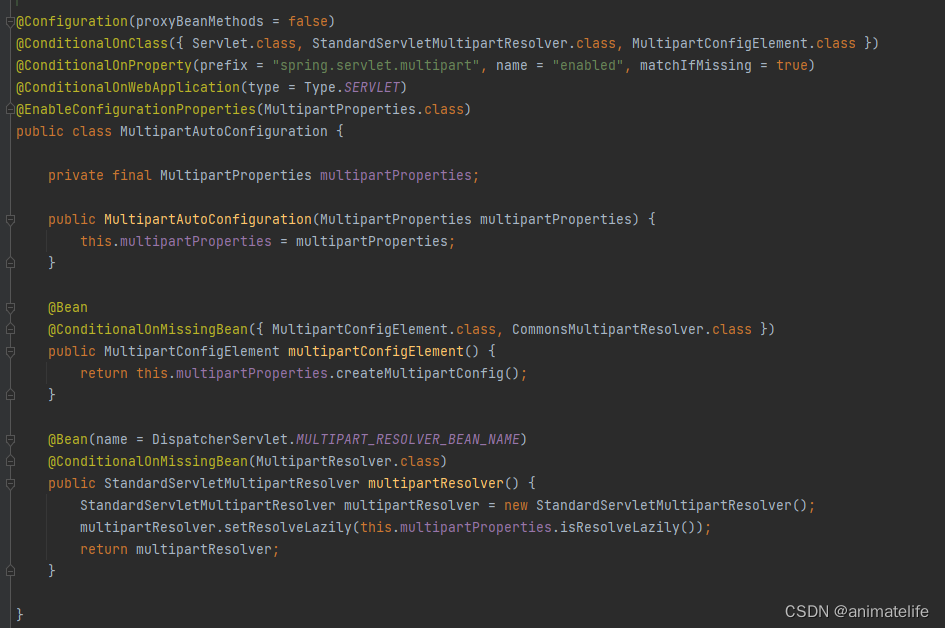
- SpringBoot 默认已经配置好 文件上传需要的 依赖和配置
- 但是还是要设置文件的大小配置的
# 单个文件的最大限制
spring.servlet.multipart.max-file-size=10MB
# 整个请求的最大限制
spring.servlet.multipart.max-request-size=100MB
对异常的处理
- 对异常的处理,SpringBoot 已经有了默认的配置
- 直接 在静态资源路径 添加 错误码.html,如5xx.html,就对应5开头的错误码,比如500,这种方式利用了默认配置,改变的只是错误的展示页面,使用的是 DefaultHandlerException—>DefaultErrorViewResolver
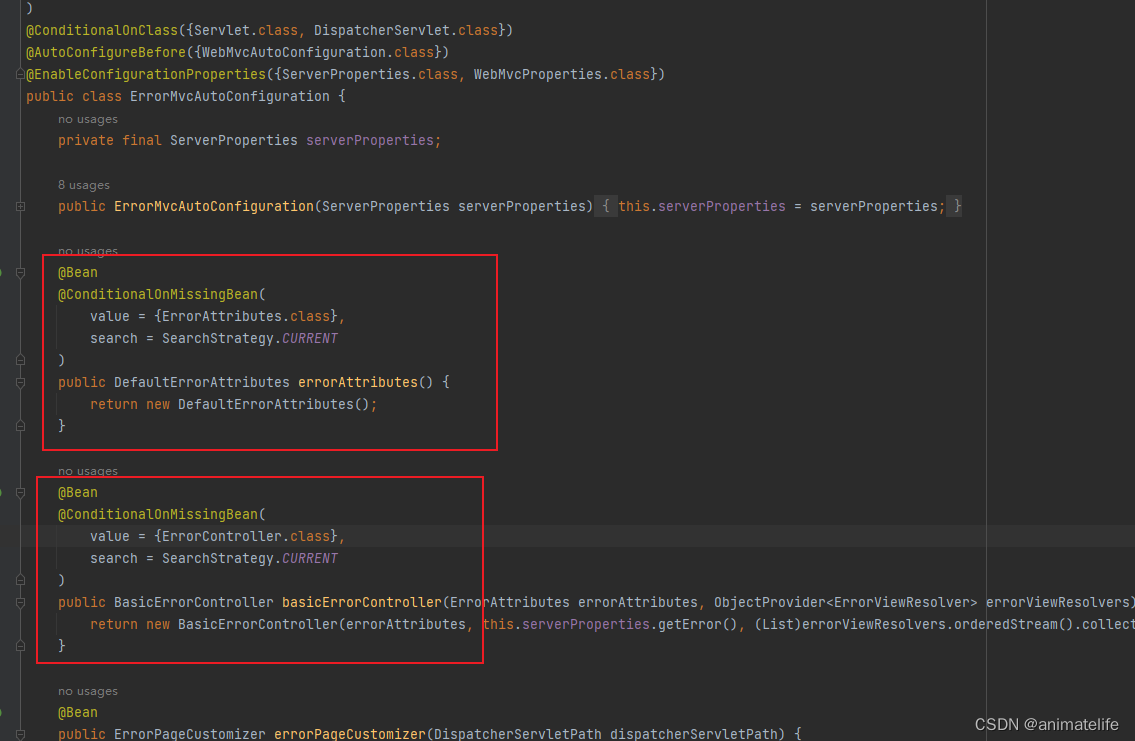
- 直接 创建一个 名字是
ErrorController的处理器,这种方式,错误的处理和页面跳转完全由开发者控制 - 直接 在配置类中 创建一个
ErrorAttributes的实例,这种方式只是修改了错误的提示信息,依然还是使用 DefaultHandlerException—>DefaultErrorViewResolver
- 自定义实现 HandlerExceptionResolver 处理异常,可以作为默认的全局异常处理规则
- @ControllerAdvice+@ExceptionHandler处理全局异常,底层是 ExceptionHandlerExceptionResolver 支持的
/**
 * 处理整个web controller的异常
 */
@Slf4j
@ControllerAdvice
public class GlobalExceptionHandler {

    @ExceptionHandler({ArithmeticException.class,NullPointerException.class})  //处理异常
    public String handleArithException(Exception e){

        log.error("异常是:{}",e);
        return "login"; //视图地址
    }
}
- @ResponseStatus + 自定义异常,实际上是交给
ResponseStatusExceptionResolver处理,最终由 Tomcat 发送错误信息返回前端,只改变了错误信息,而且使用的是最原始的 Tomcat 错误页面
@ResponseStatus(value= HttpStatus.FORBIDDEN,reason = "用户数量太多")
public class UserTooManyException extends RuntimeException {

    public  UserTooManyException(){

    }
    public  UserTooManyException(String message){
        super(message);
    }
}
Web原生组件注入(Servlet、Filter、Listener)
- 通过注解 @WebFilter、@WebServlet、@WebListener
- 通过 Servlet、Filter、Listener 它们的子类,然后在配置类中通过
ServletRegistrationBean注册
Interceptor 自定义拦截器
- 自定义的拦截器,对于自定义的
servlet不起作用,因为 拦截器起作用是建立在 DispatcherServlet 的代码逻辑上的org.springframework.web.servlet.DispatcherServlet#doDispatch ---> org.springframework.web.servlet.HandlerExecutionChain#applyPreHandle
DispatcherServlet 配置映射路径
- 在 SpringBoot 中
DispatcherServlet通过DispatcherServletAutoConfiguration-->DispatcherServletRegistrationBean-->ServletRegistrationBean完成注册到容器,使用的是webMvcProperties的属性配置 - 修改映射路径
spring.mvc.servlet.path="/",默认配置也是"/"
定制 内嵌的 服务器
- 程序启动会创建一个 web 版的IoC容器
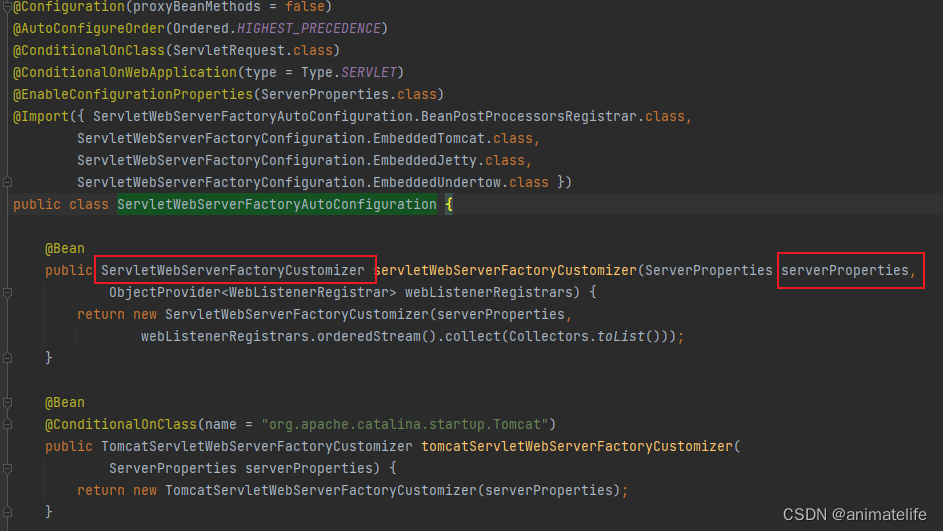
ServletWebServerApplicationContext,其逻辑是org.springframework.boot.web.embedded.xxxxx.xxxxServletWebServerFactory#getWebServer<---org.springframework.boot.web.servlet.context.ServletWebServerApplicationContext#getWebServerFactory<--ServletWebServerFactory xxxx就是下面步骤获得的服务器工厂的服务器名org.springframework.boot.autoconfigure.web.servlet.ServletWebServerFactoryAutoConfiguration--->org.springframework.boot.autoconfigure.web.servlet.ServletWebServerFactoryConfiguration-->根据导入的依赖决定是那种服务器的 ServletWebServerFactory- 其中服务器工厂的自动配置类,决定了我们对服务器的个性化配置的方式,要么修改配置文件
ServerProperties、要么模仿ServletWebServerFactoryCustomizer实现org.springframework.boot.web.server.WebServerFactoryCustomizer#customize
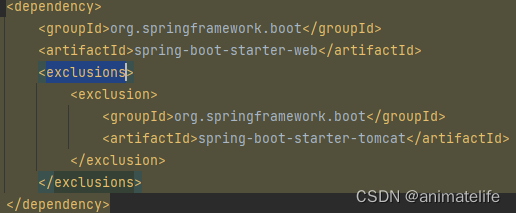
- SpringMVC 的 start 默认是导入 Tomcat 依赖的,如果想要换服务器,应该先排除 Tomcat 依赖,再导入其它服务器的依赖
定制化总结
SpringBoot 整合 Mybatis
- 在不使用多数据源的情况下,直接从 github 上导入依赖
mybatis-spring-boot-starter - 通过依赖中的 自动配置类 配置相关的属性,通过观察自动配置类,发现 会自动扫描 加了
@Mapper的 Mapper 接口,并注册代理对象到容器中,也可以通过在配置类or启动类上添加@MapperScan,避免每个 Mapper 接口都要加@Mapper - 两种配置方式:1.配置文件(xm,config-location 指明位置)、2.配置文件(yum/properties,configuration类),两种方式只能选择一种
# 配置mybatis规则
mybatis:
#  config-location: classpath:mybatis/mybatis-config.xml
  mapper-locations: classpath:mybatis/mapper/*.xml
  configuration:
    map-underscore-to-camel-case: true
- 可以实现全注解开发,不需要映射文件(xml),直接在 Mapper 接口的方法上添加对应的注解,如
@Select对应映射文件中select标签、@Option对应各种语句标签的属性,如@Option(useGeneratedKeys = true,keyProperty = "id")
SpringBoot 整合 MybatisPlus
- 从 MybatisPlus 官网获得
mybatis-plus-boot-starter - 通过依赖中的 自动配置类 定制化配置,查看方法大体上和 Mybatis 的方法相同,不过关于
mapperLocations,MybatisPlus 做了默认配置 - MybatisPlus 提供了
BaseMapper、IService、Ipage等便利的类 - 分页功能,需要添加配置类
SpringBoot 整合 redis
- 通过 spring-boot-starter-data-redis
<dependency>
    <groupId>org.springframework.boot</groupId>
    <artifactId>spring-boot-starter-data-redis</artifactId>
</dependency>
<dependency>
    <groupId>org.apache.commons</groupId>
    <artifactId>commons-pool2</artifactId>
</dependency>
- 查看 RedisAutoConfiguration 实现定制化
- 观察 RedisAutoConfiguration 发现 除了支持 redisTemplate、stringTemplate,还支持 Jedis、Lettuce,只需要导入响应的依赖即可
<dependency>
    <groupId>redis.clients</groupId>
    <artifactId>jedis</artifactId>
</dependency>
- 因为 spring-boot-starter-data-redis 底层用的就是 Lettuce,所以如果使用 Lettuce,可以直接修改 配置项 spring.redis.client-type=lettuce
- 使用 Jedis 除了依赖 也需要修改 spring.redis.client-type=jedis
SpringBoot 整合 Junit5
<dependency>
  <groupId>org.springframework.boot</groupId>
  <artifactId>spring-boot-starter-test</artifactId>
  <scope>test</scope>
</dependency>
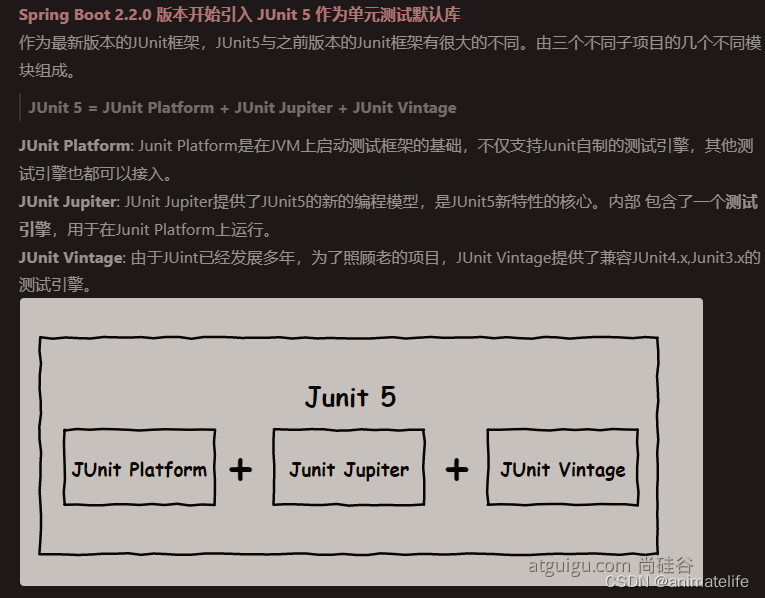

<dependency>
    <groupId>org.junit.vintage</groupId>
    <artifactId>junit-vintage-engine</artifactId>
    <scope>test</scope>
    <exclusions>
        <exclusion>
            <groupId>org.hamcrest</groupId>
            <artifactId>hamcrest-core</artifactId>
        </exclusion>
    </exclusions>
</dependency>
SpringBoot Actuator
- 未来每一个微服务在云上部署以后,我们都需要对其进行监控、追踪、审计、控制等。SpringBoot就抽取了Actuator场景,使得我们每个微服务快速引用即可获得生产级别的应用监控、审计等功能
- 引入依赖
<dependency>
    <groupId>org.springframework.boot</groupId>
    <artifactId>spring-boot-starter-actuator</artifactId>
</dependency>
Actuator Endpoint 监控端点
- 更多详情,参考官网
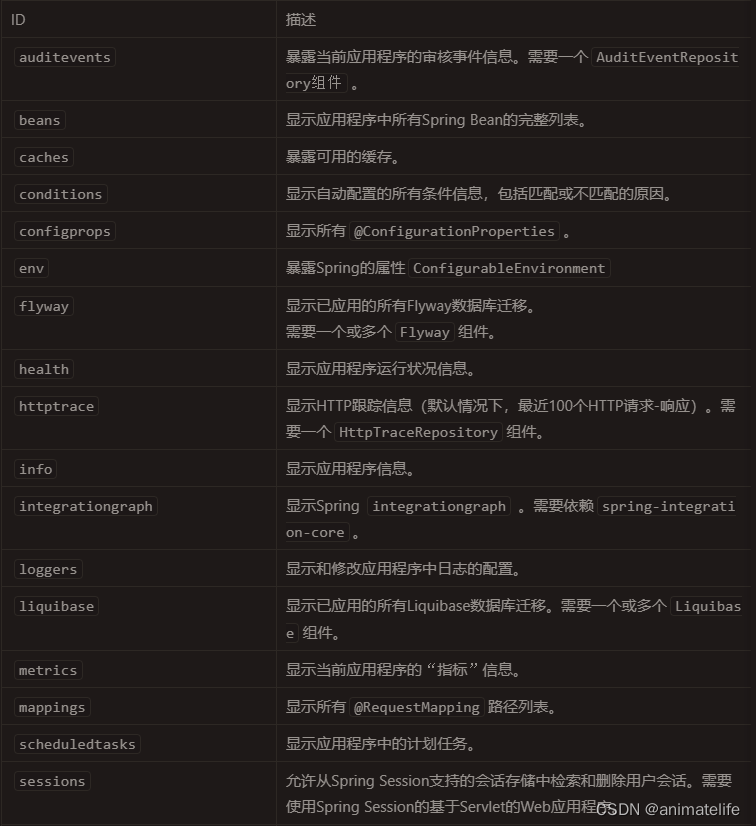
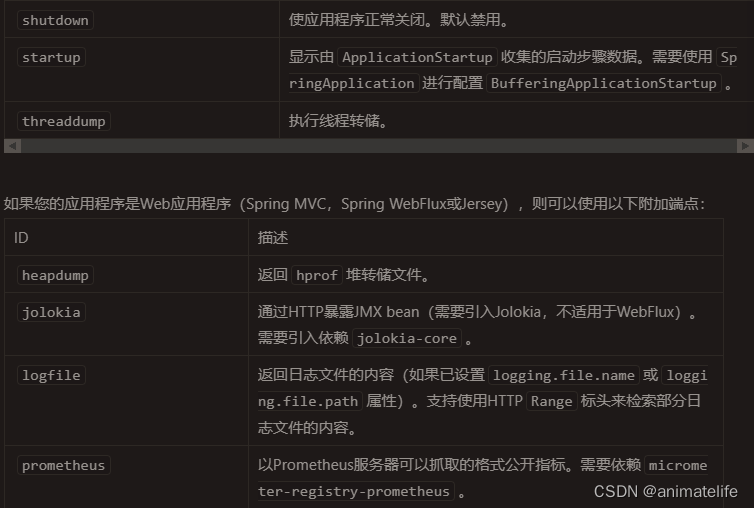
监控端点的管理和查看
- 支持的暴露方式
- HTTP:默认只暴露 health 和 info Endpoint
- 通过浏览器访问 http://项目IP:项目端口号/actuator/EndpointName/DetailName
# 以 web 方式暴露所有端点 management.endpoints.web.exposure.include='*' # web 方式下,不暴露任何端点 management.endpoints.web.exposure.exclude='*' - JMX:默认暴露所有 Endpoint
- 可以通过 jconsole 等JMX客户端工具查看配置项的值
- HTTP:默认只暴露 health 和 info Endpoint
- 配置可以访问的监控端点,除了 health 和 info,剩下的Endpoint都应该进行保护访问。如果引入SpringSecurity,则会默认配置安全访问规则
management:
  endpoints:
  	# 禁用所有的 Endpoint(web、JMX 方式下),默认是开启所有的监控端点(JMX 方式下)
    enabled-by-default: false
  endpoint:
  	# 然后手动开启指定的 Endpoint
    beans:
      enabled: true
    health:
      enabled: true
- 暴露某个端点的详细信息
management:
  endpoint:   #对某个端点的具体配置
    health:
      show-details: always
      enabled: true
常用监控端点
-
Health:监控状况
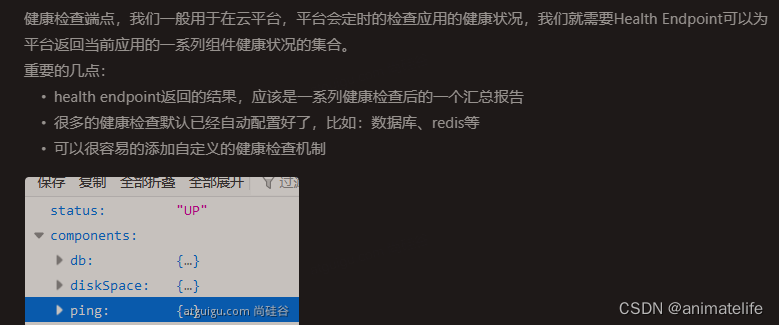
-
Metrics:运行时指标


-
Loggers:日志记录
定制 Endpoint
- 定制 Health 信息,需要组件的命名是
XXXHealthIndicator并且implements HealthIndicator - 定制info信息,有两种方式,两种方式可以一起使用,也会被一起展示
- 通过配置文件,在 info 端点下增加 k-v
info: appName: boot-admin appVersion: 1.0.0 # 读取 maven 中的配置信息 mavenProjectName: @project.artifactId@ mavenProjectVersion: @project.version@- 通过自定义组件,需要
implements InfoContributor
- 定制 Metrics
- 定制 Endpoint
可视化示例
https://github.com/codecentric/spring-boot-admin
关于配置文件(外部化配置)
profile
- 默认配置文件 application.yaml/properties,任何时候都会加载生效
- 指定环境的配置文件(profile) application-{env}.yaml/properties,根据默认配置文件中的 spring.profiles.active=env 决定是哪个环境的配置文件(profile)与默认配置文件一起生效
- 配置文件(profile)分组,可以指定一组配置文件(profile)同时生效,如下所示,此时除了默认配置文件生效,指定的配置文件组中的两个配置文件(profile)也会生效
spring.profiles.group.production[0]=proddb
spring.profiles.group.production[1]=prodmq
使用:--spring.profiles.active=production  激活
- 有同名的配置项时,指定生效的 profile 会覆盖其它 profile、默认配置文件的同名配置项
@Profile用于指定 类 或 方法 在什么 profile 生效的情况下才可以被正常使用,如@Profile(value = {"prod","default"}),表示只有在 application-{prod}.yaml/properties 生效 或 application.yaml/properties 生效 或 二者同时生效的三种情况下,该注解所在的 类 或 方法 才可以被正常使用,对于除这三种情况以外的其它 profile 生效 时,该注解所在的 类 或 方法 是不可以被使用的
配置文件的位置和优先级
- classpath 根路径
- 根路径,就是
resource、java包路径下
- 根路径,就是
- classpath 根路径下config目录
- jar 包当前目录
- jar 包当前目录的 config 目录
- 在前一种情况的基础上,config 目录的直接子目录
- 仅 Linux 系统下生效
- 当这多个位置同时存在配置文件时,越是往下的情况优先级越高,优先级低的将会不起作用
配置的来源
- 配置内容除了来自配置文件,还可以来自 环境变量、命令行 等
- 更多的配置来源,参考官网
- 比较常用的配置来源也有优先级:命令行 > 环境变量 > 前面所说的配置文件
- 获取所有的配置项,如下所示
// run 就是上下文环境对象,ApplicationContext run

ConfigurableEnvironment environment = run.getEnvironment();

Map<String, Object> systemEnvironment = environment.getSystemEnvironment();

Map<String, Object> systemProperties = environment.getSystemProperties();
读取配置项的值
- 通过
@ConfigurationProperties + @Component,配置文件中a.aa.aaa="hello"
//@ConfigurationProperties(prefix = "a.aa")
@ConfigurationProperties("a.aa")
@Component
@Data // 重要,配置项注入到属性,就是根据set方法
public class A {
    private String aaa;

}
- 通过
@ConfigurationProperties + @EnableConfigurationProperties,配置文件中a.aa.aaa="hello"
//@ConfigurationProperties(prefix = "a.aa")
@ConfigurationProperties("a.aa")
//@Component
@Data // 重要,配置项注入到属性,就是根据set方法
public class A {
    private String aaa;

}

@Configuration
@EnableConfigurationProperties(A.class)
public class AConfig {
}
- 通过
@Value
// 读取系统环境变量配置
@Value("${MAVEN_HOME}")
private String msg;

// 读取系统配置
@Value("${os.name}")
private String osName;

// 当配置文件没有设置 person.name 时,取默认值 李四,赋值给 name
@Value("${person.name:李四}")
private String name;
自定义 start

- start 依赖其中是没有内容的,其主要的作用就是引入这个 start 组件需要的各种依赖,以及最重要的 autoconfigure 依赖
- autoconfigure 依赖中,有这个组件的 xxxAutoConfiguration (自动配置类都在 META-INF/spring.factories 中列出来)、配置相关的 xxxxProperties
- 只要第三方,引入了 这个 start,就可以自动配置这个组件相关的各种配置项和依赖
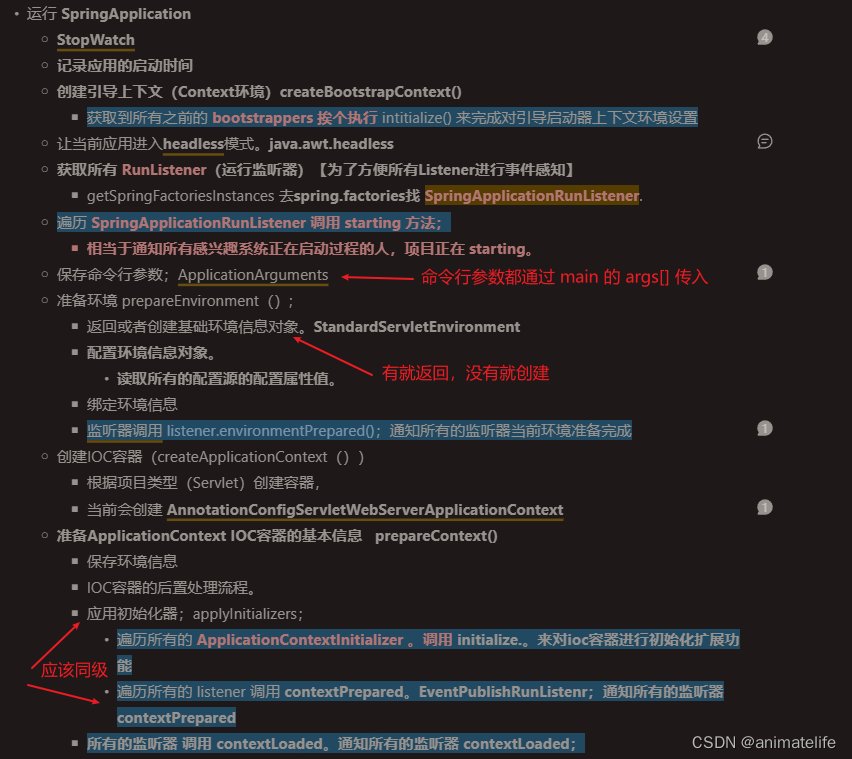
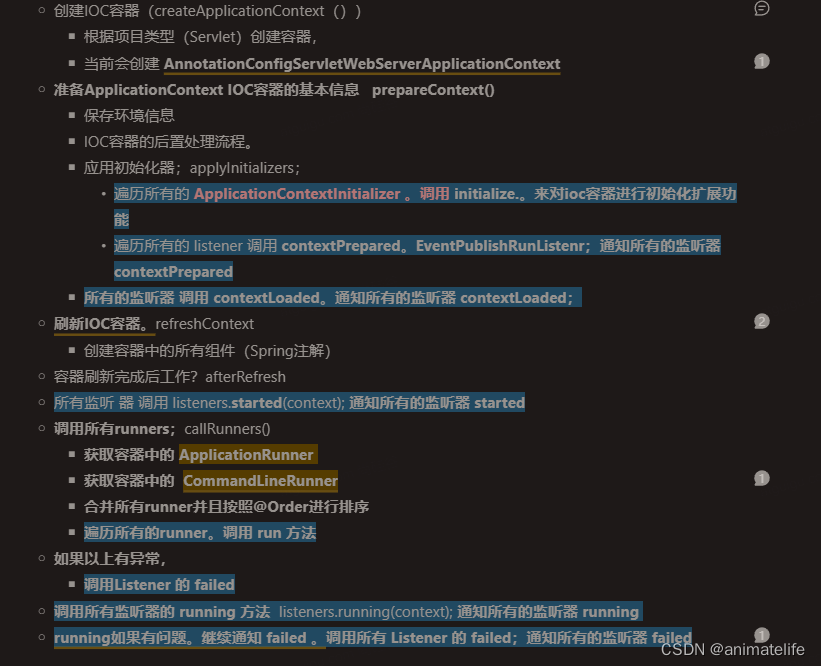
关于 SpringBoot 启动
SpringApplication.run(当前所在类的类名.class, args),分成两步,一步是创建SpringApplication对象,一步是调用run方法

风语者!平时喜欢研究各种技术,目前在从事后端开发工作,热爱生活、热爱工作。


 U8W/U8W-Mini使用与常见问题解决
 QT多线程的5种用法,通过使用线程解决UI主界面的耗时操作代码,防止界面卡死。...
 stm32使用HAL库配置串口中断收发数据(保姆级教程)
 分享几个国内免费的ChatGPT镜像网址(亲测有效)
 Allegro16.6差分等长设置及走线总结