您现在的位置是:首页 >技术杂谈 >Visual-Semantic Transformer for Scene Text Recognition论文解读及复现网站首页技术杂谈
Visual-Semantic Transformer for Scene Text Recognition论文解读及复现
Visual-Semantic Transformer for Scene Text Recognition论文解读及复现
这篇文章就基于上面的这篇论文VST中结构设计进行阅读,并将其项目Visual-Semantic Transformer进行开源。
该论文中的5个主要构成部分
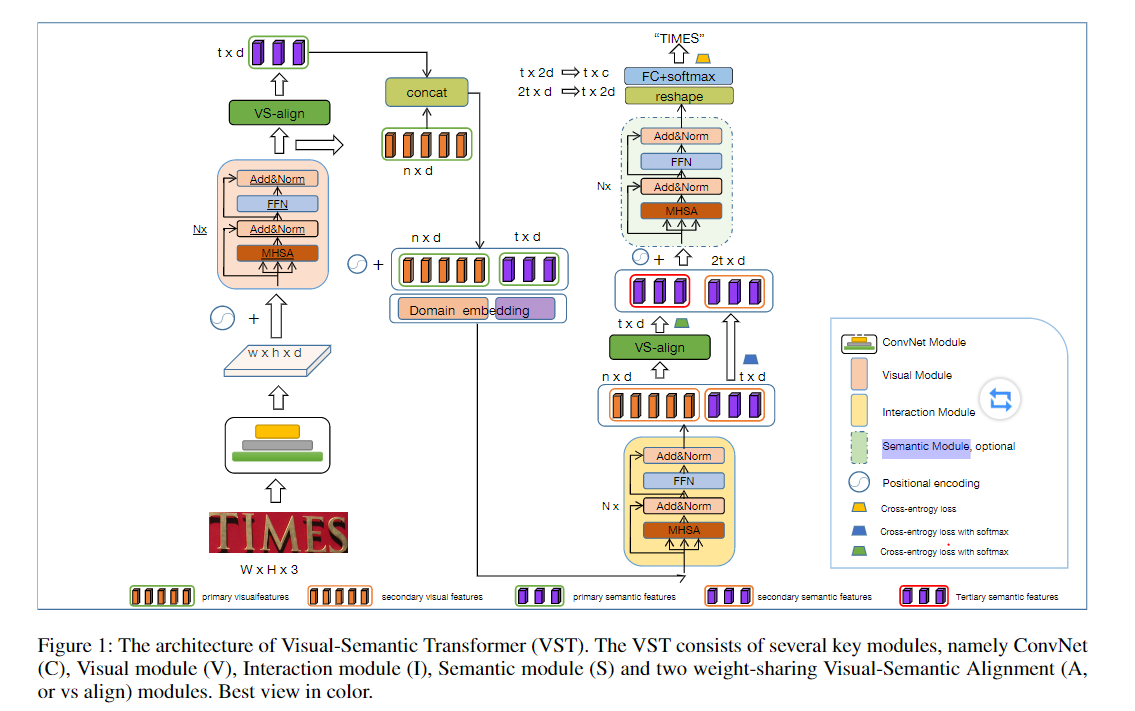
在这篇论文中作者并没有使用现如今场景文本识别任务中把语言规则建模这一方法,而是通过一个Visual-Semantic Alignment Module对齐模块把经过ConvNet和Visual Module提取到的视觉特征
V
i
s
u
a
l
1
Visual_1
Visual1向Semantic特征对齐得到
S
e
m
a
n
t
i
c
1
Semantic_1
Semantic1。这里的
S
e
m
a
n
t
i
c
1
Semantic_1
Semantic1可以认为是我们输出的字符序列的高维特征表示,可以直接使用一个线性映射层便可以将高维特征映射为识别任务的输出,因此该论文并不是基于串行的输出,而是推理速度更快的并行输出,效率更好。之后为了将这两个模态的特征进行交互以获得更好的特征表示,作者想到了Transoformer Encoder它可以实现长距离的特征建模,因此作者提出了一个基于Transformer Encoder的Interaction Module去联合的建模两个模态已达到交互的效果,之后分别得到
S
e
m
a
n
t
i
c
2
,
V
i
s
u
a
l
2
Semantic_2,Visual_2
Semantic2,Visual2。最后作者再次使用Visual-Semantic Alignment Module将
V
i
s
u
a
l
2
Visual_2
Visual2转化为
S
e
m
a
n
t
i
c
3
Semantic_3
Semantic3。之后还可以加上一个Semantic Module来对其进行语义的推理最终得到融合之后的
S
e
m
a
n
t
i
c
Semantic
Semantic特征之后接入线性层便可以将输入的Tensor转化为sequence。如下图所示,展示该论文中的所有相关Module和数据流向。

下面的部分一一介绍上面提到的5个在本文中使用到的Module。
ConvNet
本文的特征提取模块使用了Resnet网络,给定一个输出尺寸为 C × H × W C imes H imes W C×H×W的图片,我们将会得到一个 C 1 × H 8 × W 4 C_1 imes frac{H}{8} imes frac{W}{4} C1×8H×4W的输出。具体的Resnet一共使用了4个layers(1,2,5,3)。
Visual Module
该模块中作者将上面得到的特诊图进行展平进而得到一个一维的向量输入。之后使用Transformer Encoder结构将这些特征进行全局的建模得到输出我将其记做为 V i s u a l 1 Visual_1 Visual1。但是不同于Transform Encoder他这里做了一个小小的改进,便是先Layer Norm之后在进行多头注意力机制。
Visual-Semantic Alignment Module

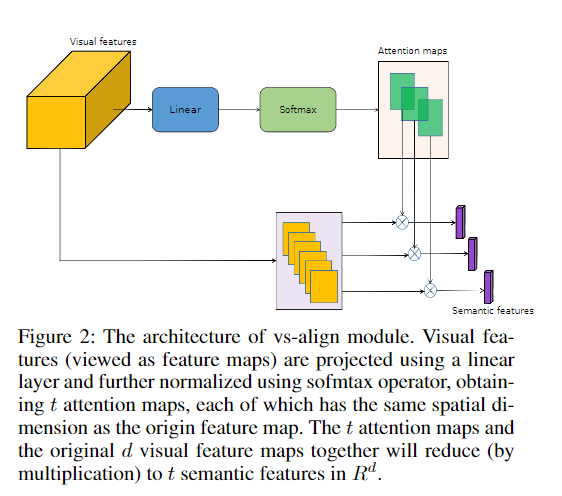
如上图所示:我们使用并行的注意力机制在计算每一个位置上字符的概率分布,因此该论文在推理的过程中是并行输出的而不需要Transform Decoder的那种自回归预测。如下面的公式一样可以计算出
S
e
m
a
n
t
i
c
1
Semantic_1
Semantic1。
S
e
m
a
n
t
i
c
1
=
s
o
f
t
m
a
x
(
Q
×
V
i
s
u
a
l
1
T
)
V
i
s
u
a
l
1
Semantic_1=softmax({Q imes Visual_1^{T}})Visual_1
Semantic1=softmax(Q×Visual1T)Visual1
上面的
Q
Q
Q是一个可训练的参数用来表示视觉和语义之间的关系。作者还认为将该模块进行参数共享的另一个作用就是使得下面的交互模块可以有更好的作用。因为第一次使用该模块以后可以有更大的机会去使用交互模块来对齐进行校正,这是在不使用语言规则之后便可以得到的效果。
Interaction Module
简单来说也就是一个Transformer的编码器结构,只不过在MHSA中计算的公式改为下面的计算:
[
V
i
s
u
a
l
1
;
S
e
m
a
n
t
i
c
1
]
=
s
o
f
t
m
a
x
(
[
V
i
s
u
a
l
1
;
S
e
m
a
n
t
i
c
1
]
K
)
[
V
i
s
u
a
l
1
;
S
e
m
a
n
t
i
c
1
]
[Visual_1; Semantic_1] = softmax(frac{[Visual_1; Semantic_1]}{sqrt{K}})[Visual_1; Semantic_1]
[Visual1;Semantic1]=softmax(K[Visual1;Semantic1])[Visual1;Semantic1]
除此之外便没有什么其他的东西。经过这个模块之后得到
[
V
i
s
u
a
l
2
;
S
e
m
a
n
t
i
c
2
]
[Visual_2; Semantic_2]
[Visual2;Semantic2],多的地方就是再次使用VS Align将得到的
V
i
s
u
a
l
2
Visual_2
Visual2转换为
S
e
m
a
n
t
i
c
3
=
V
s
a
l
g
i
n
(
V
i
s
u
a
l
2
)
Semantic_3 = Vsalgin(Visual_2)
Semantic3=Vsalgin(Visual2)。
Semantic Module
该模块将 S e m a n t i c 2 , S e m a n t i c 3 Semantic_2, Semantic_3 Semantic2,Semantic3进行在样本长度上Concatenate。之后加上Transformer Encoder进行建模。便可以得到融合后的结果 S e m a n t i c Semantic Semantic。
损失函数
由于上面我们有3可用的Semantic( S e m a n t i c 2 , S e m a n t i c 3 , S e m a n t i c Semantic_2, Semantic_3, Semantic Semantic2,Semantic3,Semantic)因此在训练的过程中一共有三个损失,将其相加便可以得到总的损失函数。在推理的过程中可以使用 S e m a n t i c Semantic Semantic进行推理。
复现结果
前三个epoch
由于数据集较大我在训练三圈之后在IC15, IC13, SVTP,SVT, CUTE, IIIT5k数据上的最好的cwr(也就是每一个样本完全预测正确才算是预测正确)平均正确率是89.06。反观论文中在这几个数据集上的平均正确率为92.483。后续出来更好的结果我会在github和这里进行更新。
更多关于OCR相关的论文阅读
我的知乎
如果大家觉得写的不错或者有用的还请点赞一下啦。


 U8W/U8W-Mini使用与常见问题解决
 QT多线程的5种用法,通过使用线程解决UI主界面的耗时操作代码,防止界面卡死。...
 stm32使用HAL库配置串口中断收发数据(保姆级教程)
 分享几个国内免费的ChatGPT镜像网址(亲测有效)
 Allegro16.6差分等长设置及走线总结