您现在的位置是:首页 >技术交流 >MyBatis凭什么征服SpringBoot ?网站首页技术交流
MyBatis凭什么征服SpringBoot ?

1、MyBatis的优势
众所周知,MyBatis 是一款优秀的持久层框架,它支持自定义 SQL、存储过程以及高级映射。通过xml映射到接口,使开发者使用接口的方式就能够轻松的映射、解析、执行xml中的SQL。MyBatis 消除了几乎所有的JDBC代码和参数的手工设置以及结果集的检索。这样做的目的在于降低代码耦合度,大大简化了数据库操作中的常用操作,修改SQL更加容易,代码也更清晰易维护。

简单了解下MyBatis的优点,以便了解为什么会将其集成到Spring中:
1) 灵活性高
MyBatis允许直接编写原生的SQL语句,提供了很高的灵活性。我们可以根据需要编写任何复杂的SQL,从而满足各种业务需求。
2)易于使用
MyBatis通过XML配置文件和注解,让你可以轻松将SQL语句与Java代码分离,使得代码结构更清晰、易维护。
3)映射简单
MyBatis提供了简单的映射方式,可以将数据库表中的字段自动映射到Java对象的属性上,降低了数据转换的复杂性。
4)扩展性良好
MyBatis提供了丰富的插件接口,你可以通过编写自定义插件来扩展MyBatis的功能,以满足特定需求。(这部分内容在MyBatis课程部分会讲解)
5)易于集成
MyBatis可以与Spring、Spring Boot等流行框架无缝集成,提供更加完整的解决方案。
6)社区活跃
MyBatis有一个活跃的开发者社区,为使用者提供了丰富的文档、教程和支持。这有助于在遇到问题时快速找到解决方案。
2、SpringBoot对MyBatis的支持
官网地址:https://mybatis.org/mybatis-3/
官方参照表:http://mybatis.org/spring/
中文官网:https://mybatis.org/mybatis-3/zh/
mybatis项目源码地址:https://github.com/mybatis/mybatis-3/
我们知道,在官方文档中明确说明,Spring 2.0 只支持 iBatis 2.0。那么,我们就想将 MyBatis3 的支持添加到 Spring 3.0 中。不幸的是,Spring 3.0 的开发在 MyBatis 3.0 官方发布前就结束了。由于 Spring 开发团队不想发布一个基于未发布版的 MyBatis 的整合支持,如果要获得 Spring 官方的支持,只能等待下一次的发布了。基于在 Spring 中对 MyBatis 提供支持的兴趣,MyBatis 社区认为,应该开始召集有兴趣参与其中的贡献者们,将对 Spring 的集成作为 MyBatis 的一个社区子项目。于是,MyBatis自己动手搞了一个Spring的扩展实现,精神可敬。另外这也得益于Spring非常优秀的扩展能力。基于这样两方面的因素,从而加快了MyBatis与Spring集成的速度。
Spring和MyBatis版本对应关系

在实际开发中,单独引入Mybatis包时,大家可以参照这个表即可。
3、SpringBoot集成MyBatis实战
说明:本次实战依然是基于前面的SpringBootCase工程之上进行集成MyBatis。
3.1 案例思路
通过SpringBoot +MyBatis实现对供应链中商品表的查询操作。
3.2 实现步骤
步骤1:准备数据库
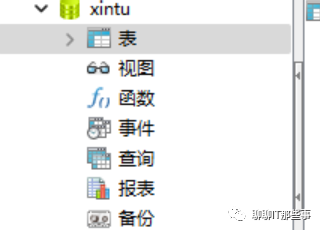
这里讲的是windows环境(linux环境类似)。首先启动本地mysql数据库,启动好后通过mysql客户端工具(Navicat等)连接本地Mysql,并创建新的数据库xintu,指定数据库字符编码为utf-8。

新建商品表并向表中插入数据。
1) 新建表
DROP TABLE IF EXISTS `t_product`;
CREATE TABLE `t_product` (
  `id` int(11) NOT NULL AUTO_INCREMENT COMMENT '主键',
  `category_id` int(10) DEFAULT NULL COMMENT '类目ID',
  `item_type` varchar(50) DEFAULT NULL COMMENT '商品类型',
  `title` varchar(500) DEFAULT NULL COMMENT '商品标题',
  `sell_point` varchar(50) DEFAULT NULL COMMENT '销售站点',
  `price` varchar(50) DEFAULT NULL COMMENT '销售价格',
  `num` int(11) DEFAULT NULL COMMENT '库存数量',
  `image` varchar(500) DEFAULT NULL COMMENT '商品图片',
  `status` int(11) DEFAULT NULL COMMENT '商品状态'
  PRIMARY KEY (`id`)
) ENGINE=InnoDB AUTO_INCREMENT=1 DEFAULT CHARSET=utf8;
2)插入数据
INSERT INTO `t_product` VALUES ('1', '23', '12', 'Redmi K50Pro 天玑9000 AMOLED 2K柔性直屏 OIS光学防抖  120W快充 幻镜  8GB+256GB 5G智能手机 小米红米', '仅上海,广州,沈阳仓有货!预购从速', '1469.00', '10', '../images/portal/02COMIXC5902A5122blue/miaosha_1.jpg', '1', '1', null, null, null, null);
INSERT INTO `t_product` VALUES ('2', '23', '12', 'Redmi K50Pro 天玑9000 AMOLED 2K柔性直屏 OIS光学防抖  120W快充 幻镜  8GB+256GB 5G智能手机 小米红米', '仅上海,广州,沈阳仓有货!预购从速', '2619.00', '10', '../images/portal/02COMIXC5902A5122blue/miaosha_2.jpg', '1', '2', null, null, null, null);
I
步骤2:SpringBoot集成MyBatis插件
在pom.xml中添加相关jar依赖。
<!--引入mybatis jar-->
<dependency>
	<groupId>org.mybatis.spring.boot</groupId>
	<artifactId>mybatis-spring-boot-starter</artifactId>
	<version>2.1.4</version>
</dependency>
<!--引入mysql jar-->
<dependency>
	<groupId>mysql</groupId>
	<artifactId>mysql-connector-java</artifactId>
	<version>8.0.25</version>
</dependency>
步骤3:application.yml中配置数据源
spring:
  datasource: # mysql相关配置
    url: jdbc:mysql://localhost:3306/xintu?useUnicode=true&characterEncoding=utf-8&serverTimezone=Asia/Shanghai
    username: root
    password: xxx
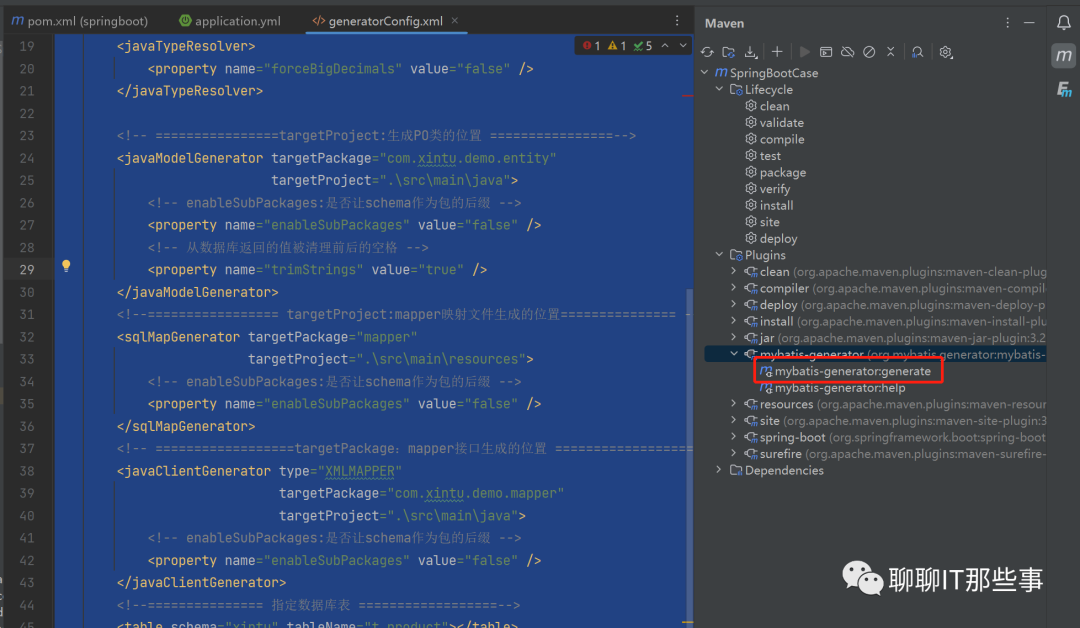
步骤4:反向工程配置
引入反向工程mybatis maven插件。由于在生成Java POJO时,需要连接数据库,所以也需要引入mysql驱动包。
<!--==========mybatis代码生成插件配置==========-->
<plugin>
	<!--插件坐标-->
	<groupId>org.mybatis.generator</groupId>
	<artifactId>mybatis-generator-maven-plugin</artifactId>
	<version>1.3.5</version>
	<!--插件依赖数据库驱动-->
	<dependencies>
		<dependency>
			<groupId>mysql</groupId>
			<artifactId>mysql-connector-java</artifactId>
			<version>8.0.25</version>
		</dependency>
	</dependencies>
	<!--插件配置-->
	<configuration>
		<!--指定配置文件位置-->
		<configurationFile>src/main/resources/generatorConfig.xml</configurationFile>
		<verbose>true</verbose>
		<overwrite>true</overwrite>
	</configuration>
</plugin>
引入反向工程配置文件generatorConfig.xml,
<?xml version="1.0" encoding="UTF-8"?>
<!DOCTYPE generatorConfiguration
        PUBLIC "-//mybatis.org//DTD MyBatis Generator Configuration 1.0//EN"
        "http://mybatis.org/dtd/mybatis-generator-config_1_0.dtd">

<generatorConfiguration>
    <context id="testTables" targetRuntime="MyBatis3">
        <commentGenerator>
            <!-- 是否去除自动生成的注释 true:是 :false:否 -->
            <property name="suppressAllComments" value="true" />
        </commentGenerator>
        <!--==================数据库连接的信息:驱动类、连接地址、用户名、密码 =====================-->
        <jdbcConnection driverClass="com.mysql.jdbc.Driver"
                        connectionURL="jdbc:mysql://localhost:3306/xintu" userId="root"
                        password="xxx">
        </jdbcConnection>
        <!-- 默认false,把JDBC DECIMAL 和 NUMERIC 类型解析为 Integer,为 true时把JDBC DECIMAL 和
            NUMERIC 类型解析为java.math.BigDecimal -->
        <javaTypeResolver>
            <property name="forceBigDecimals" value="false" />
        </javaTypeResolver>

        <!-- ================targetProject:生成PO类的位置 ================-->
        <javaModelGenerator targetPackage="com.xintu.demo.entity"
                            targetProject=".srcmainjava">
            <!-- enableSubPackages:是否让schema作为包的后缀 -->
            <property name="enableSubPackages" value="false" />
            <!-- 从数据库返回的值被清理前后的空格 -->
            <property name="trimStrings" value="true" />
        </javaModelGenerator>
        <!--================= targetProject:mapper映射文件生成的位置=============== -->
        <sqlMapGenerator targetPackage="mapper"
                         targetProject=".srcmain
esources">
            <!-- enableSubPackages:是否让schema作为包的后缀 -->
            <property name="enableSubPackages" value="false" />
        </sqlMapGenerator>
        <!-- ==================targetPackage:mapper接口生成的位置 ==================-->
        <javaClientGenerator type="XMLMAPPER"
                             targetPackage="com.xintu.demo.mapper"
                             targetProject=".srcmainjava">
            <!-- enableSubPackages:是否让schema作为包的后缀 -->
            <property name="enableSubPackages" value="false" />
        </javaClientGenerator>
        <!--=============== 指定数据库表 ==================-->
        <table schema="xintu" tableName="t_product"></table>
    </context>
</generatorConfiguration>
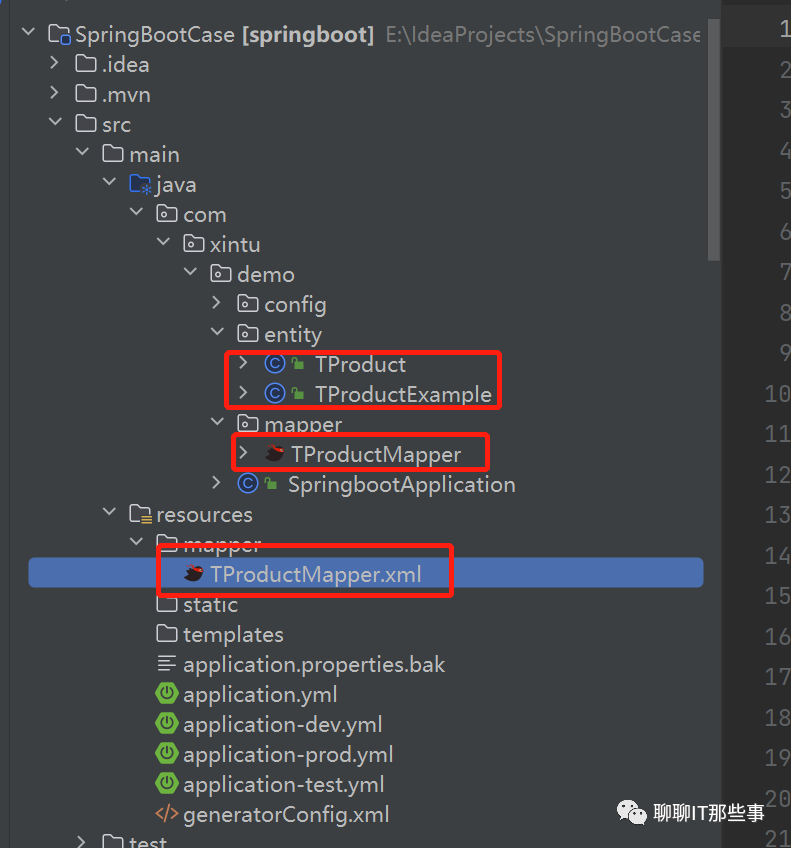
步骤5:反向代码生成

使用Mybatis反向工程生成接口、映射文件以及实体Bean。

步骤6:创建 TProductService并编写代码
package com.xintu.demo.service;

import com.xintu.demo.entity.TProduct;
import com.xintu.demo.entity.TProductExample;
import com.xintu.demo.mapper.TProductMapper;
import org.springframework.beans.factory.annotation.Autowired;
import org.springframework.stereotype.Service;

import java.util.List;

/**
 * @author XinTu
 * @classname TProductService
 * @description TODO
 * @date 2023年04月29日 21:19
 */
@Service
public class TProductService {
    @Autowired
    private TProductMapper mapper;

    /**
     * 查询测试
     * @return
     */
    public List<TProduct> queryList(){
        TProductExample example = new TProductExample();
        TProductExample.Criteria criteria = example.createCriteria();
        criteria.andCategoryIdEqualTo(1);
        return mapper.selectByExample(example);
    }
}
步骤7:创建 TProductController 并编写代码
package com.xintu.demo.controller;

import com.xintu.demo.entity.TProduct;
import com.xintu.demo.mapper.TProductMapper;
import com.xintu.demo.service.TProductService;
import org.springframework.beans.factory.annotation.Autowired;
import org.springframework.web.bind.annotation.GetMapping;
import org.springframework.web.bind.annotation.RestController;

import java.util.List;

/**
 * @author XinTu
 * @classname TProductController
 * @description TODO
 * @date 2023年04月29日 21:12
 */


@RestController
public class TProductController {

    @Autowired
    private TProductService service;

    /**
     * 查询测试
     * @return
     */
    @GetMapping(value = "/queryList")
    public List<TProduct> queryList() {
        return service.queryList();
    }

}
在 MyBatis 反向工程生成的 TProductMapper 后,有两种注入方式:
① 接口上加一个Mapper注解
② SpringbootApplication 启动类加@MapperScan("com.xintu.demo.mapper")注解
* 以上两个的作用:MyBatis自动扫描数据持久层的映射文件及DAO接口的关系
package com.xintu.demo.mapper;

import com.xintu.demo.entity.TProduct;
import com.xintu.demo.entity.TProductExample;
import java.util.List;

import org.apache.ibatis.annotations.Mapper;
import org.apache.ibatis.annotations.Param;

@Mapper //方式一:添加@Mapper注解,等同于主类上加@MapperScan("com.bjpowernode.springboot.mapper")
public interface TProductMapper {
    long countByExample(TProductExample example);

    int deleteByExample(TProductExample example);

    int deleteByPrimaryKey(Integer id);

    int insert(TProduct record);

    int insertSelective(TProduct record);

    List<TProduct> selectByExample(TProductExample example);

    TProduct selectByPrimaryKey(Integer id);

    int updateByExampleSelective(@Param("record") TProduct record, @Param("example") TProductExample example);

    int updateByExample(@Param("record") TProduct record, @Param("example") TProductExample example);

    int updateByPrimaryKeySelective(TProduct record);

    int updateByPrimaryKey(TProduct record);
}
步骤8:指定mybatis xml路径
#在application.yml配置文件中指定映射文件的位置,这个配置只有接口和映射文件不在同一个包的情况下,才需要指定
mybatis:
  mapper-locations: classpath:mapper/*.xml
步骤9:测试验证

以上这部分作为入门级内容, 主要分析了MyBatis的特点以及与SpringBoot集成实战过程。我们发现MyBatis征服SpringBoot(或者说Spring)主要靠3点:
1)MyBatis作为持久层本身的诸多优势(低耦合、易读易维护等)
2)MyBatis社区不遗余力的推进
3)SpringBoot自身强大的扩展能力
以上三点,共同铸就了MyBatis与SpringBoot的完美集成。那关于的MyBatis更多细节部分,比如实现原理,自定义扩展,将会在后面的MyBatis专栏部分进行逐一讲解。


 U8W/U8W-Mini使用与常见问题解决
 QT多线程的5种用法,通过使用线程解决UI主界面的耗时操作代码,防止界面卡死。...
 stm32使用HAL库配置串口中断收发数据(保姆级教程)
 分享几个国内免费的ChatGPT镜像网址(亲测有效)
 Allegro16.6差分等长设置及走线总结