您现在的位置是:首页 >技术教程 >Flink通过Maxwell读取mysql的binlog发送到kafka再写入mysql网站首页技术教程
Flink通过Maxwell读取mysql的binlog发送到kafka再写入mysql
简介Flink通过Maxwell读取mysql的binlog发送到kafka再写入mysql
1.准备环境
| JDK1.8 |
| MySQL |
| Zookeeper |
| Kakfa |
| Maxweill |
| IDEA |
2.实操
2.1开启mysql的binlog
查看binlog 状态,是否开启
show variables like 'log_%'如果log_bin显示为ON,则代表已开启。如果是OFF 说明还没开启。
[Linux] 编辑 /etc/my.cnf 文件,在[mysqld]后面增加
server-id=1
log-bin=mysql-bin
binlog_format=row
#如果不加此参数,默认所有库开启binlog
binlog-do-db=gmall_20230424
重启mysql 服务
service mysqld restart再次查看binlog 状态
[Windows] 编辑 mysql安装目录 下 my.ini 文件,在[mysqld]后面增加 如上 linux 一样
2.2 Zookeeper 、 Kafka
2.2.1启动 ZK
bin/zkServer.sh start2.2.2启动 Kakfa
#常规模式启动

bin/kafka-server-start.sh config/server.properties

#进程守护模式启动

nohup bin/kafka-server-start.sh config/server.properties >/dev/null 2>&1 &
2.2.3创建 kafka-topic
bin/kafka-topics.sh --bootstrap-server 192.168.221.100:9092 --create --topic flink_test01 --partitions 1 --replication-factor 1测试kafka-topic
#消费

bin/kafka-console-consumer.sh --bootstrap-server 192.168.221.100:9092 --topic flink_test01 --from-beginning

#生产

bin/kafka-console-producer.sh --broker-list 192.168.221.100:9092 --topic flink_t
2.3配置Maxwell
2.3.1创建Maxwell 所需要的 数据库 和 用户
1)创建数据库
CREATE DATABASE maxwell;2)调整MySQL数据库密码级别
set global validate_password_policy=0;

set global validate_password_length=4;
3)创建Maxwell用户并赋予其必要权限
CREATE USER 'maxwell'@'%' IDENTIFIED BY 'maxwell';

GRANT ALL ON maxwell.* TO 'maxwell'@'%';

GRANT SELECT, REPLICATION CLIENT, REPLICATION SLAVE ON *.* TO 'maxwell'@'%';
2.3.2配置Maxwell
在Maxwell安装包解压目录下,复制 并 编辑 config.properties.example
mv config.properties.example config.propertiesvim config.propertiesproducer=kafka
kafka.bootstrap.servers=192.168.221.100:9092
#目标Kafka topic,可静态配置,例如:maxwell,也可动态配置,例如:%{database}_%{table} kafka_topic=flink_test01
# mysql login info host=192.168.221.100
user=maxwell
password=maxwell2.3.3 启动Maxwell
1)启动Maxwell
bin/maxwell --config config.properties2)停止Maxwell
ps -ef | grep maxwell | grep -v grep | grep maxwell | awk '{print $2}' | xargs kill -92.4测试maxwell、mysql、kafka 正常使用
2.4.1查看Maxwell、kafka、zookeeper 进程
jps

2.4.2 mysql添加、修改、删除数据

查看 kafka 消费者
![]()
有消费 说明 流程是通畅 的
2.5 idea 编写程序
2.5.1 idea 创建 maven 项目
2.5.2 pom.xml 依赖
<dependencies>
    <dependency>
        <groupId>org.slf4j</groupId>
        <artifactId>slf4j-api</artifactId>
        <version>1.7.21</version>
    </dependency>
    <dependency>
        <groupId>org.slf4j</groupId>
        <artifactId>slf4j-log4j12</artifactId>
        <version>1.7.21</version>
    </dependency>

    <dependency>
        <groupId>org.apache.flink</groupId>
        <artifactId>flink-streaming-java_2.11</artifactId>
        <version>1.13.0</version>
    </dependency>
    <dependency>
        <groupId>org.apache.flink</groupId>
        <artifactId>flink-java</artifactId>
        <version>1.13.0</version>
    </dependency>
    <dependency>
        <groupId>org.apache.flink</groupId>
        <artifactId>flink-clients_2.11</artifactId>
        <version>1.13.0</version>
    </dependency>
    <dependency>
        <groupId>org.apache.hadoop</groupId>
        <artifactId>hadoop-client</artifactId>
        <version>3.1.3</version>
    </dependency>
    <dependency>
        <groupId>mysql</groupId>
        <artifactId>mysql-connector-java</artifactId>
        <version>8.0.13</version>
    </dependency>
    <dependency>
        <groupId>org.apache.flink</groupId>
        <artifactId>flink-table-planner-blink_2.11</artifactId>
        <version>1.13.0</version>
    </dependency>
    <!--mysql cdc -->
    <dependency>
        <groupId>com.ververica</groupId>
        <artifactId>flink-connector-mysql-cdc</artifactId>
        <version>2.2.0</version>
        <!--            <scope>provided</scope>-->
    </dependency>
    <dependency>
        <groupId>org.apache.flink</groupId>
        <artifactId>flink-connector-kafka_2.12</artifactId>
        <version>1.12.7</version>
    </dependency>

    <dependency>
        <groupId>com.alibaba</groupId>
        <artifactId>fastjson</artifactId>
        <version>2.0.29</version>
    </dependency>

    <!--kafka-->
    <dependency>
        <groupId>org.apache.kafka</groupId>
        <artifactId>kafka-clients</artifactId>
        <version>2.1.1</version>
    </dependency>

    <!--本地调试flink ui-->
    <dependency>
        <groupId>org.apache.flink</groupId>
        <artifactId>flink-runtime-web_2.11</artifactId>
        <version>1.13.0</version>
        <scope>compile</scope>
    </dependency>

    <dependency>
        <groupId>org.apache.flink</groupId>
        <artifactId>flink-connector-jdbc_2.11</artifactId>
        <version>1.12.0</version>
    </dependency>

    <dependency>
        <groupId>org.apache.flink</groupId>
        <artifactId>flink-jdbc_2.11</artifactId>
        <version>1.9.1</version>
    </dependency>

    <dependency>
        <groupId>org.apache.kafka</groupId>
        <artifactId>kafka-clients</artifactId>
        <version>3.0.0</version>
    </dependency>

    <dependency>
        <groupId>org.apache.flink</groupId>
        <artifactId>flink-table-planner_2.11</artifactId>
        <version>1.10.1</version>
    </dependency>

</dependencies>
2.5.3 编写测试代码
import com.alibaba.fastjson.JSON;
import com.alibaba.fastjson.JSONObject;
import com.qiyu.dim.KafkaUtil;
import org.apache.flink.api.common.functions.FlatMapFunction;
import org.apache.flink.api.common.functions.MapFunction;
import org.apache.flink.api.java.io.jdbc.JDBCOutputFormat;
import org.apache.flink.streaming.api.datastream.DataStream;
import org.apache.flink.streaming.api.environment.StreamExecutionEnvironment;
import org.apache.flink.types.Row;
import org.apache.flink.util.Collector;

/**
 * @Author liujian
 * @Date 2023/4/24 9:40
 * @Version 1.0
 */
public class Flink_kafka {
    public static void main(String[] args) throws Exception {
        // todo 1.获取执行环境
        StreamExecutionEnvironment env = StreamExecutionEnvironment.getExecutionEnvironment();
        // todo 2.将并行度设为1, (生产环境中,kafka中 topic有几个分区 设为几)
        env.setParallelism(1);
        // todo 3.读取 maxwell kafka 数据流
        DataStream dataStreamSource=
                env.addSource(KafkaUtil.getKafkaConsumer("flink_test01","192.168.221.100:9092"));
        // todo 4.取kafka中的数据流 有效数据,获取 emp_user 表中的 新增、修改、初始化数据 。脏数据直接打印控制台,不处理
        DataStream<JSONObject> data = dataStreamSource.flatMap(new FlatMapFunction<String, JSONObject>() {
            @Override
            public void flatMap(String s, Collector<JSONObject> collector) throws Exception {
                try {
                    // 将 数据流中 类型 转换 String >> JsonObject
                    JSONObject json = JSON.parseObject(s);
                    //取 emp_user 表数据
                    if (json.getString("table").equals("emp_user")) {
                        //取新增、修改数据
                        if (json.getString("type").equals("insert") || json.getString("type").equals("update")) {
                            System.out.println(json.getJSONObject("data"));
                            collector.collect(json.getJSONObject("data"));
                        }
                    }
                } catch (Exception e) {
                    System.out.println("脏数据:" + s);
                }

            }
        });

        // todo 5. 将 有效数据转换 为 Row 类型 。JDBCOutputFormat只能处理Row,而Row是对prepared statement的参数的一个包装类
        DataStream<Row> map = data.map(new MapFunction<JSONObject, Row>() {
            @Override
            public Row map(JSONObject jsonObject) throws Exception {
                Row row = new Row(4);
                row.setField(0, jsonObject.getString("id"));
                row.setField(1, jsonObject.getString("name"));
                row.setField(2, jsonObject.getString("age"));
                row.setField(3, jsonObject.getString("sex"));
                return row;
            }
        });

        // todo 6.  将 数据存储 到 mysql 当中,同主键 数据 就修改, 无 就新增
        String query =
                "INSERT  INTO gmall_20230424.emp_user_copy (id,name,age,sex) " +
                        "VALUES (?, ?,?,?) " +
                        "ON DUPLICATE KEY UPDATE name = VALUES(name) , age = VALUES(age)  , sex = VALUES(sex)";
        JDBCOutputFormat finish = JDBCOutputFormat.buildJDBCOutputFormat()
                .setDrivername("com.mysql.jdbc.Driver")
                .setDBUrl("jdbc:mysql://192.168.221.100:3306/gmall_20230424?user=root&password=000000")
                .setQuery(query)
                .setBatchInterval(1)
                .finish();

        //todo 7.提交存储任务
        map.writeUsingOutputFormat(finish);

        //todo 8.提交flink 任务
        env.execute();

    }
}
2.5.4 启动测试代码
2.5.5 测试
如 2.4.2 一样 ,在测试表 emp_user 中 进行 新增 、修改
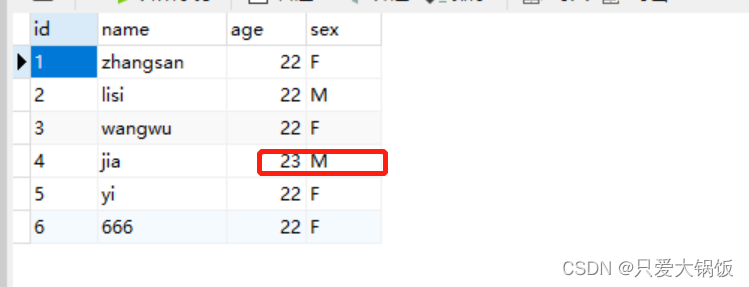
查看 是否写入 emp_user_copy表中
INSERT into emp_user VALUES ("1","zhangsan",22,"F");

INSERT into emp_user VALUES ("2","lisi",22,"M");

INSERT into emp_user VALUES ("3","wangwu",22,"F");

INSERT into emp_user VALUES ("4","jia",22,"M");

INSERT into emp_user VALUES ("5","yi",22,"F");

UPDATE emp_user set age=23 where id ="4";

INSERT into emp_user VALUES ("6","666",22,"F");
新增 id为 4的数据时:age=22,但后面做了次 update age=23

风语者!平时喜欢研究各种技术,目前在从事后端开发工作,热爱生活、热爱工作。


 U8W/U8W-Mini使用与常见问题解决
 QT多线程的5种用法,通过使用线程解决UI主界面的耗时操作代码,防止界面卡死。...
 stm32使用HAL库配置串口中断收发数据(保姆级教程)
 分享几个国内免费的ChatGPT镜像网址(亲测有效)
 Allegro16.6差分等长设置及走线总结