您现在的位置是:首页 >其他 >A-loam运行kitti及轨迹保存网站首页其他
A-loam运行kitti及轨迹保存
目录
使用A-loam运行kitti数据集。
运行kitti数据集
方法一、使用rosbag播放
使用代码:
roslaunch aloam_velodyne xxx.launch
rosbag play /.../xxx.bag
其中,运行kitti数据集时,xxx.launch改为aloam_velodyne_HDL_64.launch,/.../xxx.bag改为所运行的rosbag文件,/...为该rosbag的路径。
具体操作如下:
开一个终端,运行
roslaunch aloam_velodyne aloam_velodyne_HDL_64.launch再开一个终端,运行
rosbag play /.../xxx.bag此时,若运行时rviz界面没有图像,可能是rosbag发布的topic和aloam代码中所接收的topic没有对应上,修改方法见下文故障:rviz界面没有图像部分。
方法二、使用kitti_helper.launch
按照A-loam的README.md所述:
## 4. KITTI Example (Velodyne HDL-64)
Download [KITTI Odometry dataset](http://www.cvlibs.net/datasets/kitti/eval_odometry.php) to YOUR_DATASET_FOLDER and set the `dataset_folder` and `sequence_number` parameters in `kitti_helper.launch` file. Note you also convert KITTI dataset to bag file for easy use by setting proper parameters in `kitti_helper.launch`.```
roslaunch aloam_velodyne aloam_velodyne_HDL_64.launch
roslaunch aloam_velodyne kitti_helper.launch
```
在两个终端中分别运行
roslaunch aloam_velodyne aloam_velodyne_HDL_64.launch
roslaunch aloam_velodyne kitti_helper.launch
其中,kitti_helper.launch文件中的参数需要提前配置好。
该方法适合下载好的00-10序列。
故障:rviz界面没有图像
运行时rviz界面没有图像,可能是rosbag发布的topic和aloam代码中所接收的topic没有对应上。
查看rosbag发布的topic
打开终端,运行
rosbag info /.../xxx.bag其中,/.../xxx.bag为所要查看的rosbag路径及文件名。
以我的rosbag为例,截取一段打印输出信息如下:

其中,topics是rosbag在play播放发布的topic话题。
topics中,激光点云的topic话题名称是/kitti/velo/pointcloud 。
a-loam代码中所接收的topic
aloam源代码中,scanRegistration.cpp文件中有a-loam所接收的topic,修改与rosbag发布的激光点云的topic话题名称对应。
scanRegistration.cpp的路径:/catkin_ws/src/A-LOAM-devel/src/scanRegistration.cpp
原文:
ros::Subscriber subLaserCloud = nh.subscribe<sensor_msgs::PointCloud2>("/velodyne_points", 100, laserCloudHandler);
把原来的/velodyne_points修改为/kitti/velo/pointcloud,修改后:
ros::Subscriber subLaserCloud = nh.subscribe<sensor_msgs::PointCloud2>("/kitti/velo/pointcloud", 100, laserCloudHandler);
再次编译
    cd ~/catkin_ws
    catkin_make
source ~/catkin_ws/devel/setup.bash编译成功后,运行kitti数据集。
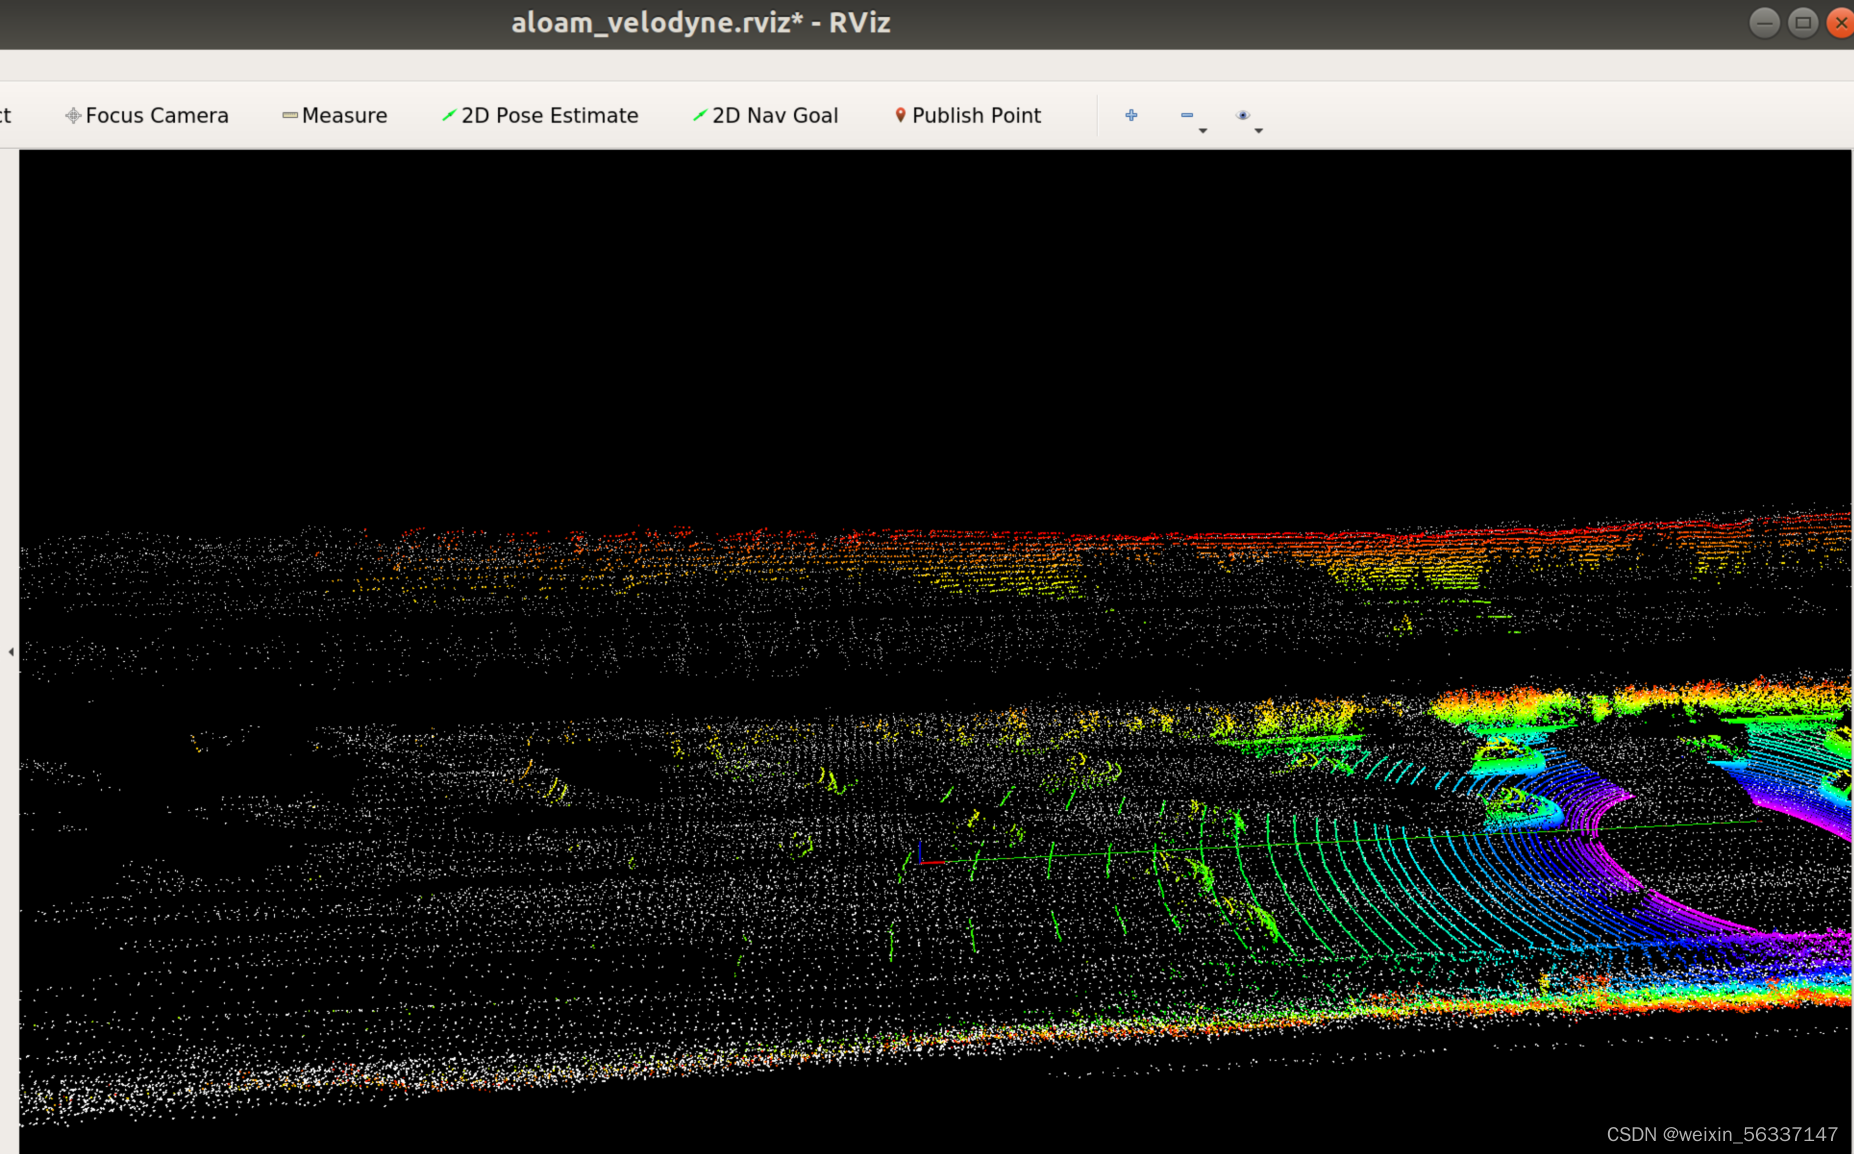
运行结果示例:

图中,彩色点是正在处理的, 白色点是处理完成的,中间横线是运动轨迹。
rqt
启动rqt
rqt是ROS的图形开发平台,是一个基于 Qt 的框架。使用“rqt_graph”指令可以显示当前系统运行情况,
如果你安装了rqt,
在新的终端中运行
rosrun rqt_graph rqt_graph或者
rqt_graph会弹出rqt界面。
如果没有弹出rqt界面,可能需要安装rqt,安装指令类似如下:
sudo apt-get install ros-indigo-rqt
sudo apt-get install ros-indigo-rqt-common-plugins
指令根据实际ROS版本修改。
查看rqt界面
正常弹出的rqt界面中,绘制有实时的node节点和topic话题信息。
可以点击右上角“Refresh ROS graph"按钮刷新界面。
本文运行a-loam时的图像如下:
只运行a-loam的roslauch命令:

再运行kitti的rosbag时:

多了左边rosbag的节点和话题,rosbag的激光点云的topic话题被scanRegistration节点接收。
还多了右下角的话题/tf,此时程序正常运行,rviz中有定位和地图结果。
rosbag播放完成后:

rosbag相关的节点和话题消失,程序运行结束。
通过rqt可以查看rosbag和aloam的运行情况,方便理解。
保存轨迹
原本的aloam不带有保存轨迹的程序,可以自己手动添加。
核心思路在于将/aft_mapped_to_init话题中的数据按照一定格式保存到txt中。
方法一、简单的
在aloam源代码laserMapping.cpp中修改代码,在laserOdometryHandler函数中添加保存轨迹代码。
laserMapping.cpp的位置:/catkin_ws/src/A-LOAM-devel/src/laserMapping.cpp
文件中,找到laserOdometryHandler函数的实现:
void laserOdometryHandler(const nav_msgs::Odometry::ConstPtr &laserOdometry)
{
在laserOdometryHandler函数的末尾追加
std::ofstream pose1("/your_path/your_file_name.txt", std::ios::app);
pose1.setf(std::ios::scientific, std::ios::floatfield);
//保存结果的精度,可调
pose1.precision(6);
pose1 << odomAftMapped.header.stamp << " "
<< odomAftMapped.pose.pose.position.x << " "
<< odomAftMapped.pose.pose.position.y << " "
<< odomAftMapped.pose.pose.position.z << " "
<< odomAftMapped.pose.pose.orientation.x << " "
<< odomAftMapped.pose.pose.orientation.y << " "
<< odomAftMapped.pose.pose.orientation.z << " "
<< odomAftMapped.pose.pose.orientation.w << std::endl;
pose1.close();
odomAftMapped绘图后的里程计,取其中的时间、位置xyz和四元数,保存到/your_path/your_file_name.txt中,your_path和your_file_name根据自己喜好设定。
优点:改动简单,容易操作。
方法二、使用ros::Subscriber和回调函数
在aloam源代码中laserMapping.cpp中修改代码。在main函数中新建ros::Subscriber 接收到所需topic话题时执行回调函数,在main函数之前编写回调函数实现轨迹保存。
在main函数中
int main(int argc, char **argv)
{
定义了很多订阅者ros::Subscriber ,包括subLaserOdometry、subLaserCloudFullRes等。定义如下:
	ros::Subscriber subLaserOdometry = nh.subscribe<nav_msgs::Odometry>("/laser_odom_to_init", 100, laserOdometryHandler);

	ros::Subscriber subLaserCloudFullRes = nh.subscribe<sensor_msgs::PointCloud2>("/velodyne_cloud_3", 100, laserCloudFullResHandler);
可以在其后定义自己的ros::Subscriber ,命名为save_path。
ros::Subscriber save_path= nh.subscribe<nav_msgs::Odometry>("/aft_mapped_to_init", 100, path_save); ros::Subscriber save_path 当有/aft_mapped_to_init话题时,执行回调函数path_save。
path_save的实现:
void path_save(nav_msgs::Odometry odomAftMapped ){

	    //保存轨迹,path_save是文件目录,txt文件提前建好,/home/xxx/xxx.txt,
   			std::ofstream pose1("/path_save/xxx.txt", std::ios::app);
			pose1.setf(std::ios::scientific, std::ios::floatfield);
			pose1.precision(9);    //精度可调,根据需要调整

			static double timeStart = odomAftMapped.header.stamp.toSec();
			auto T1 =ros::Time().fromSec(timeStart) ;

		  pose1<<	odomAftMapped.header.stamp -T1<< " "
              <<-odomAftMapped.pose.pose.position.y << " "
              << odomAftMapped.pose.pose.position.z << " "
              << odomAftMapped.pose.pose.position.x << " "
              << odomAftMapped.pose.pose.orientation.x << " "
              << odomAftMapped.pose.pose.orientation.y << " "
              << odomAftMapped.pose.pose.orientation.z << " "
              << odomAftMapped.pose.pose.orientation.w << std::endl;
			pose1.close();

}
这段path_save的实现写在main函数之前。
方法三、创建新节点用于保存轨迹
新建节点path_save。新建cpp文件、修改CMakeLists.txt、修改aloam_velodyne_VLP_16.launch。
1.新建cpp文件
aloam源代码中新建cpp文件,比如savePath.cpp。
aloam源代码路径:/catkin_ws/src/A-LOAM-devel/src/savePath.cpp
文件中写入
void path_save(nav_msgs::Odometry odomAftMapped ){

	    //保存轨迹,path_save是文件目录,txt文件提前建好,/home/xxx/xxx.txt,
   			std::ofstream pose1(“path_save”, std::ios::app);
			pose1.setf(std::ios::scientific, std::ios::floatfield);
			pose1.precision(9);

			static double timeStart = odomAftMapped.header.stamp.toSec();
			auto T1 =ros::Time().fromSec(timeStart) ;
			pose1<< odomAftMapped.header.stamp -T1<< " "
              << -odomAftMapped.pose.pose.position.y << " "
              << odomAftMapped.pose.pose.position.z << " "
              << odomAftMapped.pose.pose.position.x << " "
              << odomAftMapped.pose.pose.orientation.x << " "
              << odomAftMapped.pose.pose.orientation.y << " "
              << odomAftMapped.pose.pose.orientation.z << " "
              << odomAftMapped.pose.pose.orientation.w << std::endl;
			pose1.close();

}

int main(int argc, char **argv){
    ros::init(argc, argv, "path_save");
    ros::NodeHandle nh;
    ros::Subscriber save_path = nh.subscribe<nav_msgs::Odometry>("/aft_mapped_to_init",     100, path_save);	    //保存轨迹,a_loam直接订阅话题/aft_mapped_to_init。

    ros::spin();
     }
其中,头文件可以按照其他源文件添加,比如laserMapping.cpp的文件。
2.修改CMakeLists.txt
同时,CMakeLists.txt中也要修改。
仿照alaserMapping的
add_executable(kittiHelper src/kittiHelper.cpp)
target_link_libraries(kittiHelper ${catkin_LIBRARIES} ${PCL_LIBRARIES} ${OpenCV_LIBS})
在CMakeLists.txt末尾追加,写savePath.cpp的:
add_executable(apath_save src/savePath.cpp)
target_link_libraries(apath_save ${catkin_LIBRARIES} ${PCL_LIBRARIES} ${OpenCV_LIBS})
用 savePath.cpp创建可执行文件apath_save,并链接相应的库
3.修改aloam_velodyne_VLP_16.launch
aloam_velodyne_VLP_16.launch要发布新建的节点,在原有发布节点的代码后面追加:
<node pkg="aloam_velodyne" type="apath_save" name="b_path_save" output="screen" />
其中,apath_save对应CMakeLists.txt中add_executable产生的可执行文件名apath_save;
节点名b_path_save任意,会产生新节点b_path_save,rqt可查看新节点的产生。
该方法较复杂,savePath.cpp文件新建了节点path_save。
优点:不需要保存轨迹时,只需删除或注释掉发布新节点那段代码即可,不需要重新编译。
<!-- xxxxxxx -->
小结
保存轨迹为TUM格式,可以使用evo等工具绘制出图像。
总结
1.运行kitti数据集
roslaunch aloam_velodyne xxx.launch
rosbag play /.../xxx.bag
2.故障:rviz没有图像
把aloam代码中所接收的topic和rosbag发布的topic对应上。
别忘以后跑其他数据集修改回来。
3.rqt查看topic情况
rqt_graph
4.保存轨迹
修改laserMapping.cpp,在laserOdometryHandler函数中添加保存轨迹代码。
文章中,“aloam”、“a-loam”、“A-loam”、“A-Loam”、“A-LOAM”均指 HKUST-Aerial-Robotics 的A-LOAM。链接:
GitHub - HKUST-Aerial-Robotics/A-LOAM: Advanced implementation of LOAM


 U8W/U8W-Mini使用与常见问题解决
 QT多线程的5种用法,通过使用线程解决UI主界面的耗时操作代码,防止界面卡死。...
 stm32使用HAL库配置串口中断收发数据(保姆级教程)
 分享几个国内免费的ChatGPT镜像网址(亲测有效)
 Allegro16.6差分等长设置及走线总结