您现在的位置是:首页 >技术交流 >【Linux】输入系统详述 + 触摸屏应用实战(tslib)网站首页技术交流
【Linux】输入系统详述 + 触摸屏应用实战(tslib)
目录简述
前言:
经典环节:我一直深信,带着问题思考和实践,能够更容易理解并学习到。
(1)什么是输入系统?
(2)输入设备种类繁多,Linux输入系统是如何管理的?
- ①繁杂的输入,如何处理成统一标准的输入事件?
- ②多个事件时,驱动程序上传事件时如何告知APP已完整发送?
- ③用户程序(APP)是获得数据具体流程是怎么样的?
(3)APP可以以什么样的方式访问硬件?具体又是怎么实现的?
(4)以电容触摸屏为例,用tslib库使用输入设备。
- tslib库的作用是什么?它有什么优点?
- tslib库框架是什么样的?内部的机理是什么样的?
- 如何使用tslib库实现应用程序的功能?---应用实战
接下来的文章内容,将详细的解答上面的问题。如果有所帮助,三连关注( ^_^ ),多多支持一下,大家一同进步呀!
一、输入系统
什么是输入系统?
我们生活中有很多的输入设备,例如键盘、鼠标、遥控杆、触摸屏等等,用户通过这些设备和Linux系统进行数据交换。
多个输入设备,是否能统一接口,并也在在驱动层面以及应用层面上统一,Linux系统为了实现上面的需求,设计了一套兼容所有输入设备的框架---即输入系统。
二、Linux输入系统框架
如下图所示,Linux输入系统管理的方式具体分为三个阶段,①处理成统一标准的输入事件,上发到核心层②接收输入事件,转发给到事件层(event handler)③处理事件,提供用户空间访问接口

这里从硬件向上到APP涉及到的概念进行阐述:
(1)输入系统的驱动层
①这里有很多的硬件输入设备,会产生中断,发送数据到系统,那么系统如何去统一的处理, 处理成统一标准的输入事件?
这里的输入事件是一个“struct input_event”结构体,查阅Linux内核文件:
D:Linux-4.9.88.tarLinux-4.9.88includeuapilinux input.h


这里具体输入事件结构统一为time、type、code和value。
timeval结构体---表示事件的发生时间

type:表示哪类事件

code:表示该类事件下的那一个事件

value:表示事件值。
②多个事件时,驱动程序上传事件时如何告知APP已完整发送?

(2)输入系统核心层
中转站的角色,核心层可以决定把输入事件转发给上面哪个 handler 来处理。有多种 handler,比如:evdev_handler、kbd_handler、joydev_handler 等等。
(3)输入系统事件层
这里处理核心层上传的输入事件,之后给用户空间提供用户接口。
③在了解系统内部的结构后,用户程序(APP)是获得数据具体流程是怎么样的?
- APP发起读操作,若无数据则休眠
- 用户操作设备,硬件上产生中断
- 输入系统驱动层对应的驱动程序处理中断。
- 核心层将输入事件转发到相应的handler处理,最常用的evdev_handler。
- APP正在等待数据时,evdev_handler会把它唤醒,这样APP就可以获得数据。
这里APP获得数据的方法有2种,一种是直接访问设备节点,或者通过tslib、libinput这类库来间接访问设备节点。
好用的调试命令:
//查看设备节点,有什么事件

ls /dev/input/* -l

//获取与event对应的相关设备信息

cat /proc/bus/input/devices
//使用命令读取数据(以触摸屏为例)

hexdump /dev/input/event1
三、APP访问硬件的方式
APP可以以什么样的方式访问硬件?
APP访问硬件的方式有四种:查询方式、休眠-唤醒方式、POLL/SELECT方式以及异步通知方式。
| 方式 | 机理 |
| 查询 | 老板时不时来打扰你 |
| 休眠-唤醒 | 平时躺着不做事,老板叫了之后干活 |
| POLL/SELECT | 定个闹钟,时间到了就干活或者老板叫你时干活 |
| 异步通知 | 自己在干一些活,老板来叫你时干老板交代的活 |
上面的方式,不分优劣,都有其应用的场景,那么具体的方法实现是怎么样的?
(1)查询方式、休眠-唤醒
| 区别 | |
| 查询方式 | APP调用open函数时,传入“O_NONBLOCK”---非阻塞 APP调用read函数时,如果驱动程序中有数据,那么APP的函数会返回数据,否则立刻返回错误。 |
| 休眠-唤醒 | APP调用open函数时,不传入“O_NONBLOCK”---阻塞 APP调用read函数时,如果驱动程序中有数据,那么APP的函数会返回数据;没有则APP就会在内核态休眠。 |
具体示例:
#include <linux/input.h>

#include <sys/types.h>
#include <sys/stat.h>
#include <fcntl.h>
#include <sys/ioctl.h>
#include <unistd.h>
#include <poll.h>


#include <stdio.h>
#include <string.h>


/*01_get_input_info
	/dev/input/event1	对应触摸屏事件
	O_NONBLOCK(非阻塞方式)
	*/
int main(int argc, char **argv)
{
	int fd;
	int err;
	int len;
	int i;
	unsigned char byte;
	int bit;
	struct input_id id;
	unsigned int evbit[2];

	struct input_event event;

	/*
		Event Type
	*/
	char * ev_names[] ={
		"EV_SYN",
		"EV_KEY",
		"EV_REL",
		"EV_ABS",
		"EV_MSC",
		"EV_SW"	,
		"NUll  ",
		"NUll  ",
		"NUll  ",
		"NUll  ",
		"NUll  ",
		"EV_LED",
		"EV_SND",
		"NUll  ",
		"EV_REP",
		"EV_FF"	,
		"EV_PWR",
	};

	//阻塞、非阻塞方式的对比
	if(argc < 2)
	{
		printf("Usage: %s <dev> [noblock]
",argv[0]);
		return -1;
	}
	if(argc == 3 && !strcmp(argv[2],"noblock"))
	{
		fd =  open(argv[1], O_RDWR | O_NONBLOCK);
	}
	else
	{
		fd =  open(argv[1], O_RDWR);
	}
	if(fd < 0)
	{
		printf("Usage: %s <dev>
",argv[0]);
		return -1;
	}

	//获取设备的信息
	err = ioctl(fd, EVIOCGID, &id);
	if(err == 0)
	{
		printf("bustype = ox%x
",id.bustype);
		printf("vendor  = ox%x
",id.vendor );
		printf("product = ox%x
",id.product);
		printf("version = ox%x
",id.version);
	}

	//获取evbit,看设备支持什么事件
	len = ioctl(fd, EVIOCGBIT(0, sizeof(evbit)), &evbit);
	if(len > 0 && len <= sizeof(evbit))
	{
		printf("support evet type: ");
		for(i = 0; i <len; i++)
		{
			byte = ((unsigned char*)evbit)[i];
			for(bit = 0; bit < 8; bit++)
			{
				if(byte & (1 << bit)){
					printf("%s ", ev_names[i * 8 + bit]);
				}
			}
		}
		printf("
");
	}
	while(1){
		len = read(fd, &event, sizeof(event));
		if(len == sizeof(event))
		{
			printf(" get event: type = 0x%x, code = 0x%x, value = 0x%x
", event.type, event.code, event.value);
		}
		else
		{
			printf(" read error %d
", len);
		}
	}
	return 0;

}
实际效果:
查询方式(非阻塞):
获取设备信息,打开设备节点,之后app读取,驱动程序无数据,会一直return error

休眠唤醒(阻塞):
获取设备信息,打开设备节点,之后app读取,若无数据,会进入休眠状态,当点击触摸屏时,会返回数据。

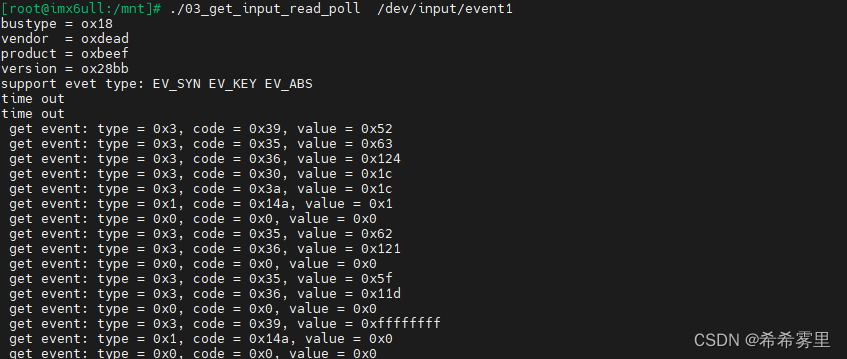
(2)POLL/SELECT方式
POLL机制、SELECT机制是完全一样的,只是APP接口函数不一样。
在调用poll、select函数时传入"超时时间"。在这段时间内,条件合适时(比如有数据可读)就会立刻返回,否则等到“超时时间”结束时返回错误。
poll/select监测事件类型有多种,如下表所示:

具体示例:
#include <linux/input.h>
#include <sys/types.h>
#include <sys/stat.h>
#include <fcntl.h>
#include <sys/ioctl.h>
#include <unistd.h>
#include <poll.h>


#include <stdio.h>
#include <string.h>


/*01_get_input_read_poll
	/dev/input/event1	对应触摸屏事件
	*/
int main(int argc, char **argv)
{
	int fd;
	int err;
	int len;
	int ret;
	int i;
	unsigned char byte;
	int bit;
	struct input_id id;
	unsigned int evbit[2];

	struct input_event event;
	struct pollfd fds[1];
	nfds_t nfds = 1;

	/*
		Event Type
	*/
	char * ev_names[] ={
		"EV_SYN",
		"EV_KEY",
		"EV_REL",
		"EV_ABS",
		"EV_MSC",
		"EV_SW"	,
		"NUll  ",
		"NUll  ",
		"NUll  ",
		"NUll  ",
		"NUll  ",
		"EV_LED",
		"EV_SND",
		"NUll  ",
		"EV_REP",
		"EV_FF"	,
		"EV_PWR",
	};


	if(argc != 2)
	{
		printf("Usage: %s <dev>
",argv[0]);
		return -1;
	}
	fd =  open(argv[1], O_RDWR);
	if(fd < 0)
	{
		printf("Usage: %s <dev>
",argv[0]);
		return -1;
	}


	//获取设备的信息
	err = ioctl(fd, EVIOCGID, &id);
	if(err == 0)
	{
		printf("bustype = ox%x
",id.bustype);
		printf("vendor  = ox%x
",id.vendor );
		printf("product = ox%x
",id.product);
		printf("version = ox%x
",id.version);
	}

	//获取evbit,看设备支持什么事件
	len = ioctl(fd, EVIOCGBIT(0, sizeof(evbit)), &evbit);
	if(len > 0 && len <= sizeof(evbit))
	{
		printf("support evet type: ");
		for(i = 0; i <len; i++)
		{
			byte = ((unsigned char*)evbit)[i];
			for(bit = 0; bit < 8; bit++)
			{
				if(byte & (1 << bit)){
					printf("%s ", ev_names[i * 8 + bit]);
				}
			}
		}
		printf("
");
	}
	//POLL和SELECT方式读取输入数据,超时时间-5s
	while(1){
        //想查询哪个文件(fd)
		fds[0].fd = fd;
        //想查询什么事件
		fds[0].events = POLLIN;
        //清除“返回事件”
		fds[0].revents = 0;
		ret = poll(fds, nfds, 5000);
		if(ret > 0){
			if(fds[0].revents == POLLIN)
			{
				while(read(fd, &event, sizeof(event)) == sizeof(event))
				{
					printf(" get event: type = 0x%x, code = 0x%x, value = 0x%x
", event.type, event.code, event.value);
				}
			}
		}
		else if(ret == 0)
		{
			printf("time out
");
		}
		else
		{
			printf("poll err
");
		}
	}
	return 0;
实际效果:

(3)异步通知方式
异步通知机制是类似与单片机开发的中断。就是APP可以忙自己的事,当驱动程序有数据时它会主动给APP发信号,这时APP执行信号处理函数。
除了清楚上述简要的流程以及对象,还有一些具体问题需要解决。
- 驱动程序给APP发什么信号?----SIGIO(驱动常用信号)
- 怎么发信号? ---内核提供函数
- 信号处理函数和信号之间怎么挂钩:APP注册信号处理函数
①...Linux-4.9.88includeuapiasm-generic signal.h中有很多信号:

②APP提供注册信号处理函数的同时,也要跟SIGIO挂钩,具体如法如下:

进一步的思考:
- 内核有很多驱动,让哪一个驱动给app发SIGIO信号?
- APP打卡驱动程序的设备节点
- 驱动程序怎么知道要将发信号给现在这个APP?
- APP把自己进程ID告诉驱动程序
具体示例:
#include <linux/input.h>

#include <sys/types.h>
#include <sys/stat.h>
#include <fcntl.h>
#include <sys/ioctl.h>
#include <unistd.h>
#include <signal.h>
#include <sys/types.h>
#include <fcntl.h>


#include <stdio.h>
#include <string.h>


int fd;

//信号处理函数
void sig_func_handler(int sig)
{
	struct input_event event;
	while(read(fd, &event, sizeof(event)) == sizeof(event))
	{
		printf(" get event: type = 0x%x, code = 0x%x, value = 0x%x
", event.type, event.code, event.value);
	}


};
/*05_get_read_faycn
	/dev/input/event1	对应触摸屏事件
	*/
int main(int argc, char **argv)
{
	int err;
	int len;
	int ret;
	int i;
	int flags;
	int count = 0;

	unsigned char byte;
	int bit;
	struct input_id id;
	unsigned int evbit[2];


	/*
		Event Type
	*/
	char * ev_names[] ={
		"EV_SYN",
		"EV_KEY",
		"EV_REL",
		"EV_ABS",
		"EV_MSC",
		"EV_SW"	,
		"NUll  ",
		"NUll  ",
		"NUll  ",
		"NUll  ",
		"NUll  ",
		"EV_LED",
		"EV_SND",
		"NUll  ",
		"EV_REP",
		"EV_FF"	,
		"EV_PWR",
	};


	if(argc != 2)
	{
		printf("Usage: %s <dev>
",argv[0]);
		return -1;
	}
	/*注册信号处理函数*/
	signal(SIGIO, sig_func_handler);

	/*打开驱动程序*/
	fd =  open(argv[1], O_RDWR);
	if(fd < 0)
	{
		printf("Usage: %s <dev>
",argv[0]);
		return -1;
	}

	//获取设备的信息
	err = ioctl(fd, EVIOCGID, &id);
	if(err == 0)
	{
		printf("bustype = ox%x
",id.bustype);
		printf("vendor  = ox%x
",id.vendor );
		printf("product = ox%x
",id.product);
		printf("version = ox%x
",id.version);
	}

	//获取evbit,看设备支持什么事件
	len = ioctl(fd, EVIOCGBIT(0, sizeof(evbit)), &evbit);
	if(len > 0 && len <= sizeof(evbit))
	{
		printf("support evet type: ");
		for(i = 0; i <len; i++)
		{
			byte = ((unsigned char*)evbit)[i];
			for(bit = 0; bit < 8; bit++)
			{
				if(byte & (1 << bit)){
					printf("%s ", ev_names[i * 8 + bit]);
				}
			}
		}
		printf("
");
	}

	/*把APP的进程号告诉驱动程序*/
	fcntl(fd, F_SETOWN, getpid());

	/*使能"异步通知"*/
	flags = fcntl(fd, F_GETFL);
	fcntl(fd, F_SETFL, flags | FASYNC);

	while(1){
		printf("main loop count = %d
", count++);
		sleep(2);
	}
	return 0;

}
实际效果:

四、tslib库框架
(1)电容屏简述
电容屏中有一个控制芯片,它会周期性产生驱动信号,接收电极接收到信号,并可测量电荷大小。当电容屏被按下时,相当于引入新的电容,从而影响了接收电极接收到的电荷大小。主控芯片根据电荷大小即可计算触点位置。
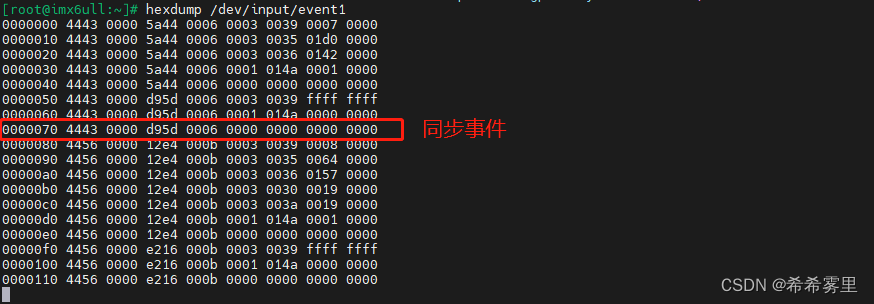
电容触摸屏数据分析,对开发板上电容屏对应的设备节点/dev/input/event1,执行以下的命令:
hexdump /dev/input/event1①一个手指点击触摸屏得到的:

② 两个手指点击触摸屏得到的:

(2)tslib库的用处
tslib库的作用是什么?它有什么优点?
我们可以看到,点击触摸屏时会有很多的事件,我们去做过滤和处理是不方便的。
tslib是一个触摸屏的开源库,可以使用它来访问触摸屏设备,可以给输入设备添加各种“filter”(过滤库,就是各种处理)。
(3)tslib框架分析
tslib库框架是什么样的?内部的机理是什么样的?
tslib的框架如图所示:

tslib的主要代码有:
- src/ 接口函数
- ts_setup.c
- ts_open.c
- ts_config.c
- plugins/ 模块module,以下的都是一个模块
- linear.c
- dejitter.c
- pthres.c
- input_raw.c
- tests/ 测试程序
- ts_test.c
- ts_test_mt.c
- ts_print.c
- ts_print_mt.c
分析整个tslib框架,参照示例程序(ts_test.c和ts_test_mt.c),用于单点触摸屏以及多点触摸屏。tslib的运行流程如下:
- 1.调用ts_open,打开设备节点,构造出tsdev结构体。这个结构体的内容如下:

- 2.调用ts_config,读取配置文件的处理,对于所有的模块,都会插入链表表头。module和module_raw对应tsdev结构体里不同的链表list、list_raw。
- 3.递归调用各个模块,input_raw→pthres→dejitter→linear模块,对从设备节点获得的原始数据进行数据处理,返回最终数据。下图就是递归的过程。
-

所以主体就调用三个函数:ts_setup、ts_read或ts_readmt、ts_close。
五、基于tslib的测试程序:
如何使用tslib库实现应用程序的功能?
(1)交叉编译tslib库
//配置交叉编译工具链(复制时注意检查哈,看是否一致)
export ARCH=arm
export CROSS_COMPILE=arm-linux-gnueabihf-export PATH=$PATH:/home/book/100ask_imx6ull-sdk/ToolChain/gcc-linaro-6.2.1-2016.11-x86_64_arm-linux-gnueabihf/bin
//tslib库解压
cp /home/book/01_all_series_quickstart/04_嵌入式Linux应用开发基础知识/source/11_input/02_tslib/tslib-1.21.tar.xz ./
tar xJf tslib-1.21.tar.xz
//交叉编译万能命令
cd tslib-1.21
./configure --host=arm-linux-gnueabihf --prefix=/
make
make install DESTDIR=$PWD/tmp
//把头文件、库文件放到工具链目录下
cd tslib-1.21/tmp/
cp include/* /home/book/100ask_imx6ull-sdk/ToolChain/gcc-linaro-6.2.1-2016.11-x86_64_arm-linux-gnueabihf/bin/../arm-linux-gnueabihf/libc/usr/include
cp -d lib/*so* /home/book/100ask_imx6ull-sdk/ToolChain/gcc-linaro-6.2.1-2016.11-x86_64_arm-linux-gnueabihf/bin/../arm-linux-gnueabihf/libc/usr/lib/
(2)板子上测试编译
//复制文件到nfs挂载的文件夹nfs_rootfs里
cp -r ~/tslib-1.21/* ~/nfs_rootfs
//板子上将文件复制到lib、bin和etc上
cp /mnt/tslib-1.21/tmp/lib/*so* -d /lib
cp /mnt/tslib-1.21/tmp/bin/* /bin
cp /mnt/tslib-1.21/tmp/etc/ts.conf -d /etc
cp /mnt/tslib-1.21/tmp/lib/ts -rf /lib
//关闭默认的qt GUI程序(以实际为准),打开/etc/init.d/查看 qtGUI程序名
//重新开启的话,就将将相应的文件移回去
mv /etc/init.d/S99myirhmi2 /root
reboot
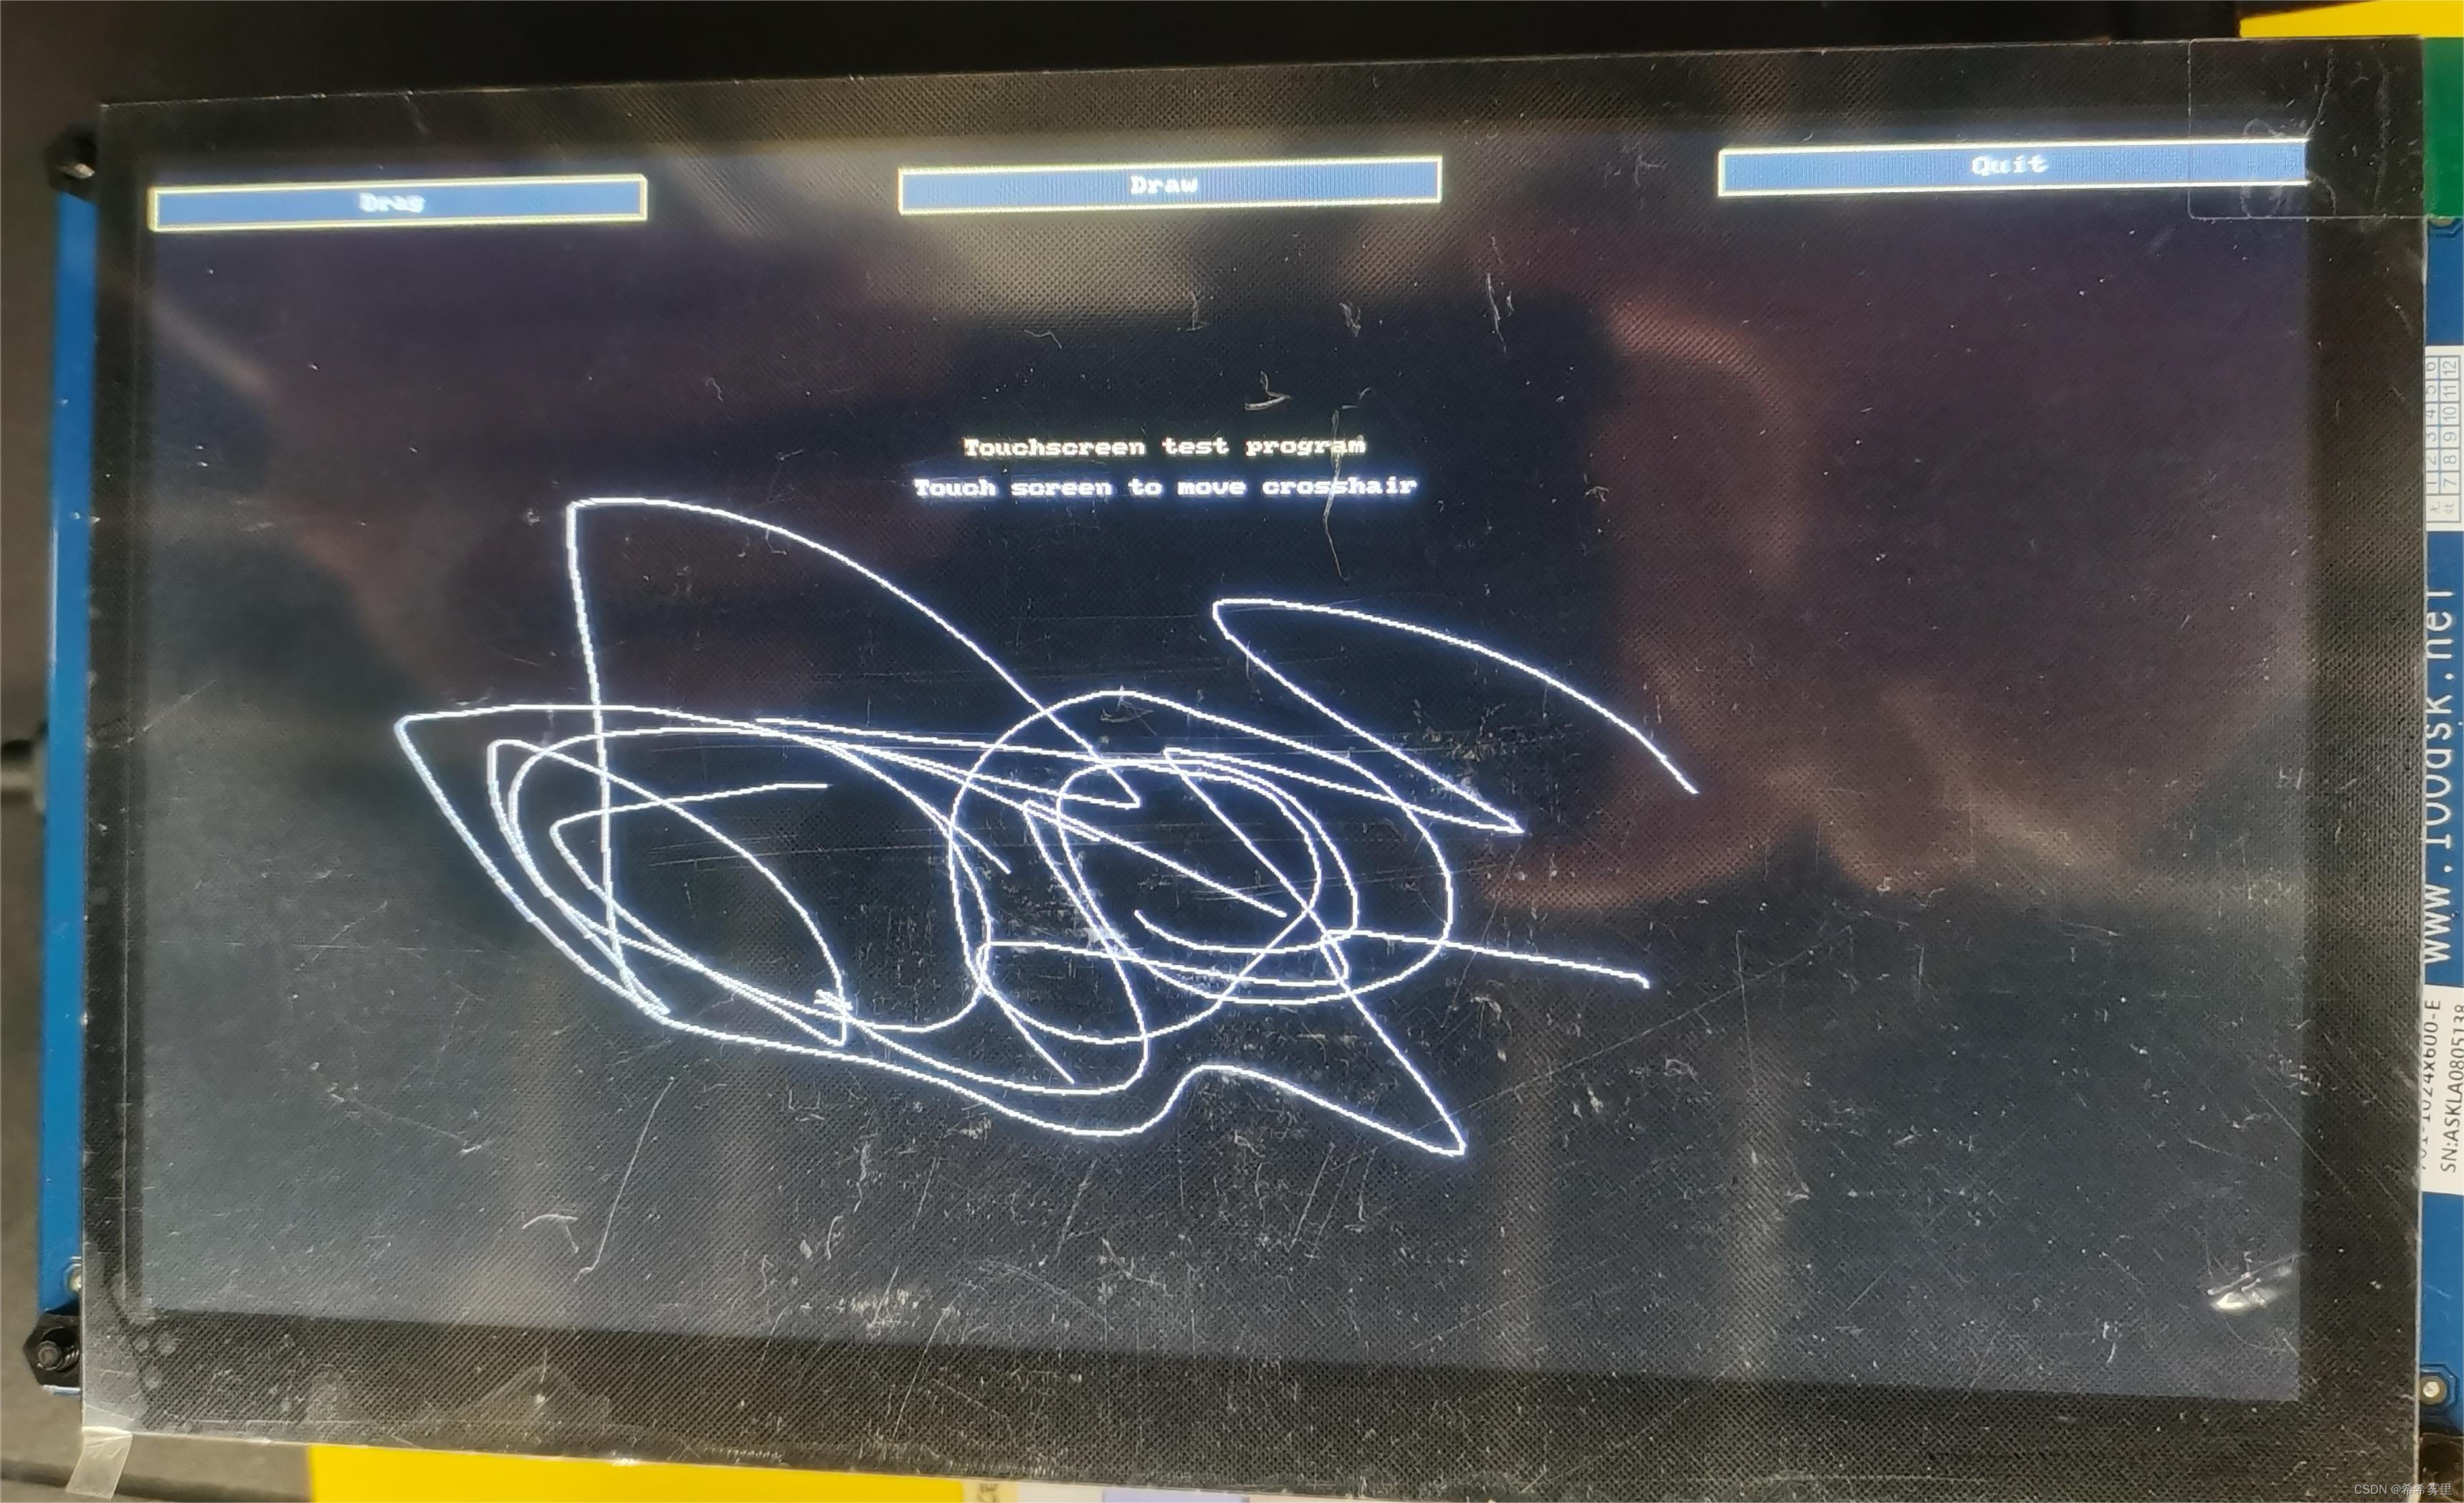
//测试
ts_test_mt
测试结果:

六、基于tslib的应用实战:
实现一个程序,不断打印2个触点的距离
触摸屏可能支持多个触点,比如5个,tslib为了简化处理,即使只有两个触点,ts_read_mt函数也会返回五个触点的数据。
驱动程序中使用slot、tracing_id来标识一个触点,当tracing_id等于-1时,标识这个触点被松开了。
所以可以根据这个标识来判断数据是否有效,所以当有两个触点有效时,就打印它俩之间的距离。
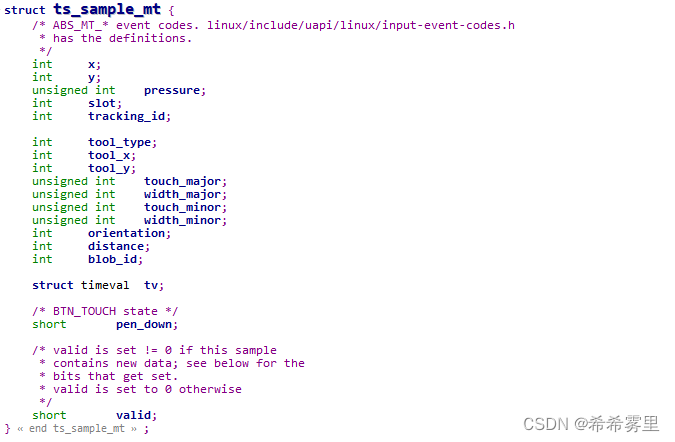
核心函数:ts_read_mt
四个参数:tsdev结构体、max_slots(最大点数)、ts_sample_mt结构体(存数据)、nr


具体示例:
根据第四部分的内容、上述的思路以及ts_test_mt.c示例程序,完成程序的编写。
#include <stdio.h>
#include <stdint.h>
#include <stdlib.h>
#include <string.h>
#include <signal.h>
#include <errno.h>
#include <sys/types.h>
#include <sys/stat.h>
#include <fcntl.h>
#include <unistd.h>
#include <getopt.h>

#include <linux/input.h>

#include <sys/ioctl.h>

#include <tslib.h>

int distance(struct ts_sample_mt *point1, struct ts_sample_mt *point2)
{
	int x = point1->x - point2->x;
	int y = point1->y - point2->y;

	return x*x + y*y;
}

int main(int argc, char **argv)
{
	struct tsdev *ts;
	int i;
	int ret;
	//定义新旧触点sample结构体
	struct ts_sample_mt **samp_mt;
	struct ts_sample_mt **pre_samp_mt;
	int max_slots;
	int point_pressed[20];
	struct input_absinfo slot;
	int touch_cnt = 0;

	//阻塞方式
	ts = ts_setup(NULL, 0);
	if (!ts)
	{
		printf("ts_setup err
");
		return -1;
	}

	//读取设备节点,获取属性---同时支持多少个触点,得到max_slots
	if (ioctl(ts_fd(ts), EVIOCGABS(ABS_MT_SLOT), &slot) < 0) {
		perror("ioctl EVIOGABS");
		ts_close(ts);
		return errno;
	}

	max_slots = slot.maximum + 1 - slot.minimum;


	//参照测试程序初始samp_mt和pre_samp_mt结构体数组
	samp_mt = malloc(sizeof(struct ts_sample_mt *));
	if (!samp_mt) {
		ts_close(ts);
		return -ENOMEM;
	}
	samp_mt[0] = calloc(max_slots, sizeof(struct ts_sample_mt));
	if (!samp_mt[0]) {
		free(samp_mt);
		ts_close(ts);
		return -ENOMEM;
	}

	pre_samp_mt = malloc(sizeof(struct ts_sample_mt *));
	if (!pre_samp_mt) {
		ts_close(ts);
		return -ENOMEM;
	}
	pre_samp_mt[0] = calloc(max_slots, sizeof(struct ts_sample_mt));
	if (!pre_samp_mt[0]) {
		free(pre_samp_mt);
		ts_close(ts);
		return -ENOMEM;
	}

	for ( i = 0; i < max_slots; i++)
		pre_samp_mt[0][i].valid = 0;


	while (1)
	{
		//第一步:读取触点数据
		ret = ts_read_mt(ts, samp_mt, max_slots, 1);
		if (ret < 0) {
			printf("ts_read_mt err
");
			ts_close(ts);
			return -1;
		}

		//第二步:判断是否更新,将新数据拷贝到旧数据里
		for (i = 0; i < max_slots; i++)
		{
			if (samp_mt[0][i].valid)
			{
				memcpy(&pre_samp_mt[0][i], &samp_mt[0][i], sizeof(struct ts_sample_mt));
			}
		}

		//第三步:判断是否有两个触点,如果是两个,则执行打印
		touch_cnt = 0;
		for (i = 0; i < max_slots; i++)
		{
			if (pre_samp_mt[0][i].valid && pre_samp_mt[0][i].tracking_id != -1)
				point_pressed[touch_cnt++] = i;
		}

		if (touch_cnt == 2)
		{
			printf("distance: %08d
", distance(&pre_samp_mt[0][point_pressed[0]], &pre_samp_mt[0][point_pressed[1]]));
		}
	}

	return 0;
}
实际效果:
//交叉编译
arm-buildroot-linux-gnueabihf-gcc -o mt_cal_distance mt_cal_distance.c -lts

//复制到nfs挂载文件 nfs_rootfs
cp mt_cal_distance ~/nfs_rootfs
板子上运行程序,两个手指放上去之后打印出结果:


 U8W/U8W-Mini使用与常见问题解决
 QT多线程的5种用法,通过使用线程解决UI主界面的耗时操作代码,防止界面卡死。...
 stm32使用HAL库配置串口中断收发数据(保姆级教程)
 分享几个国内免费的ChatGPT镜像网址(亲测有效)
 Allegro16.6差分等长设置及走线总结