您现在的位置是:首页 >技术交流 >Angular与PDF之四: 反思代码与模板的复用网站首页技术交流
Angular与PDF之四: 反思代码与模板的复用

在我们前面关于Angular与PDF的几篇博客中分别讲了如何在在如何在客户端渲染PDF(Angular与PDF之一:如何在客户端渲染PDF_angular pdf_KenkoTech的博客-CSDN博客) 和预览(Angular 与PDF之二:打印预览的实现_angular pdf预览_KenkoTech的博客-CSDN博客) 然后是服务器端渲染(Angular与PDF之三: 服务器端渲染PDF_KenkoTech的博客-CSDN博客)
这一次我们分析一个实现预览和服务器渲染PDF的例子和其中关于代码和模板服用的一些思考。
对于这个需求也许有人会提出问题既然可以实现预览为什么不直接在客户端渲染PDF还要在服务器端渲染?其实如果复杂或者专业化的需求往往对于PDF的美观度和可定制化的页眉页脚是有需求的,目前对于单纯的客户端浏览器来说还无法做到定制复杂的页眉页脚等元素。以Chrome内置的PDF导出工具页面页脚是这样:
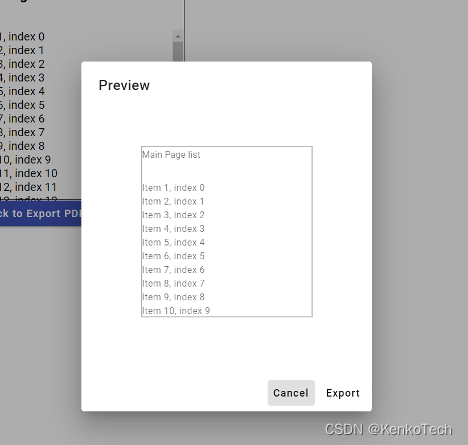
所以我想要定制页面页脚还是要借助服务器端的能力.也因此我们不能直接使用浏览器的浏览窗口,所以我们需要自定义预览界面。不同于浏览器动态可交互的特性,我们的PDF是固定好的尺寸和字体大小等相关元素。因此这里的预览需要有不同于实际页面的样式要求。
main-page.component.html
<div class="main-page">
  <h3>Main Page list</h3>
  <div class="main-page-list">
      <div *ngFor="let item of listItems; let i = index;">
          {{item.name}}, index {{i}}
      </div>
  </div>
  <button mat-raised-button color="primary" (click)="showPreviewModal()">Click to Export PDF</button>
</div>
main-page.component.ts
import { Component } from '@angular/core';
import { MatDialog } from '@angular/material/dialog'
import { PdfPreviewModalComponent } from '../pdf-preview-modal/pdf-preview-modal.component';
import { HttpClient } from '@angular/common/http';

@Component({
  selector: 'app-main-page',
  templateUrl: './main-page.component.html',
  styleUrls: ['./main-page.component.css']
})
export class MainPageComponent {
  listItems = [
    { name: 'Item 1' }, { name: 'Item 2' }, { name: 'Item 3' }, { name: 'Item 4' },
    { name: 'Item 5' }, { name: 'Item 6' }, { name: 'Item 7' }, { name: 'Item 8' },
    { name: 'Item 9' }, { name: 'Item 10' }, { name: 'Item 11' }, { name: 'Item 12' },
    { name: 'Item 13' }, { name: 'Item 14' }, { name: 'Item 15' }, { name: 'Item 16' },
    { name: 'Item 17' }, { name: 'Item 18' }, { name: 'Item 19' }, { name: 'Item 20' }
  ];
  constructor(public dialog: MatDialog, public http: HttpClient) {

  }
  showPreviewModal() {
    this.dialog.open(PdfPreviewModalComponent).afterClosed().subscribe((pages) => {
      this.http.post('api/pdfRender', {
        pages
      }).subscribe((pdf: any) => {
        const pdfUrl = URL.createObjectURL(pdf);
        const download = document.createElement('a');
        download.href = pdfUrl;
        download.download = 'demo.pdf';
        download.click();
      });
    });
  }
}
main-page.component.css
* {
  box-sizing: border-box;
  margin: 0;
}
.main-page  {
  width: 300px;
  height: 300px;
  border: 1px solid;
}

h3 {
  height: 60px;
}

.main-page-list {
  height: 240px;
  width: 100%;
  overflow: auto;
}
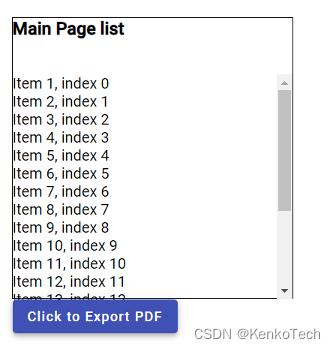
实际结果是如下图:
我们看到在这里右边会出现一个滚动条,但是这个在PDF中不能交互所以我们需要单独设置样式隐藏它。
下面是关于预览窗口的具体代码:
pdf-preview-modal.component.html
<h2 mat-dialog-title>Preview</h2>
<mat-dialog-content class="mat-typography" #previewContent>
  <app-main-page [previewMode]="true"></app-main-page>
</mat-dialog-content>
<mat-dialog-actions align="end">
  <button mat-button mat-dialog-close>Cancel</button>
  <button mat-button (click)="confirmExport()">Export</button>
</mat-dialog-actions>
pdf-preview-modal.component.ts
import { Component, ViewChild, ElementRef } from '@angular/core';
import { MatDialogRef } from '@angular/material/dialog';

@Component({
  selector: 'app-pdf-preview-modal',
  templateUrl: './pdf-preview-modal.component.html',
  styleUrls: ['./pdf-preview-modal.component.css']
})
export class PdfPreviewModalComponent {
  @ViewChild('previewContent') previewContent!: ElementRef;

  constructor(private dialogRef: MatDialogRef<PdfPreviewModalComponent>) {

  }

  confirmExport() {
    const reportEls: Element[] = this.previewContent.nativeElement.querySelectorAll('.main-page');
    this.dialogRef.close(reportEls.map(o => o.innerHTML));
  }
}
pdf-preview-modal.component.css
:host ::ng-deep .main-page {
  transform: scale(0.8, 0.8);
}

:host ::ng-deep .main-page-list {
  overflow: hidden;
}
实际预览结果如下:
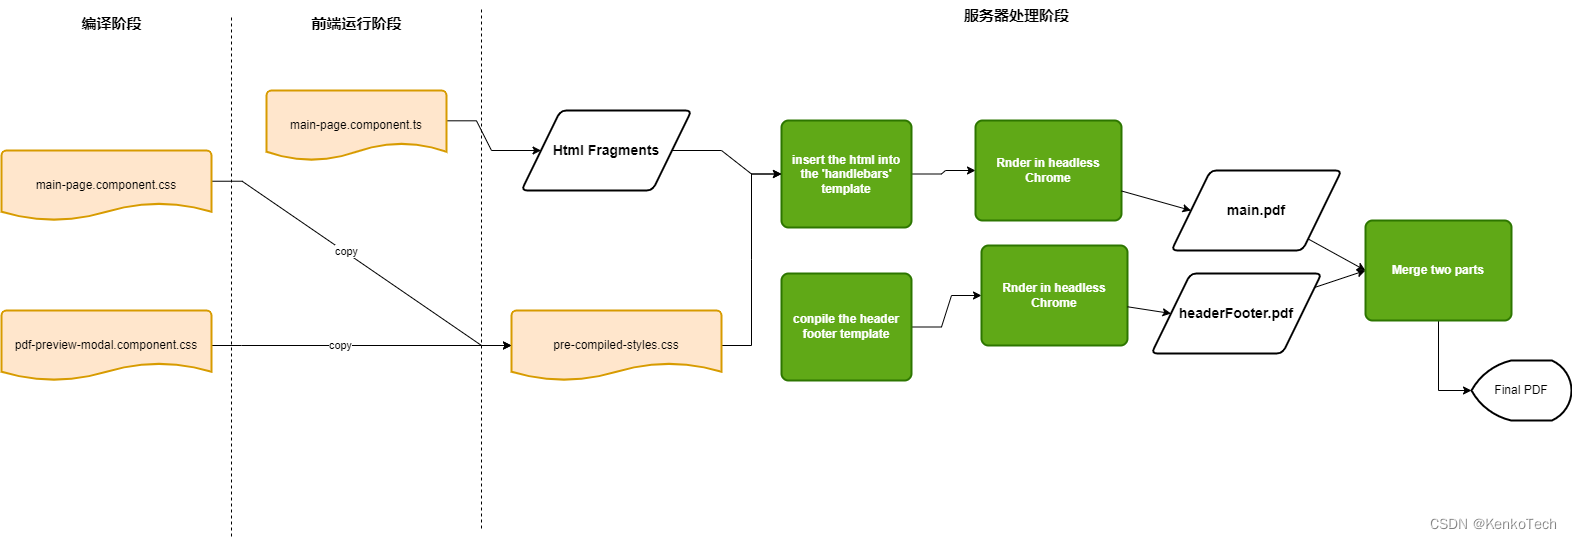
关于服务器端的实现这里比较复杂,我们需要借助于一个工具库jsreport,它可以让我们把数据动态绑定到模板并实现PDF合并的操作。我们不在这里讨论其具体的功能步骤代码,我们这里讨论的是简略的流程。
下面是服务器端的handlebar模板的实现。
main.handlebars
<link rel="stylesheet" href="{#asset main-page.component.css @encoding=link}" type="text/css" />
<link rel="stylesheet" href="{#asset pdf-preview-modal.component.css @encoding=link}" type="text/css" />
<div id="page-content"></div>
<script>
  var dataset = {{{ toJSON dataset }}};
  if (dataset && dataset.pages) {
    var contentEl = document.getElementById('page-content');
    if (contentEl) {
      contentEl.innerHTML = dataset.pages;
    }
  }
</script>
headerFooter.handlebars
<head>
    <title>header-footer</title>
    <link rel="stylesheet" href="{#asset headerFooter.css @encoding=link}" type="text/css" />
</head>

<body>
    <div style="page-break-before: always;"></div>
    {{/if}}
    <main class="main">
        <header class="header">
          <div class="icon">
            <img src="some-customer-brand-image.svg" alt="header-image">
          </div>
        </header>
        <footer class="footer">
          <div class="icon">
            <img src="some-customer-brand-image.svg" alt="header-image">
          </div>
          <div class="legal-info">
            some text here
          </div>
        </footer>
    </main>
</body>
简略时序图:
这里可以看到我们直接将客户端的采集的DOM结构数据绑定到了服务器端的模板并且复用了所有相关的样式文件。这个是这个实现的核心,在以往的实现中我们通常需要准备数据并书写PDF模板,然后才是绑定数据渲染。这种实现直接帮数据准备和模板书写和绑定数据三个步骤直接在客户端完成了,所以我们直接拿最终的DOM数据给到服务器端来做最后的渲染工作。
理想情况是最终我们不需要维护客户端和服务端的两套代码,只需要维护客户端的页面和样式文件就能直接在服务器端服用。
但是现实情况是受限于PDF与客户端页面的性质差异,最终我们还是要做一些差异化的处理。对于可能的PDF页面尺寸限制,我们会需要增加单独的样式。
因为最终的PDF内容直接来自预览窗口,所以原始的main-page组件里添加了针对预览页面的适配。
综合以上的措施,最终我们实现了PDF内容和样式的一次维护两端复用(PDF端,客户端), 避免了可能的复杂的维护情况。
优势:
- PDF内容直接复用, 也就是数据的生产和绑定的逻辑直接复用了。
- 客户端的样式直接复用。
- 由于采用直接复用DOM,对于PDF模板没有单独的书写要求可以采用通用的PDF模板,并且这里的模板几乎可以免维护。
劣势:
- 客户端实际上同时维护了一份针对PDF的样式。
- 任何关于PDF端新增的修改,需要同时在客户端component上操作,增加逻辑分叉。


 U8W/U8W-Mini使用与常见问题解决
 QT多线程的5种用法,通过使用线程解决UI主界面的耗时操作代码,防止界面卡死。...
 stm32使用HAL库配置串口中断收发数据(保姆级教程)
 分享几个国内免费的ChatGPT镜像网址(亲测有效)
 Allegro16.6差分等长设置及走线总结