您现在的位置是:首页 >学无止境 >源码分析spring容器启动销毁资源网站首页学无止境
源码分析spring容器启动销毁资源
文章目录
spring项目启动时,在bean的生命周期内,可以添加一些前置、后置处理,也可用于资源初始化、资源销毁。本文结合着源码对spring的一些扩展功能,执行顺序进行分析。
一、InitializingBean
InitializingBean是一个接口,类实现了此接口,重写afterPropertiesSet方法,可以在bean实例化、属性赋值(populateBean方法)之后进行一些处理。
1.源码
public interface InitializingBean {
    void afterPropertiesSet() throws Exception;
}
只包含一个afterPropertiesSet方法,子类实现了接口需要实现此方法。
2.spring boot源码调用
(1)位置
处理此接口的源码调用位置如下:
run() ->
this.refreshContext(context) ->
this.refresh(context) ->
applicationContext.refresh() ->
this.finishBeanFactoryInitialization(beanFactory) ->
beanFactory.preInstantiateSingletons() -> DefaultListableBeanFactory.preInstantiateSingletons() ->
this.getBean(beanName) ->
this.doGetBean() ->
this.createBean(beanName, mbd, args) ->
AbstractAutowireCapableBeanFactory.createBean() ->
this.doCreateBean(beanName, mbdToUse, args) ->
this.initializeBean(beanName, exposedObject, mbd) ->
this.invokeInitMethods(beanName, wrappedBean, mbd) -> ((InitializingBean)bean).afterPropertiesSet()
(2)调用
在bean进行初始化的时候,会执行invokeInitMethods初始化的方法,这个方法里面处理了对InitializingBean接口的afterPropertiesSet方法、用户自定义的初始化方法。用户自定义的方法指的是通过注解@Bean来申明一个bean时使用initMethod属性来指定的方法,申明bean除了@Bean还有@Component,@Component只能配置bean的名称,它可以直接在类上使用,spring容器会把它加载为一个bean;@Bean需要放在配置类(@Configuration修饰)中,放在基础类中spring是扫描不到的。
@Component源码:
@Target({ElementType.TYPE})
@Retention(RetentionPolicy.RUNTIME)
@Documented
@Indexed
public @interface Component {
    String value() default "";
}
使用@Bean配置自定义初始化方法:
@Configuration
public class BeanConfig {

    @Scope(value="singleton")
    @Bean(initMethod = "intMethod")
    public BeanDemo beanDemo(){
        return new BeanDemo("张三",18);
    }
}
一个类既实现了InitializingBean接口,又配置了自定义initMethod方法,它的执行顺序是:先InitializingBean接口的方法-》initMethod方法,从invokeInitMethods方法源码可以看出:
  protected void invokeInitMethods(String beanName, Object bean, @Nullable RootBeanDefinition mbd) throws Throwable {
        //bean对象实现了InitializingBean接口
        boolean isInitializingBean = bean instanceof InitializingBean;
        if (isInitializingBean && (mbd == null || !mbd.isExternallyManagedInitMethod("afterPropertiesSet"))) {
            if (this.logger.isTraceEnabled()) {
                this.logger.trace("Invoking afterPropertiesSet() on bean with name '" + beanName + "'");
            }

            if (System.getSecurityManager() != null) {
                try {
                    AccessController.doPrivileged(() -> {
                        ((InitializingBean)bean).afterPropertiesSet();
                        return null;
                    }, this.getAccessControlContext());
                } catch (PrivilegedActionException var6) {
                    throw var6.getException();
                }
            } else {
                //先执行InitializingBean接口的afterPropertiesSet方法
                ((InitializingBean)bean).afterPropertiesSet();
            }
        }

        if (mbd != null && bean.getClass() != NullBean.class) {
            //获取bean自定义的初始化方法
            String initMethodName = mbd.getInitMethodName();
            if (StringUtils.hasLength(initMethodName) && (!isInitializingBean || !"afterPropertiesSet".equals(initMethodName)) && !mbd.isExternallyManagedInitMethod(initMethodName)) {
                //使用反射执行自定义方法methodToInvoke.invoke(bean)
                this.invokeCustomInitMethod(beanName, bean, mbd);
            }
        }
    }
3.使用场景
在xxl-job项目中有使用,通过afterPropertiesSet方法来初始化定时守护线程、创建线程池等。看下部分源码:
@Component
public class XxlJobAdminConfig implements InitializingBean, DisposableBean {

    private static XxlJobAdminConfig adminConfig = null;
    public static XxlJobAdminConfig getAdminConfig() {
        return adminConfig;
    }

    // ---------------------- XxlJobScheduler ----------------------

    private XxlJobScheduler xxlJobScheduler;

    //实现了InitializingBean接口,在Bean初始化完并把参数注入成功后会调用afterPropertiesSet()
    @Override
    public void afterPropertiesSet() throws Exception {
        adminConfig = this;

        xxlJobScheduler = new XxlJobScheduler();
        //初始化调度中心资源
        xxlJobScheduler.init();
    }
二、SmartInitializingSingleton
SmartInitializingSingleton是一个接口,类实现了此接口,可以在bean实例化、初始化完成后进行后置处理,要求bean为单例且非懒加载的方式才会触发方法的执行,通过注解@Scope来指定bean为单例还是多实例,值为singleton:单例(全局有且只有一个实例),值为prototype:多实例(每次获取bean都是一个新实例),使用@Bean或者@Component声明的bean默认是单例的。
1.源码
public interface SmartInitializingSingleton {
    void afterSingletonsInstantiated();
}
只有一个afterSingletonsInstantiated方法,子类可以实现此方法,进行资源的初始化。
2.spring boot源码调用
(1)位置
处理此接口的源码调用位置如下:
run() ->
this.refreshContext(context) ->
this.refresh(context) ->
applicationContext.refresh() ->
this.finishBeanFactoryInitialization(beanFactory) ->
beanFactory.preInstantiateSingletons() -> DefaultListableBeanFactory.preInstantiateSingletons() ->
smartSingleton.afterSingletonsInstantiated()
(2)调用
当bean已经完成实例化、初始化并执行完初始方法后才会处理SmartInitializingSingleton,使用while(true)来处理bean,先通过getBean实例化、初始化bean,并保存到缓存中,最后从缓存中取出bean,处理类型为SmartInitializingSingleton的bean,调用它的afterSingletonsInstantiated方法,所以此方法是bean初始化最后执行的方法。看下源码处理:
  do {
                while(true) {
                    RootBeanDefinition bd;
                    do {
                        do {
                            do {
                                if (!var2.hasNext()) {
                                    var2 = beanNames.iterator();

                                    while(var2.hasNext()) {
                                        beanName = (String)var2.next();
                                        //从缓存中获取bean
                                        Object singletonInstance = this.getSingleton(beanName);
                                        if (singletonInstance instanceof SmartInitializingSingleton) {
                                            StartupStep smartInitialize = this.getApplicationStartup().start("spring.beans.smart-initialize").tag("beanName", beanName);
                                            SmartInitializingSingleton smartSingleton = (SmartInitializingSingleton)singletonInstance;
                                            if (System.getSecurityManager() != null) {
                                                AccessController.doPrivileged(() -> {
                                                    smartSingleton.afterSingletonsInstantiated();
                                                    return null;
                                                }, this.getAccessControlContext());
                                            } else {
                                                                            smartSingleton.afterSingletonsInstantiated();//执行afterSingletonsInstantiated方法
                                            }

                                            smartInitialize.end();
                                        }
                                    }

                                    return;
                                }

                                beanName = (String)var2.next();
                                bd = this.getMergedLocalBeanDefinition(beanName);
                            } while(bd.isAbstract());
                        } while(!bd.isSingleton());
                    } while(bd.isLazyInit());

                    if (this.isFactoryBean(beanName)) {
                        bean = this.getBean("&" + beanName);
                        break;
                    }
                    //获取bean,会创建bean对象,并保存到缓存中
                    this.getBean(beanName);
                }
            } while(!(bean instanceof FactoryBean));
3.使用场景
在xxl-job项目中有使用,当bean已经初始化完成,把bean中被@XxlJob修饰的方法添加到map集合中,初始化了netty服务器和线程池等。看下部分源码:
public class XxlJobSpringExecutor extends XxlJobExecutor implements ApplicationContextAware, SmartInitializingSingleton, DisposableBean {

    // 实现了SmartInitializingSingleton接口(只适用于单列bean),在bean实例初始化完成后,会调用afterSingletonsInstantiated方法
    @Override
    public void afterSingletonsInstantiated() {

        //初始化任务方法,处理所有Bean中使用@XxlJob注解标识的方法
        initJobHandlerMethodRepository(applicationContext);

        // refresh GlueFactory
        //重新设置GlueFactory的类型为SpringGlueFactory
        GlueFactory.refreshInstance(1);

        // super start
        try {
            //调用到XxlJobExecutor类的start方法,对一些资源进行初始化
            super.start();
        } catch (Exception e) {
            throw new RuntimeException(e);
        }
    }
}
三、@PostConstruct
@PostConstruct是jdk的注解,也是用于初始化资源使用,spring使用InitDestroyAnnotationBeanPostProcessor对@PostConstruct、@PreDestroy注解进行包装,这样就可以使用BeanPostProcessor对使用了@PostConstruct、@PreDestroy修饰的方法进行调用。
1.源码
@Documented
@Retention (RUNTIME)
@Target(METHOD)
public @interface PostConstruct {
}
2.spring boot源码调用
(1)位置
先看InitDestroyAnnotationBeanPostProcessor类的源码:
public class InitDestroyAnnotationBeanPostProcessor implements DestructionAwareBeanPostProcessor, MergedBeanDefinitionPostProcessor, PriorityOrdered, Serializable {
    @Nullable
    private Class<? extends Annotation> initAnnotationType;
    @Nullable
    private Class<? extends Annotation> destroyAnnotationType;

    public InitDestroyAnnotationBeanPostProcessor() {
    }

    public void setInitAnnotationType(Class<? extends Annotation> initAnnotationType) {
        this.initAnnotationType = initAnnotationType;
    }

    public void setDestroyAnnotationType(Class<? extends Annotation> destroyAnnotationType) {
        this.destroyAnnotationType = destroyAnnotationType;
    }
}
InitDestroyAnnotationBeanPostProcessor类实现了MergedBeanDefinitionPostProcessor接口,里面有两个类型为Annotation的属性,Annotation是所有注解的父类即@PostConstruct的父类,initAnnotationType用于标识接收初始化注解的类型,destroyAnnotationType用于标识接收销毁注解的类型,具体接收哪个注解由InitDestroyAnnotationBeanPostProcessor的子类CommonAnnotationBeanPostProcessor来实现。
看下CommonAnnotationBeanPostProcessor部分源码:
public class CommonAnnotationBeanPostProcessor extends InitDestroyAnnotationBeanPostProcessor implements InstantiationAwareBeanPostProcessor, BeanFactoryAware, Serializable {

    public CommonAnnotationBeanPostProcessor() {
        this.setInitAnnotationType(PostConstruct.class);
        this.setDestroyAnnotationType(PreDestroy.class);
    }
}
CommonAnnotationBeanPostProcessor类的默认构造函数设置了 initAnnotationType的类型为PostConstruct,destroyAnnotationType类型为PreDestroy。
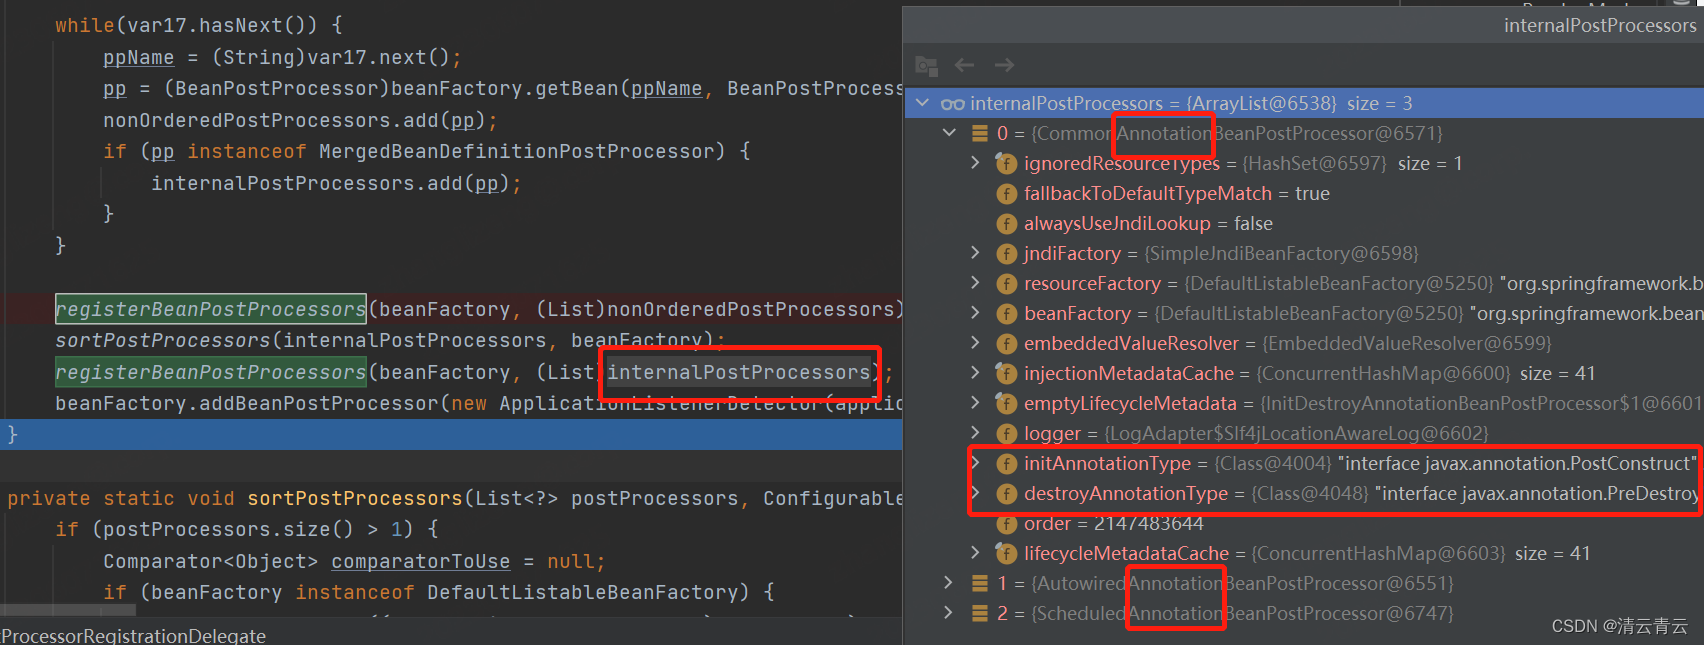
在注册BeanPostProcessor时,会向beanPostProcessors这个list集合添加一个CommonAnnotationBeanPostProcessor,这样在后面遍历beanPostProcessors集合执行postProcessBeforeInitialization方法时,会调用到InitDestroyAnnotationBeanPostProcessor类的postProcessBeforeInitialization方法,此方法通过反射执行被@PostConstruct修饰的方法。
注册BeanPostProcessor的源码位置:
run() ->
this.refreshContext(context) ->
this.refresh(context) ->
applicationContext.refresh() ->
this.registerBeanPostProcessors(beanFactory) ->
PostProcessorRegistrationDelegate.registerBeanPostProcessors(beanFactory, this)
处理BeanPostProcessor的源码位置:
run() ->
this.refreshContext(context) ->
this.refresh(context) ->
applicationContext.refresh() ->
this.finishBeanFactoryInitialization(beanFactory) ->
beanFactory.preInstantiateSingletons() -> DefaultListableBeanFactory.preInstantiateSingletons() ->
this.getBean(beanName) ->
this.doGetBean() ->
this.createBean(beanName, mbd, args) ->
AbstractAutowireCapableBeanFactory.createBean() ->
this.doCreateBean(beanName, mbdToUse, args) ->
this.initializeBean(beanName, exposedObject, mbd) ->
this.applyBeanPostProcessorsBeforeInitialization
(2)调用
看下registerBeanPostProcessors注册的部分源码:
 public static void registerBeanPostProcessors(ConfigurableListableBeanFactory beanFactory, AbstractApplicationContext applicationContext) {
        //从bean工厂获取到bean实现了BeanPostProcessor或者BeanPostProcessor子类的名称集合
        String[] postProcessorNames = beanFactory.getBeanNamesForType(BeanPostProcessor.class, true, false);
        //注册BeanPostProcessor
        registerBeanPostProcessors(beanFactory, (List)nonOrderedPostProcessors);
    }

    //注册BeanPostProcessor
    private static void registerBeanPostProcessors(ConfigurableListableBeanFactory beanFactory, List<BeanPostProcessor> postProcessors) {
        Iterator var2 = postProcessors.iterator();
        while(var2.hasNext()) {
            BeanPostProcessor postProcessor = (BeanPostProcessor)var2.next();
            beanFactory.addBeanPostProcessor(postProcessor);
        }
    }

    //BeanPostProcessor添加到集合中
    public void addBeanPostProcessor(BeanPostProcessor beanPostProcessor) {
        this.beanPostProcessors.remove(beanPostProcessor);
        this.beanPostProcessors.add(beanPostProcessor);
    }
从bean工厂获取到bean实现了BeanPostProcessor或者BeanPostProcessor子类的集合,把他们添加到beanPostProcessors这个list集合中,bean中有方法被@PostConstruct或者@PreDestroy修饰,会匹配到CommonAnnotationBeanPostProcessor类。截图如下:

在处理BeanPostProcessor集合时会调用到postProcessBeforeInitialization方法,看下它的入口initializeBean方法部分源码:
 protected Object initializeBean(String beanName, Object bean, @Nullable RootBeanDefinition mbd) {

        Object wrappedBean = bean;
        if (mbd == null || !mbd.isSynthetic()) {
            //遍历BeanPostProcessor集合,执行它的postProcessBeforeInitialization方法
            wrappedBean = this.applyBeanPostProcessorsBeforeInitialization(bean, beanName);
        }

        try {
            //执行初始化方法,包含InitializingBean和自定义InitMethod
            this.invokeInitMethods(beanName, wrappedBean, mbd);
        } catch (Throwable var6) {
            throw new BeanCreationException(mbd != null ? mbd.getResourceDescription() : null, beanName, "Invocation of init method failed", var6);
        }

        return wrappedBean;
    }
被@PostConstruct修饰的方法,遍历list到CommonAnnotationBeanPostProcessor类时会被调用,所以初始化执行顺序为:@PostConstruct-》InitializingBean接口的方法-》initMethod方法。
注册进去的是CommonAnnotationBeanPostProcessor子类,postProcessBeforeInitialization方法定义在父类InitDestroyAnnotationBeanPostProcessor中,看下部分源码:
    public Object postProcessBeforeInitialization(Object bean, String beanName) throws BeansException {
        //获取被注解修饰的方法
        InitDestroyAnnotationBeanPostProcessor.LifecycleMetadata metadata = this.findLifecycleMetadata(bean.getClass());
        metadata.invokeInitMethods(bean, beanName);
    }

   public void invokeDestroyMethods(Object target, String beanName) throws Throwable         {
       for(Iterator var5 = ((Collection)destroyMethodsToUse).iterator();
           var5.hasNext(); element.invoke(target)) {//使用反射执行方法

       }
    }
通过bean获取到被@PostConstruct修饰的方法,使用反射执行对应的方法。
3.使用场景
项目中可以用于初始化资源使用,例如从properties配置文件中获取到数据,但是数据格式需要再处理一下,可以使用@PostConstruct实现。
@Configuration
@ConfigurationProperties(prefix="inner.ignored")
@Data
public class ApiWhiteListConfig {

    //忽略的访问集合,key:ip,value:port
    private Map<String,String> ignoredMap = new HashMap<String,String>();
    private List<String> urlList;

    @PostConstruct
    public void init(){
        if(null != urlList && urlList.size() > 0){
            for(int i = 0;i < urlList.size();i++){
                String str = urlList.get(i);
                String[] arr = str.split(":");
                if(null != arr && arr.length == 2){
                    ignoredMap.put(arr[0],arr[1]);
                }
             }
        }
    }
}
四、DisposableBean
DisposableBean是一个接口,用于bean销毁时做一些清理工作。
1.源码
public interface DisposableBean {
    void destroy() throws Exception;
}
只有一个destroy方法,子类实现DisposableBean,重写它的方法。
2.spring boot源码调用
(1)位置
处理此接口的源码调用位置如下:
run() ->
this.refreshContext(context) ->
this.refresh(context) ->
applicationContext.refresh() ->
this.finishBeanFactoryInitialization(beanFactory) ->
beanFactory.preInstantiateSingletons() -> DefaultListableBeanFactory.preInstantiateSingletons() ->
this.getBean(beanName) ->
this.doGetBean() ->
this.createBean(beanName, mbd, args) ->
AbstractAutowireCapableBeanFactory.createBean() ->
this.doCreateBean(beanName, mbdToUse, args) ->
this.registerDisposableBeanIfNecessary(beanName, bean, mbd) ->
this.registerDisposableBean(beanName, new DisposableBeanAdapter(bean, beanName, mbd, this.getBeanPostProcessorCache().destructionAware, acc)) ->
class DisposableBeanAdapter implements DisposableBean ->
DisposableBeanAdapter.destroy() ->
((DisposableBean)this.bean).destroy()
(2)调用
在bean进行初始化完成后,方法registerDisposableBeanIfNecessary会注册DisposableBean,最终创建一个DisposableBeanAdapter对象,DisposableBeanAdapter类实现了DisposableBean接口。销毁资源的方式可以让类实现DisposableBean接口,重写destroy方法;也可以使用@Bean的方式声明bean对象,通过属性destroyMethod配置销毁方法,例如:
@Configuration
public class BeanConfig {

    @Scope(value="singleton")
    @Bean(destroyMethod = "destroyMethod")
    public BeanDemo beanDemo(){
        return new BeanDemo("张三",18);
    }

}
也可以使用注解@PreDestroy在bean销毁之前执行方法,例如:
    @PreDestroy
    public void preDestroy(){
        System.out.println("=========【@PreDestroy】的preDestroy()方法===========");
    }
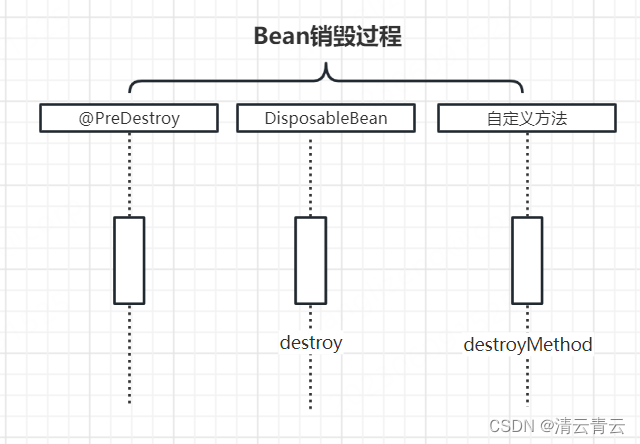
这三种方法的执行顺序:@PreDestroy -》 DisposableBean-》destroyMethod。可以看下DisposableBeanAdapter的销毁源码:
    public void destroy() {
        if (!CollectionUtils.isEmpty(this.beanPostProcessors)) {
            Iterator var1 = this.beanPostProcessors.iterator();

            while(var1.hasNext()) {
                DestructionAwareBeanPostProcessor processor = (DestructionAwareBeanPostProcessor)var1.next();
                //调用被@PreDestroy注解修饰的方法执行
                processor.postProcessBeforeDestruction(this.bean, this.beanName);
            }
        }

        if (this.invokeDisposableBean) {
            if (logger.isTraceEnabled()) {
                logger.trace("Invoking destroy() on bean with name '" + this.beanName + "'");
            }

            try {
                if (System.getSecurityManager() != null) {
                    AccessController.doPrivileged(() -> {
                        ((DisposableBean)this.bean).destroy();
                        return null;
                    }, this.acc);
                } else {
                    //执行实现了DisposableBean接口的destroy方法
                    ((DisposableBean)this.bean).destroy();
                }
            } catch (Throwable var3) {
                String msg = "Invocation of destroy method failed on bean with name '" + this.beanName + "'";
                if (logger.isDebugEnabled()) {
                    logger.warn(msg, var3);
                } else {
                    logger.warn(msg + ": " + var3);
                }
            }
        }

        if (this.destroyMethod != null) {
            //执行自定义的destroyMethod方法
            this.invokeCustomDestroyMethod(this.destroyMethod);
        } else if (this.destroyMethodName != null) {
            Method methodToInvoke = this.determineDestroyMethod(this.destroyMethodName);
            if (methodToInvoke != null) {
                this.invokeCustomDestroyMethod(ClassUtils.getInterfaceMethodIfPossible(methodToInvoke));
            }
        }
    }
前面分析了在注册beanPostProcessor时,会注册CommonAnnotationBeanPostProcessor类,当销毁时会调用到父类InitDestroyAnnotationBeanPostProcessor的postProcessBeforeDestruction,然后使用反射执行方法;再执行DisposableBean子类的destroy方法;最后使用反射执行自定义的destroyMethod方法。
3.使用场景
在xxl-job项目中就有使用,用于清理资源,停止创建的守护线程,销毁线程池等后置工作。
@Component
public class XxlJobAdminConfig implements InitializingBean, DisposableBean {

    // 实现DisposableBean接口,重写它的bean销毁方法
    @Override
    public void destroy() throws Exception {
        xxlJobScheduler.destroy();
    }
}
五、@PreDestroy
@PreDestroy是jdk的注解,用于销毁资源时的清理工作。
1.源码
@Documented
@Retention (RUNTIME)
@Target(METHOD)
public @interface PreDestroy {
}
2.spring boot源码调用
(1)位置
与@PostConstruct一致,详见@PostConstruct分析。
(2)调用
在DisposableBean中已经分析,详见DisposableBean分析。
六、BeanPostProcessor
BeanPostProcessor是一个接口,类实现了此接口,可以在bean实例化、属性赋值(populateBean方法)完成后,在开始进行初始化之前、初始化之后进行一些加强处理。某个类实现了BeanPostProcessor接口,则spring容器中所有bean进行实例化前后都会调用这个类重写的方法,可以用于所有bean的一些校验或者根据bean类型单独处理某些bean。
1.源码
public interface BeanPostProcessor {
    @Nullable
    default Object postProcessBeforeInitialization(Object bean, String beanName) throws BeansException {
        return bean;
    }

    @Nullable
    default Object postProcessAfterInitialization(Object bean, String beanName) throws BeansException {
        return bean;
    }
}
包含两个方法,postProcessBeforeInitialization初始化之前调用,postProcessAfterInitialization初始化之后调用。
2.spring boot源码调用
(1)位置
处理此接口的源码调用位置如下:
run() ->
this.refreshContext(context) ->
this.refresh(context) ->
applicationContext.refresh() ->
this.finishBeanFactoryInitialization(beanFactory) ->
beanFactory.preInstantiateSingletons() ->
DefaultListableBeanFactory.preInstantiateSingletons() ->
this.getBean(beanName) ->
this.doGetBean() ->
this.createBean(beanName, mbd, args) ->
AbstractAutowireCapableBeanFactory.createBean() ->
this.doCreateBean(beanName, mbdToUse, args) ->
this.initializeBean(beanName, exposedObject, mbd) ->
this.applyBeanPostProcessorsBeforeInitialization(bean, beanName) ->
this.applyBeanPostProcessorsAfterInitialization(wrappedBean, beanName)
在@PostConstruct介绍时已经给出注册BeanPostProcessor的源码位置:
run() ->
this.refreshContext(context) ->
this.refresh(context) ->
applicationContext.refresh() ->
this.registerBeanPostProcessors(beanFactory) ->
PostProcessorRegistrationDelegate.registerBeanPostProcessors(beanFactory, this)
(2)调用
我们先定义一个bean1,再定义一个实现了BeanPostProcessor的bean2,在bean2中可以对bean1初始化前后做一些处理。
bean1的定义:
@Component
public class BeanDemo implements InitializingBean, DisposableBean{
    @Override
    public void destroy() throws Exception {
        System.out.println("=========【DisposableBean】的destroy()方法===========");
    }

    @Override
    public void afterPropertiesSet() throws Exception {
        System.out.println("=========【InitializingBean】的afterPropertiesSet()方法===========");
    }
}
bean2的定义:
@Component
public class BeanDemo2 implements  BeanPostProcessor {

    @Override
    public Object postProcessBeforeInitialization(Object bean, String beanName) throws BeansException {
        if(bean instanceof BeanDemo) {
            System.out.println("=========【BeanPostProcessor】的postProcessBeforeInitialization()方法===========");
        }
        return bean;
    }

    @Override
    public Object postProcessAfterInitialization(Object bean, String beanName) throws BeansException {
        if(bean instanceof BeanDemo) {
            System.out.println("=========【BeanPostProcessor】的postProcessAfterInitialization()方法===========");
        }
        return bean;
    }
}
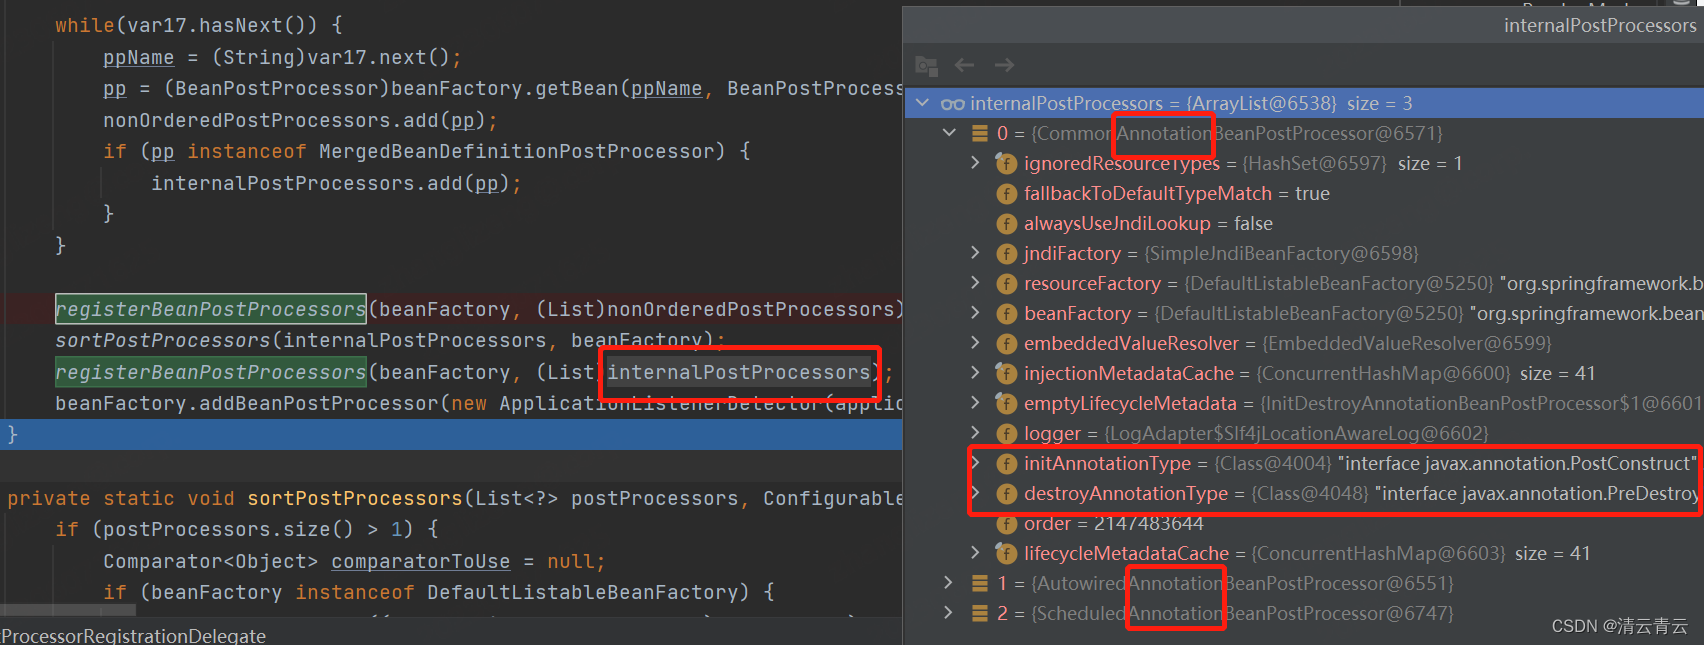
在执行registerBeanPostProcessors方法注册BeanPostProcessor的时候,先注册的是实现了BeanPostProcessor接口的bean,再注册处理例如@PostConstruct注解的BeanPostProcessor,而注册到的是一个list集合中,这样在遍历list集合的时候,优先遍历实现了BeanPostProcessor接口的bean。看下注册的情况:


看下初始化bean的initializeBean方法执行顺序部分源码:
   protected Object initializeBean(String beanName, Object bean, @Nullable RootBeanDefinition mbd) {

        Object wrappedBean = bean;
        if (mbd == null || !mbd.isSynthetic()) {
            //遍历BeanPostProcessor集合,执行postProcessAfterInitialization方法
            wrappedBean = this.applyBeanPostProcessorsBeforeInitialization(bean, beanName);
        }

        try {
            //执行初始化方法,包含InitializingBean和自定义InitMethod
            this.invokeInitMethods(beanName, wrappedBean, mbd);
        } catch (Throwable var6) {
            throw new BeanCreationException(mbd != null ? mbd.getResourceDescription() : null, beanName, "Invocation of init method failed", var6);
        }

        if (mbd == null || !mbd.isSynthetic()) {
            //遍历BeanPostProcessor集合,执行postProcessAfterInitialization方法
            wrappedBean = this.applyBeanPostProcessorsAfterInitialization(wrappedBean, beanName);
        }

        return wrappedBean;
    }
从这可以看出初始化执行顺序:BeanPostProcessor实现类before-》@PostConstruct-》InitializingBean接口的方法-》initMethod方法-》BeanPostProcessor实现类after。
看下遍历BeanPostProcessor集合的方法源码:
    public Object applyBeanPostProcessorsBeforeInitialization(Object existingBean, String beanName) throws BeansException {
        Object result = existingBean;

        Object current;
        //获取BeanPostProcessor集合
        for(Iterator var4 = this.getBeanPostProcessors().iterator(); var4.hasNext(); result = current) {
            BeanPostProcessor processor = (BeanPostProcessor)var4.next();
            //执行postProcessBeforeInitialization方法
            current = processor.postProcessBeforeInitialization(result, beanName);
            if (current == null) {
                return result;
            }
        }

        return result;
    }
七、ApplicationContextAware
ApplicationContextAware是一个接口类,类实现了此接口,重写它的方法即可获取ApplicationContext程序上下文,根据程序上下文可以获取到spring容器中的bean对象,然后根据业务需求对bean进行其他处理。
1.源码
public interface ApplicationContextAware extends Aware {
    void setApplicationContext(ApplicationContext var1) throws BeansException;
}
只有一个setApplicationContext方法,子类重写此方法,在spring启动时即可接收ApplicationContext。
2.spring boot源码调用
(1)位置
处理此接口的源码调用位置如下:
run() ->
this.refreshContext(context) ->
this.refresh(context) ->
applicationContext.refresh() ->
AbstractApplicationContext.refresh() ->
this.prepareBeanFactory(beanFactory) ->
beanFactory.addBeanPostProcessor(new ApplicationContextAwareProcessor(this)) ->
ApplicationContextAwareProcessor.postProcessBeforeInitialization() ->
ApplicationContextAwareProcessor.invokeAwareInterfaces()
(2)调用
关键的逻辑在这一行代码:
beanFactory.addBeanPostProcessor(new ApplicationContextAwareProcessor(this))
向存放BeanPostProcessor的list集合中加入ApplicationContextAwareProcessor,ApplicationContextAwareProcessor实现了BeanPostProcessor,后面spring处理每个bean时,会对这个集合进行遍历,调用每个对象的postProcessBeforeInitialization方法,并把当前处理的bean作为参数传递进去,在postProcessBeforeInitialization方法中判断当前bean是否实现了ApplicationContextAware接口,实现了则进行bean方法的调用。
看下addBeanPostProcessor的方法:
   private final List<BeanPostProcessor> beanPostProcessors = new AbstractBeanFactory.BeanPostProcessorCacheAwareList();

   public void addBeanPostProcessor(BeanPostProcessor beanPostProcessor) {
        Assert.notNull(beanPostProcessor, "BeanPostProcessor must not be null");
        this.beanPostProcessors.remove(beanPostProcessor);
        this.beanPostProcessors.add(beanPostProcessor);
    }
之所以使用list形式存放BeanPostProcessor是因为list是有序的,先加入的对象先遍历到,这也是bean对象的setApplicationContext方法相比其他方法先执行的原因,添加这个BeanPostProcessor在prepareBeanFactory方法中,添加其他的BeanPostProcessor在registerBeanPostProcessors中,所以遍历BeanPostProcessor集合执行初始化方法的顺序:ApplicationContextAware-》BeanPostProcessor实现类before-》@PostConstruct-》InitializingBean接口的方法-》initMethod方法-》BeanPostProcessor实现类after。下面是refresh方法中注册BeanPostProcessor的两个入口截图:

分析下ApplicationContextAwareProcessor#postProcessBeforeInitialization方法部分源码:
 public Object postProcessBeforeInitialization(Object bean, String beanName) throws BeansException {
        //判断bean对象的类型是否属于这些aware,都不属于则直接返回bean
        if (!(bean instanceof EnvironmentAware) && !(bean instanceof EmbeddedValueResolverAware) && !(bean instanceof ResourceLoaderAware) && !(bean instanceof ApplicationEventPublisherAware) && !(bean instanceof MessageSourceAware) && !(bean instanceof ApplicationContextAware) && !(bean instanceof ApplicationStartupAware)) {
            return bean;
        } else {
            AccessControlContext acc = null;
            if (System.getSecurityManager() != null) {
                acc = this.applicationContext.getBeanFactory().getAccessControlContext();
            }

            if (acc != null) {
                AccessController.doPrivileged(() -> {
                    this.invokeAwareInterfaces(bean);
                    return null;
                }, acc);
            } else {
                //执行aware方法
                this.invokeAwareInterfaces(bean);
            }

            return bean;
        }
    }

    //根据bean对象是哪种类型,强制转成需要的类型,调用它定义的方法
    private void invokeAwareInterfaces(Object bean) {
        if (bean instanceof EnvironmentAware) {
            ((EnvironmentAware)bean).setEnvironment(this.applicationContext.getEnvironment());
        }

        if (bean instanceof ApplicationContextAware) {
            ((ApplicationContextAware)bean).setApplicationContext(this.applicationContext);
        }

    }
判断bean对象的类型是否属于这些aware,都不属于则直接返回bean,其中就有判断ApplicationContextAware类型的,包含需要处理的aware,则根据bean对象是哪种类型,强制转成需要的类型,调用它定义的方法,像setApplicationContext就是ApplicationContextAware接口的方法,类实现了ApplicationContextAware接口,重写setApplicationContext接收applicationContext,在这个阶段就会调用到实现类的setApplicationContext方法。
3.使用场景
在xxl-job开源项目中就有使用,需要从spring容器中获取bean对象中使用了@XxlJob注解修饰的方法,把这些方法添加到map集合中,当定时器调用到具体的任务时,通过反射执行方法。需要获取bean对象就需要使用applicationContext上下文,所以实现ApplicationContextAware接口,重写setApplicationContext接收applicationContext。看下部分源码:
public class XxlJobSpringExecutor extends XxlJobExecutor implements ApplicationContextAware, SmartInitializingSingleton, DisposableBean {
   private static ApplicationContext applicationContext;

    //实现ApplicationContextAware接口,获取上下文,得到加载到spring容器中的所有bean对象
    @Override
    public void setApplicationContext(ApplicationContext applicationContext) throws BeansException {
        XxlJobSpringExecutor.applicationContext = applicationContext;
    }

    public static ApplicationContext getApplicationContext() {
        return applicationContext;
    }
}
八、Bean初始化销毁过程
经过上面的分析,可以看出在spring启动时,初始化的流程为:添加ApplicationContextAwareProcessor到list集合中-》bean实现BeanPostProcessor则添加这个bean到list集合中-》添加CommonAnnotationBeanPostProcessor到list集合中-》初始化bean时遍历list,调用每个BeanPostProcessor的postProcessBeforeInitialization方法-》按list的加入顺序,执行ApplicationContextAware、BeanPostProcessor、CommonAnnotationBeanPostProcessor(@PostConstruct)-》执行InitializingBean接口方法-》执行自定义initMethod方法-》遍历list,调用每个BeanPostProcessor的postProcessAfterInitialization方法-》执行SmartInitializingSingleton接口方法。
bean初始化流程图:

bean销毁流程图:

来看一个demo,根据输出结果验证一下:
bean1定义:
@Configuration
public class BeanConfig {

    @Scope(value="singleton")
    @Bean(initMethod = "intMethod",destroyMethod = "destroyMethod")
    public BeanDemo beanDemo(){
        return new BeanDemo("张三",18);
    }
}

public class BeanDemo implements ApplicationContextAware, SmartInitializingSingleton, InitializingBean, DisposableBean{

    private String name;
    private Integer age;

    public BeanDemo(String name, Integer age) {
        this.name = name;
        this.age = age;
        System.out.println("=========【BeanDemo】的有参构造方法===========");
    }

    @Override
    public void destroy() throws Exception {
        System.out.println("=========【DisposableBean】的destroy()方法===========");
    }

    @Override
    public void afterPropertiesSet() throws Exception {
        System.out.println("=========【InitializingBean】的afterPropertiesSet()方法===========");
    }

    @Override
    public void afterSingletonsInstantiated() {
        System.out.println("=========【SmartInitializingSingleton】的afterSingletonsInstantiated()方法===========");
    }

    @Override
    public void setApplicationContext(ApplicationContext applicationContext) throws BeansException {
        System.out.println("=========【ApplicationContextAware】的setApplicationContext()方法===========");
    }

    public void intMethod(){
        System.out.println("=========【intMethod】的intMethod()方法===========");
    }

    public void destroyMethod(){
        System.out.println("=========【destroyMethod】的destroyMethod()方法===========");
    }

    @PreDestroy
    public void preDestroy(){
        System.out.println("=========【@PreDestroy】的preDestroy()方法===========");
    }

    @PostConstruct
    public void postConstruct(){
        System.out.println("=========【@PostConstruct】的postConstruct()方法===========");
    }
}
bean2定义:
@Component
public class BeanDemo2 implements  BeanPostProcessor {

    @Override
    public Object postProcessBeforeInitialization(Object bean, String beanName) throws BeansException {
        if(bean instanceof BeanDemo) {
            System.out.println("=========【BeanPostProcessor】的postProcessBeforeInitialization()方法===========");
        }
        return bean;
    }

    @Override
    public Object postProcessAfterInitialization(Object bean, String beanName) throws BeansException {
        if(bean instanceof BeanDemo) {
            System.out.println("=========【BeanPostProcessor】的postProcessAfterInitialization()方法===========");
        }
        return bean;
    }
}
程序启动时输出结果:

程序结果输出结果:


 QT多线程的5种用法,通过使用线程解决UI主界面的耗时操作代码,防止界面卡死。...
 U8W/U8W-Mini使用与常见问题解决
 stm32使用HAL库配置串口中断收发数据(保姆级教程)
 分享几个国内免费的ChatGPT镜像网址(亲测有效)
 Allegro16.6差分等长设置及走线总结