您现在的位置是:首页 >技术交流 >【Gradio应用】工业异常行为检测网站首页技术交流
【Gradio应用】工业异常行为检测
? 【Gradio应用】工业异常行为检测 ?
1 项目背景 ?【项目与应用体验地址】
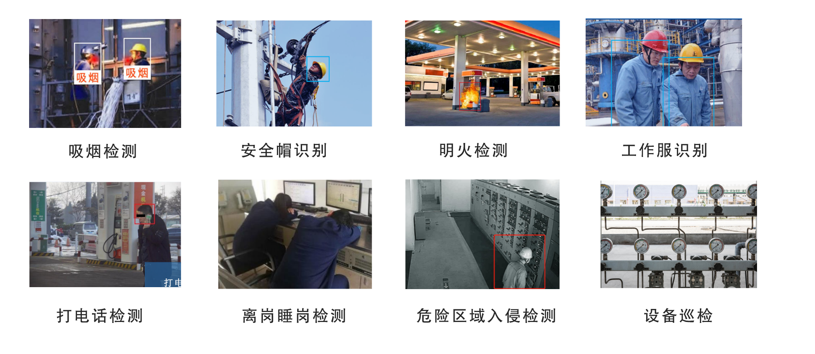
早期的人群异常行为检测研究多利用手工特征描述符来表示行人外观和运动特征,构建对应的特征空间,然后使用传统机器学习算法进行人群异常行为检测。其中,手工特征描述符主要包括轨迹、梯度方向直方图(HOG)、光流直方图(HOF)、混合动态纹理和光流场等低级视觉特征。由于监控场景种类繁多,人群运动复杂,人群密度随时变化,低级视觉特征提取方法难以捕获到有效的、稳健的行为特征,直接影响了基于此类特征的异常检测方法的性能。?
随着深度学习相关研究的蓬勃发展,研究人员开始探索基于深度学习的人群异常行为检测,并取得了一系列的成果。与早期传统方法相比,深度学习方法注重提取视频中的行人外观和运动的高级特征,从而更有效地区分正常行为和异常行为。?
2 项目方案选择 ?
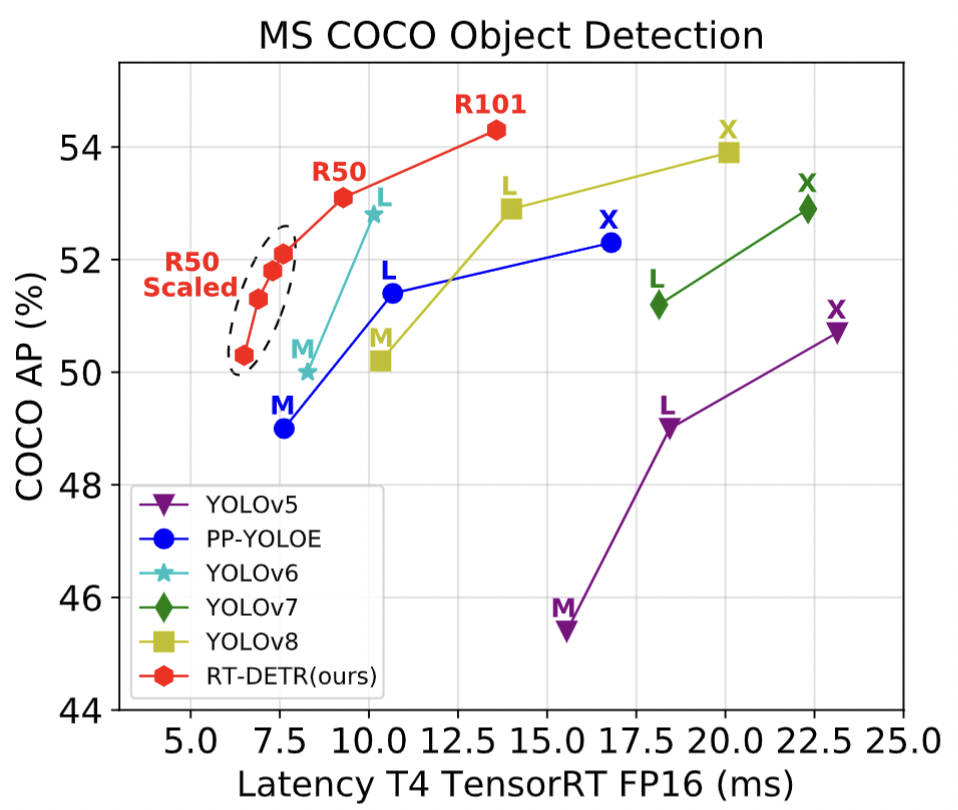
众所周知,实时目标检测(✨Real-Time Object Detection✨)一直被YOLO系列检测器统治着,YOLO版本更是更新到了v8,百度飞桨的PaddleDetection团队发布了一个名为 ✨RT-DETR✨ 的检测器,YOLO对实时检测的领域的统治被打破。论文标题很直接:《✨DETRs Beat YOLOs on Real-time Object Detection✨》,直译就是 RT-DETR在实时目标检测中击败YOLO家族!
在本项目中将选择用✨RT-DETR✨和✨PP-YOLOE✨模型对数据进行训练,将RT-DETR模型通过✨ONNXRUNTIME✨进行部署,PP-YOLOE模型通过✨FastDeploy✨进行快速部署。最后完成行人异常行为检测应用系统,接下来,让我们一探究竟吧!
? 2.1 模型介绍
? RT-DETR (DETRs Beat YOLOs on Real-time Object Detection)
✨RT-DETR✨是第一个实时端到端目标检测器。具体而言,我们设计了一个高效的混合编码器,通过解耦尺度内交互和跨尺度融合来高效处理多尺度特征,并提出了IoU感知的查询选择机制,以优化解码器查询的初始化。此外,RT-DETR支持通过使用不同的解码器层来灵活调整推理速度,而不需要重新训练,这有助于实时目标检测器的实际应用。RT-DETR-L在COCO val2017上实现了53.0%的AP,在T4 GPU上实现了114FPS,RT-DETR-X实现了54.8%的AP和74FPS,在速度和精度方面都优于相同规模的所有YOLO检测器。RT-DETR-R50实现了53.1%的AP和108FPS,RT-DETR-R101实现了54.3%的AP和74FPS,在精度上超过了全部使用相同骨干网络的DETR检测器。【✨论文地址✨】
?️ RT-DETR模型结构
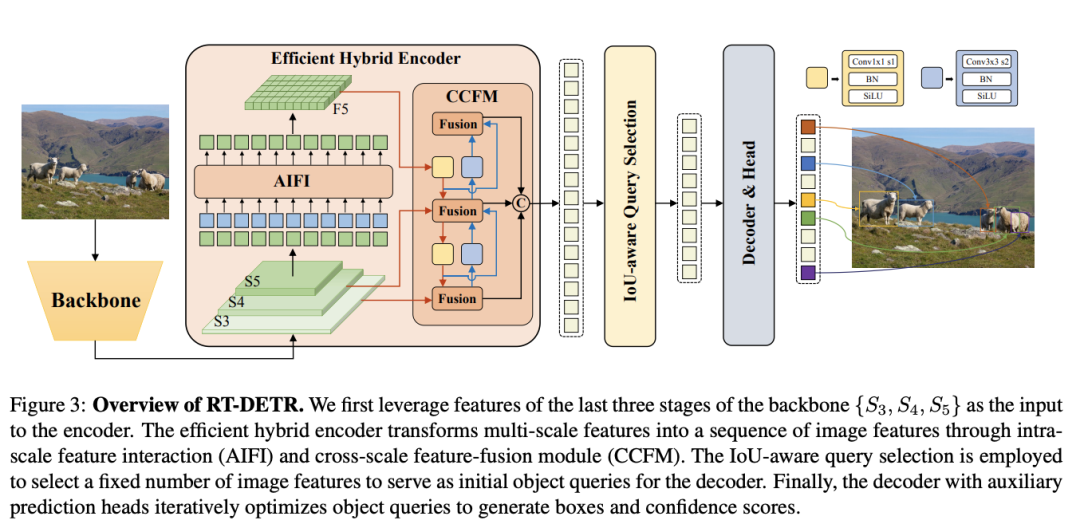
 ✨ Backbone: 采用了经典的ResNet和百度自研的HGNet-V2两种,backbone是可以Scaled,应该就是常见的s m l x分大中小几个版本,不过可能由于还要对比众多高精度的DETR系列所以只公布了HGNetv2的L和X两个版本,也分别对标经典的ResNet50和ResNet101,不同于DINO等DETR类检测器使用最后4个stage输出,RT-DETR为了提速只需要最后3个,这样也符合YOLO的风格;

 ✨ Neck:起名为HybridEncoder,其实是相当于DETR中的Encoder,其也类似于经典检测模型模型常用的FPN,论文里分析了Encoder计算量是比较冗余的,作者解耦了基于Transformer的这种全局特征编码,设计了AIFI (尺度内特征交互)和 CCFM(跨尺度特征融合)结合的新的高效混合编码器也就是 Efficient Hybrid Encoder,此外把encoder_layer层数由6减小到1层,并且由几个通道维度区分L和X两个版本,配合CCFM中RepBlock数量一起调节宽度深度实现Scaled RT-DETR;

✨ Transformer: 起名为RTDETRTransformer,基于DINO Transformer中的decoder改动的不多;

✨ Head和Loss: 和DINOHead基本一样,从RT-DETR的配置文件其实也可以看出neck+transformer+detr_head其实就是一整个Transformer,拆开写还是有点像YOLO类的风格。而训练加入了IoU-Aware的query selection,这个思路也是针对分类score和iou未必一致而设计的,改进后提供了更高质量(高分类分数和高IoU分数)的decoder特征;

✨ Reader和训练策略: Reader采用的是YOLO风格的简单640尺度,没有DETR类检测器复杂的多尺度resize,其实也就是原先他们PPYOLOE系列的reader,都是非常基础的数据增强,0均值1方差的NormalizeImage大概是为了节省部署时图片前处理的耗时,然后也没有用到别的YOLO惯用的mosaic等trick;训练策略和优化器,采用的是DETR类检测器常用的AdamW,毕竟模型主体还是DETR类的。
? PP-YOLOE+
✨PP-YOLOE✨是基于PP-YOLOv2的卓越的单阶段Anchor-free模型,超越了多种流行的YOLO模型。PP-YOLOE有一系列的模型,即s/m/l/x,可以通过width、multiplier和depth multiplier配置。PP-YOLOE避免了使用诸如Deformable Convolution或者Matrix NMS之类的特殊算子,以使其能轻松地部署在多种多样的硬件上。PP-YOLOE+l在COCO test-dev2017达到了53.3的mAP, 同时其速度在Tesla V100上达到了78.1 FPS。PP-YOLOE+s/m/x同样具有卓越的精度速度性价比,本项目使用的是yoloe+_x。 【✨论文地址✨】
?️ PP-YOLOE+模型结构
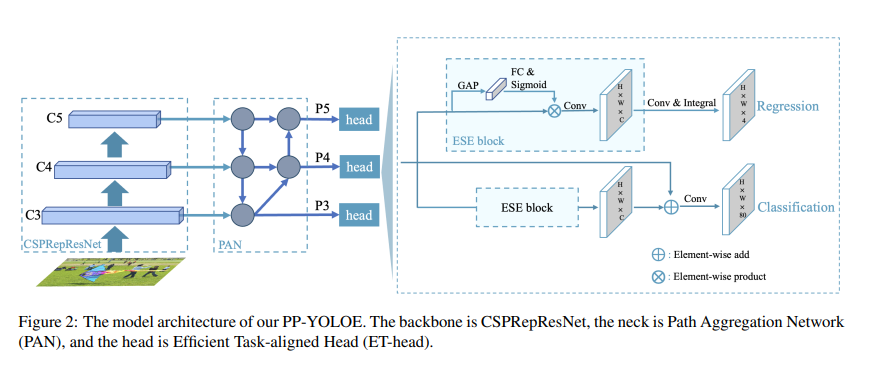
✨ PP-YOLOEE的模型架构,骨干是CSPRepResNet,Neck部分是路径聚合网络(PAN),Head部分是有效的任务对齐头(ET-Head)。
?️ PP-YOLOE+模型特点
✨ Anchor-free:YOLOE借鉴FCOS,在每个像素上放置一个锚点,为三个检测头设置上、下边界,将 ground truths分配给相应的特征图。然后,计算 bounding box的中心位置,选择最近的像素点作为正样本。这种方式使模型更快一些,但损失了0.3 AP。

✨ Backbone and Neck:Residual Connections和Dense Connections在现代卷积神经网络中得到了广泛的应用。Residual connections引入了捷径来缓解梯度消失问题,也可以作为一种模型集成方法。Dense Connections聚集了具有不同接受域的中间特征,在目标检测任务中表现出良好的性能。CSPNet利用跨阶段Dense Connections来降低计算负担,在不损失精度的情况下降低计算负担,这种方式在YOLOv4、YOLOv5上被使用,且证明是有效的。

✨ RepRes-Block:通过结合Residual Connections和Dense Connections,用于YOLOE的主干和颈部。但作者简化了原始的Block(图3(a))。使用 element-wise Add操作来替换连接操作(图3(b)),这两个操作在某种程度上近似于RMNet。因此,在推理阶段,可以重新参数化为RepResBlock(图3(c))。作者使用RepResBlock构建类似于ResNet的网络,称之为CSPRepResNet(图3(d),ESE制SE注意力模块)。

✨ Task Alignment Learning (TAL). 标签分配是一个重要的问题。YOLOX使用SimOTA作为标签分配策略来提高性能。然而,为了进一步克服分类和定位的错位,在TOOD中提出了Task Alignment Learning,该策略由 dynamic label assignment和task aligned loss组成。通过对齐这两个任务,TAL可以同时获得最高的分类分数和最精确的边界框。
3 数据集处理 ?
? 3.1 项目运行环境搭建
? step 1: 克隆PaddleDetection仓库并且安装依赖
%cd ~/
# !git clone --branch develop --depth 1 https://gitee.com/PaddlePaddle/PaddleDetection.git
!unzip PaddleDetection.zip
%cd ~/PaddleDetection
!pip install -r requirements.txt --user
? 3.2 解压数据集
? step 2:解压数据集,并将图片和标注文件移动至指定文件夹
!unzip -oq /home/aistudio/data/data218179/smoking_phone_water.zip -d ~/PaddleDetection/dataset/voc
!mv /home/aistudio/PaddleDetection/dataset/voc/VOCData/Annotations /home/aistudio/PaddleDetection/dataset/voc/
!mv /home/aistudio/PaddleDetection/dataset/voc/VOCData/images /home/aistudio/PaddleDetection/dataset/voc/
? 3.3 数据集矫正
? step 3:将images中图片后缀名为.JPG的文件更新为.jpg,保证在转换COCO数据集时正常运行。
import os

# 这是你需要修改文件的路径地址
filePath = r"/home/aistudio/PaddleDetection/dataset/voc/images"

def update(filePath):
    # listdir:返回指定的文件夹包含的文件或文件夹的名字的列表
    files = os.listdir(filePath)
    for file in files:
        fileName = filePath + os.sep + file
        path1 = filePath
        # 运用递归;isdir:判断某一路径是否为目录
        if os.path.isdir(fileName):
            update(fileName)
            continue
        else:
            if file.endswith('.JPG'):
                test = file.replace(".JPG", ".jpg")
                print("修改前:" + path1 + os.sep + file)
                print("修改后:" + path1 + os.sep + test)
                os.renames(path1 + os.sep + file, path1 + os.sep + test)

if __name__ == '__main__':
    update(filePath)
? step 4:将Annotations中的标注文件中的图片名和路径名进行更新,保证在转换COCO数据集时正常运行。
import os
import os.path
import xml.dom.minidom
path = r'/home/aistudio/PaddleDetection/dataset/voc/Annotations'
files = os.listdir(path)  # 得到文件夹下所有文件名称
s = []
count = 0
for xmlFile in files:  # 遍历文件夹
    if not os.path.isdir(xmlFile):  # 判断是否是文件夹,不是文件夹才打开
            name1 = xmlFile.split('.')[0]
            dom = xml.dom.minidom.parse(path + '/' + xmlFile)
            root = dom.documentElement
            newfolder = root.getElementsByTagName('folder')
            newpath = root.getElementsByTagName('path')
            newfilename = root.getElementsByTagName('filename')
            newfilename[0].firstChild.data = name1 + '.jpg'
            with open(os.path.join(path, xmlFile), 'w') as fh:
                dom.writexml(fh)
                print('写入成功')
            count = count + 1
? step 5:将VOC数据集进行划分,并且生成label_list列表,保证在转换COCO数据集时正常运行。
import random
import os
#生成trainval.txt和val.txt
random.seed(2020)
xml_dir  = '/home/aistudio/PaddleDetection/dataset/voc/Annotations'#标签文件地址
img_dir = '/home/aistudio/PaddleDetection/dataset/voc/images'#图像文件地址
path_list = list()
for img in os.listdir(img_dir):
    img_path = os.path.join(img_dir,img)
    xml_path = os.path.join(xml_dir,img.replace('jpg', 'xml'))
    path_list.append((img_path, xml_path))
random.shuffle(path_list)
ratio = 0.9
train_f = open('/home/aistudio/PaddleDetection/dataset/voc/trainval.txt','w') #生成训练文件
val_f = open('/home/aistudio/PaddleDetection/dataset/voc/val.txt' ,'w')#生成验证文件

for i ,content in enumerate(path_list):
    img, xml = content
    text = img + ' ' + xml + '
'
    if i < len(path_list) * ratio:
        train_f.write(text)
    else:
        val_f.write(text)
train_f.close()
val_f.close()

#生成标签文档
label = ['normal', 'drink', 'phone', 'smoke', 'face']#设置你想检测的类别
with open('/home/aistudio/PaddleDetection/dataset/voc/label_list.txt', 'w') as f:
    for text in label:
        f.write(text+'
')
? 3.4 VOC数据集格式转换为COCO数据集格式
# 将训练集转换为COCO格式
%cd ~/PaddleDetection
!python tools/x2coco.py
        --dataset_type voc
        --voc_anno_dir dataset/voc/Annotations/
        --voc_anno_list dataset/voc/trainval.txt
        --voc_label_list dataset/voc/label_list.txt
        --voc_out_name dataset/voc/train.json
# 将验证集转换为COCO格式
%cd ~/PaddleDetection
!python tools/x2coco.py
        --dataset_type voc
        --voc_anno_dir dataset/voc/Annotations/
        --voc_anno_list dataset/voc/val.txt
        --voc_label_list dataset/voc/label_list.txt
        --voc_out_name dataset/voc/val.json
4 RT-DETR模型训练与预测 ?
? 4.1 模型训练
%cd ~/PaddleDetection
!python tools/train.py
    -c configs/rtdetr/rtdetr_hgnetv2_x_6x_coco.yml
    --eval
    --use_vdl True
    --vdl_log_dir ./log
    --resume /home/aistudio/PaddleDetection/output/rtdetr_hgnetv2_x_6x_coco/22.pdparams
? 4.2 模型评估
!python tools/eval.py
    -c configs/rtdetr/rtdetr_hgnetv2_x_6x_coco.yml
    -o weights=output/rtdetr_hgnetv2_x_6x_coco/best_model.pdparams
? 4.3 模型预测
!python tools/infer.py
    -c configs/rtdetr/rtdetr_hgnetv2_x_6x_coco.yml
    -o weights=output/rtdetr_hgnetv2_x_6x_coco/best_model.pdparams
    --infer_dir=/home/aistudio/PaddleDetection/dataset/voc/test/test
    --output_dir infer_output/
5 模型部署 ?
? 5.1 模型导出
!python tools/export_model.py
    -c configs/rtdetr/rtdetr_hgnetv2_x_6x_coco.yml
    -o weights=output/rtdetr_hgnetv2_x_6x_coco/best_model.pdparams
? 5.2 转换模型至ONNX
? step 1:安装Paddle2ONNX 和 ONNX
!pip install onnx==1.13.0
!pip install paddle2onnx==1.0.5
? step 2:转换模型
!paddle2onnx --model_dir=./output_inference/rtdetr_hgnetv2_x_6x_coco/
    --model_filename model.pdmodel
    --params_filename model.pdiparams
    --opset_version 16
    --save_file rtdetr_hgnetv2_x_6x_coco.onnx
6 ONNXRUNTIME部署 ?
? step 1:安装onnxruntime
!pip install onnxruntime --user
? step 2:可视化demo
import onnxruntime as rt
import cv2
import numpy as np

sess = rt.InferenceSession("/home/aistudio/PaddleDetection/rtdetr_hgnetv2_x_6x_coco.onnx")
img = cv2.imread("/home/aistudio/PaddleDetection/dataset/voc/test/test/1018.png")
org_img = img
im_shape = np.array([[float(img.shape[0]), float(img.shape[1])]]).astype('float32')
img = cv2.resize(img, (640,640))
scale_factor = np.array([[float(640/img.shape[0]), float(640/img.shape[1])]]).astype('float32')
img = img.astype(np.float32) / 255.0
input_img = np.transpose(img, [2, 0, 1])
image = input_img[np.newaxis, :, :, :]
output_dict = ["reshape2_83.tmp_0","tile_3.tmp_0"]
inputs_dict = {
    'im_shape': im_shape,
    'image': image,
    'scale_factor': scale_factor
}
result = sess.run(output_dict, inputs_dict)
for item in result[0]:
    if item[1] > 0.5:
        if item[0] == 0:
            cv2.rectangle(org_img, (int(item[2]), int(item[3])), (int(item[4]), int(item[5])), (255,0,0), 2)
            cv2.putText(org_img, "normal", (int(item[2]), int(item[3])), cv2.FONT_HERSHEY_SIMPLEX, 0.5, (255,255,255), 1)
        elif item[0] == 1:
            cv2.rectangle(org_img, (int(item[2]), int(item[3])), (int(item[4]), int(item[5])), (0,255,0), 2)
            cv2.putText(org_img, "drink", (int(item[2]), int(item[3])), cv2.FONT_HERSHEY_SIMPLEX, 0.5, (255,255,255), 1)
        elif item[0] == 2:
            cv2.rectangle(org_img, (int(item[2]), int(item[3])), (int(item[4]), int(item[5])), (0,0,255), 2)
            cv2.putText(org_img, "phone", (int(item[2]), int(item[3])), cv2.FONT_HERSHEY_SIMPLEX, 0.5, (255,255,255), 1)
        elif item[0] == 3:
            cv2.rectangle(org_img, (int(item[2]), int(item[3])), (int(item[4]), int(item[5])), (225,225,0), 2)
            cv2.putText(org_img, "smoke", (int(item[2]), int(item[3])), cv2.FONT_HERSHEY_SIMPLEX, 0.5, (255,255,255), 1)
        else:
            cv2.rectangle(org_img, (int(item[2]), int(item[3])), (int(item[4]), int(item[5])), (128,0,128), 2)
            cv2.putText(org_img, "face", (int(item[2]), int(item[3])), cv2.FONT_HERSHEY_SIMPLEX, 0.5, (255,255,255), 1)
cv2.imwrite("/home/aistudio/work/result.png", org_img)
? step 3:将以上模型用Gradio应用进行部署, 具体代码如下所示:
import gradio as gr
import onnxruntime as rt
import numpy as np
import cv2

# 发布应用
sess = rt.InferenceSession("/home/aistudio/launch/rtdetr_hgnetv2_x_6x_coco.onnx")

def infer(img):
    org_img = img
    im_shape = np.array([[float(img.shape[0]), float(img.shape[1])]]).astype('float32')
    img = cv2.resize(img, (640,640))
    scale_factor = np.array([[float(640/img.shape[0]), float(640/img.shape[1])]]).astype('float32')
    img = img.astype(np.float32) / 255.0
    input_img = np.transpose(img, [2, 0, 1])
    image = input_img[np.newaxis, :, :, :]
    output_dict = ["reshape2_83.tmp_0","tile_3.tmp_0"]
    inputs_dict = {
        'im_shape': im_shape,
        'image': image,
        'scale_factor': scale_factor
    }
    result = sess.run(output_dict, inputs_dict)
    for item in result[0]:
        if item[1] > 0.5:
            if item[0] == 0:
                cv2.rectangle(org_img, (int(item[2]), int(item[3])), (int(item[4]), int(item[5])), (255,0,0), 2)
                cv2.putText(org_img, "helmet", (int(item[2]), int(item[3])), cv2.FONT_HERSHEY_SIMPLEX, 0.5, (255,255,255), 1)
            elif item[0] == 1:
                cv2.rectangle(org_img, (int(item[2]), int(item[3])), (int(item[4]), int(item[5])), (0,255,0), 2)
                cv2.putText(org_img, "vest", (int(item[2]), int(item[3])), cv2.FONT_HERSHEY_SIMPLEX, 0.5, (255,255,255), 1)
            elif item[0] == 2:
                cv2.rectangle(org_img, (int(item[2]), int(item[3])), (int(item[4]), int(item[5])), (0,0,255), 2)
                cv2.putText(org_img, "worker", (int(item[2]), int(item[3])), cv2.FONT_HERSHEY_SIMPLEX, 0.5, (255,255,255), 1)
            elif item[0] == 3:
                cv2.rectangle(org_img, (int(item[2]), int(item[3])), (int(item[4]), int(item[5])), (225,225,0), 2)
                cv2.putText(org_img, "smoke", (int(item[2]), int(item[3])), cv2.FONT_HERSHEY_SIMPLEX, 0.5, (255,255,255), 1)
            else:
                cv2.rectangle(org_img, (int(item[2]), int(item[3])), (int(item[4]), int(item[5])), (128,0,128), 2)
                cv2.putText(org_img, "face", (int(item[2]), int(item[3])), cv2.FONT_HERSHEY_SIMPLEX, 0.5, (255,255,255), 1)
    return org_img

# 发布应用
demo = gr.Interface(fn=infer, title="行人异常行为检测与识别", inputs=gr.Image(), outputs="image", examples=["/home/aistudio/launch/1018.png", "/home/aistudio/launch/1093.png"], cache_examples=True, allow_flagging='never')

demo.launch()
7 PPYOLOE+模型训练 ?
? 7.1 模型训练
%cd ~/PaddleDetection
!python tools/train.py
    -c configs/ppyoloe/ppyoloe_plus_crn_s_80e_coco.yml
    --eval
    --use_vdl True
    --vdl_log_dir ./ppyoloe_log
? 7.2 模型评估
%cd ~/PaddleDetection
!python tools/eval.py
    -c configs/ppyoloe/ppyoloe_plus_crn_s_80e_coco.yml
    -o weights=output/ppyoloe_plus_crn_s_80e_coco/best_model.pdparams
8 FastDeploy部署模型 ?
? 8.1 FastDeploy介绍
FastDeploy是一款全场景、易用灵活、极致高效的AI推理部署工具。提供超过 ?160+ Text,Vision, Speech和跨模态模型?开箱即用的部署体验。包括物体检测、字符识别(OCR)、人脸、人像扣图、多目标跟踪系统、NLP、Stable Diffusion文图生成、TTS 等几十种任务场景。FastDeploy需要安装一些包进行适配,安装包在requirements.txt文件夹里,部署时会自动安装。大家可以尝试一下FastDeploy支持的其他模型进行应用部署。FastDeploy的PPYOLOE Python部署参考链接
? 8.2 FastDeploy模型部署
? step 1:导出模型
-
model.pdiparams
-
model.pdiparams.info
-
infer_cfg.yml
-
model.pdmodel
!python tools/export_model.py
    -c configs/ppyoloe/ppyoloe_plus_crn_s_80e_coco.yml
    -o weights=output/ppyoloe_plus_crn_s_80e_coco/best_model.pdparams
? step 2:安装相关包
# 安装相关包
!pip install numpy opencv-python fastdeploy-python -f https://www.paddlepaddle.org.cn/whl/fastdeploy.html --user
? step 3:验证部署是否正确
# 验证部署是否正确
import cv2
import fastdeploy.vision as vision
model = vision.detection.PPYOLOE("/home/aistudio/PaddleDetection/output_inference/ppyoloe_plus_crn_s_80e_coco/model.pdmodel",
                                    "/home/aistudio/PaddleDetection/output_inference/ppyoloe_plus_crn_s_80e_coco/model.pdiparams",
                                    "/home/aistudio/PaddleDetection/output_inference/ppyoloe_plus_crn_s_80e_coco/infer_cfg.yml",
                                )
im = cv2.imread("/home/aistudio/PaddleDetection/dataset/voc/test/test/1018.png")
result = model.predict(im)
vis_im = vision.vis_detection(im, result, score_threshold=0.4)
cv2.imwrite("/home/aistudio/work/result1.png", vis_im)
9 Gradio应用部署 ?
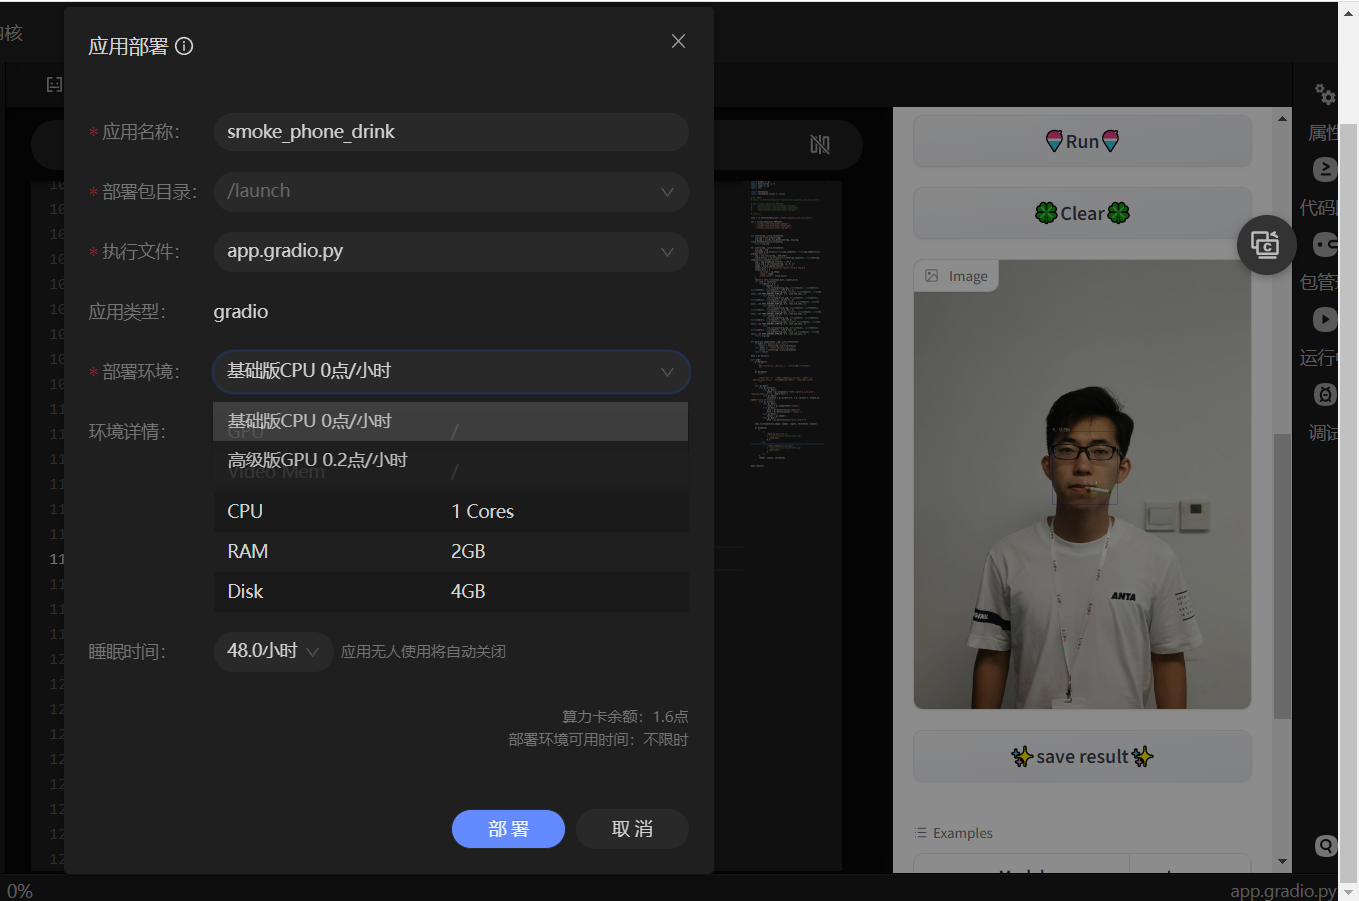
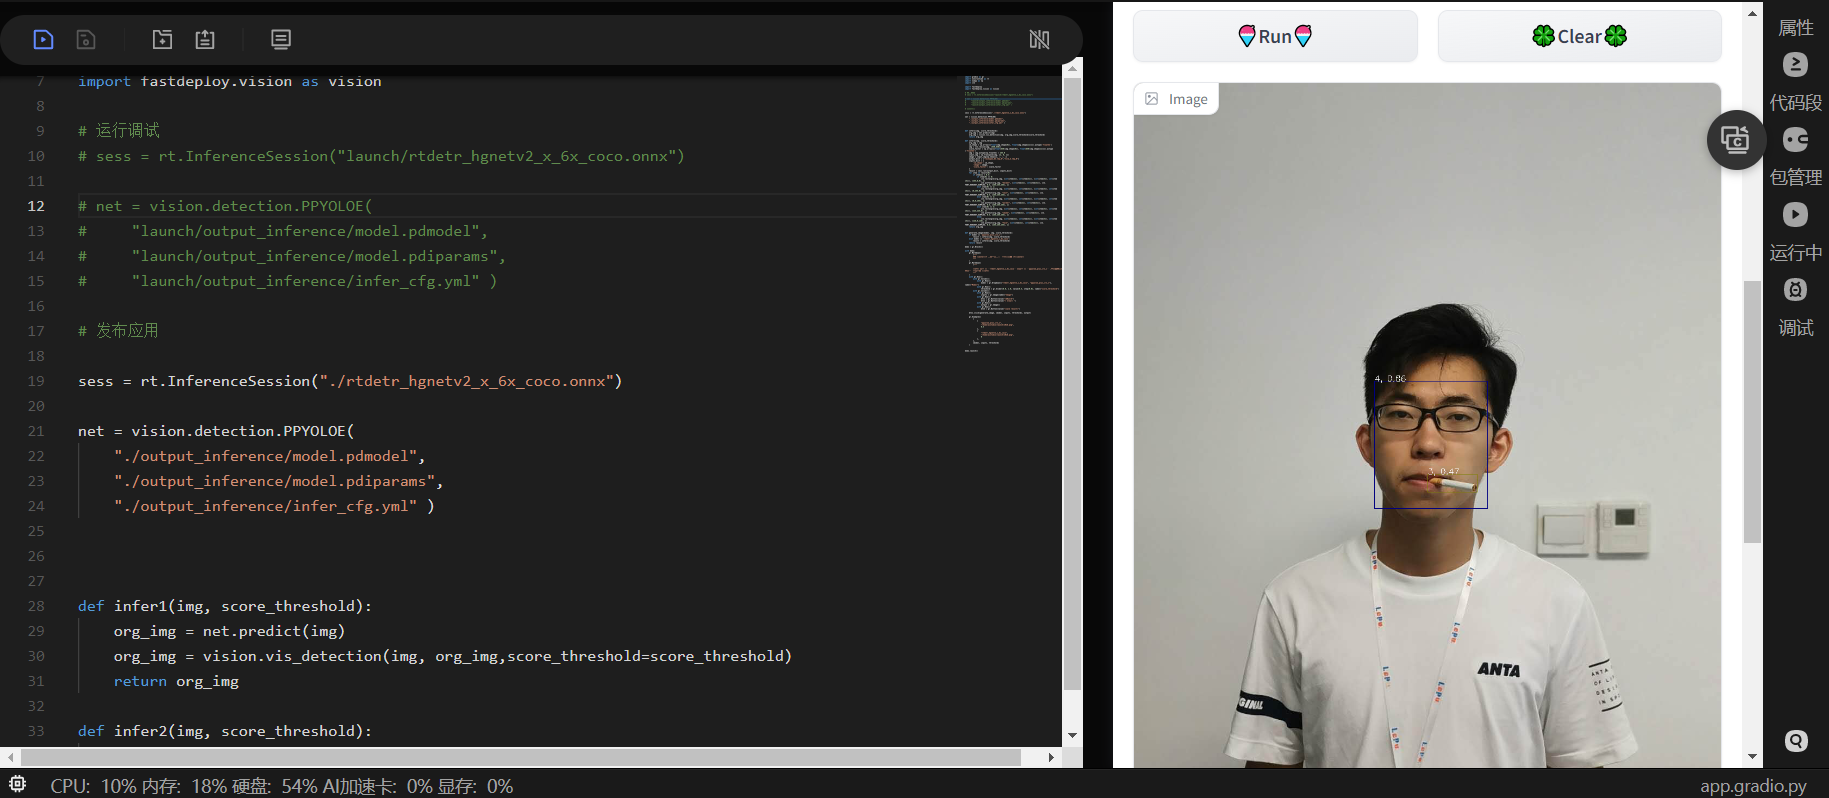
部署好的Gradio在launch文件夹下,效果如下图所示:
10 参考资料和项目总结 ?
? 10.1 参考资料
? 10.2 项目总结
本项目是使用飞桨团队最新推出的 RT-DETR 模型和2022年推出的PPYOLOE+模型来实现的。根据论文描述,两个模型都可以达到实时检测的效果,并且在此行人异常行为检测数据集取得了较好的精度,并将RT-DETR模型通过ONNXRUNTIME进行部署、PPYOLOE+模型通过FastDeploy经行部署,最后通过Gradio实现了行人异常行为检测应用系统。
请点击此处查看本环境基本用法.
Please click here for more detailed instructions.


 U8W/U8W-Mini使用与常见问题解决
 QT多线程的5种用法,通过使用线程解决UI主界面的耗时操作代码,防止界面卡死。...
 stm32使用HAL库配置串口中断收发数据(保姆级教程)
 分享几个国内免费的ChatGPT镜像网址(亲测有效)
 Allegro16.6差分等长设置及走线总结