您现在的位置是:首页 >其他 >【OpenAI】Python:基于 Gym-CarRacing 的自动驾驶项目(4) | 车辆控制功能的实现网站首页其他
【OpenAI】Python:基于 Gym-CarRacing 的自动驾驶项目(4) | 车辆控制功能的实现
 猛戳!跟哥们一起玩蛇啊 ? 《一起玩蛇》?
? 写在前面:本篇是关于多伦多大学自动驾驶专业项目的博客。GYM-Box2D CarRacing 是一种在 OpenAI Gym 平台上开发和比较强化学习算法的模拟环境。它是流行的 Box2D 物理引擎的一个版本,经过修改以支持模拟汽车在赛道上行驶的物理过程。模块化组件 (Modular Pipeline) 分为 低层次感知与场景解析、路径训练 和车辆控制。本章我们要讲解的内容是本自动驾驶基础学习系列博客的最后一个部分 —— 车辆控制 (Vehicle Control) 相关的知识,并做出实现。
- ? 多伦多大学自动驾驶专项课程:Motion Planning for Self-Driving Cars | Coursera
- ? GYM-Car Racing 文档:Car Racing - Gym Documentation
? 本章目录:
0x02 闭环控制(Closed-loop Control)
0x03 提供的模板文件说明(longitudinal control.py)
0x00 完整代码(longitudinal control.py)
Ⅰ. 控制器的主要类型(Controller)
0x00 引入:车辆控制(Vehicle Control)
① 关键对象:控制器 (Controller) 和物体 (Object)
- 控制器根据给定的状态给物体(车辆)发送指令。
- 物体(车辆)接收并处理指令,其状态发生变化。
② 目标:舒适地实现车辆的目标状态(无振荡,较小的阻尼)
- 使速度
保持在
- 规律地驾驶曲线 (curve)
- 按照航点 (way_point) 行驶
0x01 开环控制(Open-loop Control)
"开环控制是不带反馈的控制方式,全员莽夫最爱!"
简单来说:开环控制意味着没有反馈,开环控制是没有反馈机制的控制方式。
对于未知干扰毫无防备,可能导致严重偏离预期。因此控制器必须进行彻底的校准!我们用一个现实中的物品 —— "烤面包机" 来举例,方便大家理解。
? 举个例子:通过 "烤面包机" 来理解 "开环控制"
烤面包机通常具有定时器和温度控制,我们设定烤面包的时间和温度后,它开始工作。在这个过程中,烤面包机同样没有反馈机制来检测面包的烤制程度。因此,如果我们没有准确估计所需的烤制时间和温度,就有可能导致面包烤制不均匀或过度烤焦。由于缺乏反馈,我们无法及时调整烤面包机的时间或温度,以适应面包的实际烤制情况,从而导致烤制结果偏离预期。
这个例子很好地突出了 开环控制的主要缺点,即 缺乏反馈机制。
开环控制在没有实时反馈的情况下依赖预设的输入,因此对于未知的干扰或变化时,
可能无法有效地进行调整,导致系统的性能偏离预期。
因此,开环控制常需要仔细校准和准确的输入估计,以确保系统的正常运行。

0x02 闭环控制(Closed-loop Control)
"闭环控制是有反馈机制的控制方式,非常可以!"
简单来说,闭环控制时有反馈的,闭环控制是具有反馈机制的控制方式。
与开环控制相比,闭环控制能够根据系统输出的实际情况进行调整和纠正,
以使系统更好地适应外部变化和干扰,使用闭环控制能够有效减小观测值和参考值之间的误差。
闭环控制的例子:通过调节燃料或工作流体的流量来控制引擎的转速,以保持近乎恒定的速度

额……这个东西大家可能比较陌生,所以还是用我们刚才举的烤面包机的例子吧!
还是烤面包机,只不过我们现在让这个烤面包机变得更加智能化一点,变成智能烤面包机!
? 举个例子:用 "闭环控制",造出更加智能的 "烤面包机"
闭环控制会引入一个反馈传感器,用于检测面包的烤制程度。在烤面包的过程中,反馈传感器会实时监测面包的状态,例如面包的颜色或温度。通过将这些实际的反馈信息与预期的烤制结果进行比较,控制器可以对烤面包机的操作进行调整。假设面包开始烤制后,反馈传感器检测到面包的颜色已经接近预期的烤制程度,但烤制时间还没有结束。闭环控制器会根据这个反馈信息判断面包已经达到了所需的程度,然后及时终止加热过程,以防止面包过度烤焦。相反,如果面包的烤制程度不够,闭环控制器会相应地增加烤制时间或温度,以确保面包达到理想的烤制效果。
闭环控制通过实时的反馈机制,能够根据实际情况进行调整和纠正,从而使系统能够更好地应对未知干扰和变化。 从我们的例子也不难看出,做一个比较智能的烤面包机会麻烦许多!
所以,闭环控制的设计和调试可能更加复杂,需要考虑更多的因素。
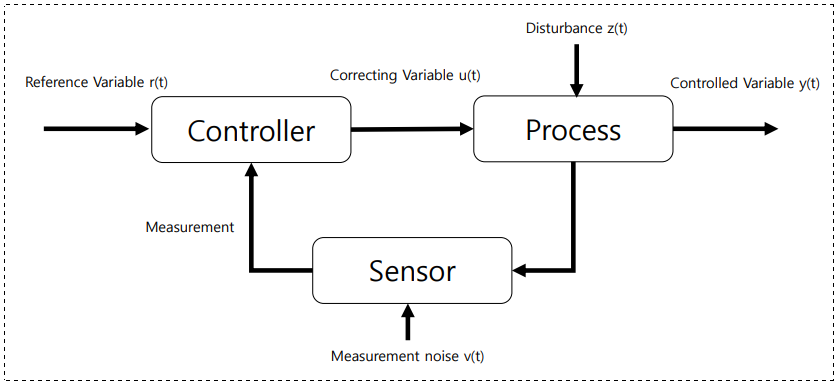
❓ 思考:如何区分开环控制与闭环控制?
- 看看有无反馈!
- 是否对当前控制起作用?开环控制一般是在瞬间就完成的控制活动,闭环控制一定会持续一定的时间,我们可以借此判断。
Ⅱ. 黑盒控制(Black-Box Control)
0x00 引入:什么是黑盒控制?
"黑盒控制器对于处理过程一无所知,盲人摸象地控制!"
黑盒控制是指对一个系统或者过程进行控制,但对其内部机制和工作原理一无所知的控制方法。
在黑盒控制中,我们只能观察到系统的输入和输出,而无法直接了解其内部的结构和运作方式。
黑盒控制常用于对复杂系统进行控制,它的基本思想是通过观察系统的输入和输出,
建立输入与输出之间的关系,并根据所需的输出来调整输入,以达到控制系统的目标。
下面我们就来介绍几种常见的 黑盒控制 (Black-Box Control) !
0x01 起停式控制(Bang-Bang Control)
起停式控制,又称 砰砰控制 (bang-bang control) 。英文就叫 bangbang,单个人觉得 "起停式" 的叫法更好,便于顾名思义。起停式控制是会让控制输出在两种状态之间切换的回授控制器,起停式控制会使控制输出在某个状态停留一段时间,再跳到另一个状态。
我们举一个空调调节温度的例子,来讲解起停式控制:
- 当温度高于设定温度(例如30度)时,自动调温器会输出一个开的信号,启动冷气。
- 当温度低于设定温度减去迟滞区间(例如28度)时,自动调温器会输出一个关的信号,关闭冷气。
- 在设定温度与设定温度减去迟滞区间之间的温度范围内,自动调温器不会发出任何信号,保持冷气的状态(开启或关闭)不变。
这种起停式控制的设计可以避免频繁地启动和停止冷气,以减少能源消耗和提高设备寿命。迟滞区间的存在允许温度在一定范围内波动,而不会触发冷气的频繁启停。同时,迟滞功能的元件在控制系统中起到了缓冲和稳定的作用,使得温度可以在设定值附近波动而不至于过于剧烈。
该法数学形式如下:


0x01 PID 控制(PID Control)
PID 控制 (Proportional-Integral-Derivative control),用于控制系统中的连续过程。结合了比例控制、积分控制和微分控制三个部分,以实现系统的稳定和响应性能的优化。
PID 控制的工作原理是通过比较实际输出与期望输出之间的差异,计算出一个控制量,从而调节系统的输入,使得输出逐渐接近期望值。PID 控制算法根据以下三个部分的计算结果来生成控制量,PID 分别表示 比例控制、积分控制、微分控制:
- 比例控制( P roportional Control):该部分的输出与实际输出与期望输出之间的差异成正比。比例控制的作用是根据当前误差大小,提供一个相应的控制量,用于减小误差。
- 积分控制( I ntegral Control):该部分的输出与实际输出与期望输出之间的积分值成正比。积分控制的作用是考虑过去的误差累积情况,用于消除持续的静态误差,使系统更快地达到期望值。
- 微分控制( D erivative Control):该部分的输出与实际输出与期望输出之间的变化率成正比。微分控制的作用是根据当前误差变化的速率,提供一个控制量,用于调节系统的响应速度和稳定性,防止过冲和震荡。
其数学形式可表示为如下方程:
PID 控制器的数学形式通过比例项(与Error成正比)、积分项(对Error的积分)和微分项(Error的导数)来综合考虑系统的瞬态响应和稳态误差,以实现对系统的精确控制。根据具体应用的需求,可以通过调整比例增益、积分时间和微分时间来优化 PID 控制器的性能。

P 控制:
- 控制变量:位置 (Postion)
- 修正变量:加速度 (Acceleration)
PD 控制:

- 控制变量:位置 (Postion)
- 修正变量:加速度 (Acceleration)
PID 控制:
纵向车辆控制:
其中, 表示时间
的目标速度,
表示与前车的距离。
- 参考变量 (reference variable):
目标速度 (target velocity)
- 修正变量 (correcting variable):
油门 / 刹车
- 控制变量 (controlled variable):
当前速度 (current velocity)
- Error:

图像:

横向车辆控制:
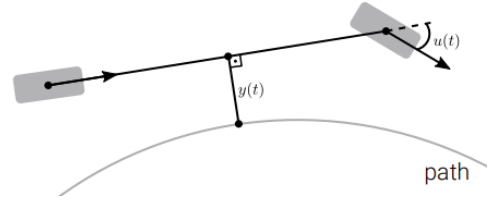

- 参考变量 (reference variable):
no cross-track error
- 修正变量 (correcting variable):
steering angle
- 控制变量 (controlled variable):
cross track error)
- Error:
cross track error

Ⅳ. 几何控制(Geometric Control)
0x00 横向控制算法(Stanley Control)
针对低速场景,这是 Stanley 在 DARPA 挑战赛中使用的控制法:
其中 表示速度,
表示 heading err,
表示 crosstrack err。
结合了 heading 和 cross-track error。

- 第一项:heading error
- 第二项:考虑 cross-track error


Ⅳ. 实践说明(Experiment)
0x00 引入:前置说明
提供基础代码模板 lateral control.py,和用于测试的 test lateral control.py。
开始前建议检查一下小车环境是否正常,如果环境有问题可以第一节:
【OpenAI】Python:基于 Gym-CarRacing 的自动驾驶项目(1)
? 运行前环境检查:

检查 gym 目录下 gym/envs/box2d 中 car_racing 是否可以正常运行:

环境没有问题,下面我们介绍一下要做的事情。
Stanley 控制器:建议阅读 Stanley 论文中的第 9.2 小节后,再尝试写代码:
? 链接:Stanley paper
理解启发式控制法:

0x01 Stanley 控制器
- 根据路径点和速度实现控制器功能
- → LateralController.stanley()
- Orientation error
是车辆方向与第一段路径的角度差。
- Cross track error
是理想路径上参数为零时的路径点与车辆位置之间的距离。
- 为了避免除零错误 (division by zero),可以加入一个很小的
值。
- 检查你的车辆行为。
0x02 阻尼 (Damping)
阻尼是指减小当前步骤中转向指令与前一步中转向轮角度之间的差异
- 描述你的车辆行为
0x03 提供的模板文件说明(longitudinal control.py)
* 提供基础框架,只需要在 TODO 位置填写代码即可!
longitudinal control.py,以及用于测试的 test_longitudinal_control.py
? longitudinal control.py:
import numpy as np
import matplotlib.pyplot as plt
from scipy.signal import find_peaks
from scipy.interpolate import splprep, splev
from scipy.optimize import minimize
import time

class LongitudinalController:
    '''
    Longitudinal Control using a PID Controller

    functions:
        PID_step()
        control()
    '''
    def __init__(self, KP=0.01, KI=0.0, KD=0.0):
        self.last_error = 0
        self.sum_error = 0
        self.last_control = 0
        self.speed_history = []
        self.target_speed_history = []
        self.step_history = []

        # PID parameters
        self.KP = KP
        self.KI = KI
        self.KD = KD

    def PID_step(self, speed, target_speed):
        '''
        ##### TODO ####
        Perform one step of the PID control
        - Implement the descretized control law.
        - Implement a maximum value for the sum of error you are using for the intgral term

        args:
            speed
            target_speed

        output:
            control (u)
        '''

        # define error from set point target_speed to speed

        # derive PID elements


    def control(self, speed, target_speed):
        '''
        Derive action values for gas and brake via the control signal
        using PID controlling

        Args:
            speed (float)
            target_speed (float)

        output:
            gas
            brake
        '''

        control = self.PID_step(speed, target_speed)
        brake = 0
        gas = 0

        # translate the signal from the PID controller
        # to the action variables gas and brake
        if control >= 0:
            gas = np.clip(control, 0, 0.8)
        else:
            brake = np.clip(-1*control, 0, 0.8)

        return gas, brake

    def plot_speed(self, speed, target_speed, step, fig):
        self.speed_history.append(speed)
        self.target_speed_history.append(target_speed)
        self.step_history.append(step)
        plt.gcf().clear()
        plt.plot(self.step_history, self.speed_history, c="green")
        plt.plot(self.step_history, self.target_speed_history)
        fig.canvas.flush_events()
? test_longitudinal_control.py
import gym
from gym.envs.box2d.car_racing import CarRacing
from lane_detection import LaneDetection
from waypoint_prediction import waypoint_prediction, target_speed_prediction
from lateral_control import LateralController
from longitudinal_control import LongitudinalController
import matplotlib.pyplot as plt
import numpy as np
import pyglet
from pyglet import gl
from pyglet.window import key

# action variables
a = np.array( [0.0, 0.0, 0.0] )

# init environement
env = CarRacing()
env.render()
env.reset()

# define variables
total_reward = 0.0
steps = 0
restart = False

# init modules of the pipeline
LD_module = LaneDetection()
LatC_module = LateralController()
LongC_module = LongitudinalController()

# init extra plot
fig = plt.figure()
plt.ion()
plt.show()


while True:
    # perform step
    s, r, done, info = env.step(a)
    speed = info['speed']
    # lane detection
    lane1, lane2 = LD_module.lane_detection(s)

    # waypoint and target_speed prediction
    waypoints = waypoint_prediction(lane1, lane2)
    target_speed = target_speed_prediction(waypoints, max_speed=60, exp_constant=4.5)

    # control
    a[0] = LatC_module.stanley(waypoints, speed)
    a[1], a[2] = LongC_module.control(speed, target_speed)

    # reward
    total_reward += r

    # outputs during training
    if steps % 2 == 0 or done:
        print("
action " + str(["{:+0.2f}".format(x) for x in a]))
        print("speed {:+0.2f} targetspeed {:+0.2f}".format(speed, target_speed))

        #LD_module.plot_state_lane(s, steps, fig, waypoints=waypoints)
        LongC_module.plot_speed(speed, target_speed, steps, fig)

    steps += 1
    env.render()

    # check if stop
    if done or restart or steps>=600:
        print("step {} total_reward {:+0.2f}".format(steps, total_reward))
        break

env.close()
0x04 关于 PID 控制器
实现用于油门和制动的 PID 控制步骤,我们使用离散化版本:
由于积分饱和问题,为积分项实现一个上界。从控制信号到油门和制动操作值的转换:

参数搜索:运行测试 lateral control.py,并查看目标速度和实际速度的图表。
- 调整参数
和
- 从
和
开始。
- 每次只修改一个项!
Ⅴ. 代码实现
0x00 PID_step 函数的实现
def PID_step(self, speed, target_speed):
    '''
    ##### TODO ####
    Perform one step of the PID control
    - Implement the descretized control law.
    - Implement a maximum value for the sum of error you are using for the intgral term

    args:
        speed
        target_speed

    output:
        control (u)
    '''

    # define error from set point target_speed to speed

    # KD KI KP
执行 PID 控制的一步,实现离散控制法则,实现用于积分项的误差之和的最大值。
参数为速度 speed 和 目标速度 target_speed,最后输出 control(u) 。根据公式:
? 代码演示:PID_step
def PID_step(self, speed, target_speed):
    # define error from set point target_speed to speed
    self.sum_error += (target_speed - speed)

    # KD KI KP
    ret = (
        self.KD
        * ((target_speed - speed) - self.last_error))
        + (self.KI * self.sum_error)
        + (self.KP * (target_speed - speed)
    )

    return ret
0x01 完整代码(longitudinal control.py)
? 代码演示:longitudinal control.py:
import numpy as np
import matplotlib.pyplot as plt
from scipy.signal import find_peaks
from scipy.interpolate import splprep, splev
from scipy.optimize import minimize
import time

class LongitudinalController:
    '''
    Longitudinal Control using a PID Controller

    functions:
        PID_step()
        control()
    '''
    def __init__(self, KP=0.01, KI=0.0, KD=0.0):
        self.last_error = 0
        self.sum_error = 0
        self.last_control = 0
        self.speed_history = []
        self.target_speed_history = []
        self.step_history = []

        # PID parameters
        self.KP = KP
        self.KI = KI
        self.KD = KD

    def PID_step(self, speed, target_speed):
        '''
        ##### TODO ####
        Perform one step of the PID control
        - Implement the descretized control law.
        - Implement a maximum value for the sum of error you are using for the intgral term

        args:
            speed
            target_speed

        output:
            control (u)
        '''

        # define error from set point target_speed to speed
        self.sum_error += (target_speed - speed)
        # KD KI KP
        ret = (self.KD * ((target_speed - speed) - self.last_error)) + (self.KI * self.sum_error) + (self.KP * (target_speed - speed))

        return ret


    def control(self, speed, target_speed):
        '''
        Derive action values for gas and brake via the control signal
        using PID controlling

        Args:
            speed (float)
            target_speed (float)

        output:
            gas
            brake
        '''

        control = self.PID_step(speed, target_speed)
        brake = 0
        gas = 0

        # translate the signal from the PID controller
        # to the action variables gas and brake
        if control >= 0:
            gas = np.clip(control, 0, 0.8)
        else:
            brake = np.clip(-1*control, 0, 0.8)

        return gas, brake

    def plot_speed(self, speed, target_speed, step, fig):
        self.speed_history.append(speed)
        self.target_speed_history.append(target_speed)
        self.step_history.append(step)
        plt.gcf().clear()
        plt.plot(self.step_history, self.speed_history, c="green")
        plt.plot(self.step_history, self.target_speed_history)
        fig.canvas.flush_events()
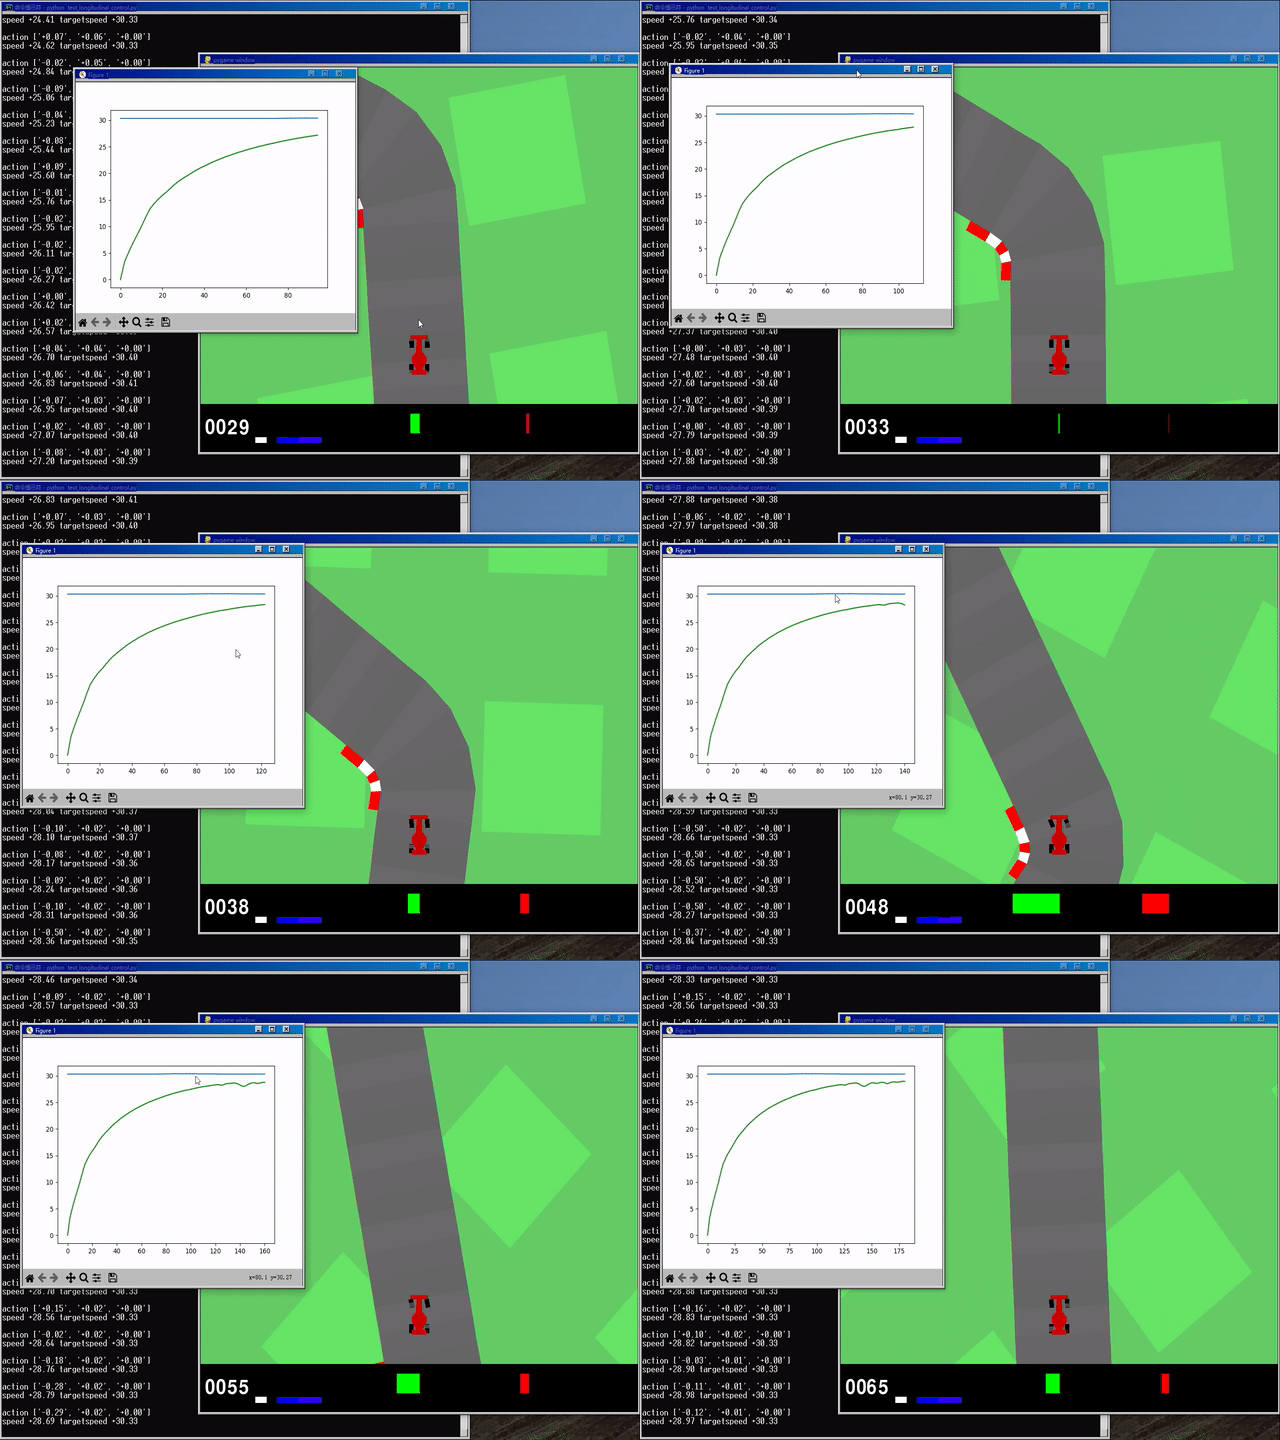
0x02 运行结果演示
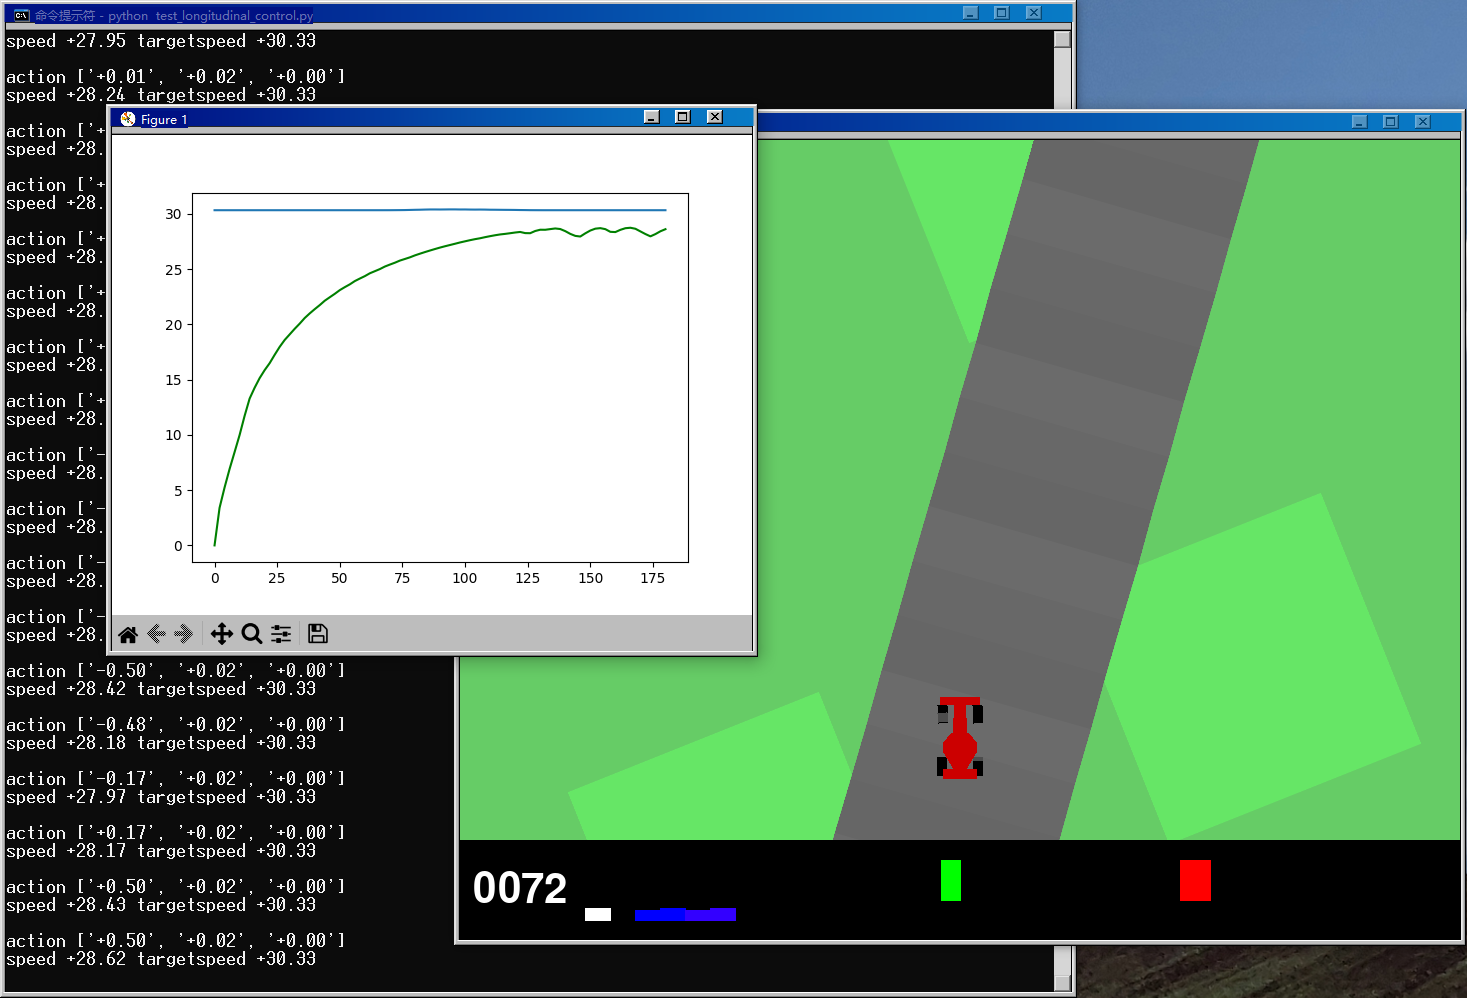
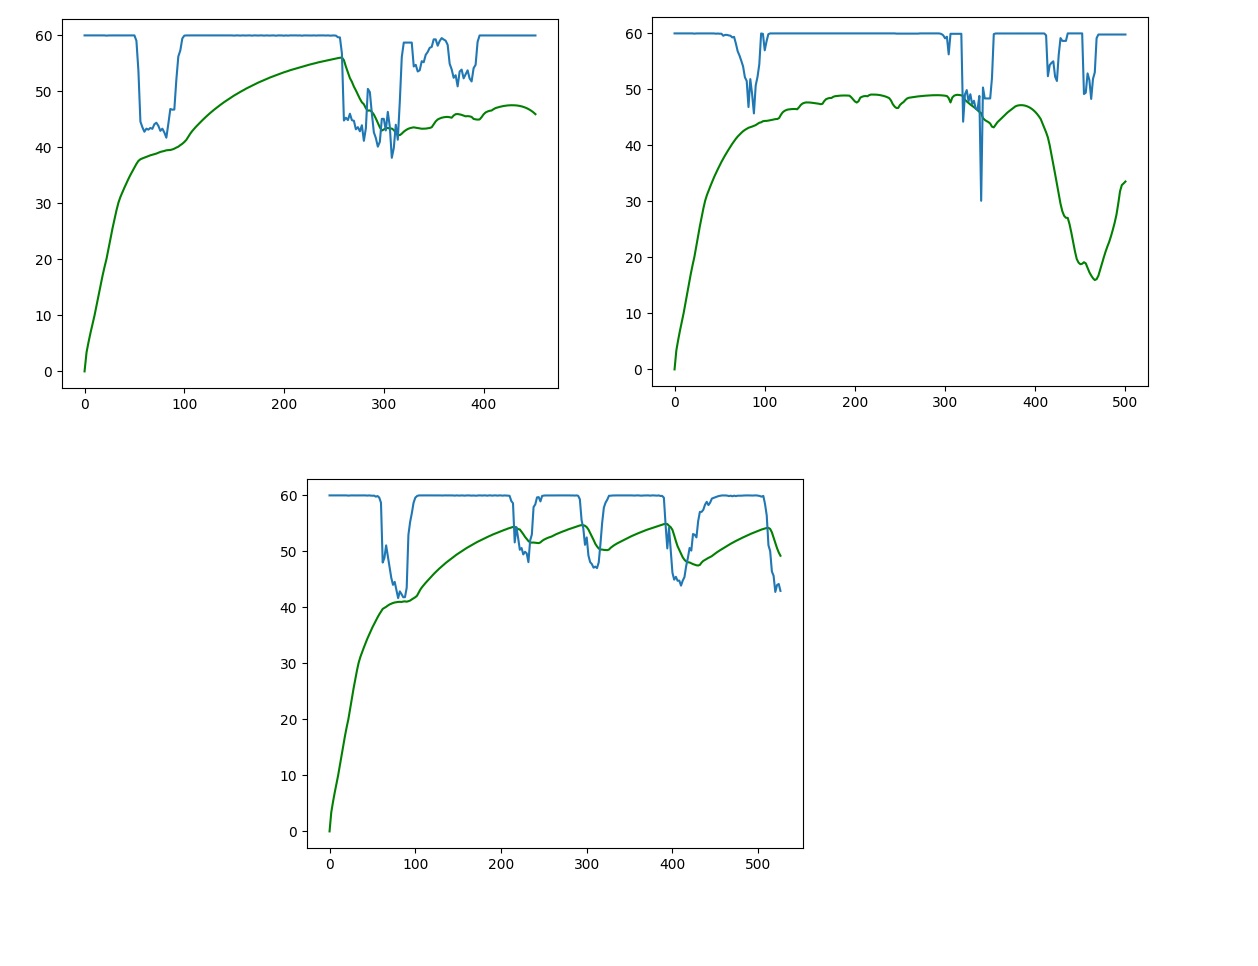
(gym) 环境下 cd 至对应目录后,输入 python test_longitudinal_control.py 测试:

? 运行结果如下:
? GIF:


? [ 笔者 ]   foxny, Akam
? [ 更新 ]   2023.6.7
❌ [ 勘误 ]   /* 暂无 */
? [ 声明 ]   由于作者水平有限,本文有错误和不准确之处在所难免,
本人也很想知道这些错误,恳望读者批评指正!| ? 参考资料 [6] Montemerlo M, Becker J, Bhat S, et al. Junior: The Stanford entry in the Urban Challenge Slide Credit: Steven Waslander LaValle: Rapidly-exploring random trees: A new tool for path planning. Techical Report, 1998 Dolgov et al.: Practical Search Techniques in Path Planning for Autonomous Driving. STAIR, 2008. Microsoft. MSDN(Microsoft Developer Network)[EB/OL]. []. . 百度百科[EB/OL]. []. https://baike.baidu.com/. . [EB/OL]. []. https://blog.waymo.com/2021/10/the-waymo-driver-handbook-perception.html. |


 U8W/U8W-Mini使用与常见问题解决
 QT多线程的5种用法,通过使用线程解决UI主界面的耗时操作代码,防止界面卡死。...
 stm32使用HAL库配置串口中断收发数据(保姆级教程)
 分享几个国内免费的ChatGPT镜像网址(亲测有效)
 Allegro16.6差分等长设置及走线总结