您现在的位置是:首页 >其他 >Spring事务简介及相关案例网站首页其他
Spring事务简介及相关案例
目录
一、事务简介
事务(Transaction),一般是指要做的或所做的事情。在计算机术语中是指访问并可能更新数据库中各种数据项的一个程序执行单元(unit)。事务通常由高级数据库操纵语言或编程语言(如SQL,C++或Java)书写的用户程序的执行所引起,并用形如begin transaction和end transaction语句(或函数调用)来界定。事务由事务开始(begin transaction)和事务结束(end transaction)之间执行的全体操作组成。
事务:不可分割的原子操作。即一系列的操作要么同时成功,要么同时失败。
开发过程中,事务管理一般在service层,service层中可能会操作多次数据库,这些操作是不可分割的。否则当程序报错时,可能会造成数据异常。
如:张三给李四转账时,需要两次操作数据库:张三存款减少、李四存款增加。如果这两次数据库操作间出现异常,则会造成数据错误。
二、准备数据库
读者把下面代码段复制粘贴到文本,然后把后缀名改为sql,就是sql文件了,然后打开数据库运行数据库脚本即可。这里就一个表,字段有id,用户名,余额。
SET NAMES utf8mb4;
SET FOREIGN_KEY_CHECKS = 0;

-- ----------------------------
-- Table structure for account
-- ----------------------------
DROP TABLE IF EXISTS `account`;
CREATE TABLE `account`  (
  `id` int NOT NULL AUTO_INCREMENT,
  `username` varchar(255) CHARACTER SET utf8 COLLATE utf8_general_ci NULL DEFAULT NULL,
  `balance` double NULL DEFAULT NULL,
  PRIMARY KEY (`id`) USING BTREE
) ENGINE = InnoDB AUTO_INCREMENT = 2 CHARACTER SET = utf8 COLLATE = utf8_general_ci ROW_FORMAT = Dynamic;

-- ----------------------------
-- Records of account
-- ----------------------------
INSERT INTO `account` VALUES (1, '张三', 1000);
INSERT INTO `account` VALUES (2, '李四', 1000);

SET FOREIGN_KEY_CHECKS = 1;
三、创建maven项目,引入依赖和完成相关配置
这里我们需要引入的依赖有:mysql驱动包,druid连接池,spring依赖,MyBatis与Spring的整合包,该包可以让Spring创建MyBatis的对象,junit测试,spring整合测试模块依赖的依赖。
1. pom.xml文件
<?xml version="1.0" encoding="UTF-8"?>
<project xmlns="http://maven.apache.org/POM/4.0.0"
         xmlns:xsi="http://www.w3.org/2001/XMLSchema-instance"
         xsi:schemaLocation="http://maven.apache.org/POM/4.0.0 http://maven.apache.org/xsd/maven-4.0.0.xsd">
    <modelVersion>4.0.0</modelVersion>

    <groupId>com.example</groupId>
    <artifactId>spring_transfer</artifactId>
    <version>1.0-SNAPSHOT</version>

    <properties>
        <maven.compiler.source>11</maven.compiler.source>
        <maven.compiler.target>11</maven.compiler.target>
    </properties>

    <dependencies>
        <!--  mybatis  -->
        <dependency>
            <groupId>org.mybatis</groupId>
            <artifactId>mybatis</artifactId>
            <version>3.1.1</version>
        </dependency>
        <!--  mysql驱动包  -->
        <dependency>
            <groupId>mysql</groupId>
            <artifactId>mysql-connector-java</artifactId>
            <version>8.0.26</version>
        </dependency>
        <!--  druid连接池  -->
        <dependency>
            <groupId>com.alibaba</groupId>
            <artifactId>druid</artifactId>
            <version>1.2.8</version>
        </dependency>
        <!-- spring -->
        <dependency>
            <groupId>org.springframework</groupId>
            <artifactId>spring-context</artifactId>
            <version>5.3.13</version>
        </dependency>
        <dependency>
            <groupId>org.springframework</groupId>
            <artifactId>spring-tx</artifactId>
            <version>5.3.13</version>
        </dependency>

        <!-- MyBatis与Spring的整合包,该包可以让Spring创建MyBatis的对象 -->
        <dependency>
            <groupId>org.mybatis</groupId>
            <artifactId>mybatis-spring</artifactId>
            <version>1.1.1</version>
        </dependency>
        <dependency>
            <groupId>org.springframework</groupId>
            <artifactId>spring-jdbc</artifactId>
            <version>5.3.13</version>
        </dependency>
        <!--  AspectJ    -->
        <dependency>
            <groupId>org.aspectj</groupId>
            <artifactId>aspectjweaver</artifactId>
            <version>1.8.7</version>
        </dependency>
        <!-- junit,如果Spring5整合junit,则junit版本至少在4.12以上 -->
        <dependency>
            <groupId>junit</groupId>
            <artifactId>junit</artifactId>
            <version>4.12</version>
            <scope>test</scope>
        </dependency>
        <!-- spring整合测试模块 -->
        <dependency>
            <groupId>org.springframework</groupId>
            <artifactId>spring-test</artifactId>
            <version>5.3.13</version>
            <scope>test</scope>
        </dependency>
    </dependencies>


</project>
2. 创建配置文件
配置文件主要用于数据库的连接,还有bean对象的建立,如下就是applicationContext.xml文件的内容
<?xml version="1.0" encoding="UTF-8"?>

<beans
        xmlns="http://www.springframework.org/schema/beans"
        xmlns:context="http://www.springframework.org/schema/context"
        xmlns:xsi="http://www.w3.org/2001/XMLSchema-instance"
        xmlns:tx="http://www.springframework.org/schema/tx"
        xmlns:aop="http://www.springframework.org/schema/aop" xmlns:http="http://www.springframework.org/schema/p"
        xsi:schemaLocation="http://www.springframework.org/schema/beans
        http://www.springframework.org/schema/beans/spring-beans.xsd
        http://www.springframework.org/schema/context
        http://www.springframework.org/schema/context/spring-context.xsd
        http://www.springframework.org/schema/aop
        http://www.springframework.org/schema/aop/spring-aop.xsd
        http://www.springframework.org/schema/tx
        http://www.springframework.org/schema/tx/spring-tx.xsd">

    <!-- 包扫描 -->
    <context:component-scan base-package="com.example"/>
    <!-- 创建druid数据源对象 -->
    <bean id="dataSource" class="com.alibaba.druid.pool.DruidDataSource">
        <property name="driverClassName" value="com.mysql.cj.jdbc.Driver"/>
        <property name="url" value="jdbc:mysql:///spring"/>
        <property name="username" value="root"/>
        <property name="password" value="666666"/>
    </bean>

    <bean id="sqlSession" class="org.mybatis.spring.SqlSessionTemplate">
        <constructor-arg name="sqlSessionFactory" ref="sqlSessionFactory"/>

    </bean>

    <bean id="sqlSessionFactory" class="org.mybatis.spring.SqlSessionFactoryBean">
        <property name="dataSource" ref="dataSource"/>
    </bean>

    <bean id="mapperScanner" class="org.mybatis.spring.mapper.MapperScannerConfigurer">
        <property name="basePackage" value="com.example.dao"/>
    </bean>

</beans>
四、编写Java代码
这里同样是编写账户的实体类即可,然后还要写一个Dao接口,业务层。
1. Account实体类
package com.example.pojo;

public class Account {

    // 账号
    private int id;
    // 用户名
    private String username;
    // 余额
    private double balance;

    public Account() {
    }

    public Account(int id, String username, double balance) {
        this.id = id;
        this.username = username;
        this.balance = balance;
    }

    public int getId() {
        return id;
    }

    public void setId(int id) {
        this.id = id;
    }

    public String getUsername() {
        return username;
    }

    public void setUsername(String username) {
        this.username = username;
    }

    public double getBalance() {
        return balance;
    }

    public void setBalance(double balance) {
        this.balance = balance;
    }

    @Override
    public String toString() {
        return "Account[ " +
                "id=" + id +
                ", username='" + username + ''' +
                ", balance=" + balance +
                " ]";
    }
}
2. AccountDao接口
package com.example.dao;

import com.example.pojo.Account;
import org.apache.ibatis.annotations.Select;
import org.apache.ibatis.annotations.Update;
import org.springframework.stereotype.Repository;

@Repository
public interface AccountDao {

    // 根据id查找用户
    @Select("select * from account where id=#{id}")
    Account findById(int id);

    // 修改用户
    @Update("update account set balance = #{balance} where id = #{id}")
    void update(Account account);
}
3. AccountService业务类
package com.example.service;

import com.example.dao.AccountDao;
import com.example.pojo.Account;
import org.mybatis.spring.SqlSessionTemplate;
import org.springframework.beans.factory.annotation.Autowired;
import org.springframework.stereotype.Service;

@Service
public class AccountService {
    @Autowired
    private AccountDao accountDao;

    /**
     *
     * @param id1 转出人id
     * @param id2 转入人id
     * @param price 金额
     */
    // 作用方法上时,该方法都将具有该类型事务的事务属性
    public void transfer(int id1,int id2, double price){

        // 转出人减少余额
        Account account1 = accountDao.findById(id1);
        account1.setBalance(account1.getBalance() - price);
        accountDao.update(account1);

        // 模拟程序出错
        int i = 1 / 0;

        // 转入人增加余额
        Account account2 = accountDao.findById(id2);
        account2.setBalance(account2.getBalance() + price);
        accountDao.update(account2);
    }

}
五、测试
1. 测试方法
import com.example.service.AccountService;
import org.junit.Test;
import org.junit.runner.RunWith;
import org.springframework.beans.factory.annotation.Autowired;
import org.springframework.context.ApplicationContext;
import org.springframework.context.annotation.AnnotationConfigApplicationContext;
import org.springframework.test.context.ContextConfiguration;
import org.springframework.test.context.junit4.SpringJUnit4ClassRunner;


@RunWith(SpringJUnit4ClassRunner.class)
@ContextConfiguration(locations = "classpath:applicationContext.xml")
public class AccountServiceTest {
    @Autowired
    private AccountService accountService;

    @Test
    public void testTransfer(){
        accountService.transfer(1,2,500);
    }
}
2. 测试结果
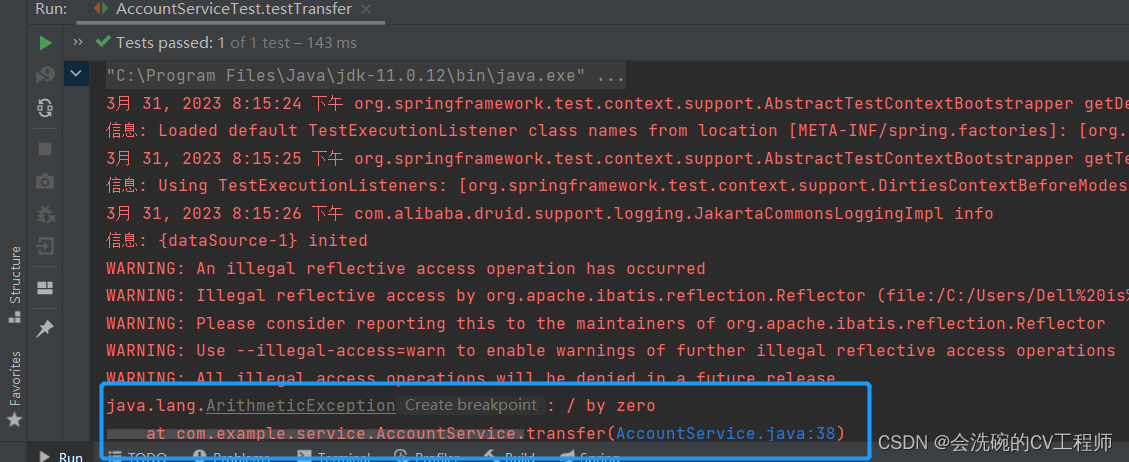
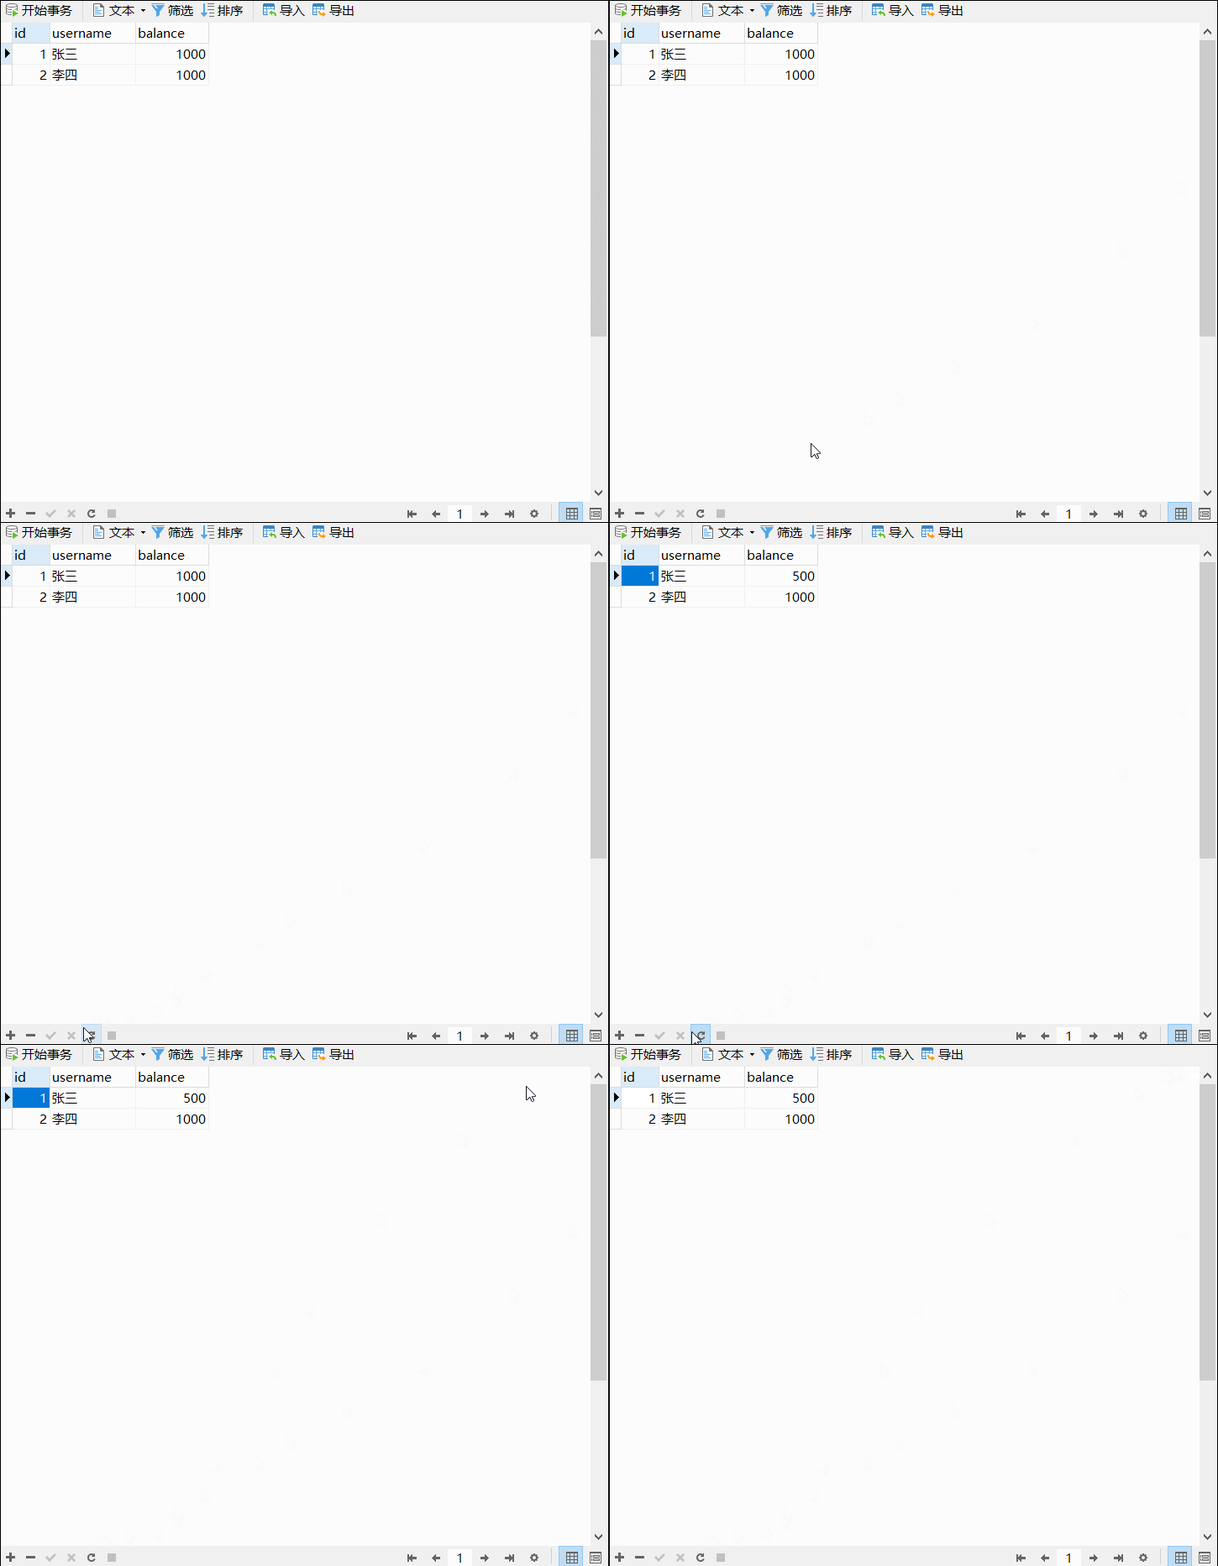
OK,可以看到这里程序是出现异常中断了的。 现在观看数据库里面的情况是怎么样的。

此时没有事务管理,会造成张三的余额减少,而李四的余额并没有增加。所以事务处理位于业务层,即一个service方法是不能分割的。 因此下一篇文章我们会学习到事务管理方案。一步步深入学习,期待大家的支持啊。
往期专栏&文章相关导读
大家如果对于本期内容有什么不了解的话也可以去看看往期的内容,下面列出了博主往期精心制作的Maven,Mybatis等专栏系列文章,走过路过不要错过哎!如果对您有所帮助的话就点点赞,收藏一下啪。其中Spring专栏有些正在更,所以无法查看,但是当博主全部更完之后就可以看啦。
1. Maven系列专栏文章
| Maven系列专栏 | Maven工程开发 |
| Maven聚合开发【实例详解---5555字】 |


 QT多线程的5种用法,通过使用线程解决UI主界面的耗时操作代码,防止界面卡死。...
 U8W/U8W-Mini使用与常见问题解决
 stm32使用HAL库配置串口中断收发数据(保姆级教程)
 分享几个国内免费的ChatGPT镜像网址(亲测有效)
 Allegro16.6差分等长设置及走线总结