您现在的位置是:首页 >技术杂谈 >SpringBoot+thymeleaf+antd vue 学习记录网站首页技术杂谈
SpringBoot+thymeleaf+antd vue 学习记录
SpringBoot+thymeleaf+antd vue 学习记录
目前就是先简单做个列表和增删改查的页面,最终实现还要继续学习和调试;
之前也看过vue,实在是看不懂,这次直接照着组件api来写,把过程记录在这里,防止以后忘记。
一、需要的引用包
<script type="text/javascript" th:src="@{/js/vue/vue.min.js}"></script>
<script type="text/javascript" th:src="@{/js/vue/vue-i18n.min.js}"></script>
<script type="text/javascript" th:src="@{/js/vue/vue-router.min.js}"></script>
<script type="text/javascript" th:src="@{/js/vue/antd.min.js}"></script>
<link rel="stylesheet" th:href="@{/css/vue/antd.css}">
二、代码结构
我是springboot的maven项目,每个模块前后端都整合在一起,模块之间互不干扰,需要的时候pom中引入依赖即可。

thymeleaf相关配置为:
spring.thymeleaf.cache=false spring.thymeleaf.prefix=classpath:/templates/ spring.thymeleaf.suffix=.html spring.thymeleaf.mode=LEGACYHTML5 spring.thymeleaf.encoding=UTF-8
src/main/java中创建controller包,并创建测试类;这里的view是为了项目启动后这个路径可以直接定位到我的前端页面:
@Controller
@RequestMapping("/project")
public class ProjectController {
    @GetMapping("/index")
    public ModelAndView projectView(HttpServletRequest request) {
        //页面路径为vue文件夹下的index.html
        ModelAndView mav = new ModelAndView("vue/index");
        return mav;
    }
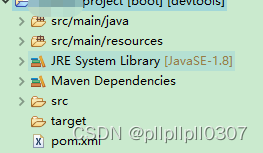
在src/main/resouces下创建templates文件夹,用于存放html文件;创建static文件夹,用于存放js和css文件;在templates下创建vue文件夹,在vue下创建index.html。
三、页面
我这里用的Ant Design Vue是V1的版本https://1x.antdv.com/components/layout/
1、Layout页面布局
在文档中挑选一个自己喜欢的布局,把包引用好,直接运行就可以了。
<!DOCTYPE html>
<html xmlns:th="http://www.thymeleaf.org" xmlns:shiro="http://www.pollix.at/thymeleaf/shiro">
<head>
<meta charset="UTF-8">
<title>antd+vue</title>
<script type="text/javascript" th:src="@{/js/vue/vue.min.js}"></script>
<script type="text/javascript" th:src="@{/js/vue/vue-i18n.min.js}"></script>
<script type="text/javascript" th:src="@{/js/vue/vue-router.min.js}"></script>
<script type="text/javascript" th:src="@{/js/vue/antd.min.js}"></script>
<link rel="stylesheet" th:href="@{/css/vue/antd.css}">
<!-- vue1是我调试页面用的css -->
<link rel="stylesheet" th:href="@{/css/vue/vue1.css}">
</head>
<body>
    <div id="app" >
        <a-layout id="components-layout-demo-custom-trigger">
            <!-- 左侧菜单 -->
            <a-layout-sider v-model="collapsed" :trigger="null" collapsible>
              <div class="logo" ><div class="title" style="height:28px;padding-top: 4px">测试项目</div></div>
              <a-menu theme="dark" mode="inline" :default-selected-keys="['1']">
                 <a-menu-item key="1"> <a-icon type="smile" ></a-icon><span>nav 1</span> </a-menu-item>
                 <a-menu-item key="2"> <a-icon type="setting" ></a-icon><span>nav 2</span> </a-menu-item>
                 <a-menu-item key="3"> <a-icon type="upload" ></a-icon> <span>nav 3</span> </a-menu-item>
              </a-menu>
            </a-layout-sider>
            <!-- 右侧布局 -->
            <a-layout>
              <a-layout-header>Header</a-layout-header>
              <a-layout-content>
              <!-- content里面可以放主要内容 -->
              <a-card :bordered="false" style="height: 100%">
              内容
              </a-card>
              </a-layout-content>
              <a-layout-footer>Footer</a-layout-footer>
           </a-layout>
        </a-layout>
    </div>
</body>
<script>
    var app = new Vue({
        el : '#app',
        data() {
            return {
                collapsed : false,
            }
        }
    })
</script>
</html>
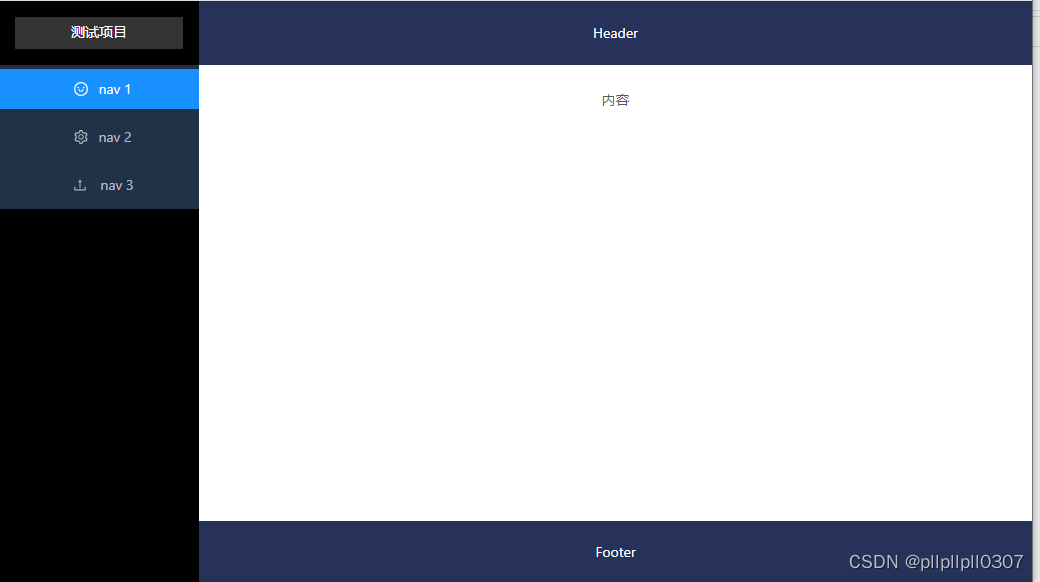
最终页面如图:

2、Table、Button
我要在content中实现一个table数据列表,用< a-table >标签:
<a-layout-content>
    <a-card :bordered="false" style="height: 100%">
        <a-table :columns="columns" :data-source="data" :scroll="{ x: 1500, y: 300 }">
           <template slot="action" slot-scope="text, record">
               <a-button icon="edit"></a-button>
               <a-button type="danger" icon="delete" @click="handleDel">
               </a-button>
           </template>
         </a-table>
     </a-card>
</a-layout-content>
这里先给定data和columns,以后再改成从后台取值
<script>
// columns和data文档中有很多示例,随便找哪个都行
var columns = [ {
        title : 'Name',
        dataIndex : 'name',
        key : 'name',
        width : 120
    }, ..., {
        title : 'Action',
        key : 'action',
        width : 130,
        fixed : 'right',
        scopedSlots : {//自定义渲染,模板中对应的slot-scope可以用来传递参数
            customRender : 'action',
        },
    } ];
    var data = [ {
        key : '1',
        name : 'John Brown',
        age : 32,
        address : 'New York No. 1 Lake Park',
        tags : [ 'nice', 'developer' ],
    }... ];
    var app = new Vue({
        el : '#app',
        data() {
            return {
                columns : columns,
                data : data,
                collapsed : false,
            }
        }
     })
</script>
列表效果如图:

3、Modal
要实现的功能:增加一个add添加按钮,点击按钮打开弹窗,弹窗内容为form表单。
vue我基本没有用过,所以这里费了很多时间,不知道要怎么实现(以前用easyui是直接请求后台controller接口,从接口直接定位到view页面,类似上面的/project/index)
首先在vue文件夹下创建一个add.html,先把弹窗要显示的内容做好(先随便在文档找了个示例,主要是为了完成绑定添加模板弹窗功能):
<!DOCTYPE html>
<html xmlns:th="http://www.thymeleaf.org">
<div th:fragment="tAdd">
  <template id="vue-add">
  <!-- a-model标签为弹窗,v-model用来绑定form -->
   <a-modal :width="modalWidth" title="新增字典" :confimLoading="loading" v-model="show" @ok="handleOk"
           @cancel="handleCancel">
    <a-form :form="form" :label-col="{ span: 5 }" :wrapper-col="{ span: 12 }">
       <a-form-item label="Note">
           <a-input v-decorator="['note', { rules: [{ required: true, message: 'Please input your note!' }] }]" />
       </a-form-item>
       <a-form-item label="Gender">
           <a-select v-decorator="['gender',{ rules: [{ required: true, message: 'Please select your gender!' }] },]"
               placeholder="Select a option and change input text above" @change="handleSelectChange">
             <a-select-option value="male"> male </a-select-option>
             <a-select-option value="female"> female </a-select-option>
           </a-select>
       </a-form-item>
    </a-form>
    </a-modal>
  </template>
  <script>
     const VueAdd = {
        template: '#vue-add',
        props: {
            value: {
              type: Boolean,
              default: false
            }
          },
        data() {
            return {
                formLayout: 'horizontal',
                form: this.$form.createForm(this, { name: 'coordinated' }),
                show: this.value,
                loading: false,
                modalWidth: window.innerWidth * 0.5,
              };
        },
        methods: {
            handleOk() {
                this.form.validateFields(err => {

                });
                setTimeout(() => {
                  this.$nextTick(() => {
                    this.loading = false;
                  })
                }, 1000);
              },
              handleCancel() {
                this.closeModal(false);
              },
              closeModal(val) {
                this.$emit('input', val);
              },
            handleSelectChange(value) {
                  console.log(value);
                  this.form.setFieldsValue({
                    note: `Hi, ${value === 'male' ? 'man' : 'lady'}!`,
                  });
                },
        },
        watch: {
            value(val) {
              this.show = val;
            },
            show(val) {
              if (val) {
                this.form.resetFields();
              } else {
                this.closeModal(val);
              }
            }
          },
    }
</script>
</div>
</html>
在index.html中绑定添加模板:
<template th:replace="@{vue/add}::tAdd"></template>
<a-card :bordered="false" style="height: 100%">
     <div class="editable-add-btn">
           <a-button @click="handleAdd">
              <a-icon type="plus" ></a-icon>Add
            </a-button>
      </div>
      <!-- vue-add即为add.html的模板 -->
      <vue-add v-model="addShow" ></vue-add>
      <a-table :columns="columns" :data-source="data" :scroll="{ x: 1500, y: 300 }"> ...</a-table>
 </a-card>
<script>
var app = new Vue({
        el : '#app',
        components: {
            'vue-add': VueAdd,
        },
        props: {
            addShow: {
              type: Boolean,
              default: false
            }
          },
        data() {
            return {
                ...,
                addShow: false,
            }
        },
        methods: {
            handleAdd() {
                this.addShow = true;
              },
              handleDel() {
                  this.$confirm({
                    title: '确定要删除这条数据吗?',
                    content: 'Some descriptions',
                    okText: 'Yes',
                    okType: 'danger',
                    cancelText: 'No',
                    onOk() {
                      console.log('OK');
                    },
                    onCancel() {
                      console.log('Cancel');
                    },
                  });
                },
        }
    })
</script>
点击Add,效果如图:

最后把我的css也贴到这里
#app {
  text-align: center;
}
.ant-layout-header,
.ant-layout-footer {
  background: #263259;
  color: #fff;
}
#app .ant-layout-footer {
  line-height: 1;
}
#app .ant-layout-sider {
  background: #000000;
  color: #fff;
  height:100vh;
}
#app .ant-layout-content {
  color: #fff;
  min-height: 120px;
}
#app > .ant-layout {
  margin-bottom: 48px;
}
#app > .ant-layout:last-child {
  margin: 0;
}
#components-layout-demo-custom-trigger .trigger {
  font-size: 18px;
  line-height: 64px;
  padding: 0 24px;
  cursor: pointer;
  transition: color 0.3s;
}

#components-layout-demo-custom-trigger .trigger:hover {
  color: #1890ff;
}

#components-layout-demo-custom-trigger .logo {
  height: 32px;
  background: rgba(255, 255, 255, 0.2);
  margin: 16px;
}
.ant-menu {
    background: #1f3247;
}
.editable-add-btn {
    margin: 8px 8px 8px 0px;
    text-align: right;
}
以后还需要调整的有从后台获取数据、添加/编辑提交、列表排序,以及最重要的router跳转…好多东西啊,这次暂时只做到了这里,后续有时间会继续完善,有同样在学习这个的小伙伴可以评论区一起交流~


 QT多线程的5种用法,通过使用线程解决UI主界面的耗时操作代码,防止界面卡死。...
 U8W/U8W-Mini使用与常见问题解决
 stm32使用HAL库配置串口中断收发数据(保姆级教程)
 分享几个国内免费的ChatGPT镜像网址(亲测有效)
 Allegro16.6差分等长设置及走线总结