您现在的位置是:首页 >技术教程 >Spring的创建与使用网站首页技术教程
Spring的创建与使用
目录
2、添加Spring框架支持(spring-context,spring-beans)
1、得到Spring上下文(对象都交给Spring了,所以获取的时候要下获取到Spring的上下文)
ApplicationContext和BeanFactory的区别是什么
3、根据bean的id和bean的类型获取bean(推荐使用)
Spring的创建
Spring的创建分为3个步骤:
1、创建一个Maven项目
2、添加Spring框架支持(spring-context,spring-beans)
3、添加启动类
1、创建Maven项目

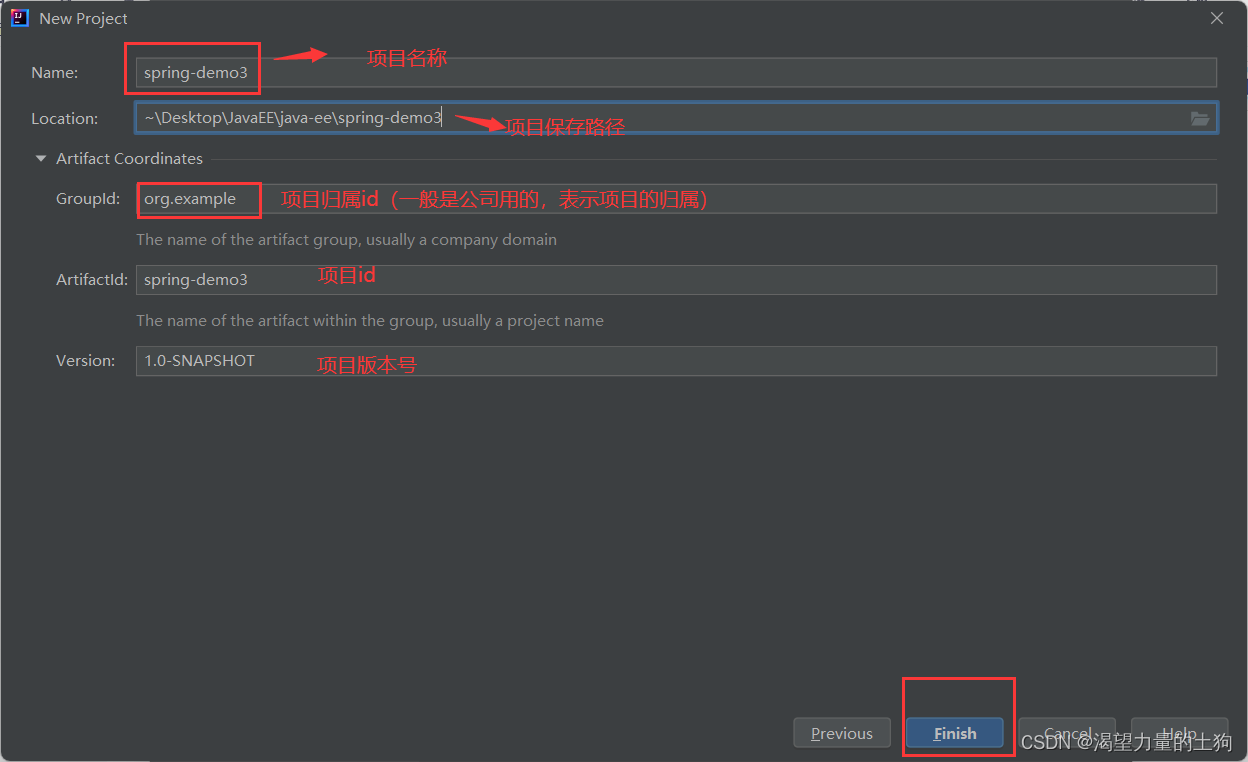 创建完成后进行spring框架的添加
2、添加Spring框架支持(spring-context,spring-beans)
在pom.xml中添加Spring的框架支持:
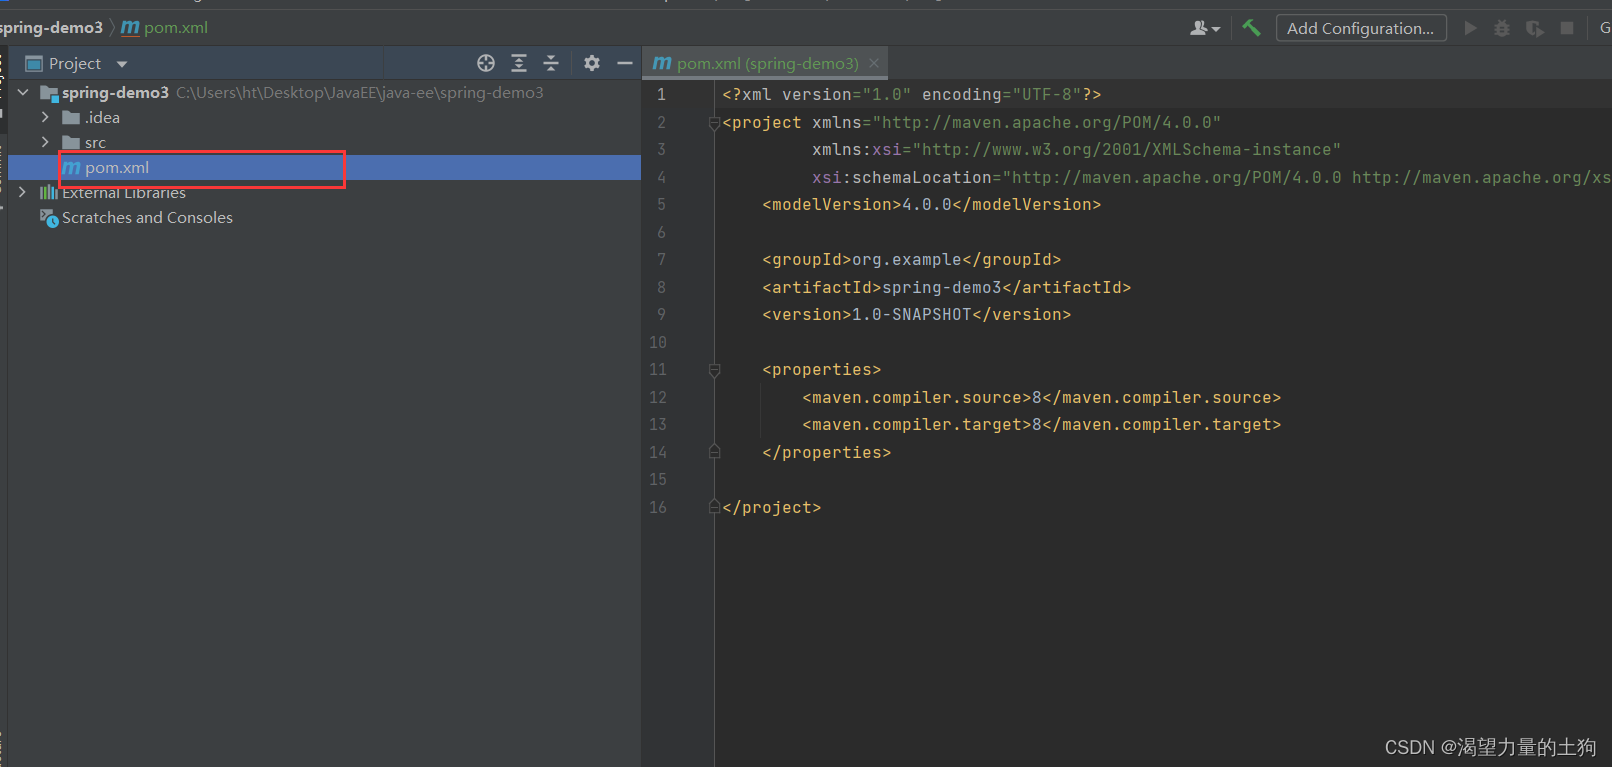 打开Maven中央仓库:搜索Spring:
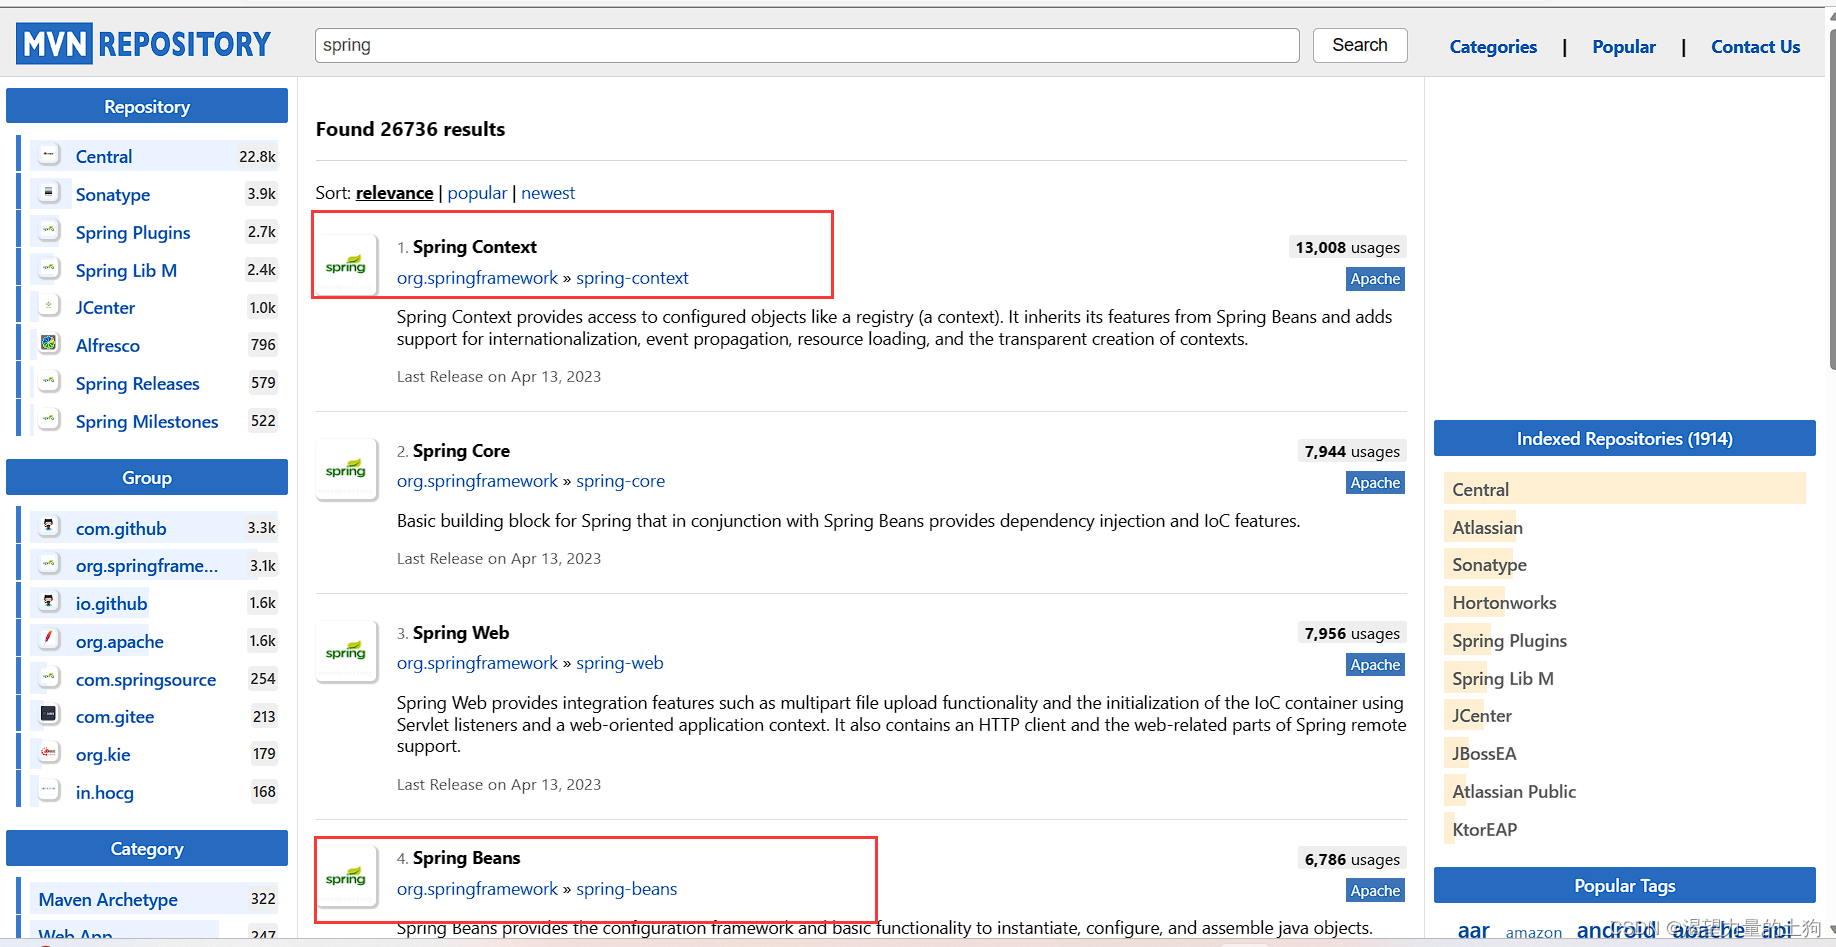
点开Spring Context选择一个5.x版本
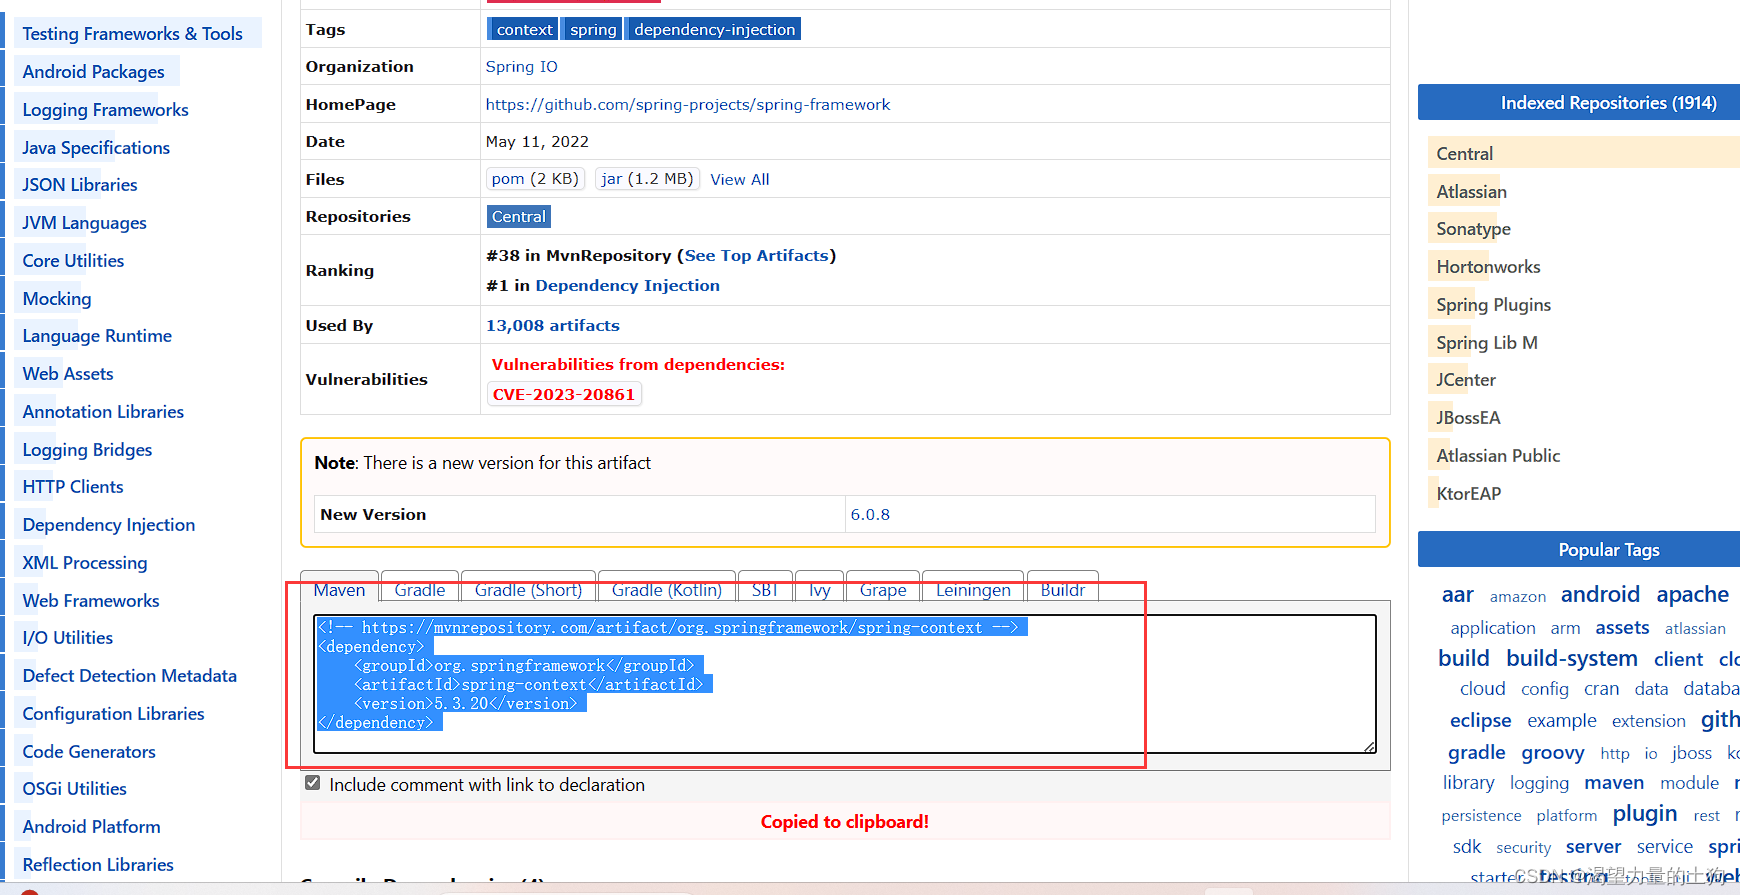 复制依赖到pom.xml中
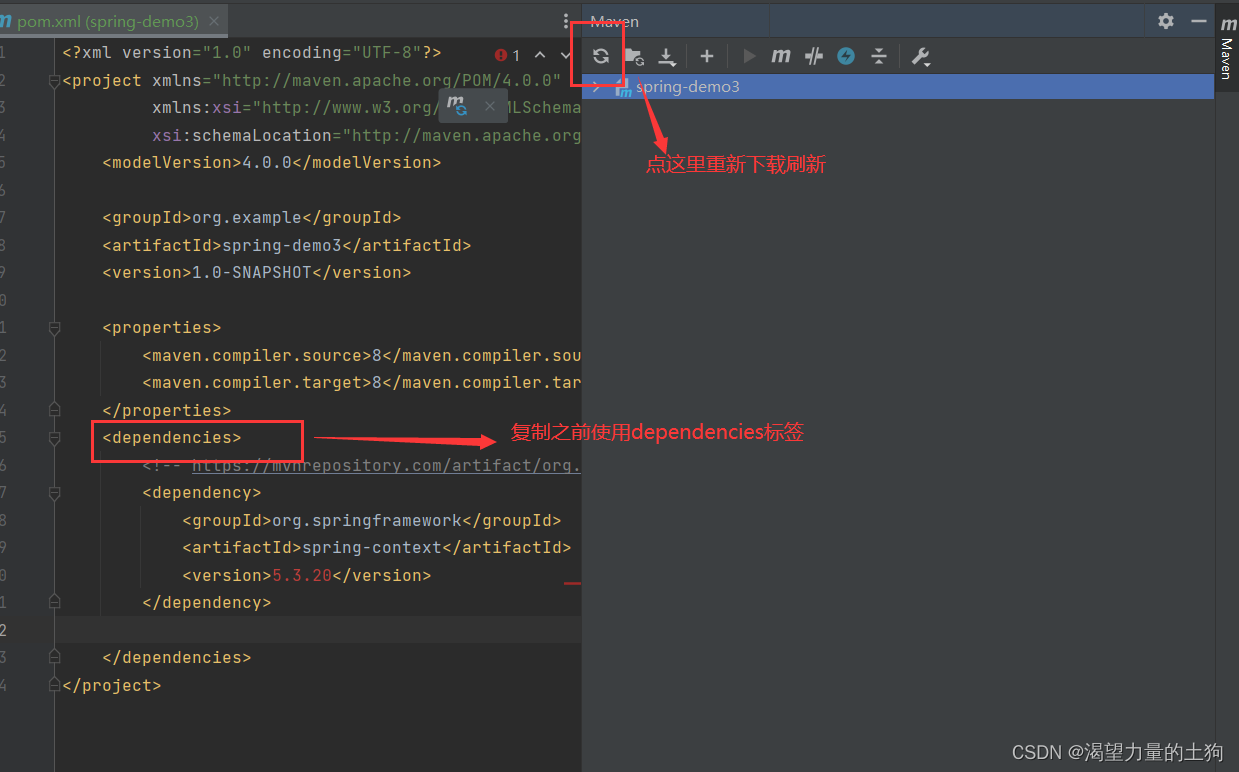 下载完就不再爆红
 然后我们引入spring-beans依赖:(同样的步骤)
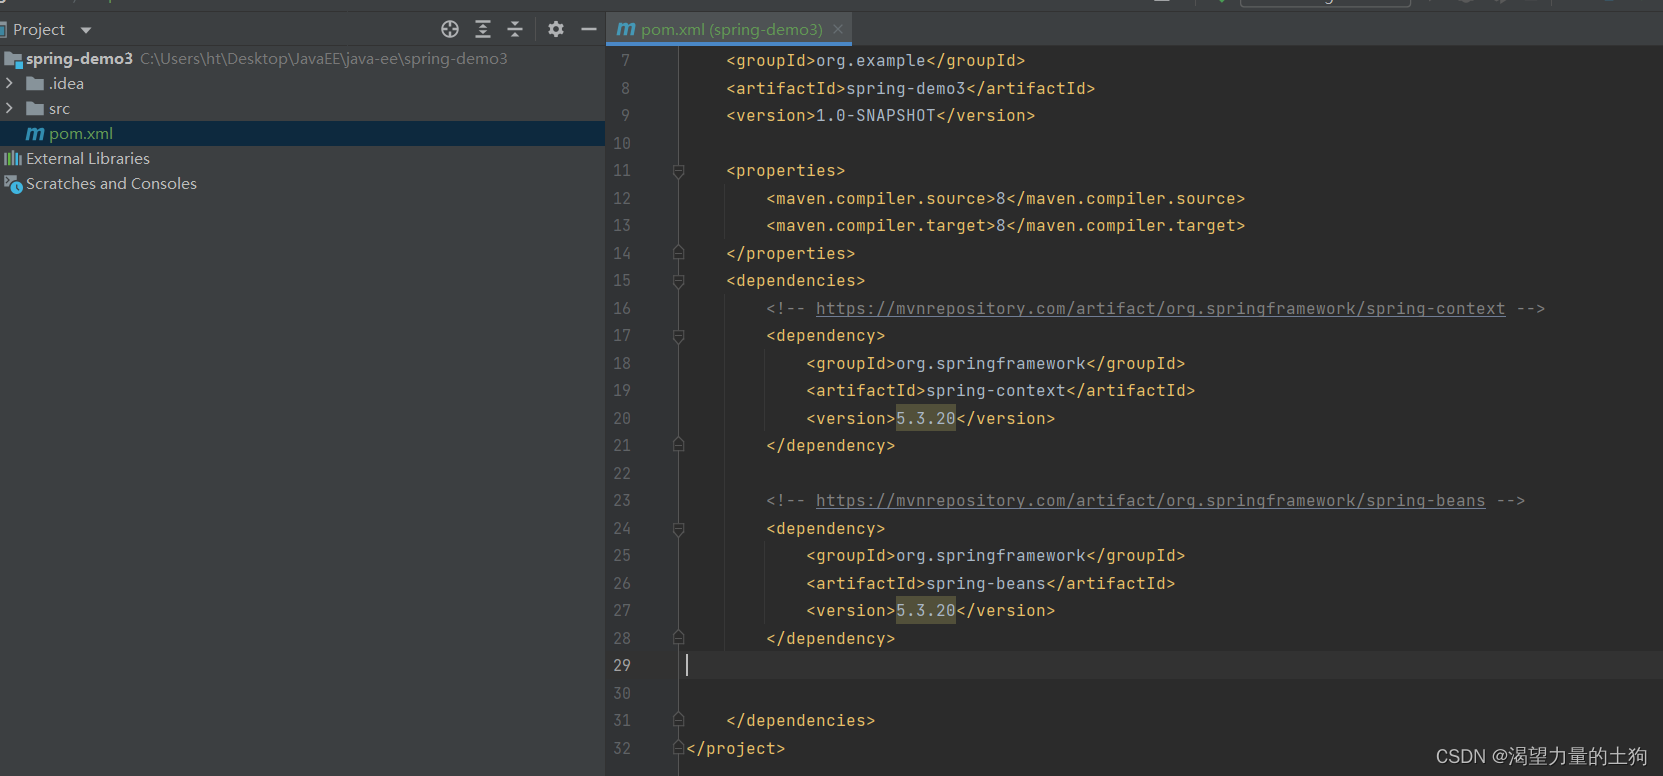
这是引入的依赖:
    <dependencies>
        <!-- https://mvnrepository.com/artifact/org.springframework/spring-context -->
        <dependency>
            <groupId>org.springframework</groupId>
            <artifactId>spring-context</artifactId>
            <version>5.3.20</version>
        </dependency>

        <!-- https://mvnrepository.com/artifact/org.springframework/spring-beans -->
        <dependency>
            <groupId>org.springframework</groupId>
            <artifactId>spring-beans</artifactId>
            <version>5.3.20</version>
        </dependency>


    </dependencies>
其中spring-context是spring上下文,spring-beans是管理对象的模块。
 这一块出现这样就说明都引入成功了。
3、添加启动类
启动类就和平时创建一个普通类一样:
public class App {
    public static void main(String[] args) {
        System.out.println("Hello Spring");
    }
}
启动类用来测试后面的代码。
至此一个Spring项目就创建完成了。再来看看怎么使用Spring项目
Spring的使用 (Bean对象的存取及使用)
Bean对象的存储
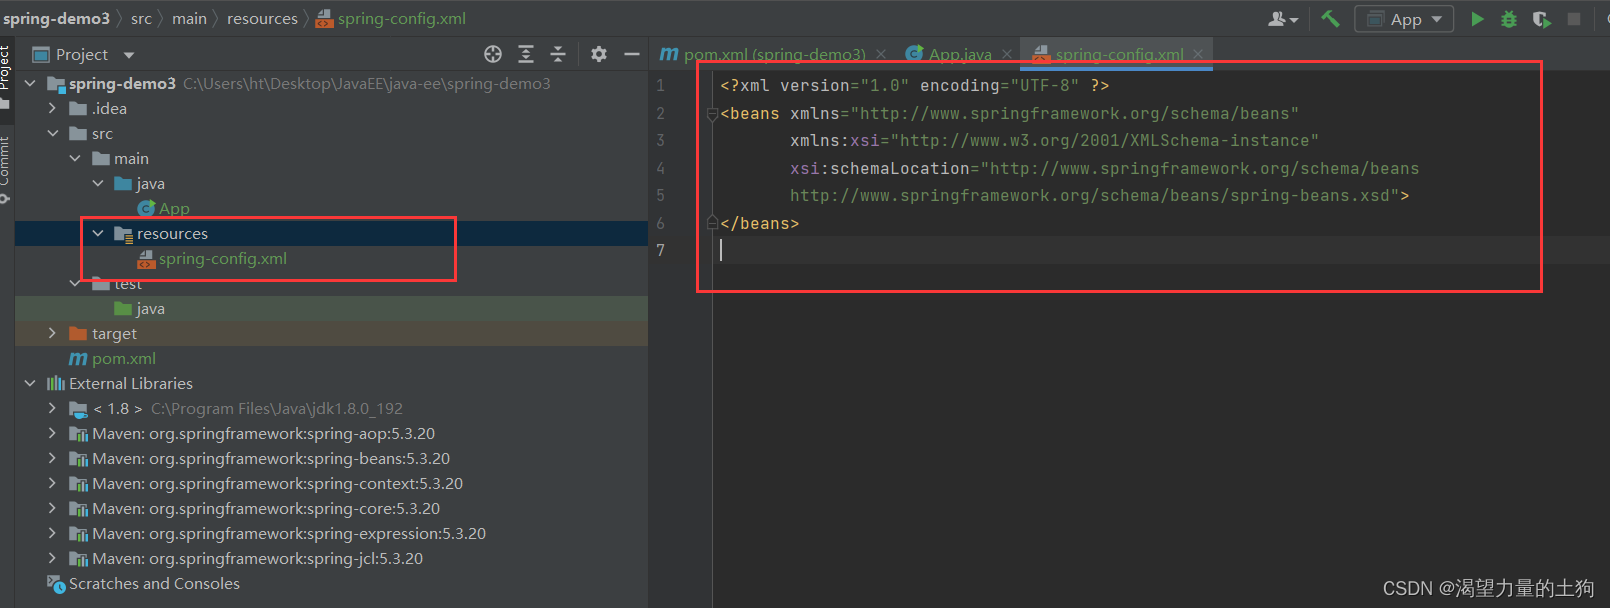
1、添加Spring的配置文件
在resources目录下创建spring-config.xml文件:
添加下述内容:
<?xml version="1.0" encoding="UTF-8" ?>
<beans xmlns="http://www.springframework.org/schema/beans"
       xmlns:xsi="http://www.w3.org/2001/XMLSchema-instance"
       xsi:schemaLocation="http://www.springframework.org/schema/beans
       http://www.springframework.org/schema/beans/spring-beans.xsd">
</beans>
建议把这个配置保存在码云,用的时候直接去复制即可

2、创建Bean对象
新建一个类即可。

3、将Bean注册到容器中(在配置文件中进行配置)
<bean id="user" class="com.spring.demo.Bean.User"></bean>
Bean对象的获取
Bean对象的获取要2个步骤:
1、得到Spring上下文(对象都交给Spring了,所以获取的时候要下获取到Spring的上下文)
2、通过Spring上下文获取指定Bean对象
1、得到Spring上下文(对象都交给Spring了,所以获取的时候要下获取到Spring的上下文)
使用ApplicationContext来获取对象
1、得到Spring上下文
//获取Spring上下文
ApplicationContext context=new ClassPathXmlApplicationContext("spring-config.xml");
2、获取指定Bean对象
//获取指定Bean对象
User user = (User)context.getBean("user");
注意:
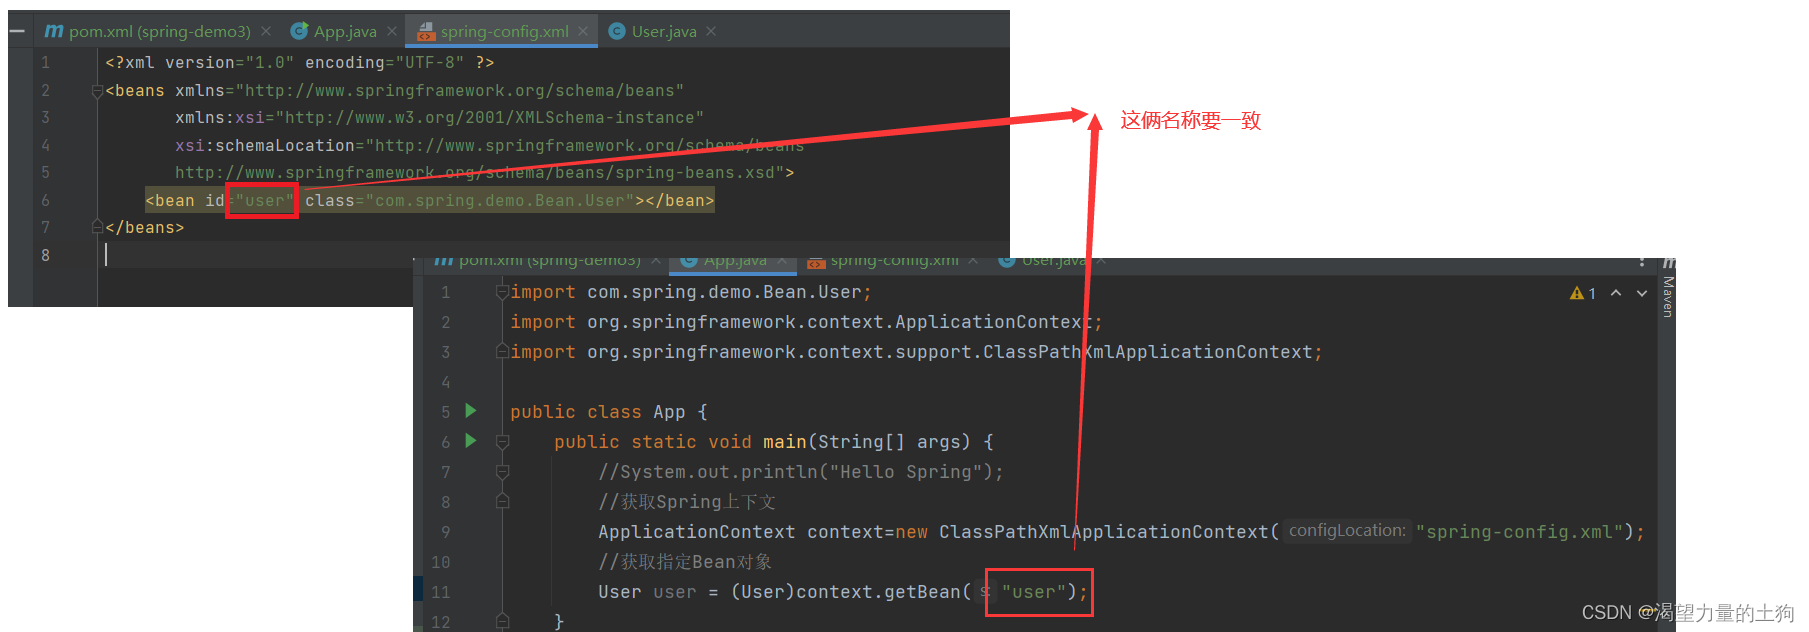
这是这个对象就可以进行使用了。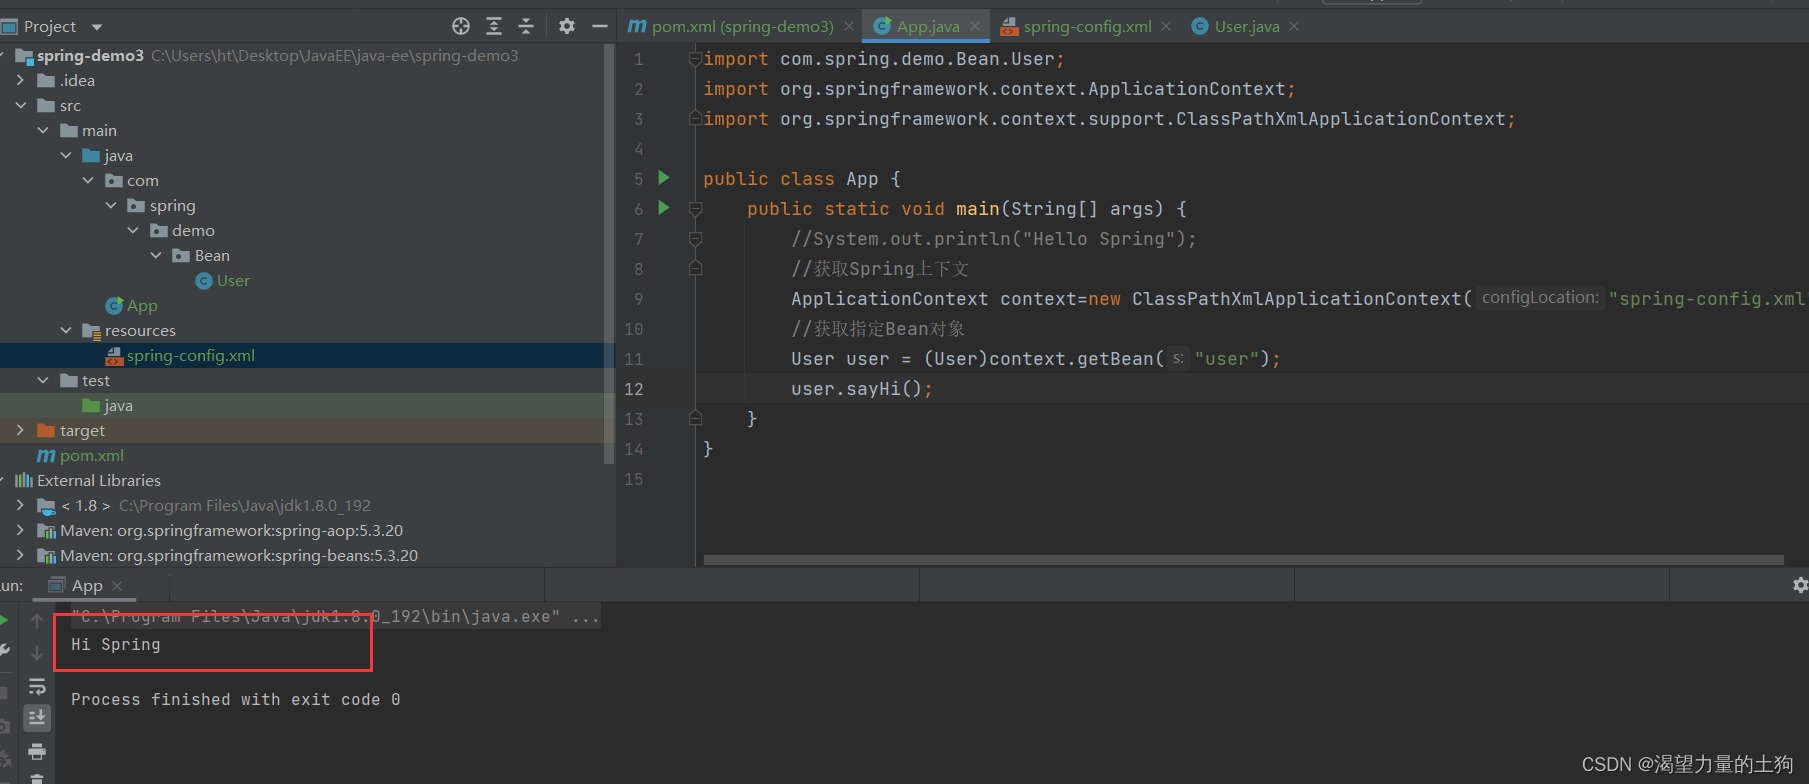
这样我们就可以不用new对象而能够使用对象了。
除了使用 ApplicationContext来获取对象外,我们还可以使用BeanFactory来获取对象
使用BeanFactory来获取对象
public static void main(String[] args) {
        //获取Spring上下文
        BeanFactory beanFactory=new XmlBeanFactory(new ClassPathResource("spring-config.xml"));
        //获取Bean对象
        User user= (User) beanFactory.getBean("user");
        //使用bean
        user.sayHi();
    }
写到这里就有个面试题了:
ApplicationContext和BeanFactory的区别是什么
相同点:都可以从IoC容器当中获取bean。
不同点 :
从继承关系和功能方面:ApplicationContext继承于BeanFactory。BeanFactory只提供了最基础的访问bean的方法,而ApplicationContext除了拥有BeanFactory以外,还拥有一些其他的机制,例如:支持国际化,资源访问,事件传播等等
从性能方面: ApplicationContext 是⼀次性加载并初始化所有的 Bean 对象,⽽BeanFactory 是需要那个才去加载那个,因此更加轻量(ApplicationContext采用的是"饿加载"的方式来进行加载的。而BeanFactory采用的是"懒加载"的方式来进行加载的。)
关于getBean()的更多用法
1、根据bean的id获取bean
User user = (User)context.getBean("user");user是该bean的id,且这个id只能存在一个,Spring容器中不能存在多个名称为user的bean
2、根据bean的类型获取bean
User user1 = context.getBean(User.class);这种类型的好处是不用进行类型的强转,但是这个在出现容器中同一个类有多个对象注入的时候就会报错。因为不能确定是哪个对象。
3、根据bean的id和bean的类型获取bean(推荐使用)
User user2 = context.getBean("user",User.class);这种写法既可以不用强制类型转换,也能够准确的获取到指定的bean对象,推荐使用这种方式。


 QT多线程的5种用法,通过使用线程解决UI主界面的耗时操作代码,防止界面卡死。...
 U8W/U8W-Mini使用与常见问题解决
 stm32使用HAL库配置串口中断收发数据(保姆级教程)
 分享几个国内免费的ChatGPT镜像网址(亲测有效)
 Allegro16.6差分等长设置及走线总结