您现在的位置是:首页 >技术交流 >Unity中对预制体烘焙光照贴图,在其他Scene中使用或者动态生成带光照贴图的预制体网站首页技术交流
Unity中对预制体烘焙光照贴图,在其他Scene中使用或者动态生成带光照贴图的预制体
记录个人开发笔记,如果有大佬有更好的方法或者觉得我这个方法哪里有问题欢迎指正!
首先说下为什么会弄预制体烘焙光照贴图,因为项目需求需要动态生成一个房间的,因此是将房间弄成预制体,动态生成就好了,这个很简单,但是呢最后程序是在一体机中跑的,性能比较差,所有美术调好的效果后如果是实时光,性能开销就比较大,烘焙呢又因为不需要一开始显示而且必须在同一个scene中所有才去弄了这么个烘焙预制体光照贴图。(既然是预制体烘焙,因此此方法也可以跨工程使用,所有有时候美术调效果时可以直接只烘焙一个预制体给到开发人员,不用再给开发人员整个场景了)
接下来直接说怎么操作:
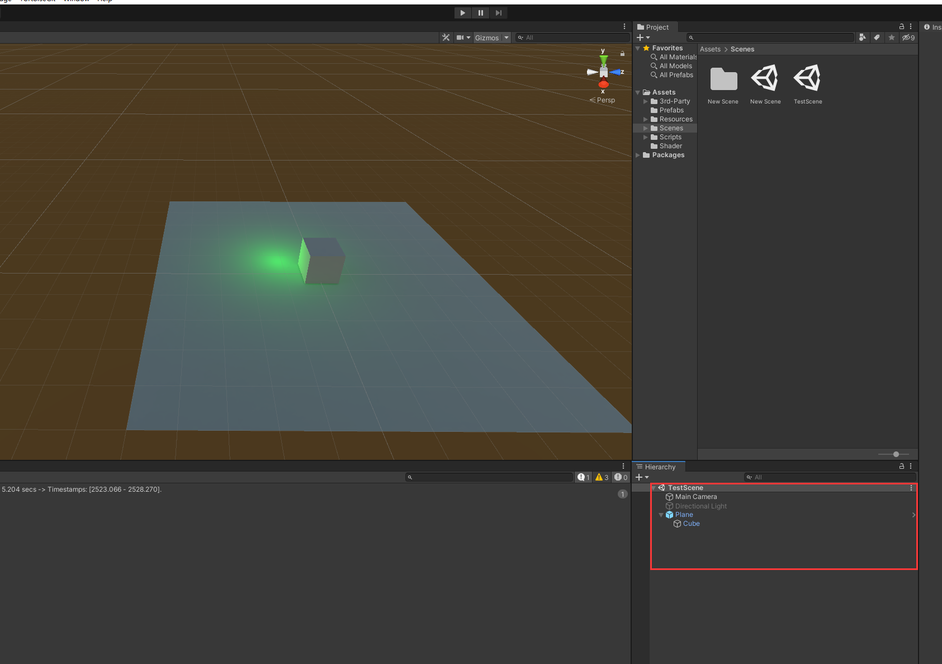
先简单的搭建了一个Plane和Cube再打了一个点光源

接下去,我们再需要烘焙的预制体的最外层父节点上挂上一个PrefabLightmapsData的脚本(具体脚本内容会在最后提供)
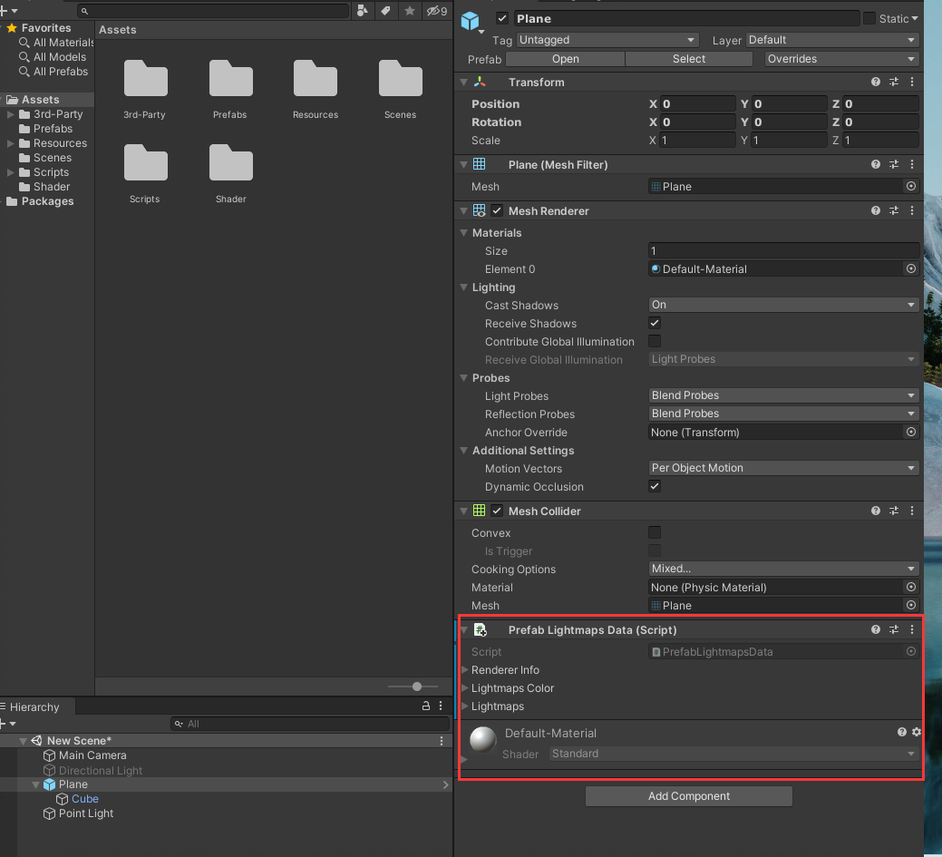
后面将我们需要烘焙光照贴图的物体都勾上Static,让他成为静态物体,同时我们要点击Static旁边的小箭头,取消Batching Static

当然了,别忘了把我们的光(这边是点光源)改成Baked
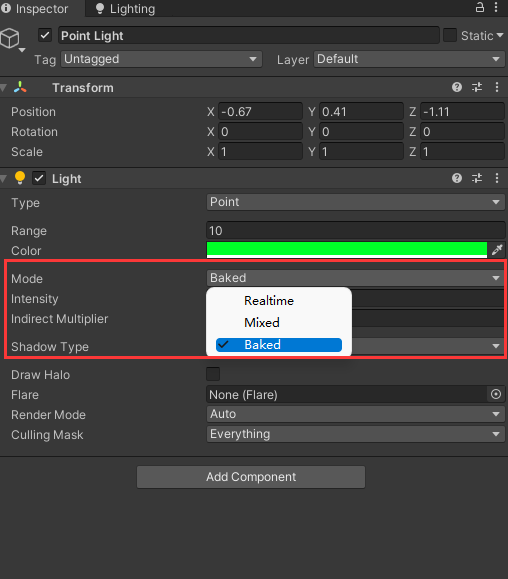
然后打开Lighting Setting一样按照需求设置光照贴图数据就行

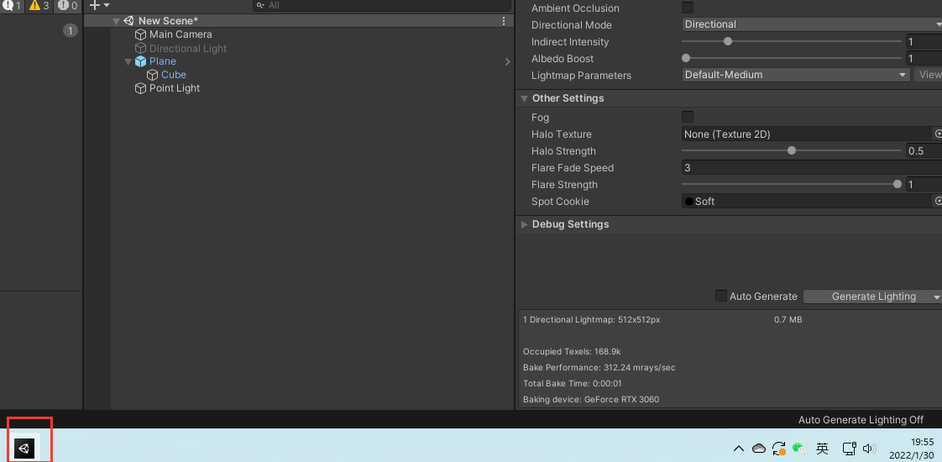
但是接下来烘焙需要注意不再是点击Lighting setting里的Generate Lighting按钮烘焙了,再之前的PrefabLightmapsData脚本中提供了一个简单的编辑器扩展的烘焙按钮,在最上方有个Tools->Bake Prefab Lightmaps的按钮,我们点击这个按钮进行烘焙

顺便提一下,通过我们编辑器扩展的按钮烘焙的时候,烘焙进度不在原来的引擎自带的地方显示了,而是在下方的任务栏上那个Unity图标上会有一个绿色的进度
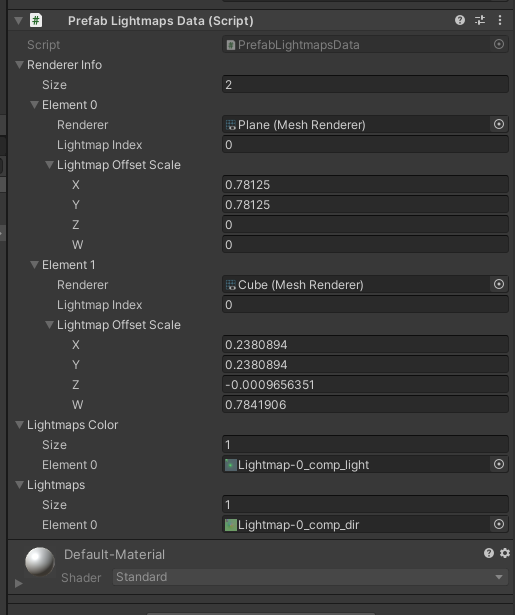
烘焙完成后,我们就可以在PrefabLightmapsData上的三个数组中看到这些模型和光照贴图的数据了
接着我们可以创建一个新的Scene,然后把预制体拖进去看下效果,下图我们可以看到新的场景中是没有任何光照灯的,但是看到的效果却是有正常光照贴图的效果,如果没看到效果,因为是在Awake中设置的,可以运行后再看就会有效果了
到这里基本上预制体烘焙光照贴图就已经完成了,下面放上PrefabLightmapsData脚本的代码,以及最后会写几点之前我使用时踩到过的几个坑。
(脚本有更新,原先的脚本不支持地形的光照贴图设置)
using System.Collections.Generic;
using UnityEditor;
using UnityEngine;

[DisallowMultipleComponent]
[ExecuteInEditMode]
public class PrefabLightmapsData : MonoBehaviour
{
    [System.Serializable]
    struct RendererInfo
    {
        public Terrain terrain;
        public Renderer renderer;
        public int lightmapIndex;
        public Vector4 lightmapOffsetScale;
    }

    [SerializeField]
    RendererInfo[] m_RendererInfo;
    [SerializeField]
    Texture2D[] m_LightmapsColor;
    [SerializeField]
    Texture2D[] _lightmaps;

    void Awake()
    {
        if (m_RendererInfo == null || m_RendererInfo.Length == 0)
            return;

        var lightmaps = LightmapSettings.lightmaps;
        var combinedLightmaps = new LightmapData[lightmaps.Length + m_LightmapsColor.Length];

        lightmaps.CopyTo(combinedLightmaps, 0);
        for (int i = 0; i < m_LightmapsColor.Length; i++)
        {
            combinedLightmaps[i + lightmaps.Length] = new LightmapData();
            combinedLightmaps[i + lightmaps.Length].lightmapColor = m_LightmapsColor[i];
            combinedLightmaps[i + lightmaps.Length].lightmapDir = _lightmaps[i];

        }

        ApplyRendererInfo(m_RendererInfo, lightmaps.Length);
        LightmapSettings.lightmaps = combinedLightmaps;
    }


    static void ApplyRendererInfo(RendererInfo[] infos, int lightmapOffsetIndex)
    {
        for (int i = 0; i < infos.Length; i++)
        {
            var info = infos[i];
            if (info.renderer != null)
            {
                info.renderer.lightmapIndex = info.lightmapIndex + lightmapOffsetIndex;
                info.renderer.lightmapScaleOffset = info.lightmapOffsetScale;
            }
            else if(info.terrain!=null)
            {
                info.terrain.lightmapIndex = info.lightmapIndex + lightmapOffsetIndex;
                info.terrain.lightmapScaleOffset = info.lightmapOffsetScale;
            }
        }
    }


#if UNITY_EDITOR
    [UnityEditor.MenuItem("Tools/Bake Prefab Lightmaps")]
    static void GenerateLightmapInfo()
    {
        if (UnityEditor.Lightmapping.giWorkflowMode != UnityEditor.Lightmapping.GIWorkflowMode.OnDemand)
        {
            Debug.LogError("ExtractLightmapData requires that you have baked you lightmaps and Auto mode is disabled.");
            return;
        }
        UnityEditor.Lightmapping.Bake();

        PrefabLightmapsData[] prefabs = GameObject.FindObjectsOfType<PrefabLightmapsData>();

        foreach (var instance in prefabs)
        {
            var gameObject = instance.gameObject;
            var rendererInfos = new List<RendererInfo>();
            var lightmapsColor = new List<Texture2D>();
            List<Texture2D> lightmapsDir = new List<Texture2D>();

            GenerateLightmapInfo(gameObject, rendererInfos, lightmapsColor, lightmapsDir);

            instance.m_RendererInfo = rendererInfos.ToArray();
            instance.m_LightmapsColor = lightmapsColor.ToArray();
            instance._lightmaps = lightmapsDir.ToArray();


            var targetPrefab = PrefabUtility.GetCorrespondingObjectFromOriginalSource(instance.gameObject) as GameObject;
            if (targetPrefab != null)
            {
                GameObject root = PrefabUtility.GetOutermostPrefabInstanceRoot(instance.gameObject);

                if (root != null)
                {
                    GameObject rootPrefab = PrefabUtility.GetCorrespondingObjectFromSource(instance.gameObject);
                    string rootPath = AssetDatabase.GetAssetPath(rootPrefab);
                    PrefabUtility.UnpackPrefabInstanceAndReturnNewOutermostRoots(root, PrefabUnpackMode.OutermostRoot);
                    try
                    {
                        PrefabUtility.ApplyPrefabInstance(instance.gameObject, InteractionMode.AutomatedAction);
                    }
                    catch { }
                    finally
                    {
                        PrefabUtility.SaveAsPrefabAssetAndConnect(root, rootPath, InteractionMode.AutomatedAction);
                    }
                }
                else
                {
                    PrefabUtility.ApplyPrefabInstance(instance.gameObject, InteractionMode.AutomatedAction);
                }
            }
        }
    }

    static void GenerateLightmapInfo(GameObject root, List<RendererInfo> rendererInfos, List<Texture2D> lightmapsColor, List<Texture2D> lightmapsDir)
    {
        var renderers = root.GetComponentsInChildren<MeshRenderer>();
        foreach (MeshRenderer renderer in renderers)
        {
            if (renderer.lightmapIndex != -1)
            {
                RendererInfo info = new RendererInfo();
                info.renderer = renderer;
                if (renderer.lightmapScaleOffset != Vector4.zero)
                {
                    info.lightmapOffsetScale = renderer.lightmapScaleOffset;
                    Texture2D lightmapColor = LightmapSettings.lightmaps[renderer.lightmapIndex].lightmapColor;
                    Texture2D lightmapDir = LightmapSettings.lightmaps[renderer.lightmapIndex].lightmapDir;

                    info.lightmapIndex = lightmapsColor.IndexOf(lightmapColor);
                    if (info.lightmapIndex == -1)
                    {
                        info.lightmapIndex = lightmapsColor.Count;
                        lightmapsColor.Add(lightmapColor);
                        lightmapsDir.Add(lightmapDir);
                    }

                    rendererInfos.Add(info);
                }
            }
        }

        var Terrainrenderers = root.GetComponentsInChildren<Terrain>();
        foreach (var terrain in Terrainrenderers)
        {
            if (terrain.lightmapIndex != -1)
            {
                RendererInfo info = new RendererInfo();
                info.terrain = terrain;
                if (terrain.lightmapScaleOffset != Vector4.zero)
                {
                    info.lightmapOffsetScale = terrain.lightmapScaleOffset;
                    Texture2D lightmapColor = LightmapSettings.lightmaps[terrain.lightmapIndex].lightmapColor;
                    Texture2D lightmapDir = LightmapSettings.lightmaps[terrain.lightmapIndex].lightmapDir;

                    info.lightmapIndex = lightmapsColor.IndexOf(lightmapColor);
                    if (info.lightmapIndex == -1)
                    {
                        info.lightmapIndex = lightmapsColor.Count;
                        lightmapsColor.Add(lightmapColor);
                        lightmapsDir.Add(lightmapDir);
                    }

                    rendererInfos.Add(info);
                }
            }
        }
    }
#endif
}
具体的我也没去往深入的研究为什么,如果有大佬研究了可以写在评论区,这边我就直接说我的解决方案,在烘焙前的Lightmapping Settings里有个Directional Mode的设置,默认选择的时Directional,表示有漫反射的,Non-Directional是关闭漫反射的烘焙,我们只需要选择Non-Directional后烘焙就行,但是呢这样烘焙出来的光照贴图会缺少一张lightmap-dir的图片,导致效果不好。

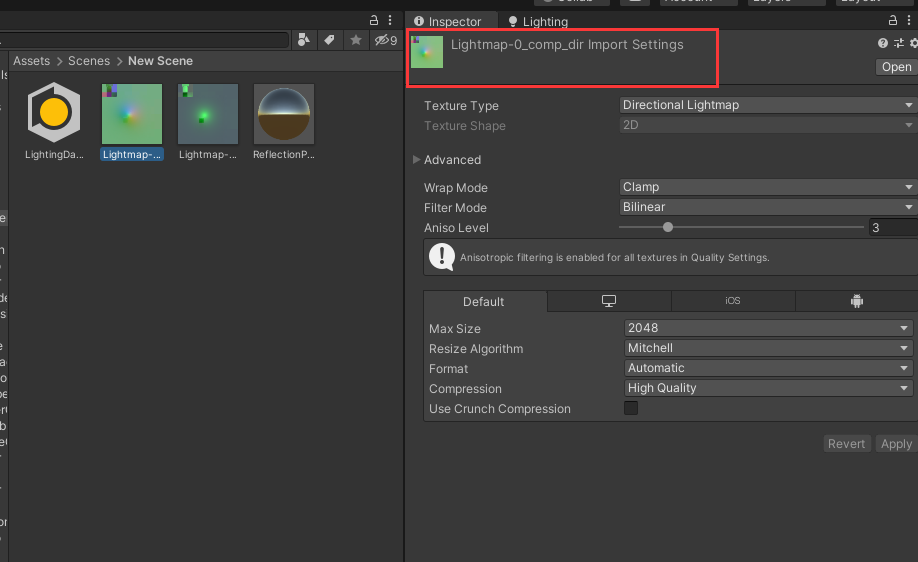
要怎么保证效果好旋转后又不会出现问题,后面再说,先来说下我碰到的过的第二个问题,因为这个的解决方法和第二个问题的解决方法一致。
2、第二个问题呢我直接描述下,因为现在写笔记时暂时没碰到因此就没有图片看出现问题的效果了。出现的问题是烘培好预制体后放到新的工程或者新的场景中时,所有文件都正常的,但是在场景中不管是运行状态还是没运行状态预制体的贴图都变成黑白的了。
具体原因我也没有深入的查找,如果有大佬知道欢迎在评论区或者私信告知,谢谢!
我这里也直接说解决方案,我们直接托烘焙好的预制体虽然会把光照贴图设置上去,但是在Lighting Setting中下图这个位置,是没有LightingDataAsset文件的,我们只需要在这个场景中(可以不放任何东西烘焙一个空的贴图生成一个LightingDataAsset文件即可)然后在把烘焙好的预制体放到场景中,就不会出现黑白的情况了。

由于在最终的Scene会烘焙一个空的光照贴图生成一个LightingDataAsset文件,就让我产生了一个想法,在第一个问题中我们需要把Directional Mode设置成Non-Directional来避免第一个问题,那么我们是不是可以在最终Scene上烘焙的时候这么设置,然后烘焙预制体的时候还是选择Directional来正常设置,这样如果能成功不就能提高了预制体的烘焙效果,又能避免旋转后出现问题了吗。
然后我就开始了尝试,先给空的场景设置Non-Directional后用PrefabLightmapsData脚本中提供的烘焙按钮给空场景烘焙了个贴图和LightingDataAsset


然后再将之前设置Directional烘焙出来的预制体放入场景中,再把X旋转90度后我们可以看到做出红框中的光照贴图也不再变黑了。

好了本篇笔记就到这边结束了,如果有问题,请在评论区留言讨论.


 U8W/U8W-Mini使用与常见问题解决
 QT多线程的5种用法,通过使用线程解决UI主界面的耗时操作代码,防止界面卡死。...
 stm32使用HAL库配置串口中断收发数据(保姆级教程)
 分享几个国内免费的ChatGPT镜像网址(亲测有效)
 Allegro16.6差分等长设置及走线总结