您现在的位置是:首页 >技术交流 >Nginx网站服务网站首页技术交流
Nginx网站服务
简介Nginx网站服务
文章目录
Nginx概述

Nginx和Apache的差异
- Nginx是一个基于事件的Web服务器,Apache是一个基于流程的服务器;
- Nginx是异步进程,多个连接可以对应一个进程;
- Apache是同步多进程,一个连接对应一个进程;
- Nginx高度模块化,编写模块相对简单,且组件比Apache少;
- Nginx轻量级,比Apache占用更少的内存及资源;
- 静态处理:Nginx静态处理性能比Apache高;
- Nginx可以实现无缓存的反向代理加速,提高网站运行速度;
- Nginx的性能和可伸缩性不依赖于硬件,Apache依赖于硬件;
- Nginx支持热部署,启动速度迅速,可以在不间断服务的情况下,对软件版本或者配置进行升级;
- 高并发下Nginx能保持低资源低消耗高性能;
- Nginx配置简洁,Apache配置复杂;
编译安装Nginx服务
(1)关闭防火墙,将安装Nginx所需软件包传到/opt目录下
[root@clr ~]# systemctl disable --now firewalld.service
[root@clr ~]# setenforce 0
[root@clr ~]# vim /etc/selinux/config
[root@clr ~]# df
文件系统          1K-块    已用     可用 已用% 挂载点
/dev/sr0        4600876 4600876        0  100% /mnt
(2)安装依赖包
#Nginx的配置及运行需要pcre、zlib、openssl等软件包的支持,因此需要安装这些软件的开发包,以便提供相应的库和头文件。
[root@clr ~]# yum -y install pcre-devel zlib-devel openssl-devel gcc gcc-c++ make
(3)创建运行用户、组(Nginx服务程序默认以 nobody身份运行,建议为其创建专门的用户账号,以便更准确地控制其访问权限)
[root@clr ~]# useradd -M -s /sbin/nologin nginx
(4)编译安装Nginx
[root@clr ~]# cd /opt
[root@clr /opt]# rz -E
[root@clr /opt]# tar xf nginx-1.22.0.tar.gz
[root@clr /opt]# ls
nginx-1.22.0  nginx-1.22.0.tar.gz  rh
[root@clr /opt]# cd nginx-1.22.0/

[root@clr /opt/nginx-1.22.0]# ./configure
--prefix=/usr/local/nginx
--user=nginx
--group=nginx
--with-http_stub_status_module

[root@clr /opt/nginx-1.22.0]# make -j2 && make install

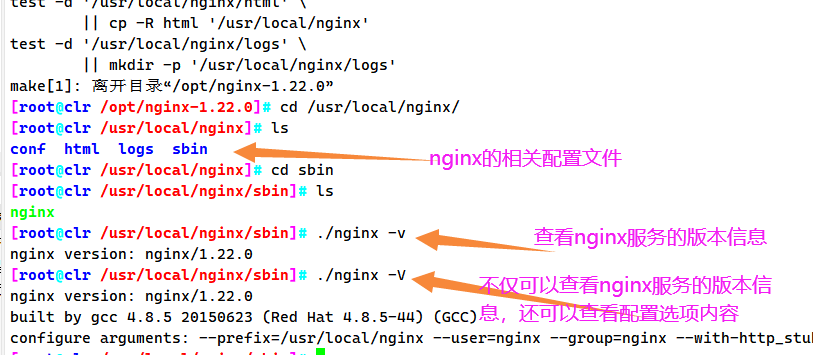
[root@clr /usr/local/nginx/sbin]# ln -s /usr/local/nginx/sbin/nginx /usr/local/sbin/  #让系统识别nginx的操作命令
[root@clr /usr/local/nginx/sbin]# nginx -V
nginx version: nginx/1.22.0
built by gcc 4.8.5 20150623 (Red Hat 4.8.5-44) (GCC)
configure arguments: --prefix=/usr/local/nginx --user=nginx --group=nginx --with-http_stu

./configur配置选项的功能作用:
| 常用选项 | 功能作用 |
|---|---|
| - -prefix=/usr/local/nginx | #指定nginx的安装路径 |
| - -user=nginx | #指定用户名 |
| - -group=nginx | #指定组名 |
| - -with-http_stub_status_module | #启用http stub_status_module模块以支持状态统计 |

(5)检查、启动、重启、停止nginx服务
检查配置文件是否配置正确
nginx -t
绝对路径启动nginx服务
/usr/local/nginx/sbin/nginx
停止nginx服务

cat /usr/local/nginx/logs/nginx.pid		#先查看nginx的PID号
kill -3  <PID号>
kill -s QUIT <PID号>
killall -3 nginx
kill -s QUIT nginx
kill QUIT nginx
#重载nginx服务的配置文件
kill -1(数字1) <PID号>
kill -s HUP <PID号>
killall -1 nginx
killall -s HUP nginx

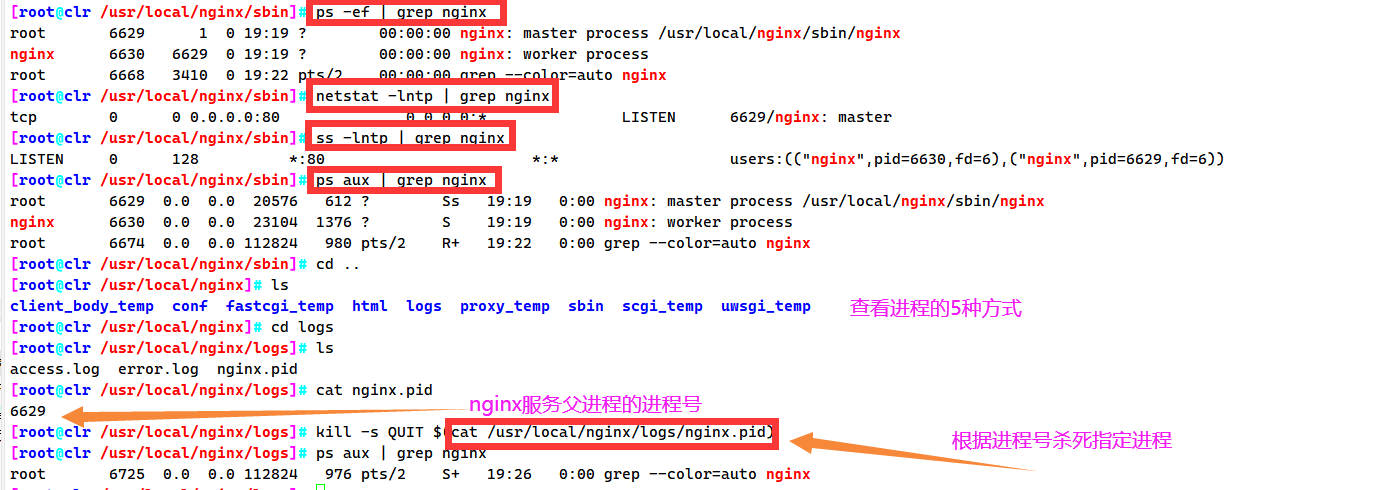
总结: 查看进程号的五种方法:

[root@clr /usr/local/nginx/sbin]# ps -ef | grep nginx
root       6629      1  0 19:19 ?        00:00:00 nginx: master process /usr/local/nginx/sbin/nginx(父进程)
nginx      6630   6629  0 19:19 ?        00:00:00 nginx: worker process(子进程)
root       6668   3410  0 19:22 pts/2    00:00:00 grep --color=auto nginx

[root@clr /usr/local/nginx/sbin]# netstat -lntp | grep nginx
tcp        0      0 0.0.0.0:80              0.0.0.0:*               LISTEN      6629/nginx: master

[root@clr /usr/local/nginx/sbin]# ss -lntp | grep nginx
LISTEN     0      128          *:80                       *:*                   users:(("nginx",pid=6630,fd=6),("nginx",pid=6629,fd=6))

[root@clr /usr/local/nginx/sbin]# ps aux | grep nginx
root       6629  0.0  0.0  20576   612 ?        Ss   19:19   0:00 nginx: master process /usr/local/nginx/sbin/nginx
nginx      6630  0.0  0.0  23104  1376 ?        S    19:19   0:00 nginx: worker process
root       6674  0.0  0.0 112824   980 pts/2    R+   19:22   0:00 grep --color=auto nginx

[root@clr /usr/local/nginx/sbin]# cd ..
[root@clr /usr/local/nginx]# ls
client_body_temp  conf  fastcgi_temp  html  logs  proxy_temp  sbin  scgi_temp  uwsgi_temp
[root@clr /usr/local/nginx]# cd logs
[root@clr /usr/local/nginx/logs]# ls
access.log  error.log  nginx.pid
[root@clr /usr/local/nginx/logs]# cat nginx.pid     #pid文件,用于保存服务进程号
6629

[root@clr /usr/local/nginx/logs]# kill -s QUIT $(cat /usr/local/nginx/logs/nginx.pid)  #根据进程号杀死指定进程
[root@clr /usr/local/nginx/logs]# ps aux | grep nginx  #在杀死父进程(master)的时候,子进程(worker)也会被杀死,但是子进程被杀死的时候,父进程不一定会被杀死
root       6725  0.0  0.0 112824   976 pts/2    S+   19:26   0:00 grep --color=auto nginx
日志分制,重新打开日志文件
kill -USR1 <PID号>
平滑升级
kill -USR2 <PID号> #不关闭服务的情况下,升级服务版本
新版本升级

[root@clr /opt]# tar -zxvf nginx-1.24.0.tar.gz
[root@clr /opt]# cd nginx-1.24.0
./ configure
-prefix=/usr/local/nginx
--user=nginx
--group=nginx
--with-http_stub_status_module
--with-http_ssl_module

[root@clr /opt/nginx-1.24.0]# make -j2
[root@clr /opt/nginx-1.24.0]# ls
auto  CHANGES  CHANGES.ru  conf  configure  contrib  html  LICENSE  Makefile  man  objs  README  src
[root@clr /opt/nginx-1.24.0]# ls objs/
autoconf.err  Makefile  nginx  nginx.8  ngx_auto_config.h  ngx_auto_headers.h  ngx_modules.c  ngx_modules.o  src

[root@clr /opt/nginx-1.24.0]# cd /usr/local/nginx/sbin/
[root@clr /usr/local/nginx/sbin]# ls
nginx
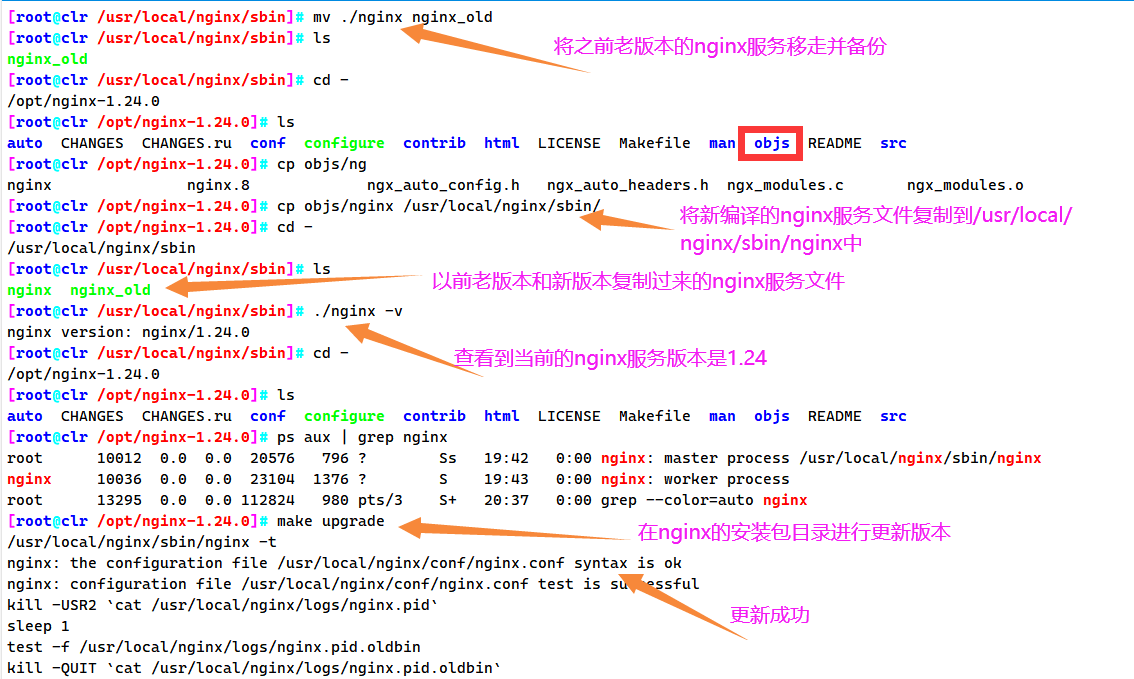
[root@clr /usr/local/nginx/sbin]# mv ./nginx nginx_old
[root@clr /usr/local/nginx/sbin]# ls
nginx_old
[root@clr /usr/local/nginx/sbin]# cd -
/opt/nginx-1.24.0
[root@clr /opt/nginx-1.24.0]# ls
auto  CHANGES  CHANGES.ru  conf  configure  contrib  html  LICENSE  Makefile  man  objs  README  src

[root@clr /opt/nginx-1.24.0]# cp objs/nginx /usr/local/nginx/sbin/
[root@clr /opt/nginx-1.24.0]# cd -
/usr/local/nginx/sbin
[root@clr /usr/local/nginx/sbin]# ls
nginx  nginx_old
[root@clr /usr/local/nginx/sbin]# cd -
/opt/nginx-1.24.0
[root@clr /opt/nginx-1.24.0]# ls
auto  CHANGES  CHANGES.ru  conf  configure  contrib  html  LICENSE  Makefile  man  objs  README  src
[root@clr /opt/nginx-1.24.0]# ps aux | grep nginx
root      10012  0.0  0.0  20576   796 ?        Ss   19:42   0:00 nginx: master process /usr/local/nginx/sbin/nginx
nginx     10036  0.0  0.0  23104  1376 ?        S    19:43   0:00 nginx: worker process
root      13295  0.0  0.0 112824   980 pts/3    S+   20:37   0:00 grep --color=auto nginx
[root@clr /opt/nginx-1.24.0]# make upgrade
/usr/local/nginx/sbin/nginx -t
nginx: the configuration file /usr/local/nginx/conf/nginx.conf syntax is ok
nginx: configuration file /usr/local/nginx/conf/nginx.conf test is successful
kill -USR2 `cat /usr/local/nginx/logs/nginx.pid`
sleep 1
test -f /usr/local/nginx/logs/nginx.pid.oldbin
kill -QUIT `cat /usr/local/nginx/logs/nginx.pid.oldbin`

[root@clr /opt/nginx-1.24.0]# /usr/local/nginx/sbin/nginx -v
nginx version: nginx/1.24.0

mv /usr/local/nginx/sbin/nginx /usr/local/nginx/sbin/nginx_old
cp objs/nginx /usr/local/nginx/sbin/nginx
make upgrade  #要保证当前nginx进程是通过/usr/locaL/nginx/sbin/nginx启动的,而不是通过查找环境变量中那个nginx命令启动的
#或者先killall nginx,再/usr/local/nginx/sbin/nginx

(6)添加Nginx系统服务
方法一:
vim /etc/init.d/nginx
#!/bin/bash
#chkconfig: - 99 20
#description:Nginx Service Control Script
COM="/usr/local/nginx/sbin/nginx"
PID="/usr/local/nginx/logs/nginx.pid"
case "$1" in
start)
	$COM
;;

stop)
	kill -s QUIT $(cat $PID)
;;

restart)
	$0 stop
	$0 start
;;

reload)
	kill -s HUP $ (cat $PID)
;;

*)
echo "Usage: $0 {start|stop|restart|reload}"
exit 1

esac
exit 0


chmod +x /etc/init.d/nginx

./etc/init.d/nginx

ps -ef | grep nginx
ps -ef | grep -v grep | grep -c nginx
方法二:
cd /usr/lib/systemd/system/
vim nginx.service

[Unit]
Description=nginx										#描述
After=network.target									#描述服务类别
[Service]
Type=forking											#后台运行类型
PIDFile =/usr/local/nginx/logs/nginx.pid				#PID文件位置
ExecStart=/usr/local/nginx/sbin/nginx					#启动服务
ExecrReload=/bin/kill -s HUP $MAINPID					#根据PID重载配置
ExecrStop=/bin/kill -s QUIT $MAINPID					#根据PID终止进程
PrivateTmp=true

[Install]
WantedBy=multi-user.target								#启动级别
风语者!平时喜欢研究各种技术,目前在从事后端开发工作,热爱生活、热爱工作。


 U8W/U8W-Mini使用与常见问题解决
 QT多线程的5种用法,通过使用线程解决UI主界面的耗时操作代码,防止界面卡死。...
 stm32使用HAL库配置串口中断收发数据(保姆级教程)
 分享几个国内免费的ChatGPT镜像网址(亲测有效)
 Allegro16.6差分等长设置及走线总结