您现在的位置是:首页 >技术交流 >Spring面向切面编程(AOP)网站首页技术交流
Spring面向切面编程(AOP)
Spring面向切面编程(AOP)
概念
AOP(Aspect Oriented Programming),即面向切面编程,利用一种称为"横切"的技术,剖开封装的对象内部,并将那些影响了多个类的公共行为封装到一个可重用模块,并将其命名为"Aspect",即切面。所谓"切面",简单说就是那些与业务无关,却为业务模块所共同调用的逻辑或责任封装起来,便于减少系统的重复代码,降低模块之间的耦合度,并有利于未来的可操作性和可维护性。
什么是AOP
面向切面编程:利用AOP可以对业务逻辑的各个部分进行隔离,从而使业务逻辑的各部分之间耦合度降低,提高程序的可重用性,提高了开发效率,通俗的讲,可以实现不修改源代码的方式,在核心业务里面 添加新的功能。
AOP底层的原理就是动态代理 ,真正干活的 bean 是 代理 bean , 代理 bean 对真实 bean 功能增强。
AOP开发术语
连接点(Joinpoint):连接点是程序类中客观存在的方法,可被Spring拦截并切入内容说白了,类中的哪些方法可以被增强,这些方法就称为是连接点
切入点(Pointcut):被Spring切入连接点真正被增强的方法称为切入点
通知、增强(Advice):可以为切入点添加额外功能,分为:前置通知、后置通知、异常通知、环绕通知,最终通知等实际增强的逻辑部分,称为通知(增强)
目标对象(Target):代理的目标对象,真实对象引介(Introduction):一种特殊的增强,可在运行期为类动态添加Field和Method织入(Weaving):把通知应用到具体的类,进而创建新的代理类的过程代理(Proxy):被AOP织入通知后,产生的结果类切面(Aspect):由切点和通知组成,将横切逻辑织入切面所指定的连接点中。 把通知 应用到 切入点的过程
作用
Spring的AOP编程即是通过动态代理类为原始类的方法添加辅助功能
开发流程
环境搭建
引入AOP相关依赖
<dependency>
    <groupId>org.springframework</groupId>
    <artifactId>spring-aspects</artifactId>
    <version>5.1.6.RELEASE</version>
</dependency>
spring-context.xml引入AOP命名空间
<?xml version="1.0" encoding="UTF-8"?>
<beans xmlns="http://www.springframework.org/schema/beans"
       xmlns:context="http://www.springframework.org/schema/context"
       xmlns:aop="http://www.springframework.org/schema/aop"
       xmlns:xsi="http://www.w3.org/2001/XMLSchema-instance"
       xsi:schemaLocation="
       http://www.springframework.org/schema/beans
       http://www.springframework.org/schema/beans/spring-beans.xsd
       http://www.springframework.org/schema/aop
       http://www.springframework.org/schema/aop/spring-aop.xsd
       ">
</beans>
代码演示
定义原始类
public interface UserService {
    public void save();
}
public class UserServiceImpl implements UserService {
    public void save() {
        System.out.println("save method executed...");
    }
}
基于Schema-based实现AOP
定义通知类(添加额外功能)
//实现前置通知接口
public class MyAdvice implements MethodBeforeAdvice {
    public void before(Method method, Object[] args, Object target) throws Throwable {
        System.out.println("before advice executed...");
    }
}
定义bean标签
<!--原始对象-->
<bean id="us" class="com.qf.aaron.aop.basic.UserServiceImpl" />

<!--辅助对象-->
<bean id="myAdvice" class="com.qf.aaron.aop.basic.MyAdvice" />
定义切入点(PointCut),形成切面(Aspect)
<aop:config>
    <!--切点-->
    <aop:pointcut id="myPointCut" expression="execution(* save())" />
    <!--组装切面 -->
    <aop:advisor advice-ref="myAdvice" pointcut-ref="myPointCut" />
</aop:config>
基于AspectJ 实现AOP
创建 通知类
/**
 * @ClassName : MyAspectJAdvice

 * @Description :   AspectJ 的 通知类  无需实现接口
 */
public class MyAspectJAdvice {

    public void before(){
        System.out.println("前置增强代码");
    }

    public Object around(ProceedingJoinPoint jp) throws Throwable {
        System.out.println("环绕增强前面的代码");
        // 让目标方法继续执行
        Object result = jp.proceed();
        System.out.println("环绕增强后面的代码");
        return result;
    }


    public void after(){
        System.out.println("最终增强的代码,类似于finally,目标方法有没有异常都要执行的");
    }


    public void throwing(Exception e){
        System.out.println("异常抛出增强代码,只有在目标方法抛出异常时才能执行");
        System.out.println("异常信息是:" + e.getMessage());
    }

    public void afterReturning(Object result){
        System.out.println("后置增强,返回值是:"+result);
    }
}
xml 配置
<?xml version="1.0" encoding="UTF-8"?>
<beans xmlns="http://www.springframework.org/schema/beans"
       xmlns:xsi="http://www.w3.org/2001/XMLSchema-instance"
       xmlns:aop="http://www.springframework.org/schema/aop"
       xmlns:context="http://www.springframework.org/schema/context"
       xsi:schemaLocation="http://www.springframework.org/schema/beans
       http://www.springframework.org/schema/beans/spring-beans.xsd
        http://www.springframework.org/schema/aop
        http://www.springframework.org/schema/aop/spring-aop.xsd
        http://www.springframework.org/schema/context
        http://www.springframework.org/schema/context/spring-context.xsd">

    <!-- 其他bean的定义... -->

    <!--了解 基于 AspectJ 的 xml 的  AOP实现 配置-->

    <!-- 配置增强类 -->
    <bean id="advice" class="com.qf.spring.aop.advice.MyAspectJAdvice" />

    <!-- 配置AOP -->
    <aop:config>
        <!-- 配置切入点 -->
        <aop:pointcut id="pc" expression="execution(* save())"/>
        <aop:aspect ref="advice">
            <!-- aop:before 前置增强的配置 -->
            <aop:before method="before" pointcut-ref="pc" />
            <!-- 环绕目标方法执行 -->
            <aop:around method="around" pointcut-ref="pc" />
            <!-- 异常抛出增强 -->
            <aop:after-throwing method="throwing" pointcut-ref="pc" throwing="e" />
            <!-- 最终增强 -->
            <aop:after method="after" pointcut-ref="pc" />
            <!-- 后置增强,目标方法抛出异常时 后置增强不执行 -->
            <aop:after-returning method="afterReturning" pointcut-ref="pc" returning="result"/>
        </aop:aspect>

    </aop:config>

</beans>
测试
	@Test
	void save() {
	   ApplicationContext context = new ClassPathXmlApplicationContext("/beans.xml");
	   UserService service = context.getBean(UserService.class);
	   service.save();
	}
AOP小结
通过AOP提供的编码流程,更便利的定制切面,更方便的定制了动态代理进而彻底解决了辅助功能冗余的问题业务类中职责单一性得到更好保障辅助功能也有很好的复用性
通知类【可选】
定义通知类,达到通知效果
前置通知:MethodBeforeAdvice

后置通知:AfterAdvice

后置通知:AfterReturningAdvice //有异常不执行,方法会因异常而结束,无返回值

异常通知:ThrowsAdvice

环绕通知:MethodInterceptor
没有必要把通知的执行顺序记得非常精确,因为 spring 新版本 5 和 之前的旧版本 通知的执行顺序 不一样
通配切入点【可选】
根据表达式通配切入点
<!--匹配参数-->
<aop:pointcut id="myPointCut" expression="execution(* *(com.qf.aaron.aop.basic.User))" />
<!--匹配方法名(无参)-->
<aop:pointcut id="myPointCut" expression="execution(* save())" />
<!--匹配方法名(任意参数)-->
<aop:pointcut id="myPointCut" expression="execution(* save(..))" />
<!--匹配返回值类型-->
<aop:pointcut id="myPointCut" expression="execution(com.qf.aaron.aop.basic.User *(..))" />
<!--匹配类名-->
<aop:pointcut id="myPointCut" expression="execution(* com.qf.aaron.aop.basic.UserServiceImpl.*(..))" />
<!--匹配包名-->
<aop:pointcut id="myPointCut" expression="execution(* com.qf.aaron.aop.basic.*.*(..))" />
<!--匹配包名、以及子包名-->
<aop:pointcut id="myPointCut" expression="execution(* com.qf.aaron.aop..*.*(..))" />
切入点表达式:expression 知道对哪个类的那个方法进行增强
语法结构: execution([权限修饰符] [返回值类型] [类全路径] [方法名称] ([参数列表])
JDK和CGLIB选择【可选】
spring底层,包含了jdk代理和cglib代理两种动态代理生成机制基本规则是:目标业务类如果有接口则用JDK代理,没有接口则用CGLib代理
class DefaultAopProxyFactory{
    // 该方法中明确定义了 JDK代理和CGLib代理的选取规则
    // 基本规则是:目标业务类如果有接口则用JDK代理,没有接口则用CGLib代理
    public AopProxy createAopProxy(){...}
}
后处理器【可选】
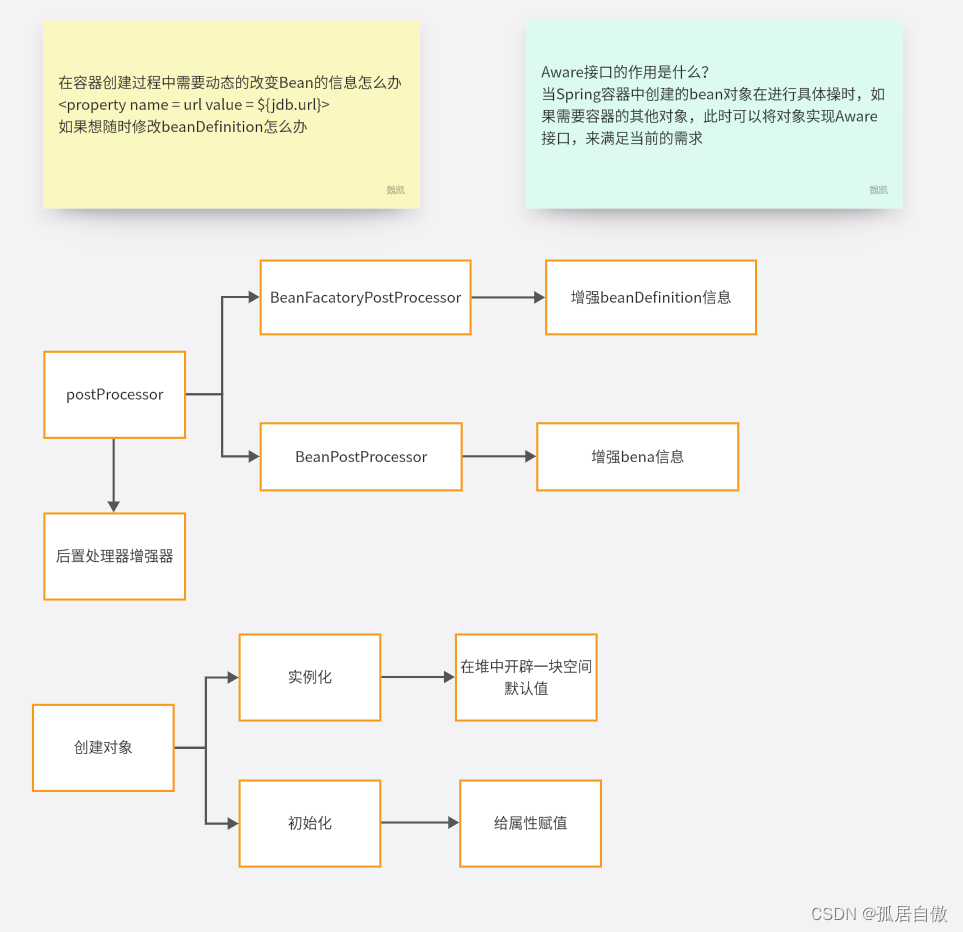
spring中定义了很多后处理器每个bean在创建完成之前 ,都会有一个后处理过程,即再加工,对bean做出相关改变和调整spring-AOP中,就有一个专门的后处理器,负责通过原始业务组件(Service),再加工得到一个代理组件

后处理器定义
/**
 * 定义bean后处理器
 * 作用:在bean的创建之后,进行再加工
 */
public class MyBeanPostProcessor implements BeanPostProcessor{

    /**
     * 在bean的init方法之前执行
     * @param bean  原始的bean对象
     * @param beanName
     * @return
     * @throws BeansException
     */
    public Object postProcessBeforeInitialization(Object bean, String beanName) throws BeansException {
        System.out.println("后处理器 在init之前执行```"+bean.getClass());
        return bean;
    }
	/**
     * 在bean的init方法之后执行
     * @param bean  postProcessBeforeInitialization返回的bean
     * @param beanName
     * @return
     * @throws BeansException
     */
    @Override
    public Object postProcessAfterInitialization(Object bean, String beanName) throws BeansException {
        System.out.println("后处理器 在init之后执行```"+bean.getClass());
        return bean;// 此处的返回是 getBean() 最终的返回值
    }
}
配置后处理器
<!-- 配置后处理器,将对工厂中所有的bean声明周期进行干预 -->
<bean class="com.qianfeng.beanpostprocessor.MyBeanPostProcessor"></bean>
bean的生命周期
bean 对象从创建到销毁的过程
bean 的实例化 通过构造方法创建bean 的实例 默认是无参构造给bean 的属性赋值执行初始化的方法得到完整的bean 对象 ,这时的bean 对象才能够使用销毁bean
要考虑 bean 的后置处理器 BeanPostProcessor
创建一个类实现BeanPostProcessor 重写 他的两个方法
public class MyBeanPost implements BeanPostProcessor {

    @Override
    public Object postProcessBeforeInitialization(Object bean, String beanName) throws BeansException {
        System.out.println("在bean 初始化之前执行");

        return bean;
    }

    @Override
    public Object postProcessAfterInitialization(Object bean, String beanName) throws BeansException {

        System.out.println("在bean初始化之后执行");
        if(bean instanceof User){
            User user = (User) bean;
            user.setName("愿天下程序员少走弯路!");
            return user;
        }

        return bean;
    }
}
在配置文件 配置这个 bean
<bean id="myPostProcessor" class="com.qf.postprocessor.MyBeanPost"></bean>
总结
-
bean 的实例化 通过构造方法创建bean 的实例 默认是无参构造 -
给bean 的属性赋值 -
把 bean 的 实例 传递给 bean的前置处理器的方法 postProcessBeforeInitialization -
执行初始化的方法 -
把 bean 的 实例 传递给 bean的后置处理器的方法 postProcessAfterInitialization -
得到完整的bean 对象 ,这时的bean 对象才能够使用 -
销毁bean 当容器关闭的时候 调用销毁的方法自定义初始化方法:添加“init-method”属性,Spring则会在创建对象之后,调用此方法。自定义销毁方法:添加“destroy-method”属性,Spring则会在销毁对象之前,调用此方法。销毁:工厂的close()方法被调用之后,Spring会毁掉所有已创建的单例对象。分类:Singleton对象由Spring容器销毁、Prototype对象由JVM销毁。
生命周期注解(初始化注解、销毁注解)
@PostConstruct //初始化
public void init(){
    System.out.println("init method executed");
}

@PreDestroy //销毁
public void destroy(){
    System.out.println("destroy method executed");
}
生命周期阶段
随工厂启动创建 ==》 构造方法 ==》 set方法(注入值) ==》 init(初始化) ==》 构建完成 ==》随工厂关闭销毁(单例bean:singleton)
被使用时创建 ==》 构造方法 ==》 set方法(注入值) ==》 init(初始化) ==》 构建完成 ==》JVM垃圾回收销毁(多例bean:prototype)
流程图


完结撒花!愿每一位程序员少走弯路是我的创作的初心!


 U8W/U8W-Mini使用与常见问题解决
 QT多线程的5种用法,通过使用线程解决UI主界面的耗时操作代码,防止界面卡死。...
 stm32使用HAL库配置串口中断收发数据(保姆级教程)
 分享几个国内免费的ChatGPT镜像网址(亲测有效)
 Allegro16.6差分等长设置及走线总结