您现在的位置是:首页 >技术教程 >Vue + intro.js 实现页面新手引导流程功能网站首页技术教程
Vue + intro.js 实现页面新手引导流程功能
简介Vue + intro.js 实现页面新手引导流程功能
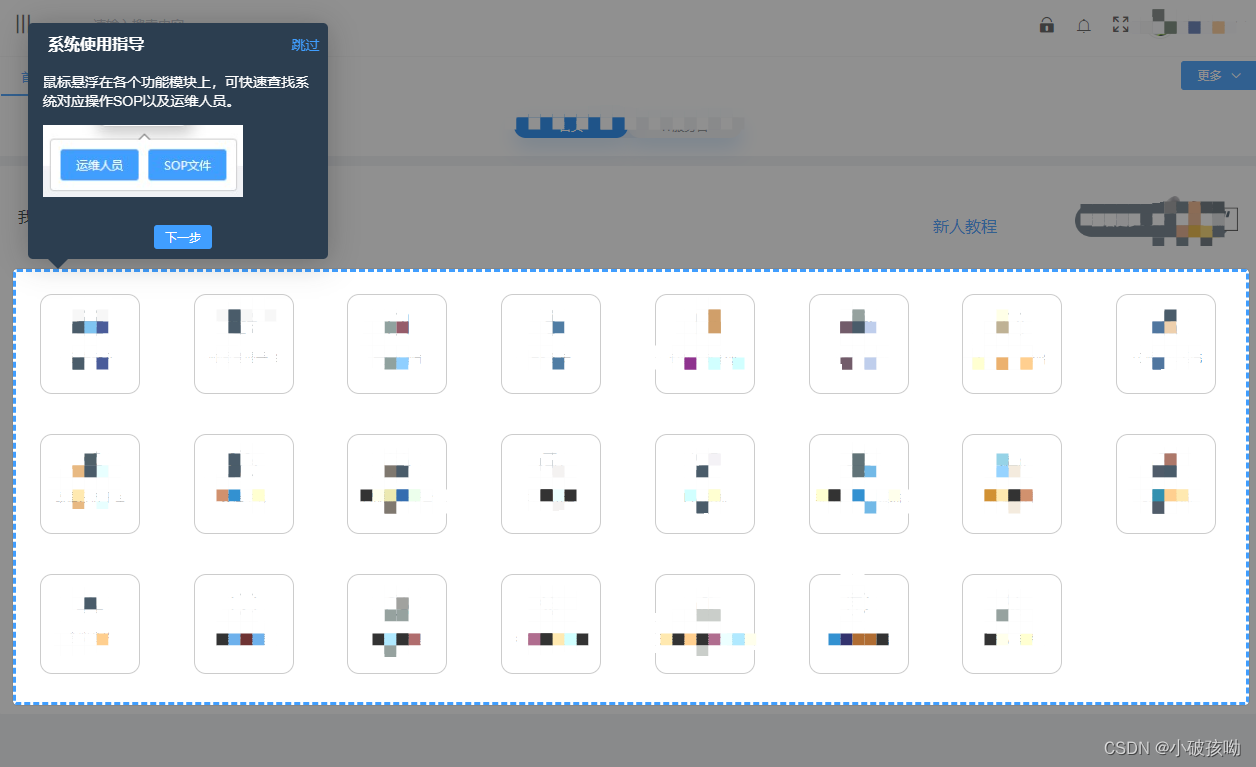
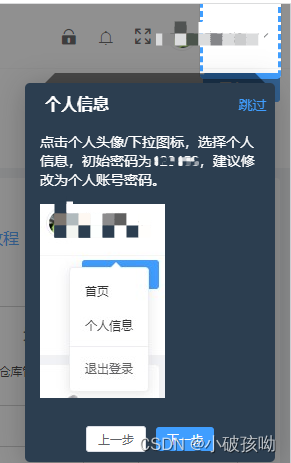
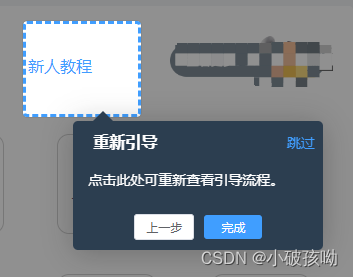
效果图:


1、安装 intro.js
npm install intro.js --save2、在项目的 main.js 中,引入 intro.js 库和相关样式文件,如下:
// 首页引导插件
import intro from 'intro.js' // introjs库
import 'intro.js/introjs.css' // introjs默认css样式
// introjs还提供了多种主题,可以通过以下方式引入
import 'intro.js/themes/introjs-modern.css' // introjs主题

// 把intro.js加入到vue的prototype中,方便使用,就可以直接通过this.$intro()来调用了
Vue.prototype.$intro = intro
3、在 data 中配置初始数据,如下:
data(){
    return{
         introOption: { // 参数对象
            prevLabel: '上一步',
            nextLabel: '下一步',
            skipLabel: '跳过',
            doneLabel: '完成',
            tooltipClass: 'intro-tooltip', /* 引导说明文本框的样式 */
            // highlightClass: 'intro-highlight', /* 说明高亮区域的样式 */
            exitOnEsc: true, /* 是否使用键盘Esc退出 */
            exitOnOverlayClick: false, /* 是否允许点击空白处退出 */
            keyboardNavigation: true, /* 是否允许键盘来操作 */
            showBullets: false, /* 是否使用点显示进度 */
            showProgress: false, /* 是否显示进度条 */
            scrollToElement: true, /* 是否滑动到高亮的区域 */
            overlayOpacity: 0.5, // 遮罩层的透明度 0-1之间
            positionPrecedence: ['bottom', 'top', 'right', 'left'], /* 当位置选择自动的时候,位置排列的优先级 */
            disableInteraction: false, /* 是否禁止与元素的相互关联 */
            hidePrev: true, /* 是否在第一步隐藏上一步 */
            // hideNext: true, /* 是否在最后一步隐藏下一步 */
            steps: [], /* steps步骤,可以写个工具类保存起来 */
          },
          tipsImg1: require('./img/tips1.jpg'), // 新手引导的提示图片
          tipsImg2: require('./img/tips2.jpg') // 新手引导的提示图片
    }
}
4、在 methods 中配置方法,用以设置引导步数,如下:
methods: {
        initGuide() {
            // 绑定标签元素的选择器数组
            this.introOption.steps = [
                { title: '系统使用指导', element: '#step1', intro: `鼠标悬浮在各个功能模块上,可快速查找系统对应操作SOP以及运维人员。<img src="` + this.tipsImg1 + `" alt="" style="width: 200px;margin-top: 15px;"/>`},
                { title: '个人信息', element: '#step2', intro: `点击个人头像/下拉图标,选择个人信息,初始密码为******,建议修改为个人账号密码。<img src="` + this.tipsImg2 + `" alt="" style="width: 125px;margin-top: 15px;"/>`, },
                { title: '重新引导', element: '#step3', intro: '点击此处可重新查看引导流程。', },
            ]
            this.$intro()
                .setOptions(this.introOption)
                // 点击结束按钮后执行的事件
                .oncomplete(() => {
                    console.log('点击结束按钮后执行的事件')
                })
                // 点击跳过按钮后执行的事件
                .onexit(() => {
                    console.log('点击跳过按钮后执行的事件')
                })
                // 确认完毕之后执行的事件
                .onbeforeexit(() => {
                    console.log('确认完毕之后执行的事件')
                })
                .start()
        },
}
5、在 mounted 中调用方法,如下:
mounted() {
    this.$nextTick(() => {
        this.initGuide() // 调用新手引导的方法
    })
}
注意:
(1)上述代码中,initGuide() 方法里配置了指引步骤和开始指引;并在 mounted 生命周期中调用 initGuide() 方法以展示指引内容。需要注意的是,为确保指引信息在原始页面渲染完毕后调用,需要在 $nextTick() 中调用 initGuide() 方法。
(2)正常是可以在 mounted 中调用指引方法,但是如果你的指引块是通过接口渲染的,那么建议在接口请求成功之后调用指引方法,避免数据为请求成功,指引块无法正确选中。
6、重新查看新手指引的方法,如下:
// 重新查看引导
viewIntro(){
   this.initGuide()
},
说明:在标签添加点击事件 viewIntro() ,然后在事件中调用 this.initGuide() 方法即可。
7、页面标签绑定,如下:
<div id="step1">
    <div>这里边是你第一步需要指引所框选的内容</div>
</div>
<div id="step2">
    <div>这里边是你第二步需要指引所框选的内容</div>
</div>
<div id="step3">
    <div>这里边是你第三步需要指引所框选的内容</div>
</div>

<div class="new-tips" @click="viewIntro()">新人教程</div>
注意:标签上的 id 所对应的是 initGuide 方法中 element 的值,每一步都是通过这个 id 进行绑定的。
8、css 样式
<!-- 新手引导提示样式 -->
<style lang="scss">
.introjs-helperLayer{
    box-shadow: rgba(33, 33, 33, 0.8) 0px 0px 1px 0px, rgba(33, 33, 33, 0.5) 0px 0px 0px 5000px!important;
    border: 3px dashed #409eff;
}
.new-tips{
    color: #409eff;
    line-height: 80px;
    cursor: pointer;
}
.introjs-tooltip-title{
    font-size: 16px;
    width: 80%;
    padding-top: 10px;
}
.warper {
  width: 200px;
  height: 100px;
  line-height: 100px;
  text-align: center;
  border: 1px solid saddlebrown;
}
/* 重置引导组件样式(类似element-ui个人使用) */
.intro-tooltip {
  color: #ffff;
  background: #2c3e50;
}
/* 引导提示框的位置 */
.introjs-bottom-left-aligned {
  left: 45% !important;
}
.introjs-right,
.introjs-left {
  top: 30%;
}
.intro-highlight {
  background: rgba(255,255,255,0.5);
}
.introjs-arrow.left {
  border-right-color: #2c3e50;
}
.introjs-arrow.top {
  border-bottom-color: #2c3e50;
}
.introjs-arrow.right {
  border-left-color: #2c3e50;
}
.introjs-arrow.bottom {
  border-top-color: #2c3e50;
}
/* 提示框头部区域 */
.introjs-tooltip-header {
  padding-right: 0 !important;
  padding-top: 0 !important;
}
.introjs-skipbutton {
  color: #409eff !important;
  font-size: 14px !important;
  font-weight: normal !important;
//   padding: 8px 10px !important ;
}
.introjs-tooltipbuttons {
  border: none !important;
}
.introjs-tooltiptext {
  font-size: 14px !important;
  padding: 15px !important;
}
/* 提示框按钮 */
.introjs-tooltipbuttons {
  display: flex;
  align-items: center;
  justify-content: center;
}
.introjs-button {
  width: 50px !important;
  text-align: center;
  padding: 4px !important;
  font-size: 12px !important;
  font-weight: 500 !important;
  border-radius: 3px !important;
  border: none !important;
}
.introjs-button:last-child {
  margin-left: 10px;
}
.introjs-prevbutton {
  color: #606266 !important;
  background: #fff !important;
  border: 1px solid #dcdfe6 !important;
}
.introjs-nextbutton {
  color: #fff !important;
  background-color: #409eff !important;
  border-color: #409eff !important;
}
.introjs-disabled {
  color: #9e9e9e !important;
  border-color: #bdbdbd !important;
  background-color: #f4f4f4 !important;
}
</style>附加:只首次进入的时候显示引导
新手引导一般只有我们第一次进入这个网站的时候才会出现引导内容,后续都不会再显示,我们这里如何实现?
可以通过 localstorge 来存储一个 key,来判断用户是否是第一次进入这个网站,只需要在引导启动时候加个判断就行,代码如下:
mounted () {
    this.$nextTick(() => {
      if (localStorage.getItem('isFirst') === null || localStorage.getItem('isFirst') !== '1') {
        this.$intro().start()
        localStorage.setItem('isFirst', 1)
      }
    })
},
至此完成,测试有效!!!
风语者!平时喜欢研究各种技术,目前在从事后端开发工作,热爱生活、热爱工作。


 U8W/U8W-Mini使用与常见问题解决
 QT多线程的5种用法,通过使用线程解决UI主界面的耗时操作代码,防止界面卡死。...
 stm32使用HAL库配置串口中断收发数据(保姆级教程)
 分享几个国内免费的ChatGPT镜像网址(亲测有效)
 Allegro16.6差分等长设置及走线总结