您现在的位置是:首页 >技术交流 >Spring(IOC,DI,事务)属性网站首页技术交流
Spring(IOC,DI,事务)属性
Spring(IOC,DI,事务)属性
IOC
概念
Inverse Of Controll:控制反转;反转了依赖关系的满足方式,由之前的自己创建依赖对象,变为由工厂推送。(变主动为被动,即反转)解决了具有依赖关系的组件之间的强耦合,使得项目形态更加稳健
什么是IOC:
控制反转,把对象创建和对象之间的调用过程,交给 Spring 进行管理使用 IOC 目的:为了耦合度降低入门案例就是 IOC 实现
IOC 底层原理:xml 解析、工厂模式、反射
项目中强耦合问题
public class UserDAOImpl implements UserDAO{....}
public class UserServiceImpl implements UserService {
    // !!!强耦合了UserDAOImpl!!!,使得UserServiceImpl变得不稳健!!
    private UserDAO userDAO= new UserDAOImpl();
    @Override
    public User queryUser() {
        return userDAO.queryUser();
    }
    ....
}
解决方案
// 不引用任何一个具体的组件(实现类),在需要其他组件的位置预留存取值入口(set/get)
public class UserServiceImpl implements UserService {
    // !!!不再耦合任何DAO实现!!!,消除不稳健因素!!
    private UserDAO userDAO;
    // 为userDAO定义set/get,允许userDAO属性接收spring赋值
    // Getters And Setters
    @Override
    public User queryUser() {
        return userDAO.queryUser();
    }
    ....
}
<!--userDao-->
<bean id="userDao" class="com.qf.hello.spring.dao.impl.UserDaoImpl"/>

<!--userService  ref:引用的其他bean的id-->
<bean id="userService" class="com.qf.hello.spring.service.impl.UserServiceImpl">
    <!-- property:设置属性name:对象的属性名ref:对象的属性值,因为userDao属性的对象类型所以属性ref -->
    <property name="userDao" ref="userDao"/>
</bean>
此时,如果需要更换其他UserDAO实现类,则UserServiceImpl不用任何改动!则此时的UserServiceImpl组件变得更加稳健
IOC 接口
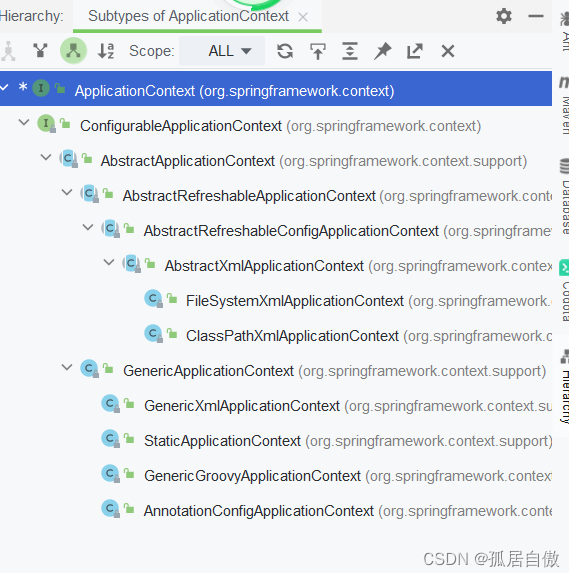
IOC 思想基于 IOC 容器完成,IOC 容器底层就是对象工厂Spring 提供 IOC 容器实现两种方式:(两个接口)
-
BeanFactory:IOC 容器基本实现,是 Spring 内部的使用接口,不提供开发人员进行使用加载配置文件时候不会创建对象,在获取对象(使用)才去创建对象
-
ApplicationContext:BeanFactory 接口的子接口,提供更多更强大的功能,一般由开发人 员进行使用加载配置文件时候就会把在配置文件对象进行创建

IOC操作bean管理-
Bean的管理指的是两个操作:1.Spring创建对象 2.Spring注入属性 -
Bean的常见的管理操作有两种方式:1.基于 xml 配置文件方式实现 2.基于注解方式实现
-
DI
概念
在Spring创建对象的同时,为其属性赋值,称之为依赖注入。
Set注入
创建对象时,Spring工厂会通过Set方法为对象的属性赋值。
代码演示:
定义目标Bean类型:
public class User {
    private Integer id;
    private String name;

    private String sex;
    private Integer age;
    private Date bornDate;
    private String[] hobbys;
    private Set<String> phones;
    private List<String> names;
    private Map<String,String> countries;
    private Properties files;
    //Getters And Setters
}
基本类型 + 字符串类型 + 日期类型:
<!-- 创建一个user对象,然后设置属性 -->
<bean id="user" class="com.qf.hello.spring.entity.User">
    <property name="id" value="1"/>
    <property name="name" value="魏凯"/>
    <property name="sex" value="男"/>
    <property name="age" value="23"/>
    <property name="bornDate" value="2000/03/05"/><!--注意格式"/"-->
</bean>
容器类型:
<!-- 创建一个user对象,然后设置属性 -->
<!-- 创建一个user对象,然后设置属性 -->
<bean id="user" class="com.qf.hello.spring.entity.User">
    <property name="id" value="1"/>
    <property name="name" value="魏凯"/>
    <property name="sex" value="男"/>
    <property name="age" value="23"/>
    <property name="bornDate" value="1999/10/15"/>
    <property name="hobbys">
        <array>
            <value>写代码</value>
            <value>JAVA中级开发工程师</value>
        </array>
    </property>

    <property name="phones">
        <set>
            <value>15112345678</value>
            <value>15114456668</value>
        </set>
    </property>

    <property name="names">
        <list>
            <value>张三</value>
            <value>赵六</value>
            <value>李四</value>
        </list>
    </property>

    <property name="countries">
        <map>
            <entry key="CN" value="中国"/>
            <entry key="USA" value="中国的某个省"/>
        </map>
    </property>

    <property name="files">
        <props>
            <prop key="driver">com.mysql.jdbc.Driver</prop>
            <prop key="url">jdbc:mysql:///</prop>
        </props>
    </property>

</bean>
自建类型:
<!--次要bean,被作为属性-->
<bean id="address" class="com.qf.hello.spring.entity.Address">
    <property name="province" value="湖北"/>
    <property name="city" value="武汉市"/>
</bean>

<!--主要bean,操作的主体-->
<bean id="user" class="com.qf.hello.spring.entity.User">
    <property name="address" ref="address" /><!--address属性引用addr对象-->
</bean>
<!--次要bean,被作为属性-->
<bean id="userDao" class="com.qf.hello.spring.dao.impl.UserDaoImpl" />

<!--主要bean,操作的主体-->
<bean id="userService" class="com.qf.hello.spring.service.impl.UserServiceImpl">
    <property name="userDao" ref="userDao" />
</bean>
构造注入【了解】
创建对象时,Spring工厂会通过构造方法为对象的属性赋值。
定义目标Bean类型:
public class Student {
    private Integer id;
    private String name;
    private String sex;
    private Integer age;

    //Constructors
  	public Student(Integer id , String name , String sex , Integer age){
      	this.id = id;
    	this.name = name;
  	    this.sex = sex;
	    this.age = age;
    }
}
注入:
<!--构造注入-->
<bean id="u3" class="com.qf.zcg.spring.day1.t2.ioc.Student">
    <constructor-arg name="id" value="1234" /> <!-- 除标签名称有变化,其他均和Set注入一致 -->
    <constructor-arg name="name" value="tom" />
    <constructor-arg name="age" value="20" />
    <constructor-arg name="sex" value="male" />
</bean>
自动注入
不用在配置中 指定为哪个属性赋值,及赋什么值
由spring自动根据某个 "原则" ,在工厂中查找一个bean,为属性注入属性值
public class UserServiceImpl implements UserService {
    private UserDAO userDAO;
    //Getters And Setters
    ....
}
<bean id="userDao" class="com.qf.spring.part1.injection.UserDaoImpl" />
<!-- 为UserServiceImpl中的属性基于类型自动注入值 -->
<bean id="userService" class="com.qf.spring.part1.injection.UserServiceImpl" autowire="byType"></bean>
<bean id="userDao" class="com.qf.spring.part1.injection.UserDaoImpl" />
<!-- 为UserServiceImpl中的属性基于类型自动注入值 -->
<bean id="userService" class="com.qf.spring.part1.injection.UserServiceImpl" autowire="byName"></bean>
事务
概念
| 名称 | 描述 |
|---|---|
| default | (默认值)(采用数据库的默认的设置) (建议) |
| read-uncommited | 读未提交 |
| read-commited | 读提交 (Oracle数据库默认的隔离级别) |
| repeatable-read | 可重复读 (MySQL数据库默认的隔离级别) |
| serialized-read | 序列化读 |
隔离级别由低到高为:read-uncommited < read-commited < repeatable-read < serialized-read
特性
安全性:级别越高,多事务并发时,越安全。因为共享的数据越来越少,事务间彼此干扰减少。并发性:级别越高,多事务并发时,并发越差。因为共享的数据越来越少,事务间阻塞情况增多。
并发问题
事务并发时的安全问题
| 问题 | 描述 |
|---|---|
| 脏读 | 一个事务读取到另一个事务还未提交的数据。大于等于 read-commited 可防止 |
| 不可重复读 | 一个事务内多次读取一行数据的相同内容,其结果不一致。大于等于 repeatable-read 可防止 |
| 幻影读 | 一个事务内多次读取一张表中的相同内容,其结果不一致。serialized-read 可防止 |
传播行为
propagation 传播行为
当涉及到事务嵌套(Service调用Service)时,可以设置:
SUPPORTS = 不存在外部事务,则不开启新事务;存在外部事务,则合并到外部事务中。(适合查询)REQUIRED = 不存在外部事务,则开启新事务;存在外部事务,则合并到外部事务中。 (默认值)(适合增删改)
读写性
readonly 读写性
true:只读,可提高查询效率。(适合查询)false:可读可写。 (默认值)(适合增删改)
事务超时
timeout 事务超时时间
当前事务所需操作的数据被其他事务占用,则等待。
100:自定义等待时间100(秒)。-1:由数据库指定等待时间,默认值。(建议)
事务回滚
rollback-for 回滚属性
如果事务中抛出 RuntimeException,则自动回滚如果事务中抛出 CheckException(非运行时异常 Exception),不会自动回滚,而是默认提交事务处理方案 : 将CheckException转换成RuntimException上抛,或 设置 rollback-for="Exception"
编织
将事务管理的Advice 切入需要事务的业务方法中
<aop:config>
	<aop:pointcut expression="execution(* com.qf.spring.service.UserServiceImpl.*(..))" id="pc"/>
    <!-- 组织切面 -->
    <aop:advisor advice-ref="txManager" pointcut-ref="pc"/>
</aop:config>
基于xml的步骤
<?xml version="1.0" encoding="UTF-8"?>
<beans xmlns="http://www.springframework.org/schema/beans"
       xmlns:xsi="http://www.w3.org/2001/XMLSchema-instance"
       xmlns:aop="http://www.springframework.org/schema/aop"
       xmlns:context="http://www.springframework.org/schema/context"
       xmlns:tx="http://www.springframework.org/schema/tx"
       xsi:schemaLocation="http://www.springframework.org/schema/beans
       http://www.springframework.org/schema/beans/spring-beans.xsd
        http://www.springframework.org/schema/aop
        http://www.springframework.org/schema/aop/spring-aop.xsd
        http://www.springframework.org/schema/context
        http://www.springframework.org/schema/context/spring-context.xsd
        http://www.springframework.org/schema/tx
        http://www.springframework.org/schema/tx/spring-tx.xsd">

    <!--1. 配置事务管理器-->
    <bean id="transactionManager" class="org.springframework.jdbc.datasource.DataSourceTransactionManager">
        <property name="dataSource" ref="dataSource"></property>
    </bean>

    <!--2. 配置 事务的通知-->
    <tx:advice id="txadvice" transaction-manager="transactionManager">
        <tx:attributes>
            <tx:method name="transferMoney" propagation="REQUIRED"/>
        </tx:attributes>
    </tx:advice>

    <!--3.织入切面-->
    <aop:config>
        <!--配置切点-->
        <aop:pointcut id="txpoint" expression="execution(* com.qf.service.impl.AccountServiceImpl.*(..))"/>
        <!--配置切面-->
        <aop:advisor advice-ref="txadvice" pointcut-ref="txpoint"></aop:advisor>
    </aop:config>

</beans>


 QT多线程的5种用法,通过使用线程解决UI主界面的耗时操作代码,防止界面卡死。...
 U8W/U8W-Mini使用与常见问题解决
 stm32使用HAL库配置串口中断收发数据(保姆级教程)
 分享几个国内免费的ChatGPT镜像网址(亲测有效)
 Allegro16.6差分等长设置及走线总结