您现在的位置是:首页 >学无止境 >注解实现自动装配网站首页学无止境
注解实现自动装配

要使用注解须知:
1.导入约束 context约束
2.配置注解的支持
官方配置文件
<?xml version="1.0" encoding="UTF-8"?>
<beans xmlns="http://www.springframework.org/schema/beans"
    xmlns:xsi="http://www.w3.org/2001/XMLSchema-instance"
    xmlns:context="http://www.springframework.org/schema/context"
    xsi:schemaLocation="http://www.springframework.org/schema/beans
        https://www.springframework.org/schema/beans/spring-beans.xsd
        http://www.springframework.org/schema/context
        https://www.springframework.org/schema/context/spring-context.xsd">

    <context:annotation-config/>

</beans>
自己的配置文件
<?xml version="1.0" encoding="UTF-8"?>
<beans xmlns="http://www.springframework.org/schema/beans"
       xmlns:xsi="http://www.w3.org/2001/XMLSchema-instance"
       xmlns:context="http://www.springframework.org/schema/context"
       xmlns:aop="http://www.springframework.org/schema/aop"
       xsi:schemaLocation="http://www.springframework.org/schema/beans
        http://www.springframework.org/schema/beans/spring-beans.xsd
          http://www.springframework.org/schema/context
        http://www.springframework.org/schema/context/spring-context.xsd
          http://www.springframework.org/schema/aop
        http://www.springframework.org/schema/aop/spring-aop.xsd">

    <bean class="com.kuang.pojo.Cat"/>
    <bean  class="com.kuang.pojo.Dog"/>
<!--  byName自动装配:会自动在容器上下文中查找,和自己对象set方法后面的值对应的bean id! -->
<!--  byType自动装配:会自动在容器上下文中查找,和自己对象属性类型相同的bean! -->
    <bean id="people" class="com.kuang.pojo.People" autowire="byType">
        <property name="name" value="基基"/>

    </bean>
<context:annotation-config/>
</beans>
@Autowired
注意:Autowire优先按类型,找不到就报错,找到多个则按名字
一般是放在属性上,也可以放在set上
自动装配
@Autowired会先根据类型进行注入,如果容器中有多个满足类型的实例,就会根据ID进行注入。并不是单纯只根据类型注入
这边设置可以为null,就可以不用在bean里面装配,老师是因为调用了shout()方法才导致的报错
package com.kuang.pojo;

import org.springframework.beans.factory.annotation.Autowired;

public class People {
    @Autowired
    private Dog dog;
    @Autowired(required = false)
    private Cat cat;
    private String name;

    public Dog getDog() {
        return dog;
    }

    public void setDog(Dog dog) {
        this.dog = dog;
    }

    public Cat getCat() {
        return cat;
    }

    public void setCat(Cat cat) {
        this.cat = cat;
    }

    public String getName() {
        return name;
    }

    public void setName(String name) {
        this.name = name;
    }

    @Override
    public String toString() {
        return "People{" +
                "dog=" + dog +
                ", cat=" + cat +
                ", name='" + name + ''' +
                '}';
    }
}

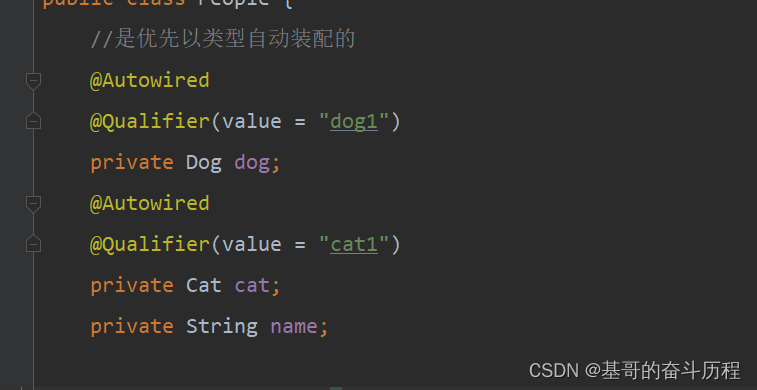
如果@Autowire自动装配的环境比较复杂,自动装配无法通过一个注解【@Autowired】完成的时候,我们可以使用@Qualifier(value="xxx") 与Bean对象的ID相同 才能注入 与去配合@Autowired的使用,指定一个唯一的bean对象注入!
@Resource注解
  @Resource(name = "cat11")
    private Cat cat;
    private String name;
    <bean id="cat1" class="com.kuang.pojo.Cat"/>
    <bean id="cat11" class="com.kuang.pojo.Cat"/>
    <bean id="dog1"  class="com.kuang.pojo.Dog"/>
    <bean id="dog11"  class="com.kuang.pojo.Dog"/>
    <bean id="people" class="com.kuang.pojo.People"/>
小结:
@Resource和@Autowired的区别:
- 都是用来自动装配的,都可以放在属性字段上
- @Autowired通过byType的方式实现,而且必须要求这个对象存在!【常用】
- @Resource默认通过byname的方式实现,如果找不到名字,则通过byType实现!如果两个都找不到的情况下就报错!【常用】
- 执行顺序不同。@Autowired通过byType的方式实现,@Resource通过byName的方式实现!
1.使用注解开发
1.bean
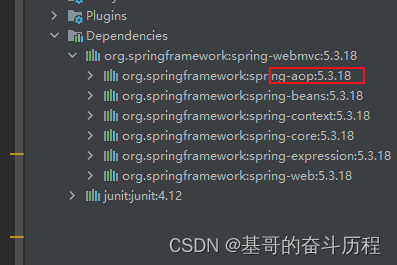
检查AOP的包是否存在

使用注解需要导入context约束,增加注解的支持!
<?xml version="1.0" encoding="UTF-8"?>
<beans xmlns="http://www.springframework.org/schema/beans"
       xmlns:xsi="http://www.w3.org/2001/XMLSchema-instance"
       xmlns:context="http://www.springframework.org/schema/context"
       xmlns:aop="http://www.springframework.org/schema/aop"
       xsi:schemaLocation="http://www.springframework.org/schema/beans
        http://www.springframework.org/schema/beans/spring-beans.xsd
          http://www.springframework.org/schema/context
        http://www.springframework.org/schema/context/spring-context.xsd
          http://www.springframework.org/schema/aop
        http://www.springframework.org/schema/aop/spring-aop.xsd">

<!--它会扫描这个包下的Pojo里的实体类,这个包下的注解就会生效  这里可以空格扫描多个包-->
     <context:component-scan base-package="com.kuang.pojo"/>
    <context:annotation-config/>


</beans>
package com.kuang.pojo;
import org.springframework.stereotype.Component;
//等价于 <bean id="user" class="com.kuang.pojo.User"/>
//@Component 组件
@Component
public class User {
public String name="秦疆";
}
package mytest;

import com.kuang.pojo.User;
import org.springframework.context.ApplicationContext;
import org.springframework.context.support.ClassPathXmlApplicationContext;

public class Mytest {
    public static void main(String[] args) {
        ApplicationContext context = new ClassPathXmlApplicationContext("applicationContext.xml");
        User user = context.getBean("user", User.class);
        System.out.println(user.name);
    }
}

2.属性如何注入
package com.kuang.pojo;

import org.springframework.beans.factory.annotation.Value;
import org.springframework.stereotype.Component;


//@Component 组件等价于    <bean id="user" class="com.kuang.pojo.User"/>
@Component
public class User {
    // 等价于 <property name="name" value="kuangshen"/>

    public String name;

    @Value("kuangshen123")
    public void setName(String name) {
        this.name = name;
    }
}
3.衍生的注解
@Component 有几个衍生注解,我们在web开发中,会按照三层架构分层!
- dao【@Repository】
- service【@Service】
- controller【@Controller】
这四个注解功能都是一样的,都是代表蒋某个类注册刀片Spring中,装配哦Bean。
4.自动装配置
- @Autowired:自动装配类型:1.类型 2.名字
  如果@Autowired不能唯一自动装配上属性,则需要@Qualifier(value="xxx");
- @Nullable 字段标记了这个注解,说明这个字段可以为null;
- @Resource : 自动装配通过名字、类型
当一个类Class A中需要一个B类型的变量时 在声明变量时加上这个注解 spring会在容器中寻找有没有是标注在一个类上的,作用是将被标注的类注册在spring容器中,将类的实例化交给spring管理完成的是bean的注册
5.作用域
package com.kuang.pojo;

import org.springframework.beans.factory.annotation.Value;
import org.springframework.context.annotation.Scope;
import org.springframework.stereotype.Component;


//@Component 组件等价于    <bean id="user" class="com.kuang.pojo.User"/>
@Component
@Scope("singleton")
public class User {
    // 等价于 <property name="name" value="kuangshen"/>

    public String name;

    @Value("kuangshen123")
    public void setName(String name) {
        this.name = name;
    }
}
6.小结
xml与注解:
- xml更加方便,适用于任何场合!维护简单方便
- 注解 不是自己类使用不了,维护相对复杂!
xml 与注解最佳实践:
- xml用来管理bean;
- 注解只负责完成属性的注入
- 我们在使用的过程中,只需要注意一个问题:必须让注解生效,就需要开启注解的支持!
<!--它会扫描这个包下的Pojo里的实体类,这个包下的注解就会生效  这里可以空格扫描多个包-->
     <context:component-scan base-package="com.kuang"/>
    <context:annotation-config/>
使用Java的方式配置Spring
3. @Bean 可以用于通过方法获取数据库连接池Connection这种对象
注意:1. 如果开启包扫描,加载配置类以后就可以通过反射拿到配置类中的对象了,
2. @Bean只写在方法上,返回的是一个对象,但一般不获取已经在容器中的对象

我们现在要完全不使用Spring的xml配置了,全权交给Java来做!
JavaConfig是Spring的一个子项目。在Spring4之后,它成为了一个核心功能。
配置类
package com.kuang.config;

import com.kuang.pojo.User;
import org.springframework.context.annotation.Bean;
import org.springframework.context.annotation.ComponentScan;
import org.springframework.context.annotation.Configuration;

@Configuration//这个也会被Spring容器托管,注册到容器中,因为它本来就是一个Component
//@Configuration代表这是一个配置类,就和我们之前看的beans.xml文件一样
@ComponentScan("com.kuang")//扫描,使注解生效
public class KuangConfig {

    //注册一个bean,就相当于我们之前小写的一个bean标签,
    //这个方法的名字,就相当于bean标签中的id属性
    //这个方法的返回值,就相当于bean标签中的class属性
    @Bean
    public User user(){
        return new User();//就是返回要注入到bean的对象
    }


}
实体类
package com.kuang.pojo;

import org.springframework.beans.factory.annotation.Value;
import org.springframework.stereotype.Component;
//这里这个注解的意思,就是说明这个类被Spring接管了,注册到了容器中
@Component
public class User {

    private String name;

    public String getName() {
        return name;
    }

    @Value("JIJIboy")//属性注入值
    public void setName(String name) {
        this.name = name;
    }

    @Override
    public String toString() {
        return "User{" +
                "name='" + name + ''' +
                '}';
    }
}
测试类
import com.kuang.config.KuangConfig;
import com.kuang.pojo.User;
import com.sun.xml.internal.bind.v2.schemagen.xmlschema.Annotated;
import org.springframework.context.ApplicationContext;
import org.springframework.context.annotation.AnnotationConfigApplicationContext;

public class Mytest {
    public static void main(String[] args) {
        //如果完全使用了配置类方式去做,我们就只能通过AnnotationConfig上下文来获取容器,通过配置类的class对象加载!
        ApplicationContext context = new AnnotationConfigApplicationContext(KuangConfig.class);
        User user = (User) context.getBean("user");
        String name = user.getName();
        System.out.println(name);
    }
}
这种纯java的配置方法,在SpringBoot中随处可见!
这个方法得需要多去理解!


 U8W/U8W-Mini使用与常见问题解决
 分享几个国内免费的ChatGPT镜像网址(亲测有效)
 stm32使用HAL库配置串口中断收发数据(保姆级教程)
 QT多线程的5种用法,通过使用线程解决UI主界面的耗时操作代码,防止界面卡死。...
 SpringSecurity实现前后端分离认证授权