您现在的位置是:首页 >学无止境 >基于Redis的Java分布式锁,接口并发处理,并发方案网站首页学无止境
基于Redis的Java分布式锁,接口并发处理,并发方案
简介基于Redis的Java分布式锁,接口并发处理,并发方案
Redis的分布式锁很多人都知道,比如使用Jedis的setNx、incr等方法都可以实现分布式锁的功能,但是Jedis需要自己管理连接池,就稍微麻烦一点。
今天介绍的是使用RedisTemplate+切面编程+自定义注解+SPEL来实现分布式锁的功能,封装完成后只需要一个注解就可以解决分布式锁的问题,而且开箱即用,对业务代码完全没有侵入。
一、新建一个springBoot项目
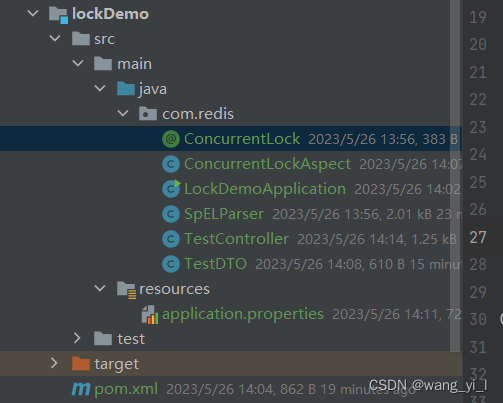
代码结构如下:
二、编写代码
1、创建自定义注解ConcurrentLock
import java.lang.annotation.*;

/**
 * @author wangyi
 * @date 2023-05-11
 * @description 分布式锁,防止重复提交
 */
@Target(ElementType.METHOD)
@Retention(RetentionPolicy.RUNTIME)
@Documented
public @interface ConcurrentLock {

    // 锁定时间,单位秒
    long lockTime() default 5;
    // 锁定key
    String lockKey();
}
2、封装SPEL表达式解析工具类SpELParser
主要用于解析自定义注解ConcurrentLock 的lockKey
import org.aspectj.lang.JoinPoint;
import org.aspectj.lang.ProceedingJoinPoint;
import org.aspectj.lang.reflect.MethodSignature;
import org.springframework.core.LocalVariableTableParameterNameDiscoverer;
import org.springframework.expression.EvaluationContext;
import org.springframework.expression.ExpressionParser;
import org.springframework.expression.spel.standard.SpelExpressionParser;
import org.springframework.expression.spel.support.StandardEvaluationContext;

import java.lang.reflect.Method;

/**
 * @author wangyi
 * @date 2023-05-11
 * @description 解析spel表达式工具类
 */
public class SpELParser {

	private EvaluationContext context;

	private ExpressionParser parser;
	private LocalVariableTableParameterNameDiscoverer discoverer;

	public SpELParser(JoinPoint jp) throws Exception {
		discoverer = new LocalVariableTableParameterNameDiscoverer();
		parser = new SpelExpressionParser();
		getContext(jp);
	}

	public SpELParser(ProceedingJoinPoint pjp) throws Exception {
		discoverer = new LocalVariableTableParameterNameDiscoverer();
		parser = new SpelExpressionParser();
		getContext(pjp);
	}

	public <T> T parseExpression(String expression, Class<T> clazz) {
		return parser.parseExpression(expression).getValue(context, clazz);
	}

	private void getContext(JoinPoint jp) throws Exception {
		Object[] args = jp.getArgs();
		Method method = ((MethodSignature) jp.getSignature()).getMethod();
		getContext(method, args);
	}

	private void getContext(ProceedingJoinPoint pjp) throws Exception {
		Object[] args = pjp.getArgs();
		Method method = ((MethodSignature) pjp.getSignature()).getMethod();
		getContext(method, args);
	}

	private void getContext(Method method, Object[] args) throws Exception {
		context = new StandardEvaluationContext();
		String[] names = discoverer.getParameterNames(method);
		for (int i = 0; i < args.length; i++) {
			context.setVariable(names[i], args[i]);
		}
	}
}
3、创建切面类ConcurrentLockAspect
分布式锁的具体逻辑封装在这个类,使用的是redisTemplate的setIfAbsent方法,如果不存在就设置,也是原子性操作,使用redisTemplate的好处是redisTemplate会自己管理连接池,但是方法没有Jedis多
import org.apache.commons.lang.StringUtils;
import org.aspectj.lang.ProceedingJoinPoint;
import org.aspectj.lang.annotation.Around;
import org.aspectj.lang.annotation.Aspect;
import org.springframework.beans.factory.annotation.Autowired;
import org.springframework.data.redis.core.RedisTemplate;
import org.springframework.stereotype.Component;

import java.util.concurrent.TimeUnit;

/**
 * @author wangyi
 * @date 2023-05-11
 * @description 分布式锁实现
 */
@Aspect
@Component
public class ConcurrentLockAspect {

    private static final String LOCK_VALUE = "1";
    // 测试Key前缀,需要使用''
    public static final String TEST_KEY = "'test_submit_'";

    @Autowired
    private RedisTemplate redisTemplate;

    @Around("@annotation(concurrentLock)")
    public Object around(ProceedingJoinPoint joinPoint, ConcurrentLock concurrentLock) throws Throwable {
        if(StringUtils.isBlank(concurrentLock.lockKey())) {
            return null;
        }
        Object result = null;// 方法执行返回值
        try {
            // 获取到注解中的参数
            SpELParser spELParser = new SpELParser(joinPoint);
            String lockKey = spELParser.parseExpression(concurrentLock.lockKey(), String.class);
            // 如果解析出来key为空,直接执行目标方法
            if(StringUtils.isBlank(lockKey)) {
                result = joinPoint.proceed();
            } else {
                long lockTime = concurrentLock.lockTime();
                // 加锁并设置过期时间
                Boolean lockResult = redisTemplate.opsForValue().setIfAbsent(lockKey, LOCK_VALUE, lockTime, TimeUnit.SECONDS);
                if(lockResult) {
                    // 加锁成功,执行目标方法
                    result = joinPoint.proceed();
                    // 解锁
                    redisTemplate.delete(lockKey);
                } else {
                    // 并发加锁失败,抛出异常
                    throw new RuntimeException("请求处理中,请勿重复提交");
                }
            }

        } catch (Exception e) {
            throw e;
        }
        return result;
    }
}
4、创建测试接口TestController
在需要防止并发的接口加上@ConcurrentLock(lockKey = ConcurrentLockAspect.TEST_KEY + " + #dto.id", lockTime = 10L)注解即可,lockKey是使用的SPEL表达式解析,要遵守SPEL表达式的规则,lockTime为最长锁定时间,
import org.springframework.http.MediaType;
import org.springframework.web.bind.annotation.*;

/**
 * @author wangyi
 * @date 2023-05-11
 * @description 测试接口
 */
@RestController
@RequestMapping(value = "/lockDemo", produces = {MediaType.APPLICATION_JSON_UTF8_VALUE})
public class TestController {

    /**
     * 分布式锁测试,指定Key防止并发
     * @param dto
     * @return
     */
    @RequestMapping(value =  "/testLock1.action",method = RequestMethod.POST)
    @ConcurrentLock(lockKey = ConcurrentLockAspect.TEST_KEY + " + #dto.id", lockTime = 10L)
    public TestDTO testLock1(@RequestBody TestDTO dto) throws Exception {
        Thread.sleep(5000);//模拟业务逻辑处理
        return dto;
    }

    /**
     * 分布式锁测试,判断如果dto.id不为null传指定的key进去,为null就传‘’进去,SPEL表达式可以进行计算,逻辑判断都可以
     * @param dto
     * @return
     */
    @RequestMapping(value =  "/testLock2.action",method = RequestMethod.POST)
    @ConcurrentLock(lockKey = "#dto.id != null ? "+ConcurrentLockAspect.TEST_KEY + " + #dto.id" + ":''", lockTime = 10L)
    public TestDTO testLock2(@RequestBody TestDTO dto) throws Exception {
        Thread.sleep(5000);//模拟业务逻辑处理
        return dto;
    }
}
测试对象TestDTO
/**
 * @author wangyi
 * @date 2023-05-11
 * @description
 */
public class TestDTO {
    private String id;
    private String name;
    private String mobile;

    public String getId() {
        return id;
    }

    public void setId(String id) {
        this.id = id;
    }

    public String getName() {
        return name;
    }

    public void setName(String name) {
        this.name = name;
    }

    public String getMobile() {
        return mobile;
    }

    public void setMobile(String mobile) {
        this.mobile = mobile;
    }
}
引入redis的pom文件
<dependency>
            <groupId>org.springframework.boot</groupId>
            <artifactId>spring-boot-starter-data-redis</artifactId>
        </dependency>
启动类
import org.springframework.boot.SpringApplication;
import org.springframework.boot.autoconfigure.SpringBootApplication;

@SpringBootApplication
public class LockDemoApplication {

    public static void main(String[] args) {
        SpringApplication.run(LockDemoApplication.class, args);
    }

}
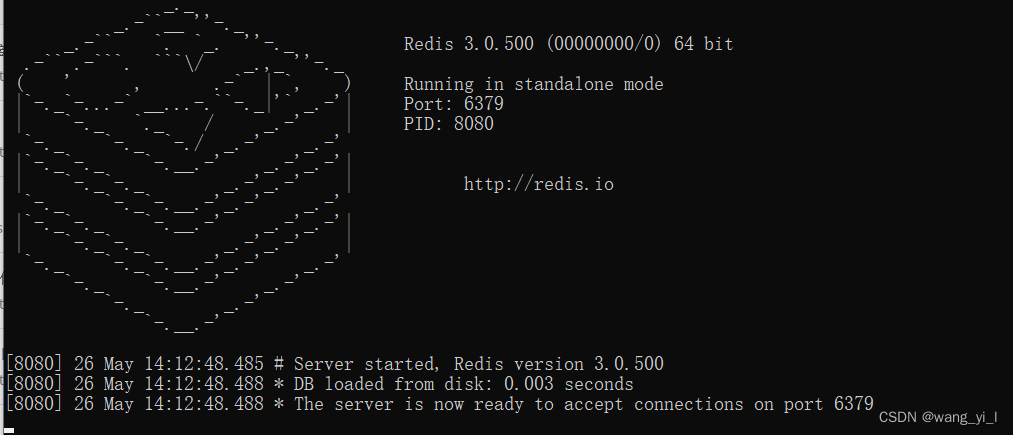
5、启动redis
6、配置application.properties
###Tomcat
server.port=8080
server.servlet.context-path=/

spring.jackson.time-zone= GMT+8
spring.jackson.date-format=yyyy-MM-dd HH:mm:ss

###
spring.http.encoding.force=true
spring.http.encoding.charset=UTF-8
spring.http.encoding.enabled=true
server.tomcat.uri-encoding=UTF-8
server.tomcat.max-http-post-size=-1
spring.servlet.multipart.max-file-size=50MB

# Redis数据库索引(默认为0)
spring.redis.database=0
# Redis服务器地址
spring.redis.host=localhost
# Redis服务器连接端口
spring.redis.port=6379
# Redis服务器连接密码(默认为空)
spring.redis.password=
三、启动项目测试并发效果
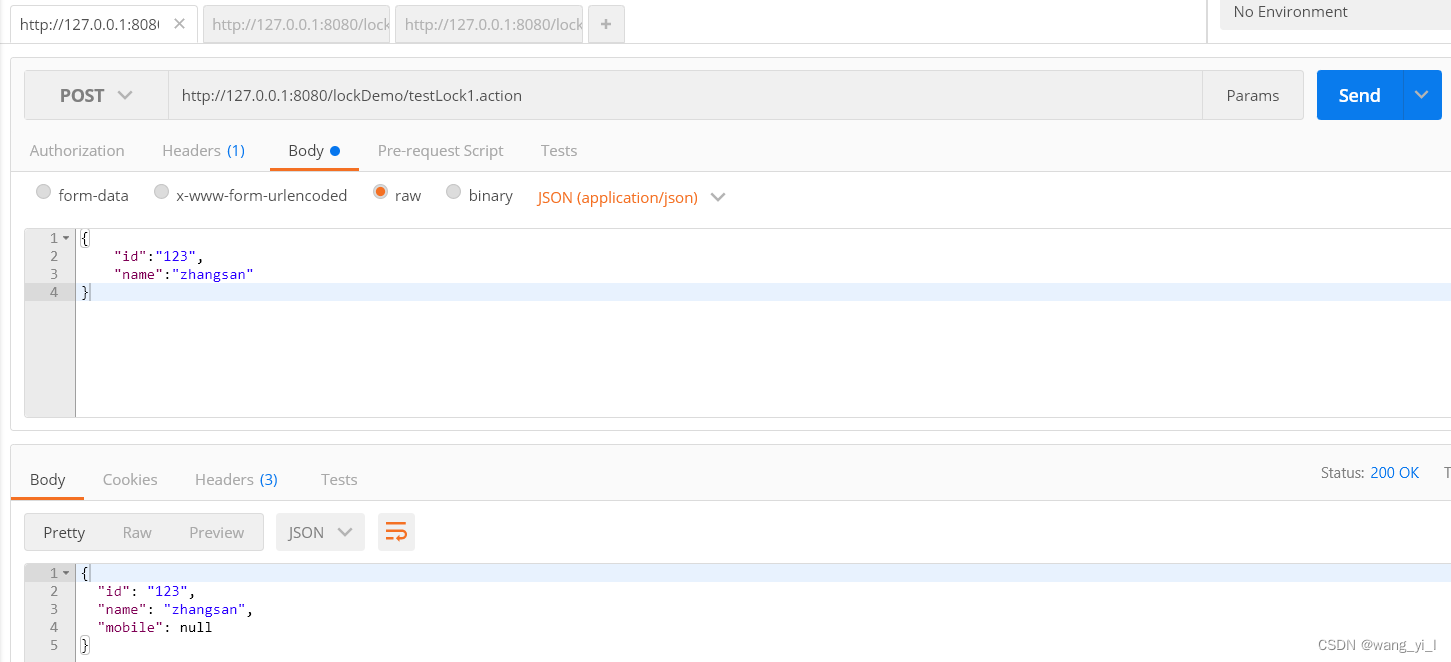
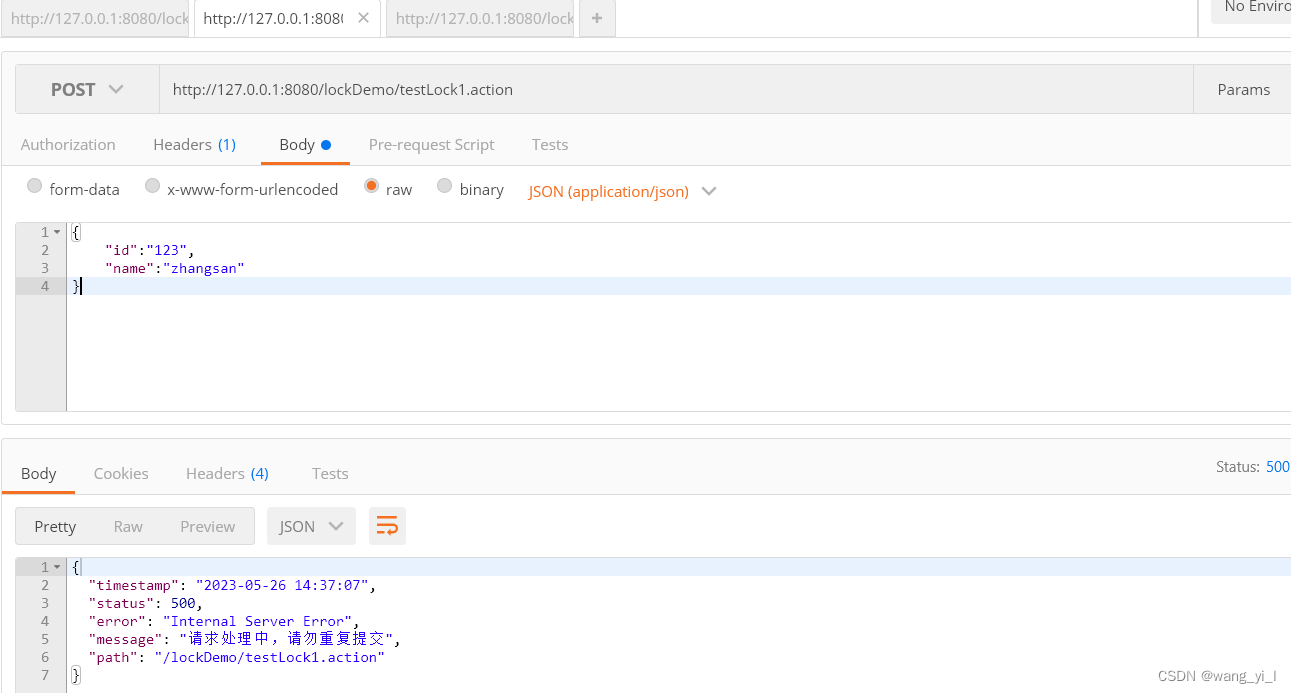
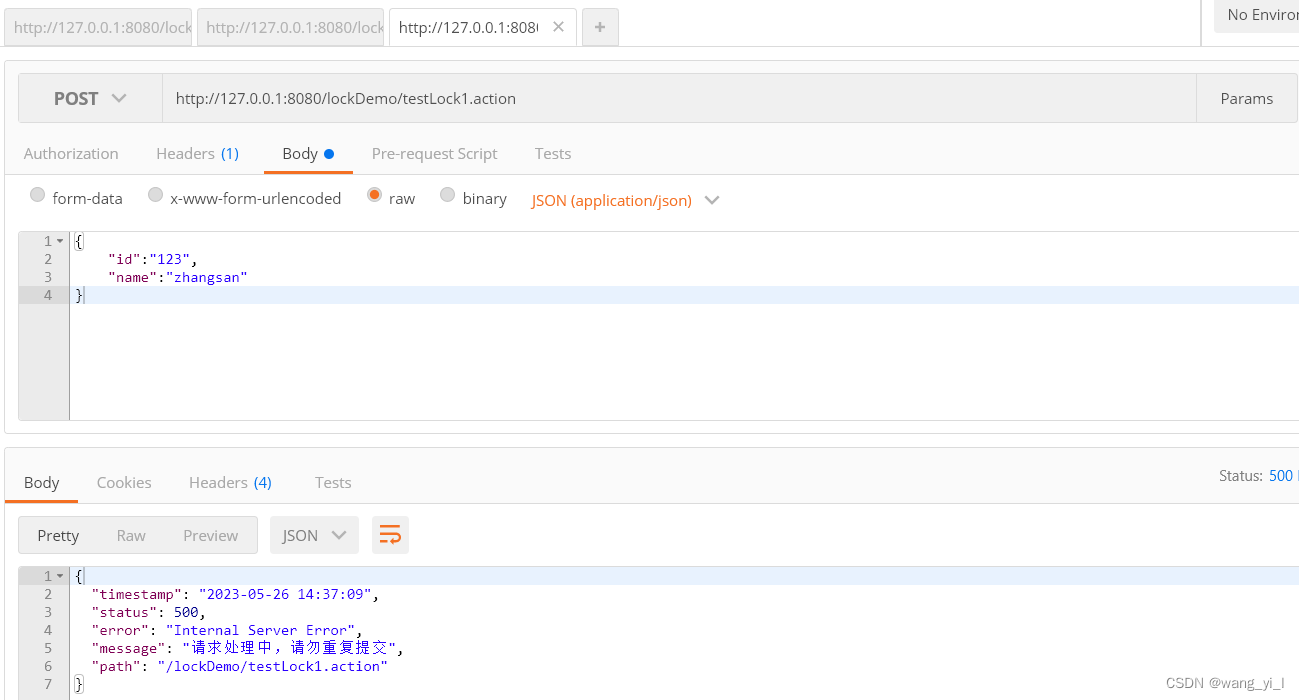
同时请求接口,只有第一个接口访问成功,另外两个接口请求失败,因为接口睡眠了5秒,模拟业务逻辑处理,第一个接口请求进入接口之后,注解上定义的lockKey只要有相同key请求进去,在前一个相同lockKey未执行完方法之前,后面的请求都无法到达,封装好后,只需要一个注解就可以防止并发
风语者!平时喜欢研究各种技术,目前在从事后端开发工作,热爱生活、热爱工作。


 U8W/U8W-Mini使用与常见问题解决
 QT多线程的5种用法,通过使用线程解决UI主界面的耗时操作代码,防止界面卡死。...
 stm32使用HAL库配置串口中断收发数据(保姆级教程)
 分享几个国内免费的ChatGPT镜像网址(亲测有效)
 Allegro16.6差分等长设置及走线总结