您现在的位置是:首页 >技术杂谈 >聊天机器人开发实战--(微信小程序+SpringCloud+Pytorch+Flask)【完整版】网站首页技术杂谈
聊天机器人开发实战--(微信小程序+SpringCloud+Pytorch+Flask)【完整版】
前言
没想到从五一之后,到现在鸽了那么久。没办法,实话实说,确实忙,五一期间就没怎么休息,开局第一周,准备IEEE国际会议报告,第二周大创结题准备材料和最后的代码调试组合。上周还跑到武汉去培训,备研大忌估计是被我踩了个遍。按照以前的传统,在520前,我是会做点啥好玩的东西,用来表白啥的,虽然我是真用不上。不过,不过由于忙,这个传统被打破了,那么竟然如此,也是时候迈向未来了。我们追求的始终是更高层次的精神会晤,精神上的交流而不单单是生理上的刺激,如果是那样,洗脚脚未必不可。那么既然,以前是写一点好玩的,用程序去表达一种浪漫给喜欢的女孩子,但是这个女孩子一直再出现对我来说。并且我们要求的是高级的会晤而非生物上的。通过现实生活当中的”概率论“以及救不了我了,那么为什么不去试试“Artificial probability”。(这一段开个玩笑,引入一下,不要当真,方便我后面吹一下)
(详细后端部分见博文:聊天机器人开发实战–(微信小程序+SpringCloud+Pytorch+Flask)【后端部分】)
Now!!!
聊天伴侣,猫雨雫 震撼上线!
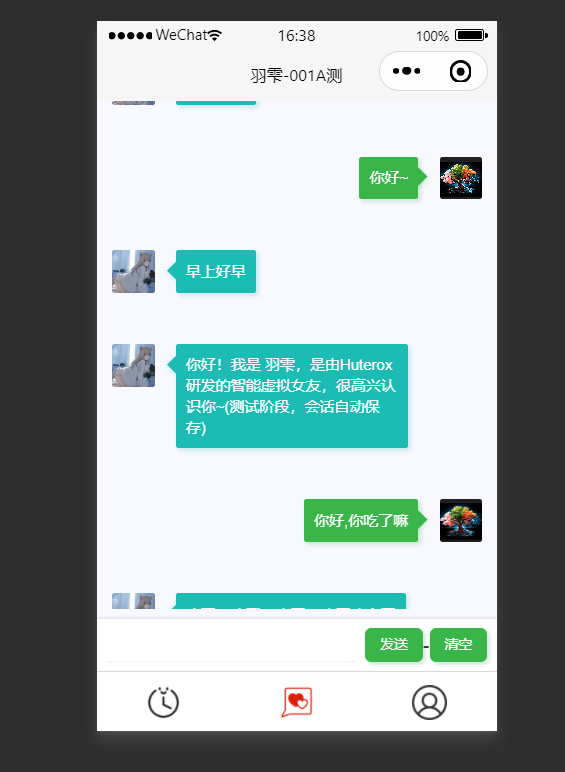
打造您的贴身伴侣,女朋友能24小时陪伴你吗?不,她不能。男朋友可以嘛?不也不行。
但是我们可以,It all you need!!!
架构
好了,牛皮吹完了,我们来点正经的。
首先为什么要做这个项目呢,肯定不是为了那啥,实际上,是为了做期末作孽。没办法,谁那么无聊呢,虽然我有时候这很符合我的风格。那么这里也说明一下,那就是,由于这个是期末作孽,所以,我不可能做得太复杂,做的怎么怎么样。很简单的道理,我们有能力做好,但是做好的前提是她值得。如果值得,那么我会尽我所能。否则,明明100块就可以搞定,我为什么要花200,太亏了呀。
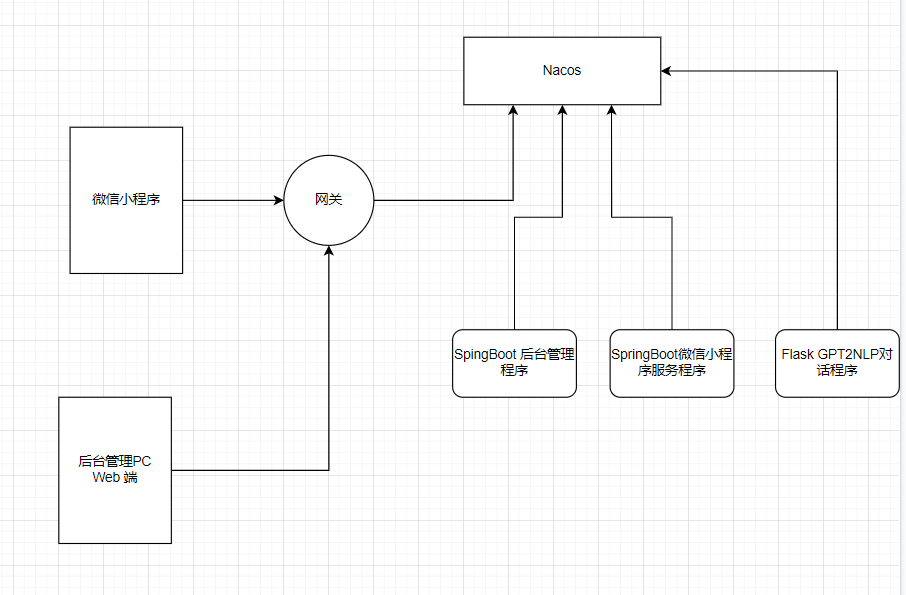
所以的话,整个项目启动,你会见到三个玩意。
小程序端
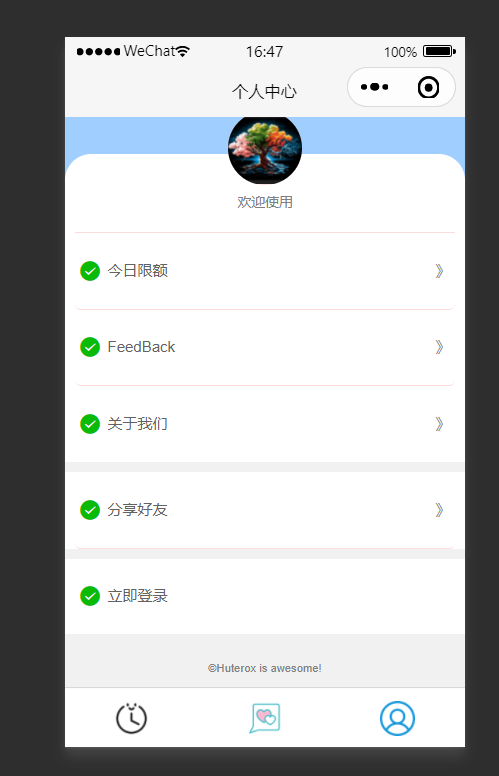
这个是个人中心
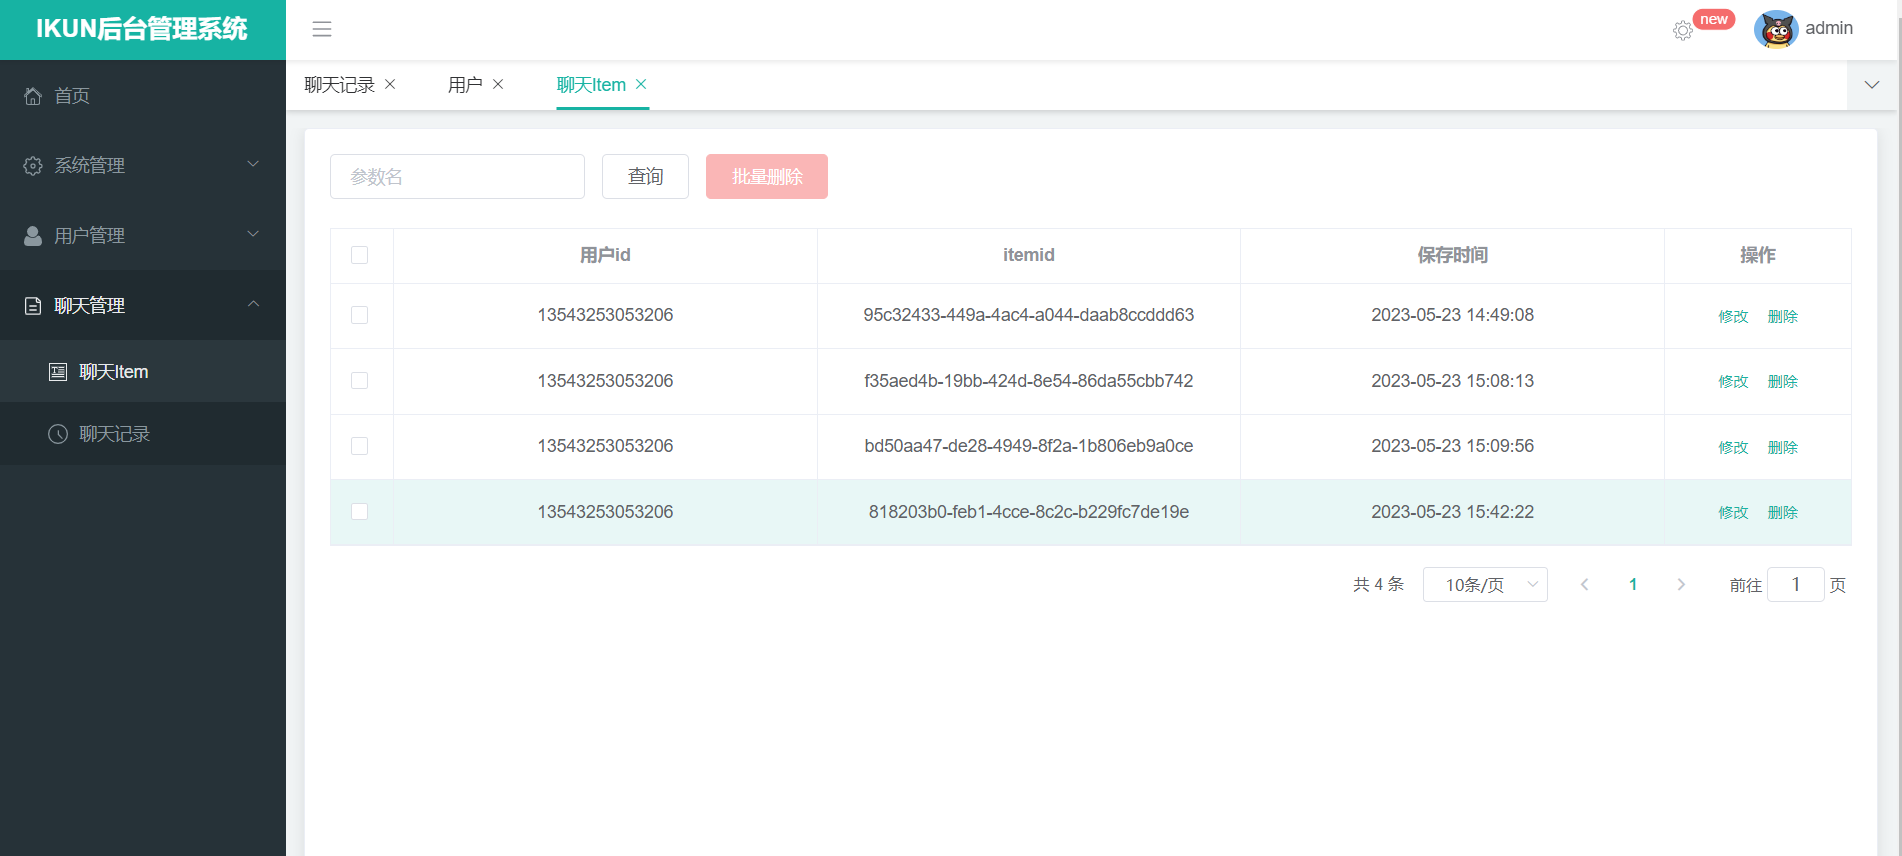
管理端
运维端
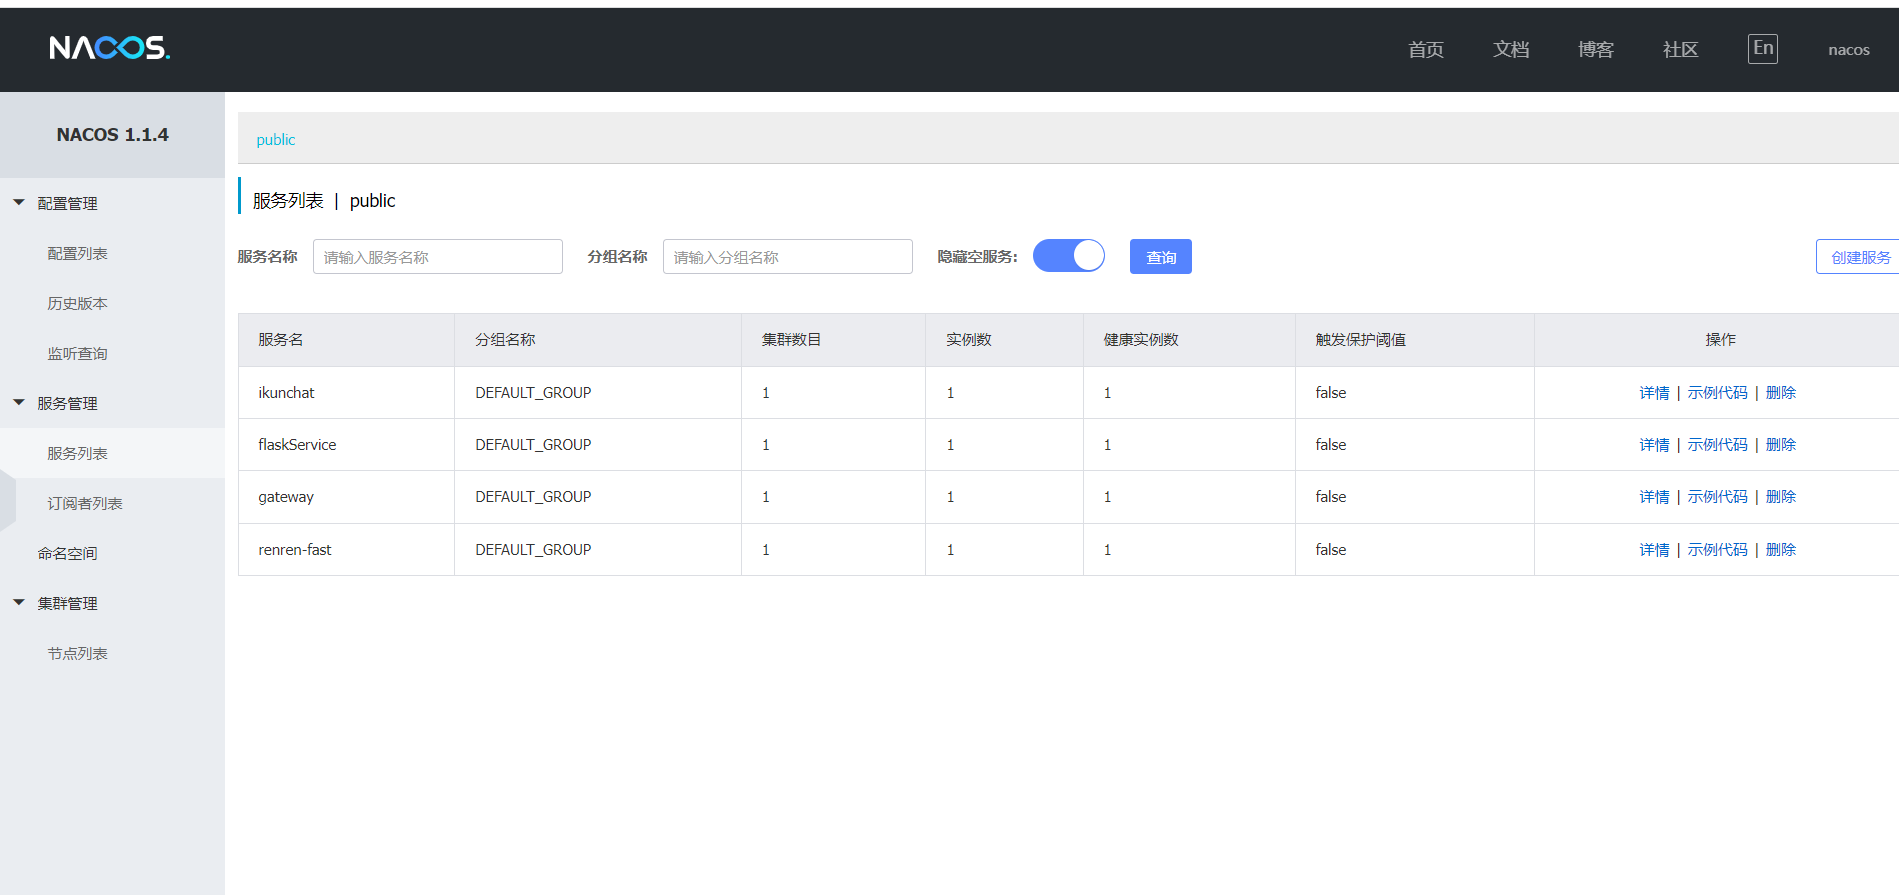
其他的就这样了。
这个结构非常简单。
交互
那么之后的话,就是交互。后端的话,基本上七七八八都说了一下,都是挺简单的东西。
那么这边的话我们,主要把注意力放在,前端这边。还有到后端的交互。
聊天页面
首先,最重要的当然就是聊天了。
聊天页面的话,设计的非常简单,也没有做什么特效,懒得做。
就这个玩意:

这里的话是封装为了一个组件,当然这样也是原来找的一个,然后改了一下。
<scroll-view class="cu-chat" scroll-y="true" enable-back-to-top enable-flex scroll-into-view="{{scrollId}}"
  style="height:{{systemInfo.windowHeight - 50}}px;" bindscrolltoupper="tapTop"
  >
  <view wx:for="{{chatList}}" wx:key="index" wx:for-item="item">
    <!--robot发送的信息-->
    <view class="cu-item" wx:if="{{item.type != 'man'}}" id="msg-{{index}}">
      <view class="cu-avatar radius" style="background-image:url({{item.avatarUrl}});"></view>
      <view class="main">
        <view class="content bg-cyan shadow">
          <text>{{item.content}}</text>
        </view>
      </view>
    </view>
    <!--自己发送的信息-->
    <view class="cu-item self" wx:if="{{item.type == 'man' }}" id="msg-{{index}}">
      <view class="main">
        <view class="content bg-green shadow">
          <text>{{item.content}}</text>
        </view>
      </view>
      <view class="cu-avatar radius" style="background-image:url({{item.avatarUrl}});"></view>
    </view>
  </view>
</scroll-view>
然后是对应的js
// release/components/chatbox
const app = getApp();
// 时间工具类
const timeutil = require('./timeutil');
const cx = Component({
  /**
   * 组件的一些选项
   */
  options: {
    addGlobalClass: true,
    multipleSlots: true
  },
  /**
   * 组件的属性列表
   */
  properties: {
    roomId: {
      type: Number,
      observer: function (newVal, oldVal) {
        if (newVal != undefined && newVal != null) {
          // console.log(newVal)
        }
      }
    }
  },
  /**
   * 组件注册页面生命周期
   */
  pageLifetimes: {
    show: function () {
      // 页面被展示
    },
  },
  lifetimes: {
    attached() {
      var that = this;
      that.initMessageHistory();
      //初始化监听器
      // that.initWatcher();
      wx.getSystemInfo({
        success: function (res) {
          that.setData({
            systemInfo: res
          })
        }
      })
    },
    detached() {
      try {
      } catch (error) {
        console.log('--消息监听器关闭失败--')
      }
    }
  },
  /**
   * 组件的初始数据
   */
  data: {
    openid: app.globalData.openid || wx.getStorageSync('openid'),
    scrollId: '',
    systemInfo: {},
    //消息记录列表
    chatList: [],
    //标记触顶事件
    isTop: false,
    cur_page: 2,
    limit: 10,
    pagesize: 0,
  },
  /**
   * 组件的方法列表
   */
  methods: {
    loadMsgs(wid,itemid){
      var that = this;
      var dataList = that.data.chatList;
      wx.request({
        method: 'POST',
        url: 'http://127.0.0.1:88/api/ikunchat/histories/msgs',
        header: {
          'content-type': 'application/json'
        },
        data: {
          wid: wid,
          itemid: itemid,
          page: that.data.cur_page,
          limit: that.data.limit
        },
        success(res) {
          // 处理响应数据
          let r_code = res.data.code
          if (r_code != 0) {
            wx.switchTab({
              url: "/pages/mycenter/mycenter"
            });
            wx.showToast({
              title: "请先登录",
              icon: 'error',
              duration: 2000
            })
          }else{
            let page = res.data.page
            that.setData({
              cur_page: that.data.cur_page+1
            })
            let list = page.list
            if(list.length==0){
              wx.showToast({
                title: "到顶了吖~",
                icon: 'error',
                duration: 2000
              })
            }
            for(var i=0;i<list.length;i++){
              dataList.unshift(list[i]);
            }
          }
        },
        fail(error) {
          // 处理请求失败情况
          wx.switchTab({
            url: "/pages/mycenter/mycenter"
          });
        },
      })
    },
    // 预览图片
    viewImage(e) {
      // console.log(e)
      let url = e.currentTarget.dataset.url;
      wx.previewImage({
        urls: [url],
      })
    },
    //触顶事件
    tapTop() {
      console.log('--触顶--')
      var that = this;
      that.setData({
        isTop: true
      }, () => {
        let current_itemid = app.globalData.curr_itemid
        let wid = app.globalData.wid
        that.loadMsgs(wid,current_itemid)
      })
    },
    //初始化
    initMessageHistory() {
      let is_new_chat = app.globalData.is_new_chat
      if(is_new_chat){
        //初始化消息历史
        var that = this;
        app.globalData.cht = that
        that.setData({
          chatList: [
            {
              "type":"robot",
              "avatarUrl":"../index/image/yu.png",
              "content":"你好!我是 羽雫,是由Huterox研发的智能虚拟女友,很高兴认识你~(测试阶段,会话自动保存)",
            }
          ]
        })
      }else{
        var that = this;
        let current_itemid = app.globalData.curr_itemid
        let wid = app.globalData.wid
        that.loadMsgs(wid,current_itemid)
      }
    },
  }
})
基本样式的话没有,因为就是堆上去的,而且作为一个组件。
聊天发送流程
那么之后就是这个流程,这个玩意的话,比较简单。
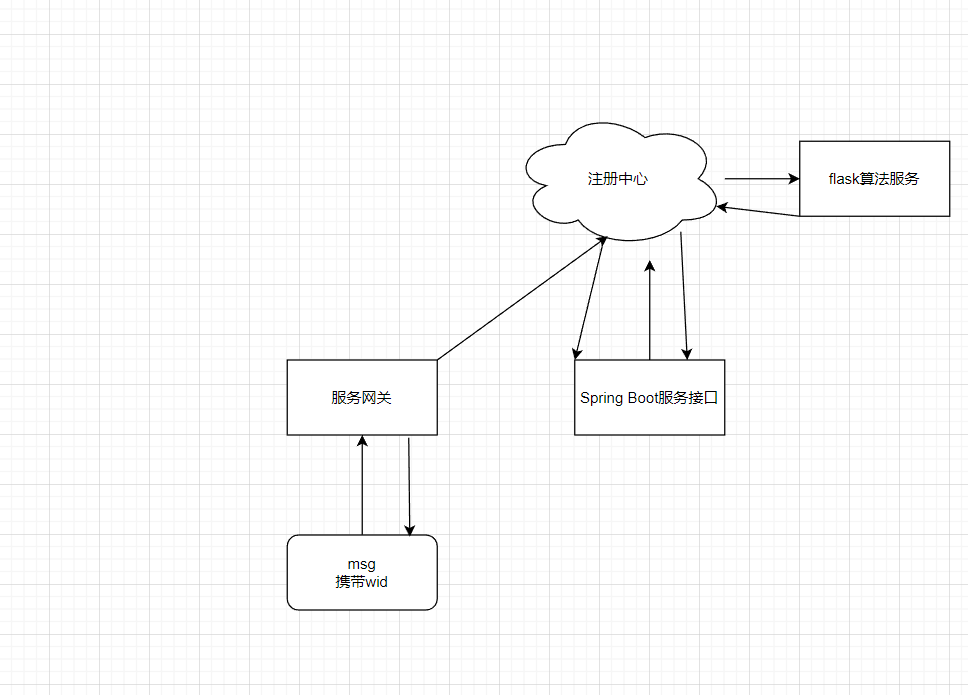
然后这里的话,用户的验证啥的做的都很简单,直接用wid,感兴趣的自己可以去优化,也非常简单,这个就作为base beta 作孽版本搞了。
然后就是基本的后端处理逻辑。这个就没啥好说的了,还是比较简单的。
历史聊天记录
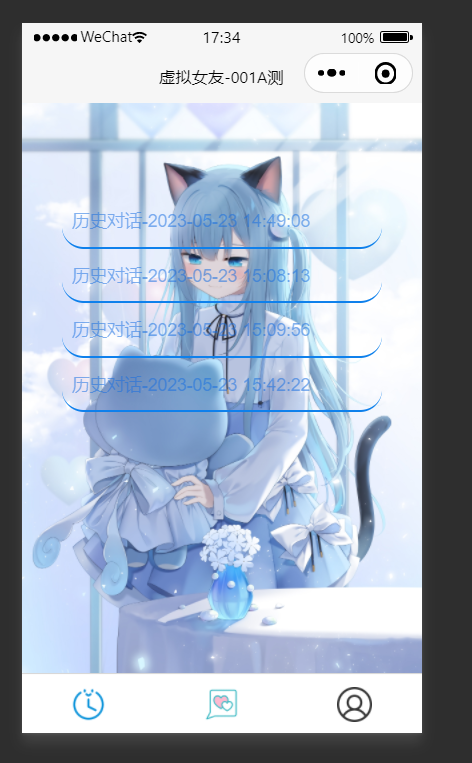
然后就是这个玩意:
,
这个玩意的前端代码比较简单,无非就是请求数据啥的。
然后比较主要的是后端的一个交互。
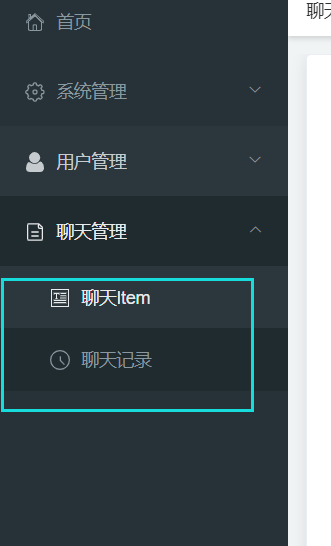
这里的话有两个玩意:
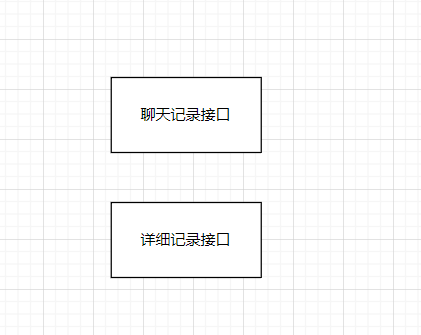
也就是这两个:
个人中心
个人中心的话其实就两个,一个是注册登录,还有一个是查看当前剩余次数。当时是想要做全套,再来个支付接口的。但是后来没时间,砍掉了。
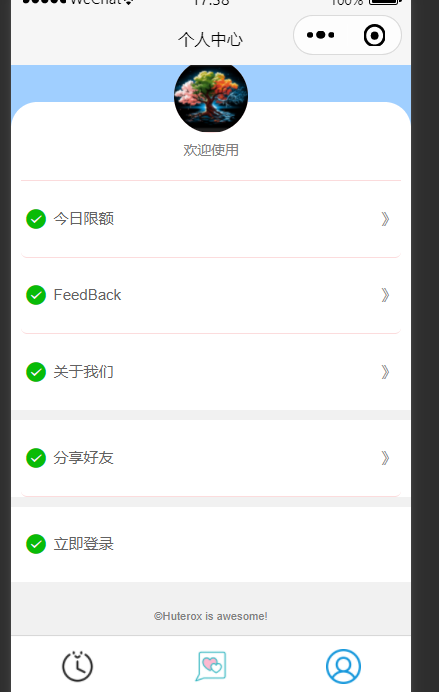
这个是相应的前端代码实现:
<view class="top-bg"></view>
<view class="box">
  <!-- 头像 -->
  <view class="head-box">
    <button open-type="chooseAvatar" class="avatar" bindchooseavatar="chooseAvatar">
      <image class="head-img" src="{{login.avatar}}" mode="widthFix"></image>
    </button>
    <view class="tip">{{login.show?'欢迎使用':'当前未登录,请登录!'}}</view>
  </view>
  <!-- 第一部分列表 -->
  <view>
    <button class="row" style="width: 100%;" bindtap="basicClick">
      <view class="left">
        <icon class="icon-small" type="success" size="16"></icon>
        <text class="text">今日限额</text>
      </view>
      <view class="right">》</view>
    </button>
    <button class="row" style="width: 100%;" bindtap="feedbackClick">
      <view class="left">
        <icon class="icon-small" type="success" size="16"></icon>
        <text class="text">FeedBack</text>
      </view>
      <view class="right">》</view>
    </button>
    <button class="row" style="width: 100%;border-bottom: none;" bindtap="aboutClick">
      <view class="left">
        <icon class="icon-small" type="success" size="16"></icon>
        <text class="text">关于我们</text>
      </view>
      <view class="right">》</view>
    </button>
  </view>
</view>
<!-- 第二部分列表 -->
<view class="end">
  <button open-type="share" class="row" style="width: 100%;">
    <view class="left">
      <icon class="icon-small" type="success" size="16"></icon>
      <text class="text">分享好友</text>
    </view>
    <view class="right">》</view>
  </button>
</view>
<!-- 第三部分列表 -->
<view class="end">
  <button wx:if="{{login.line}}" bindtap="exitClick" class="row" style="width: 100%;border-bottom: none;">
    <view class="left">
      <icon class="icon-small" type="success" size="16"></icon>
      <text class="text">退出登录</text>
    </view>
  </button>
  <button class="row" open-type="chooseAvatar" bindchooseavatar="chooseAvatar" style="width: 100%;border-bottom: none;" wx:else>
    <view class="left">
      <icon class="icon-small" type="success" size="16"></icon>
      <text class="text">立即登录</text>
    </view>
  </button>
</view>
<view class="footer">
  <text>©Huterox is awesome!</text>
</view>
然后是js
const app = getApp();
Page({
  /**
   * 页面的初始数据
   */
  data: {
    login: {
      show: false,
      avatar: 'https://img0.baidu.com/it/u=3204281136,1911957924&fm=253&fmt=auto&app=138&f=JPEG?w=500&h=500',
    },
    count: 10,
    wid: 0,
  },
  // 登录监听
  chooseAvatar(e) {
    console.log(e.detail.avatarUrl)
    var that = this;
    //请求后端服务器完成登录
    this.setData({
      login: {
        show: true,
        avatar: "../index/image/me.png",
      }
    })
    wx.request({
      method: 'POST',
      url: 'http://127.0.0.1:88/api/ikunchat/wcenter/login',
      header: {
        'content-type': 'application/json'
      },
      data: {
        wid: app.globalData.wid
      },
      success(res) {
        // 处理响应数据
        let r_code = res.data.code
        if(r_code==0){
          that.setData({
            login: {
              show: true,
              avatar: "../index/image/me.png",
            }
          })
          app.globalData.islogin = res.data.itemid
        }else{
          wx.showToast({
            title: res.data.msg,
            icon: 'error',
            duration: 2000
          })
        }
      },
      fail(error) {
        // 处理请求失败情况
        wx.showToast({
          title: error,
          icon: 'error',
          duration: 2000
        })
      }
    })
  },
  // 基本信息
  basicClick() {

    console.log(app.globalData.wid)
    var that = this;
    wx.request({
      method: 'POST',
      url: 'http://127.0.0.1:88/api/ikunchat/wcenter/count',
      header: {
        'content-type': 'application/json'
      },
      data: {
        wid: app.globalData.wid
      },
      success(res) {
        // 处理响应数据
        let r_code = res.data.code
        if(r_code==0){
          that.setData({
            count: res.data.msg
          })
          console.log(that.data.count)
          //显示
          wx.showModal({
            title: 'Hello ~',
            content: '剩余次数:' + that.data.count,
            success(res) {
              if (res.confirm) {
                console.log('用户点击了确定按钮')
              } else if (res.cancel) {
                console.log('用户点击了取消按钮')
              }
            }
          })
        }else{
          wx.showToast({
            title: res.data.msg,
            icon: 'error',
            duration: 2000
          })
        }
      },
      fail(error) {
        // 处理请求失败情况
        wx.showToast({
          title: error,
          icon: 'error',
          duration: 2000
        })
      }
    })
    console.log('基本信息监听');
  },
  // 匿名反馈
  feedbackClick() {
    wx.showModal({
      title: 'Huterox',
      content: '有问题随时email:3139541502@qq.com',
      success(res) {
        if (res.confirm) {
          console.log('用户点击了确定按钮')
        } else if (res.cancel) {
          console.log('用户点击了取消按钮')
        }
      }
    })
    console.log('匿名反馈监听');
  },
  // 关于我们
  aboutClick() {
    wx.showModal({
      title: 'Huterox',
      content: '嘿,我是一个练习时长一kun年的代码练习生',
      success(res) {
        if (res.confirm) {
          console.log('用户点击了确定按钮')
        } else if (res.cancel) {
          console.log('用户点击了取消按钮')
        }
      }
    })
    console.log('关于我们监听');
  },
  // 退出监听
  exitClick() {
    let that = this;
    wx.showModal({
      title: '提示',
      content: '确定退出登录吗?',
      success(res) {
        if (res.confirm) {
          that.setData({
            login: {
              show: false,
              avatar: 'https://img0.baidu.com/it/u=3204281136,1911957924&fm=253&fmt=auto&app=138&f=JPEG?w=500&h=500',
            }
          })
        }
      }
    })
  },
  /**
   * 生命周期函数--监听页面加载
   */
  onLoad(options) {
    var app = getApp(); // 获取 App 实例
    if (app.globalData.islogin){
      this.setData({
        login: {
          show: true,
          avatar: "../index/image/me.png",
        }
      })
      //获取剩余次数
      var that = this;
      wx.request({
        method: 'POST',
        url: 'http://127.0.0.1:88/api/ikunchat/wcenter/count',
        header: {
          'content-type': 'application/json'
        },
        data: {
          wid: app.globalData.wid
        },
        success(res) {
          // 处理响应数据
          let r_code = res.data.code
          if(r_code==0){
            that.setData({
              count: res.data.msg
            })
          }else{
            wx.showToast({
              title: res.data.msg,
              icon: 'error',
              duration: 2000
            })
          }
        },
        fail(error) {
          // 处理请求失败情况
          wx.showToast({
            title: error,
            icon: 'error',
            duration: 2000
          })
        }
      })
    }
  },

  /**
   * 生命周期函数--监听页面初次渲染完成
   */
  onReady() {

  },

  /**
   * 生命周期函数--监听页面显示
   */
  onShow() {

  },

  /**
   * 生命周期函数--监听页面隐藏
   */
  onHide() {

  },

  /**
   * 生命周期函数--监听页面卸载
   */
  onUnload() {

  },

  /**
   * 页面相关事件处理函数--监听用户下拉动作
   */
  onPullDownRefresh() {

  },

  /**
   * 页面上拉触底事件的处理函数
   */
  onReachBottom() {

  },

  /**
   * 用户点击右上角分享
   */
  onShareAppMessage() {

  }
})
之后的话是css
page {
  background-color: #f1f1f1;
}

/* 设置背景颜色 */
.top-bg {
  height: 260rpx;
  background-color: #a0cfff;
}

/* 圆角盒子 */
.box {
  background-color: white;
  margin-top: -120rpx;
  border-top-left-radius: 50rpx;
  border-top-right-radius: 50rpx;
  padding: 0 20rpx;
}

/* 头像部分 */
.head-box {
  display: flex;
  flex-direction: column;
  justify-content: center;
  align-items: center;
  border-bottom: 1rpx solid #fbdbdc;
  padding-bottom: 20rpx;
}

.avatar {
  margin-top: -80rpx;
  font-weight: inherit;
  display: flex;
  justify-content: center;
  background-color: rgba(0, 0, 0, 0);
}

.avatar::after {
  border: none;
}

.head-img {
  width: 140rpx;
  height: 140rpx;
  overflow: hidden;
  border-radius: 50%;
  background-color: #fbdbdc;
}

.tip {
  font-size: 26rpx;
  color: gray;
  margin: 15rpx 0;
}

/* 列表部分 */
.row {
  display: flex;
  align-items: center;
  padding: 36rpx 10rpx;
  font-size: 30rpx;
  font-weight: inherit;
  background-color: rgba(0, 0, 0, 0);
  border-bottom: 1rpx solid #fbdbdc;
}

.row::after {
  border: none;
}

.text {
  margin-left: 15rpx;
  color: #636262;
}

.left {
  width: 90%;
  text-align: left;
  display: flex;
  align-items: center;
}

.right {
  width: 10%;
  text-align: right;
  color: rgb(148, 147, 147);
}

.end {
  background-color: white;
  margin-top: 20rpx;
  padding: 0 20rpx;
}

.footer {
  display: flex;
  justify-content: center;
  align-items: center;
  padding: 20rpx 0;
  font-size: 22rpx;
  margin: 30rpx 0;
  color: gray;
}
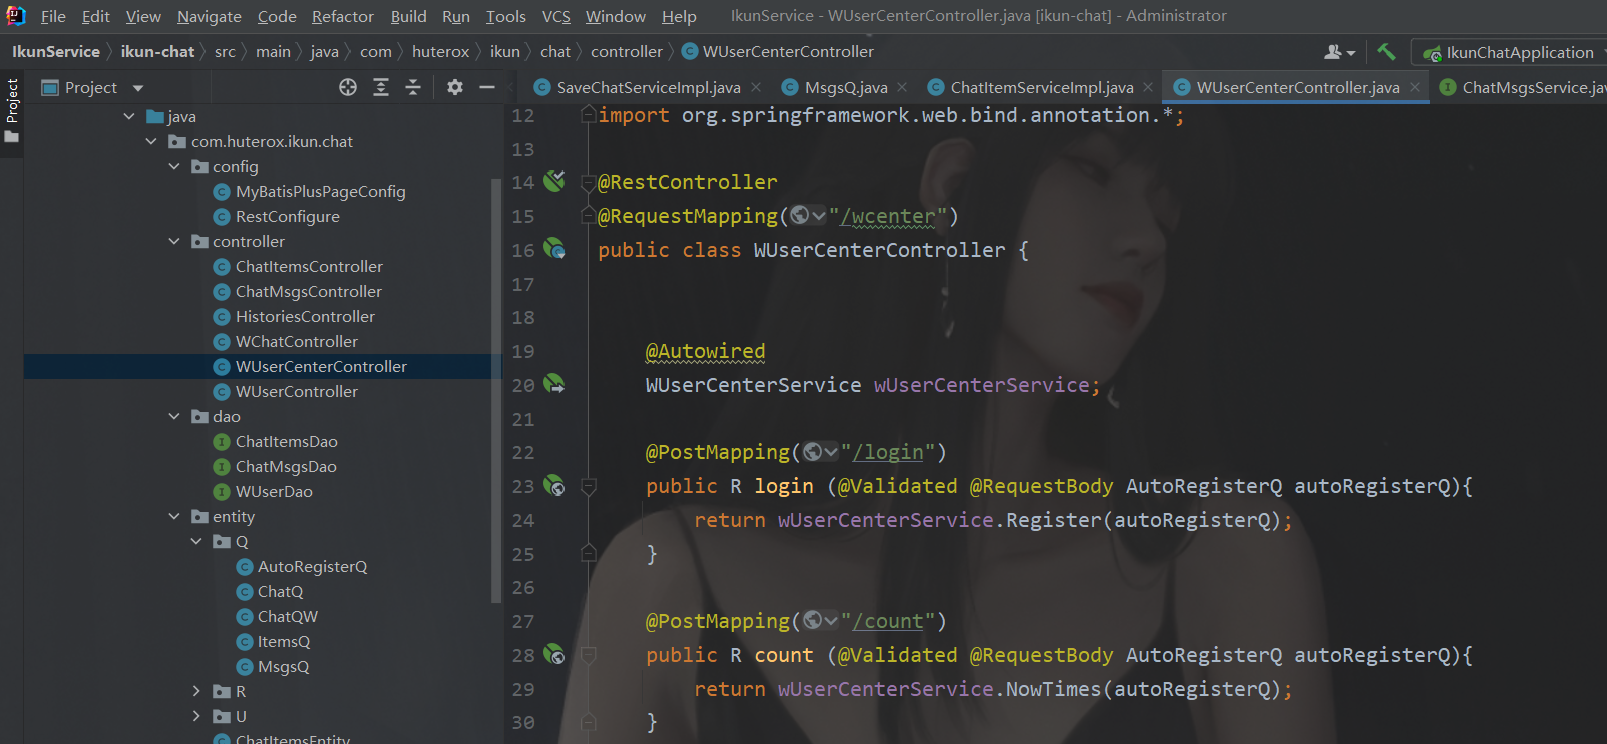
后端对应的就是这两个玩意:
总结
那么以上就是全部内容了,想要源码的话,评论区留言的同时一键三联~ 谢谢


 QT多线程的5种用法,通过使用线程解决UI主界面的耗时操作代码,防止界面卡死。...
 U8W/U8W-Mini使用与常见问题解决
 stm32使用HAL库配置串口中断收发数据(保姆级教程)
 分享几个国内免费的ChatGPT镜像网址(亲测有效)
 Allegro16.6差分等长设置及走线总结