您现在的位置是:首页 >技术杂谈 >前端工程化:发布一个属于自己的规范 npm 包网站首页技术杂谈
前端工程化:发布一个属于自己的规范 npm 包
初始化项目

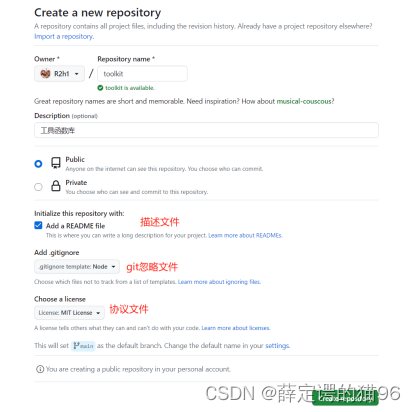
首先在github创建一个仓库,协议选择MIT,gitignore选择Node,添加README.md描述文件。使用git clone将项目克隆到本地。cd 进入目录,使用vscode打开(终端输入code . 命令即可)。
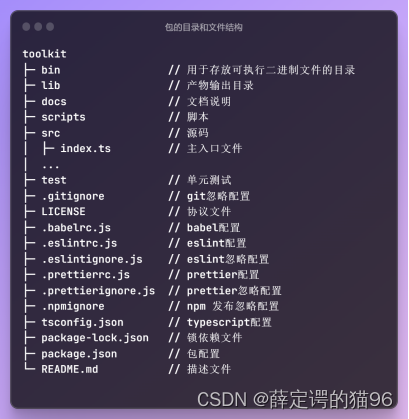
然后创建一个合理的目录结构:

配置 typescript
{
  "compilerOptions": {
    "target":  "ES5",
    "outDir": "lib",
    "lib": [
      "DOM",
      "ES2018"
    ],
    "declaration": true,
    "checkJs": false,
    "noEmitOnError": true,
    "emitDeclarationOnly": true,
    "allowJs": true,
    "experimentalDecorators": true,
    "skipLibCheck": true,
    "esModuleInterop": true,
    "importHelpers": true,
    "allowSyntheticDefaultImports": true,
    "strict": true,
    "forceConsistentCasingInFileNames": true,
    "noFallthroughCasesInSwitch": true,
    "module": "commonjs",
    "moduleResolution": "node",
    "resolveJsonModule": true,
    "isolatedModules": true,
    "pretty": true,
    "jsx": "react-jsx",
    "newLine": "lf",
    "typeRoots": [
      "./src/@types",
      "./node_modules/@types"
    ]
  },
  "include": [
    "src",
  ],
  "exclude": [
    "node_modules"
  ]
}
统一代码风格
首先,配置eslint,使用遵循Airbnb推出的JavaScript风格指南的eslint-config-airbnb,eslint-config-airbnb-typescript。

其次,配置prettier,安装依赖prettier,.prettierrc.js的推荐配置如下:
module.exports = {
    // 一行最多 80 字符
    printWidth: 80,
    // 使用 2 个空格缩进
    tabWidth: 2,
    // 不使用缩进符,而使用空格
    useTabs: false,
    // 行尾需要有分号
    semi: true,
    // 使用单引号
    singleQuote: true,
    // 结尾处不加逗号
    trailingComma: "none",
    // 对象的 key 仅在必要时用引号
    quoteProps: 'as-needed',
    // jsx 不使用单引号,而使用双引号
    jsxSingleQuote: false,
    // 大括号内的首尾需要空格
    bracketSpacing: true,
    // jsx 标签的反尖括号需要换行
    jsxBracketSameLine: false,
    // 箭头函数,只有一个参数的时候,也需要括号
    arrowParens: 'always',
    // 每个文件格式化的范围是文件的全部内容
    rangeStart: 0,
    rangeEnd: Infinity,
    // 不需要写文件开头的 @prettier
    requirePragma: false,
    // 不需要自动在文件开头插入 @prettier
    insertPragma: false,
    // 使用默认的折行标准
    proseWrap: 'preserve',
    // 根据显示样式决定 html 要不要折行
    htmlWhitespaceSensitivity: 'css',
    // vue 文件中的 script 和 style 内不用缩进
    vueIndentScriptAndStyle: false,
    // 换行符使用 lf
    endOfLine: 'lf',
};
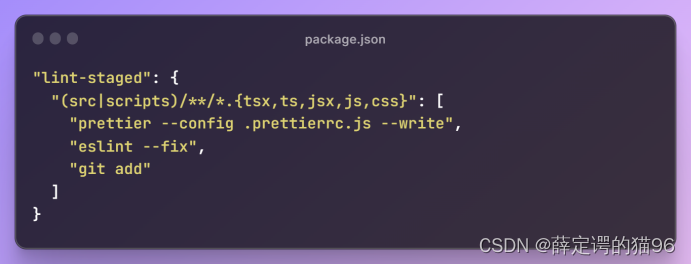
最后,增加 git 提交校验,安装依赖husky和lint-staged,其中,husky用于git 的hook,lint-staged用于针对暂存的 git 文件运行 linters。
在package.json中配置安装 husky 的命令,以及lint-staged检查:
 执行npm run prepare 安装 husky,并在生成的.husky/pre-commit文件(如果没有生成,手动创建一个即可)中添加 npx lint-staged 命令:
All ready!执行git commit 提交代码就会触发 prettier和eslint自动修复。
配置babel
module.exports = {
  env: {
    test: {
      presets: [
        '@babel/preset-env'
      ]
    },
    build: {
      presets: [
        [
          '@babel/preset-env',
          {
            // rollupjs 会处理模块,所以设置成 false
            modules: false,
            loose: true
          }
        ]
      ]
    }
  }
}
配置rollup
如果开发的是工具包,rollup更适合作为打包工具,如果是组件,比如vue组件,则@vue/cli 的 lib 模式更适合。根据开发环境区分不同的配置并在package.json的script中添加脚本命令,输出不同规范的产物:umd、umd.min、cjs、esm。
通用配置rollup.config.base.js
import { nodeResolve } from '@rollup/plugin-node-resolve'; // 解析 node_modules 中的模块
import commonjs from '@rollup/plugin-commonjs'; // cjs => esm
import alias from '@rollup/plugin-alias'; // alias 和 resolve 功能
import replace from '@rollup/plugin-replace';
import eslint from '@rollup/plugin-eslint';
import { babel } from '@rollup/plugin-babel';
import { terser } from 'rollup-plugin-terser';
import clear from 'rollup-plugin-clear';
import typescript from '@rollup/plugin-typescript';
import json from '@rollup/plugin-json'; // 支持在源码中直接引入json文件,不影响下面的
import { name as pkgName, version, author } from '../package.json';

const banner = '/*!
'
  + ` * ${pkgName} v${version}
`
  + ` * (c) 2023-${new Date().getFullYear()} ${author}
`
  + ' * Released under the MIT License.
'
  + ' */';

export default {
  input: 'src/index.ts',
  // 同时打包多种规范的产物
  output: [
    {
      file: `lib/${pkgName}.umd.js`,
      format: 'umd',
      name: pkgName,
      banner
    },
    {
      file: `lib/${pkgName}.umd.min.js`,
      format: 'umd',
      name: pkgName,
      banner,
      plugins: [terser()]
    },
    {
      file: `lib/${pkgName}.cjs.js`,
      format: 'cjs',
      name: pkgName,
      banner
    },
    {
      file: `lib/${pkgName}.esm.js`,
      format: 'es',
      banner
    }
  ],
  // 注意 plugin 的使用顺序
  plugins: [
    json(),
    clear({
      targets: ['lib']
    }),
    alias(),
    replace({
      'process.env.NODE_ENV': JSON.stringify(
        process.env.NODE_ENV || 'development'
      ),
      preventAssignment: true
    }),
    nodeResolve(),
    commonjs({
      include: 'node_modules/**'
    }),
    typescript(),
    eslint({
      throwOnError: true, // 抛出异常并阻止打包
      include: ['src/**'],
      exclude: ['node_modules/**']
    }),
    babel({ babelHelpers: 'bundled' })
  ]
};
开发环境配置rollup.config.dev.js
import serve from 'rollup-plugin-serve';
import livereload from 'rollup-plugin-livereload';
import baseConfig from './rollup.config.base';

export default {
  ...baseConfig,
  plugins: [
    ...baseConfig.plugins,
    livereload({
      watch: 'examples/browser'
    }),
    serve({
      port: 8080,
      contentBase: ['lib', 'examples/browser'],
      openPage: 'index.html'
    })
  ]
};
正式环境配置rollup.config.prod.js
import filesize from 'rollup-plugin-filesize';
import baseConfig from './rollup.config.base';

export default {
  ...baseConfig,
  plugins: [...baseConfig.plugins, filesize()]
};
添加开发与打包相关的脚本命令到package.json,借助npm-run-all 依赖,npm run build按顺序执行z,buildjs,buildts。
添加支持tree shaking 的配置到package.json中。

发布到npm
编写发布到npm时需要忽略的文件与目录的配置,即.npmignore。
# OSX
.DS_Store

# IDE
.idea

# npm
node_modules

# jest
coverage

# dev
bin
src
scripts
test
.babelrc.js
.eslintrc.js
.eslintignore
.prettierrc.js
.prettierignore
tsconfig.json

#doc
docs
examples

#other
.github
.husky
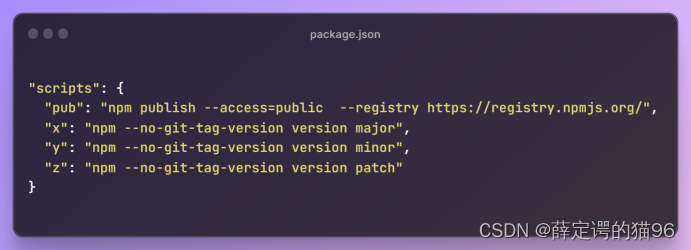
添加发布相关的脚本命令到package.json中,其中 npm --no-git-tag-version version 分别修改版本号中的major,minor,patch。
 然后登录npm官网(npm login --registry https://registry.npmjs.org/),登录成功后,直接发布即可(npm publish --registry https://registry.npmjs.org/)。
发布过程中常见的报错:
1. 400:版本问题,修改package.json的version即可;
2. 401:npm源设置成第三方源(淘宝源)的时候发生的,比如我们经常会将镜像源设置成淘宝源。因此在发布时,应该使用默认的npm源登录,即npm login --registry https://registry.npmjs.org/;
3. 403:包名重复,修改包名重新发布。


 U8W/U8W-Mini使用与常见问题解决
 QT多线程的5种用法,通过使用线程解决UI主界面的耗时操作代码,防止界面卡死。...
 stm32使用HAL库配置串口中断收发数据(保姆级教程)
 分享几个国内免费的ChatGPT镜像网址(亲测有效)
 Allegro16.6差分等长设置及走线总结