您现在的位置是:首页 >技术教程 >SpringBoot原理——起步依赖与自动装配网站首页技术教程
SpringBoot原理——起步依赖与自动装配
SpringBoot原理
如果基于Spring开发依赖和配置会比较繁琐,我们一般基于SpringBoot开发,简化了Spring配置。
Springboot好用是因为底层提供了两个非常重要的功能:起步依赖与自动配置
- **“起步依赖”能大大减少pom文件中依赖的配置,解决Spring框架当中依赖配置繁琐的问题
- **“自动配置”**大大简化框架在使用时bean的声明以及bean的配置
其中“自动配置”是最为核心的一块功能,问SpringBoot原理就是问Springboot中自动配置的原理,而且这一块是面试高频考点
一、起步依赖
如果我们使用Spring进行开发,我们需要引入下图中依赖
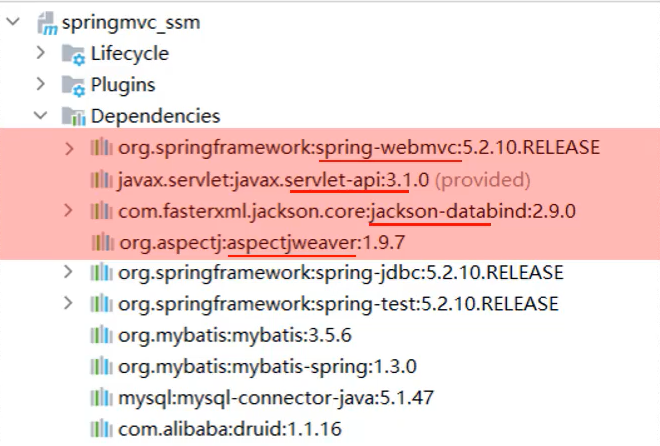
但是如果我们使用了Springboot进行开发,我们只需要引入一个依赖即可

原理其实很简单:Maven的依赖传递
spring-boot-starter-web中集成了所有Web开发常见的依赖,我们只需要引入这一个依赖,其他依赖会自动的通过Maven依赖传递传递进来。
Maven依赖传递就是:假设a依赖了b,b依赖了c,c依赖了d,那我们引入a之后,b,c,d三个依赖也会自动引用进来
二、自动配置
2.1 概述
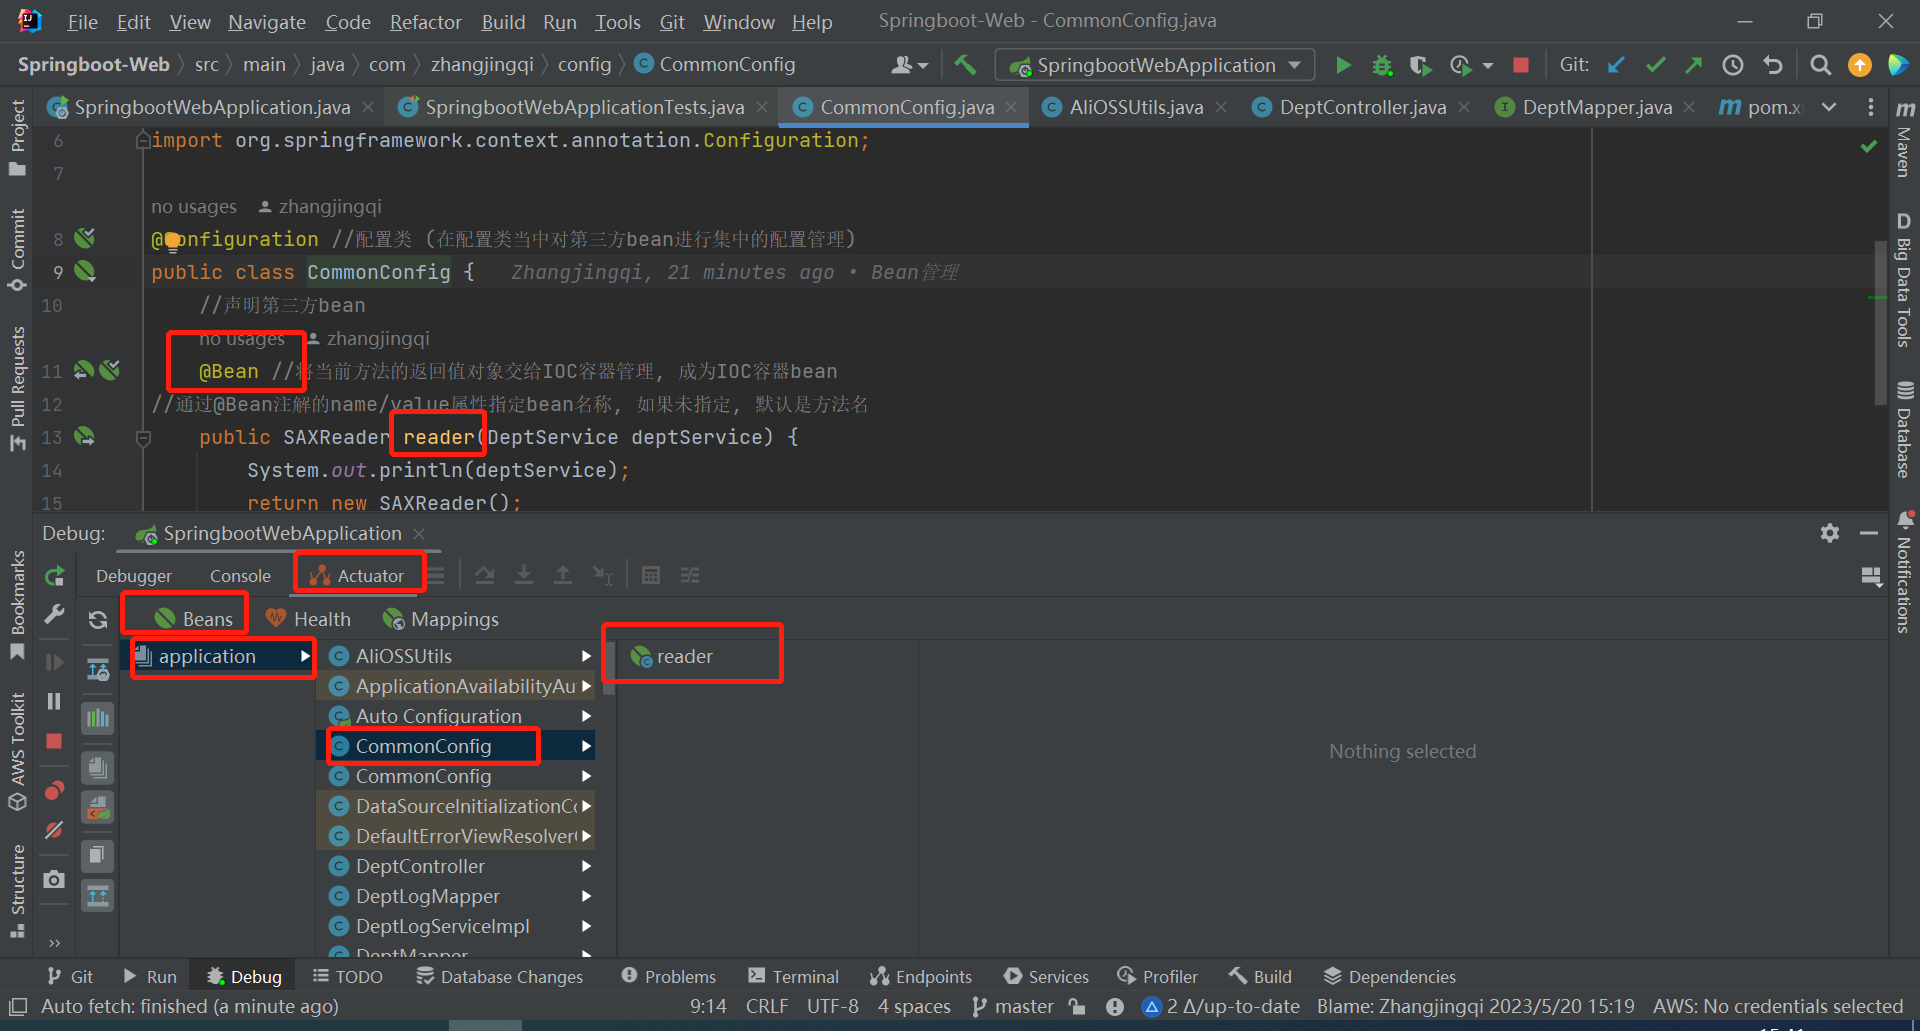
- Springboot自动配置就是当Spring容器启动后,一些配置类、bean对象就会自动存入到IOC容器中,不需要我们手动去声明,从而简化了开发,省去了繁琐的配置操作
将IDEA启动之后,我们也可观察有多少bean
2.2 工具类准备工作
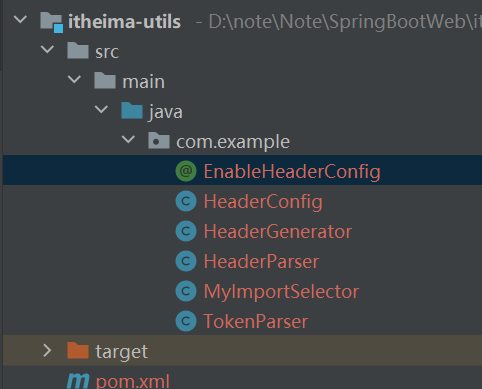
文件目录
### 2.2.1 EnableHeaderConfig
@Retention(RetentionPolicy.RUNTIME)
@Target(ElementType.TYPE)
@Import(MyImportSelector.class)
public @interface EnableHeaderConfig {
}
2.2.2 HeaderConfig
@Configuration
public class HeaderConfig {

    @Bean
    public HeaderParser headerParser(){
        return new HeaderParser();
    }

    @Bean
    public HeaderGenerator headerGenerator(){
        return new HeaderGenerator();
    }
}
2.2.3 HeaderGenerator
public class HeaderGenerator {

    public void generate(){
        System.out.println("HeaderGenerator ... generate ...");
    }

}
2.2.4 HeaderParser
public class HeaderParser {

    public void parse(){
        System.out.println("HeaderParser ... parse ...");
    }

}
2.2.5 MyImportSelector
public class MyImportSelector implements ImportSelector {
    public String[] selectImports(AnnotationMetadata importingClassMetadata) {
        return new String[]{"com.example.HeaderConfig"};
    }
}
2.2.6 TokenParser
@Component
public class TokenParser {

    public void parse(){
        System.out.println("TokenParser ... parse ...");
    }

}
2.2.7 pom.xml文件
<?xml version="1.0" encoding="UTF-8"?>
<project xmlns="http://maven.apache.org/POM/4.0.0" xmlns:xsi="http://www.w3.org/2001/XMLSchema-instance"
         xsi:schemaLocation="http://maven.apache.org/POM/4.0.0 https://maven.apache.org/xsd/maven-4.0.0.xsd">
    <modelVersion>4.0.0</modelVersion>
    <groupId>com.example</groupId>
    <artifactId>itheima-utils</artifactId>
    <version>0.0.1-SNAPSHOT</version>

    <properties>
        <maven.compiler.source>11</maven.compiler.source>
        <maven.compiler.target>11</maven.compiler.target>
    </properties>

    <dependencies>
        <dependency>
            <groupId>org.springframework.boot</groupId>
            <artifactId>spring-boot-starter</artifactId>
            <version>2.7.5</version>
        </dependency>
    </dependencies>

</project>
2.3 自动配置原理
研究自动装配原理就是研究在我们引入依赖之后,是如何将依赖jar帮当中所定义的配置类及bean加载到Spring的IOC容器当中
2.3.1 引入工具类
首先将我们自己的工具包资源引用到项目中,资料搜索heima即可
<dependency>
    <groupId>com.example</groupId>
    <artifactId>itheima-utils</artifactId>
    <version>0.0.1-SNAPSHOT</version>
</dependency>
2.3.2 案例 : 访问第三方Bean异常
访问工具类中Bean对象
@Autowired
private ApplicationContext applicationContext ;

@Test
public void testTokenParse(){
    System.out.println(applicationContext.getBean(TokenParser.class));
}
异常
org.springframework.beans.factory.NoSuchBeanDefinitionException: No qualifying bean of type ‘com.example.TokenParser’ available
异常信息描述: 没有com.example.TokenParse类型的bean
说明:在Spring容器中没有找到com.example.TokenParse类型的bean对象
说明第三方的Bean我们并不能在我们自己包中直接使用
为什么呢?
虽然第三方依赖中文件添加了@Component注解,但是不一定被Spring的组件扫描到。
@SpringBootApplication这个注解具有包扫描的作用,但是扫描范围是当前包及其子包,很显然扫描不到第三方bean所在处。
2.3.3 配置第三方bean
2.3.3.1 方案一: @ComponentScan 组件扫描
切记不要忘了扫描本项目的包!!!!
@ComponentScan({"com.example","com.zhangjingqi"})
@SpringBootApplication
public class SpringbootWebApplication {
   ...
}
运行下段程序,完美执行
@Autowired
private ApplicationContext applicationContext ;
@Test
public void testTokenParse(){
    System.out.println(applicationContext.getBean(TokenParser.class)); //com.example.TokenParser@2774dcf4
}
但是项目开发一般不采用上述方式
当需要引入大量的第三方的依赖的时候,就需要在启动类上配置N多要扫描的包,这种方式会很繁琐。而且这种大面积的扫描性能也比较低。
而且Springboot中并没有采用以上这种方案
2.3.3.2 方案二: @Import导入
使用@Import导入的类会被Spring加载到IOC容器中
导入形式
- 导入普通类
导入后,此类便交给Spring的容器管理
// 说明: TokenParser加不加@Component注解无所谓,都会注入到IOC容器中
@Import({TokenParser.class}) // 参数是一个数组
@SpringBootApplication
public class SpringbootWebApplication {

}
测试
@Autowired
private ApplicationContext applicationContext ;
@Test
public void testTokenParse(){
    System.out.println(applicationContext.getBean(TokenParser.class));
}
- 导入配置类
导入配置类之后,所有的bean对象都会加载到IOC容器中
// 说明: TokenParser加不加@Component注解无所谓,都会注入到IOC容器中
@Import({HeaderConfig.class}) // 参数是一个数组
@SpringBootApplication
public class SpringbootWebApplication {}
    @Autowired
    private ApplicationContext applicationContext ;

@Test
public void testHeaderParser(){
    System.out.println(applicationContext.getBean(HeaderParser.class));
}
-
导入ImportSelector接口实现类
MyImportSelector类实现了ImportSelector接口
@Import({MyImportSelector.class})
@SpringBootApplication
public class SpringbootWebApplication {}
在MyImportSelector类中标明了我们需要创建bean的类
public class MyImportSelector implements ImportSelector {
    public String[] selectImports(AnnotationMetadata importingClassMetadata) {
        return new String[]{"com.example.HeaderConfig"};
    }
}
2.3.3.3 方案三: @EnableXXX注解 封装@Import注解
* **如果基于以上方式完成自动配置,当要引入一个第三方依赖时,是不是还要知道第三方依赖中有哪些配置类和哪些Bean对象?**
是的。 (对程序员来讲,很不友好,而且比较繁琐)
* **当我们要使用第三方依赖,依赖中到底有哪些bean和配置类,谁最清楚?**
第三方依赖自身最清楚。
所以现在我们要想一个办法,让第三方依赖自己指定导入哪些bean对象和配置类
- 怎么让第三方依赖自己指定bean对象和配置类?
比较常见的方案就是第三方依赖给我们提供一个注解,这个注解一般都以@EnableXxxx开头的注解,注解中封装的就是@Import注解
-
使用第三方依赖提供的 @EnableXxxxx注解
@Retention 、@Target是元注解
@Import 导入配置bean的文件,在MyImportSelector文件中配置要导入哪些配置类
@Retention(RetentionPolicy.RUNTIME) //表示该注解被保存在class文件中,并且可以被反射机制所读取
@Target(ElementType.TYPE) // 标注在类上
@Import(MyImportSelector.class)
public @interface EnableHeaderConfig {
}
在这篇文章的下面介绍了元注解,文章最下面!!
将注解导入启动类即可
@EnableHeaderConfig
@SpringBootApplication
public class SpringbootWebApplication {...}
2.4 源码跟踪
2.4.1 源码及分析
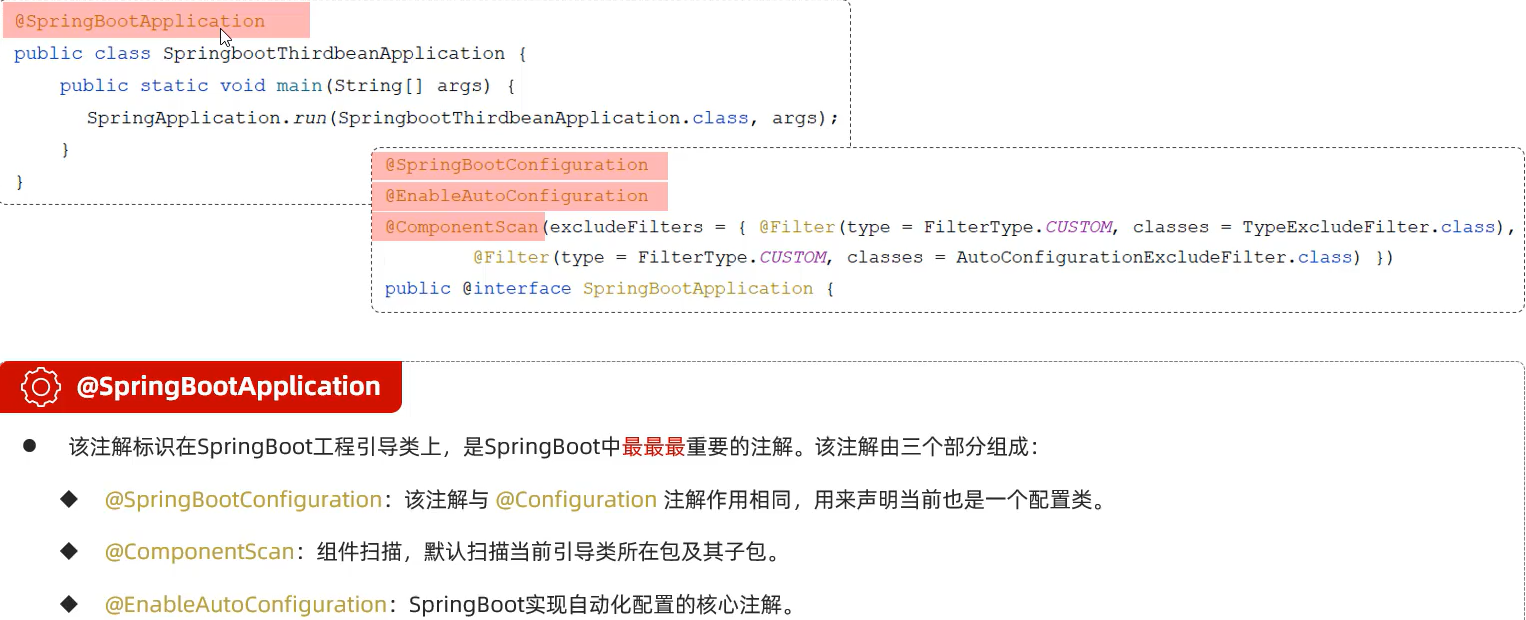
首先从启动类(也叫引导类)中的注解@SpringBootApplication入手
@Target({ElementType.TYPE}) // 元注解,标注在类上
@Retention(RetentionPolicy.RUNTIME)//元注解,表示该注解被保存在class文件中,并且可以被反射机制所读取
@Documented//元注解  @Documented注解的作用是用于指示编译器将被注解的元素记录在生成的文档中。它主要用于指示我们自定义的注解如果需要在生成的文档中呈现注解信息时,需要加上该注解。一般情况下,使用该注解对代码的运行没有影响,它只是用于辅助说明。
@Inherited//元注解 @Inherited注解只对直接继承自被注解类或方法的子类有效,如果通过实现接口的形式进行了间接继承,则不会继承父类的注解。
@SpringBootConfiguration  // 底层封装了@Configuration 注解,声明配置类,所以我们可以在启动类中声明第三方的bean
@EnableAutoConfiguration // 自动配置的核心注解,底层封装的@Import注解,详细请看下一段代码
@ComponentScan(
    excludeFilters = {@Filter(
    type = FilterType.CUSTOM,
    classes = {TypeExcludeFilter.class}
), @Filter(
    type = FilterType.CUSTOM,
    classes = {AutoConfigurationExcludeFilter.class}
)}
) // 包扫描的作用,默认扫描当前包及其子包
public @interface SpringBootApplication {...}
@EnableAutoConfiguration注解类,凡是带有@EnableXxx的注解,都会带一个@Import注解
此处导入了一个AutoConfigurationImportSelector.class类,其实就是ImportSelector接口的实现类(AutoConfigurationImportSelector实现了DeferredImportSelector接口,DeferredImportSelector接口实现了ImportSelector接口),
在ImportSelector有抽象方法“String[] selectImports(AnnotationMetadata importingClassMetadata)”,其中“String[] ”表示哪些类需要导入到Spring的IOC容器当中
@Target({ElementType.TYPE})
@Retention(RetentionPolicy.RUNTIME)
@Documented
@Inherited
@AutoConfigurationPackage
@Import({AutoConfigurationImportSelector.class}) // 注意这里的AutoConfigurationImportSelector类
public @interface EnableAutoConfiguration {
    String ENABLED_OVERRIDE_PROPERTY = "spring.boot.enableautoconfiguration";

    Class<?>[] exclude() default {};

    String[] excludeName() default {};
}
解析AutoConfigurationImportSelector类中的 String[] selectImports方法,重点关注返回值!!!!,观察一下返回值封装了哪些类的全类名(也就是说哪些类自动导入了Spring IOC容器)
public String[] selectImports(AnnotationMetadata annotationMetadata) {
    if (!this.isEnabled(annotationMetadata)) {
        return NO_IMPORTS;
    } else {

        AutoConfigurationEntry autoConfigurationEntry = this.getAutoConfigurationEntry(annotationMetadata);// getAutoConfigurationEntry此方法很重要

        return StringUtils.toStringArray(autoConfigurationEntry.getConfigurations());
    }
}
this.getAutoConfigurationEntry(annotationMetadata)方法,返回值是AutoConfigurationEntry
protected AutoConfigurationEntry getAutoConfigurationEntry(AnnotationMetadata annotationMetadata) {
    if (!this.isEnabled(annotationMetadata)) {
        return EMPTY_ENTRY;
    } else {
        AnnotationAttributes attributes = this.getAttributes(annotationMetadata);
        List<String> configurations = this.getCandidateConfigurations(annotationMetadata, attributes); // List集合,由getCandidateConfigurations获取,重点看一下
        configurations = this.removeDuplicates(configurations);
        Set<String> exclusions = this.getExclusions(annotationMetadata, attributes);
        this.checkExcludedClasses(configurations, exclusions);
        configurations.removeAll(exclusions);
        configurations = this.getConfigurationClassFilter().filter(configurations);
        this.fireAutoConfigurationImportEvents(configurations, exclusions);
        return new AutoConfigurationEntry(configurations, exclusions);
    }
}
getCandidateConfigurations方法,因为返回了configurations参数,所以看一下
protected List<String> getCandidateConfigurations(AnnotationMetadata metadata, AnnotationAttributes attributes) {
    List<String> configurations = new ArrayList(SpringFactoriesLoader.loadFactoryNames(this.getSpringFactoriesLoaderFactoryClass(), this.getBeanClassLoader()));
    ImportCandidates.load(AutoConfiguration.class, this.getBeanClassLoader()).forEach(configurations::add);
    //断言,判断configurations集合是否是空,如果是空的话,会提示下面字符串的信息
    Assert.notEmpty(configurations, "No auto configuration classes found in META-INF/spring.factories nor in META-INF/spring/org.springframework.boot.autoconfigure.AutoConfiguration.imports. If you are using a custom packaging, make sure that file is correct.");
    return configurations;
}
通过上面错误提示,我们会发现Spring会加载“META-INF/spring.factories”文件和“META-INF/spring/org.springframework.boot.autoconfigure.AutoConfiguration.imports”文件
当把上面文件中的配置加载之后会封装成一个List集合并返回,最终会将List中的内容封装到String[]数组中,String[]数组中的数据最终会加载到Spring的IOC容器当中
下面我们要找到文件META-INF/spring.factories与META-INF/spring/org.springframework.boot.autoconfigure.AutoConfiguration.imports
一般会在xxx-starter依赖下的xxx-autoconfigure

然后找到相应的依赖:发现真的存在,而且这两个文件中存储的都是类的全类名
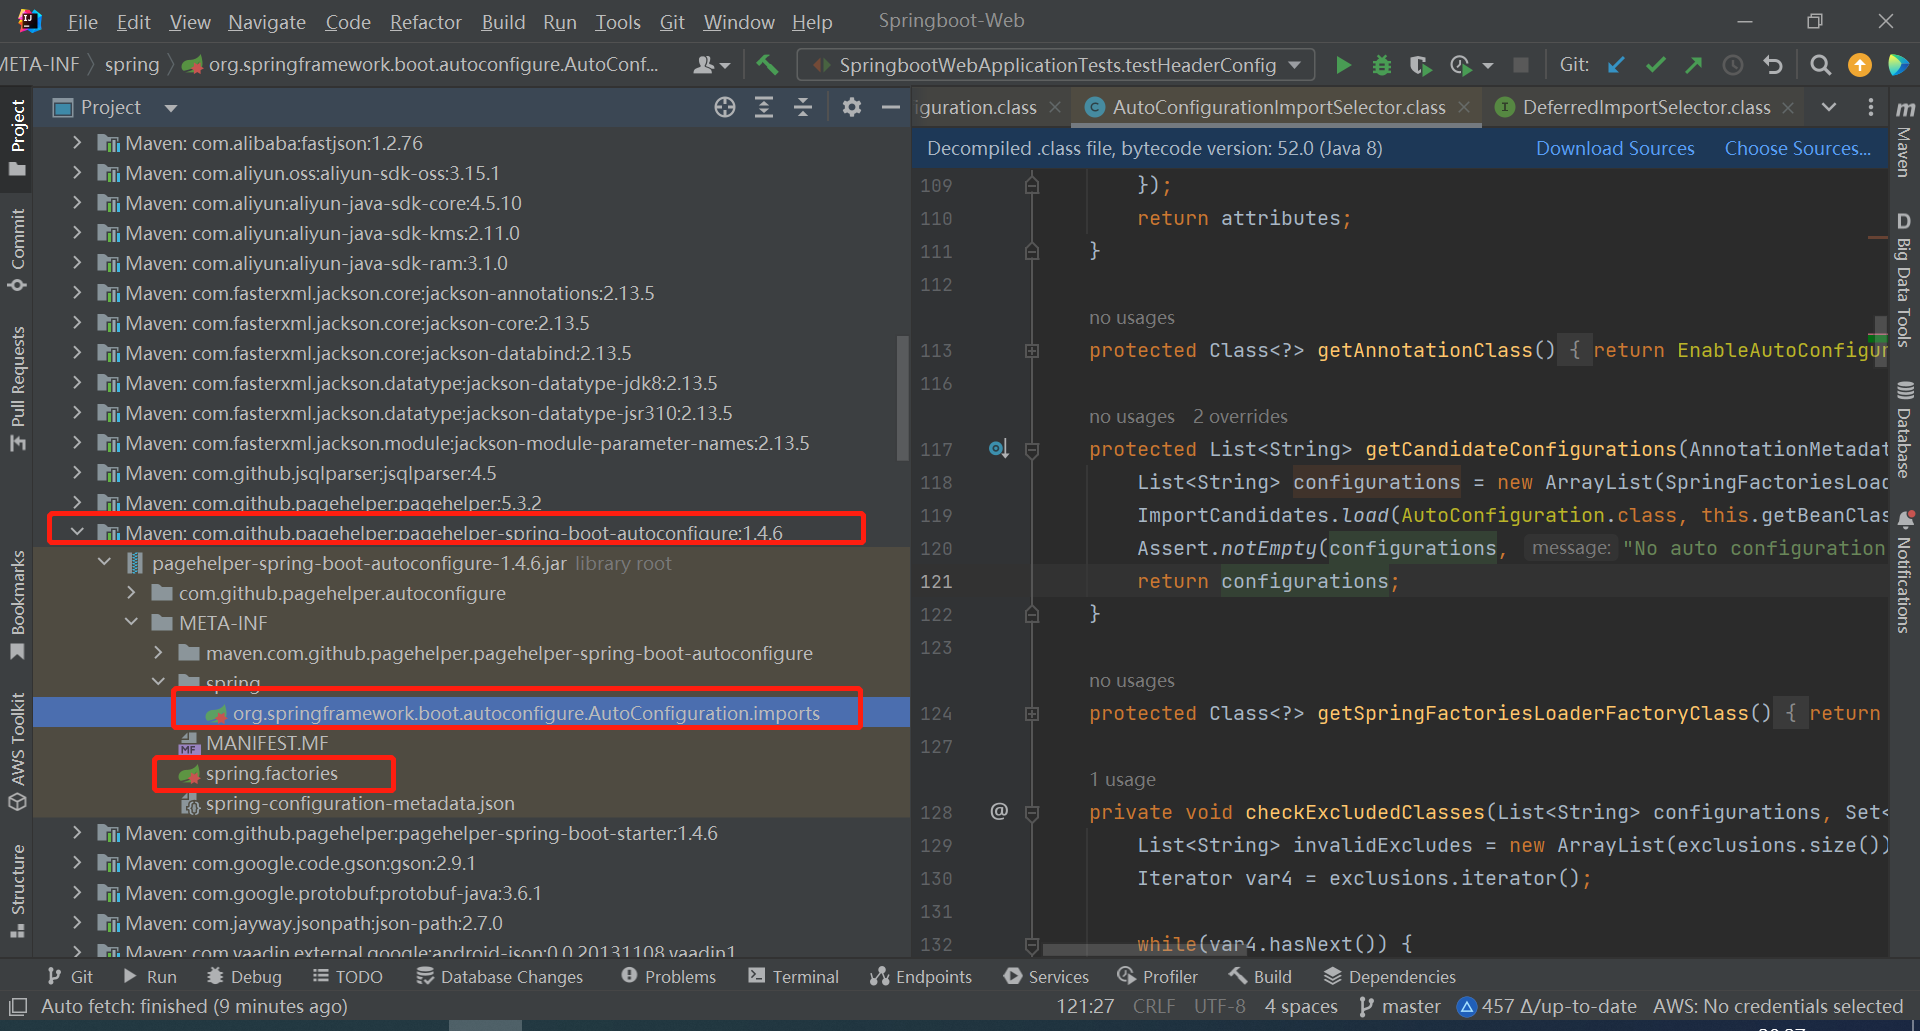
自动配置的原理底层也是一个@Configuration注解修饰,然后使用@Bean注解向容器中注入对象
2.4.2 总结
来自heima程序员
spring.factories文件是早期Springboot自动加载的文件,在spring2.7.0体提供了一个新的文件AutoConfiguration.imports
注意: 在spring2.7.x版本中还兼容spring.factories文件,但是在spring3.x.x之后便不再兼容,spring.factories文件被彻底移除,这两个文件都是记录Bean的全类名
我们以后导入的配置类定义在在AutoConfiguration.imports文件即可
String[]数组中全类名的由来就是下面标红的文件
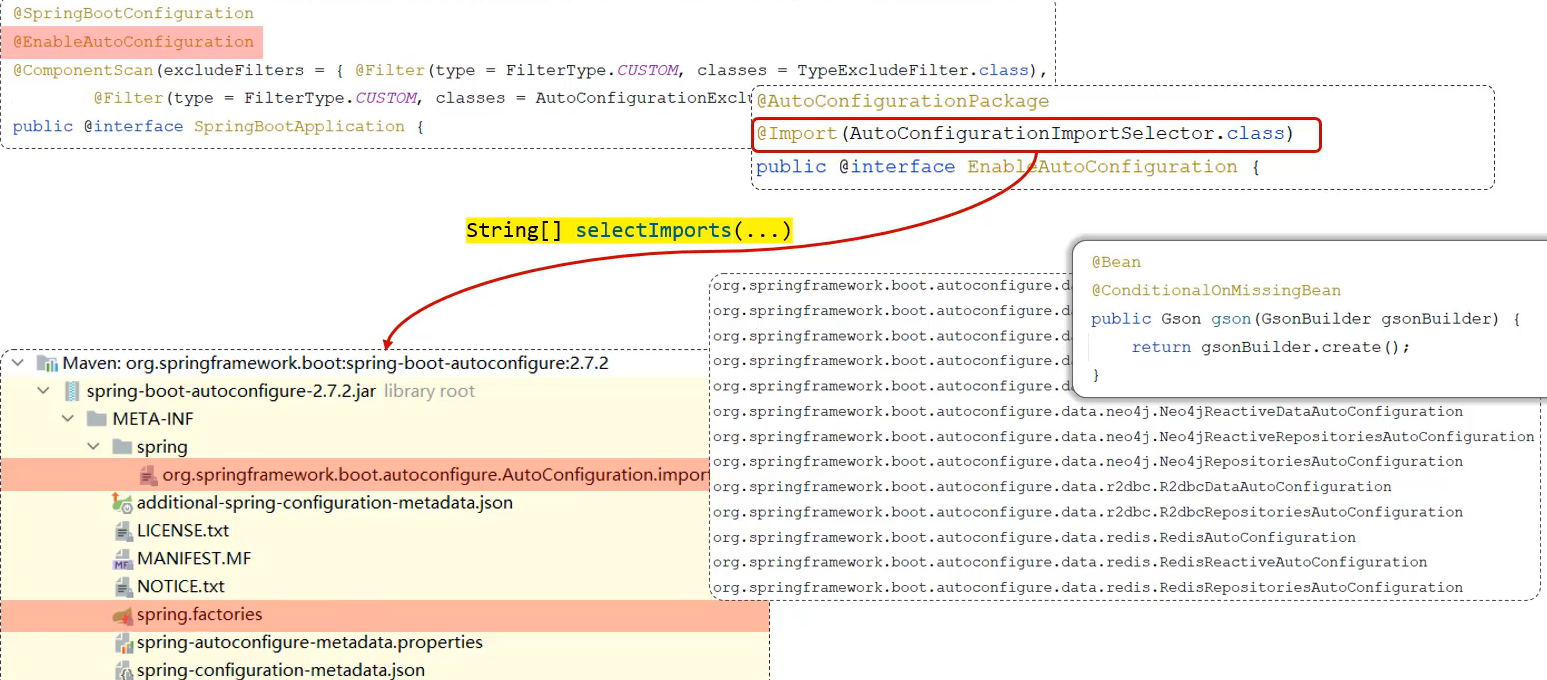
总结
AutoConfiguration.imports定义的就是配置类的全类名,在这个类当中我们就可以通过@Bean注解来声明Bean对象,最终Springboot在启动的时候就会加载这个配置文件中所配置的全类名的配置类,将配置类的信息封装到String[]数组中,最终通过@Import注解将这些配置类全部加载到Spring的IOC容器当中。
在META-INF/spring/org.springframework.boot.autoconfigure.AutoConfiguration.imports文件中定义的配置类非常多,而且每个配置类中又可以定义很多的bean,那这些bean都会注册到Spring的IOC容器中吗?
并不是。 在声明bean对象时,上面有加一个以@Conditional开头的注解,这种注解的作用就是按照条件进行装配,只有满足条件之后,才会将bean注册到Spring的IOC容器中(下面会详细来讲解)
2.5 @Conditional注解
作用:按照一定的条件进行判断,在满足给定条件后太会注册对应的Bean到Spring IOC容器当中
位置: 方法、类
@Conditional本身是一个父注解,派生出大量的子注解
-
@ConditionalOnClass:判断环境中有对应字节码文件,才注册bean到IOC容器
-
@ConditionalOnMissingBean:判断环境中没有对应的bean(类型或名称),才注册bean到IOC容器。
-
@ConditionalOnProperty:判断配置文件中有对应属性和值,才注册bean到IOC容器。
比如之前遇到的
  @Bean
  @ConditionalOnMissingBean
  public Gson gson(GsonBuilder gsonBuilder){
      return gsonBuilder.create();
  }
2.5.1 要使用的类
@Retention(RetentionPolicy.RUNTIME)
@Target(ElementType.TYPE)
@Import(MyImportSelector.class)
public @interface EnableHeaderConfig {
}
public class MyImportSelector implements ImportSelector {
    public String[] selectImports(AnnotationMetadata importingClassMetadata) {
        return new String[]{"com.example.HeaderConfig"};
    }
}
@Configuration
public class HeaderConfig {

    @Bean
    public HeaderParser headerParser(){
        return new HeaderParser();
    }

    @Bean
    public HeaderGenerator headerGenerator(){
        return new HeaderGenerator();
    }
}
启动类
@EnableHeaderConfig
@SpringBootApplication
public class SpringbootWebApplication {...}
2.5.2 @ConditionalOnClass
为下面的方法添加ConditionalOnClass注解
    @Bean
//  方式一:name 指定全类名
//  方式名:value 指定Class文件
//  会判断是否存在io.jsonwebtoken.Jwts类,如果存在则会将Bean注入IOC容器
    @ConditionalOnClass(name = "io.jsonwebtoken.Jwts")
    public HeaderParser headerParser(){
        return new HeaderParser();
    }
前提是里面有下面的坐标才会运行成功
<dependency>
    <groupId>io.jsonwebtoken</groupId>
    <artifactId>jjwt</artifactId>
    <version>0.9.0</version>
</dependency>
2.5.3 @ConditionalMissingBean
应用场景:设置一个默认的Bean对象
默认Bean对象:如果用户引入我们的依赖后,他自己定义了这个依赖的Bean,那默认定义的Bean就不会生效;如果没有定义还想使用这个Bean,那就是使用默认Bean对象
参数
- 指定类型 value属性
- 指定名称 name属性
// @ConditionalOnMissingBean若不指定参数代表 当前环境没有该类型(该类型在这里指的是HeaderParser)的Bean就创建一个
@ConditionalOnMissingBean
@Bean
public HeaderParser headerParser(){
    return new HeaderParser();
}
2.5.4 @ConditionalOnProperty
与配置文件中配置的属性有关
//  name指定配置文件中配置项的名称,value指定配置项的值
//  会判断配置文件中是否存在指定属性与值,如果都存在才会将Bean加载到IOC容器
    @ConditionalOnProperty(name = "name",havingValue = "zhangjingqi")
    @Bean
    public HeaderParser headerParser(){
        return new HeaderParser();
    }
application.yaml文件中内容
name: zhangjingqi
三、自定义Starter
3.1 自定义Starter分析
一些技术并没有提供与SpringBoot整合的起步依赖,所以我们要学会自定义
在研发当中经常会定义一些公共组件,提供给各个项目团队使用。在SpringBoot项目中,一般会将这些公共组件封装为Springboot的starter
需求:
- 自定义aliyun-oss-spring-boot-starter,完成阿里云OSS操作工具类AliyunOSSUtils
目标:
- 引入起步依赖后,要想使用阿里云OSS,注入AliyunOSSUtils直接使用即可
步骤
- 创建 aliyun-oss-spring-boot-starter 模块
- 创建 aliyun-oss-spring-boot-autoconfigure 模块,在starter中引入该模块
- 在 aliyun-oss-spring-boot-autoconfigure 模块(自动配置类)中定义自动配置功能,并定义自动配置文件META-INF/spring/xxxx.imports
3.2 实现
3.2.1 创建starter模块
仅仅留下pom文件,但是如果有“.iml”结尾的文件不要删除,因为是IDEA中的配置文件

引入autoconfigure 模块坐标
<dependency>
    <groupId>com.aliyun.oss</groupId>
    <artifactId>aliyun-oss-spring-boot-autoconfigure</artifactId>
    <version>0.0.1-SNAPSHOT</version>
</dependency>
3.2.2 创建autoconfigure 模块
不需要启动类,因为是第三方模块,其他方会依赖这个模块
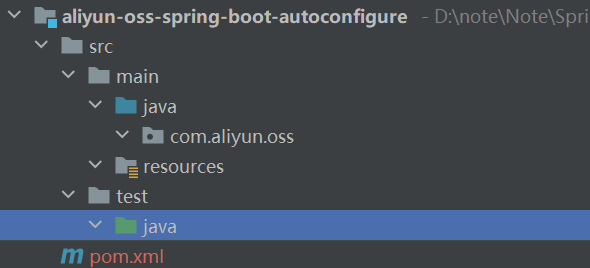
引入阿里云坐标
下面这篇文章中有对阿里云OSS的详细介绍
<dependency>
    <groupId>com.aliyun.oss</groupId>
    <artifactId>aliyun-sdk-oss</artifactId>
    <version>3.15.1</version>
</dependency>
访问OSS对象存储的代码
public class AliOSSUtils {

    private String endpoint = "https://oss-cn-beijing.aliyuncs.com";
    private String accessKeyId = "写你自己的";
    private String accessKeySecret = "写你自己的";
    private String bucketName = "picture-typora-zhangjingqi";

    /**
     * 实现上传图片到OSS
     */
    public String upload(MultipartFile file) throws IOException {
        // 获取上传的文件的输入流
        InputStream inputStream = file.getInputStream();

        // 避免文件覆盖
        String originalFilename = file.getOriginalFilename();
        String fileName = UUID.randomUUID().toString() + originalFilename.substring(originalFilename.lastIndexOf("."));

        //上传文件到 OSS
        OSS ossClient = new OSSClientBuilder().build(endpoint, accessKeyId, accessKeySecret);
        ossClient.putObject(bucketName, fileName, inputStream);

        //文件访问路径  比如 https://picture-typora-zhangjingqi.oss-cn-beijing.aliyuncs.com/1.jpg
//         相当于把bucketName拼接在http://后面,把文件名字拼接在aliyuncs.com/ 后面
        String url = endpoint.split("//")[0] + "//" + bucketName + "." + endpoint.split("//")[1] + "/" + fileName;
        // 关闭ossClient
        ossClient.shutdown();
        return url;// 把上传到oss的路径返回
    }

}
创建自动配置类
//底层封装饿了@Import注解
//@EnableConfigurationProperties(读取配置文件的类名.class,假设为AliOSSProperties.class ) //使用properties/yaml配置文件的形式读取配置信息可以直接这么创建
// 自动配置类
@Configuration
public class AliOSSAutoConfiguration {
    @Bean
    public AliOSSUtils aliOSSUtils(){
//      因为这里我没有使用properties/yaml配置文件的形式读取配置信息可以直接这么创建
        return  new AliOSSUtils();

    }

//  因为使用了@EnableConfigurationProperties(AliOSSProperties.class )AliOSSProperties类已经成为IOC的Bean了

//   下面方法的参数可以直接使用AliOSSProperties,因为它会自动根据类型进行装配

//  使用配置文件注入的
//    @Bean
//    public AliOSSUtils aliOSSUtilsProperties(AliOSSProperties aliOSSProperties){
//      如果使用了配置文件之后,也是不可以自动注入的,我们这里就要改成
//     AliOSSUtils aliOSSUtils = new AliOSSUtils();
//     aliOSSUtils.setAliOSSProperties(aliOSSProperties);
//      return aliOSSUtils;
//    }
}
创建文件
META-INF/spring/org.springframework.boot.autoconfigure.AutoConfiguration.imports
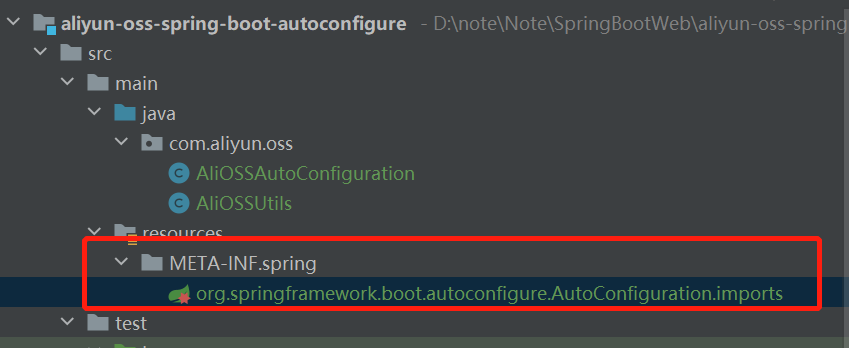
将配置类的全类名复制到上面的文件夹中即可
com.aliyun.oss.AliOSSAutoConfiguration
3.2.3 测试
引入刚刚阿里云封装的起步依赖
<dependency>
    <groupId>com.aliyun.oss</groupId>
    <artifactId>aliyun-oss-spring-boot-starter</artifactId>
    <version>0.0.1-SNAPSHOT</version>
</dependency>
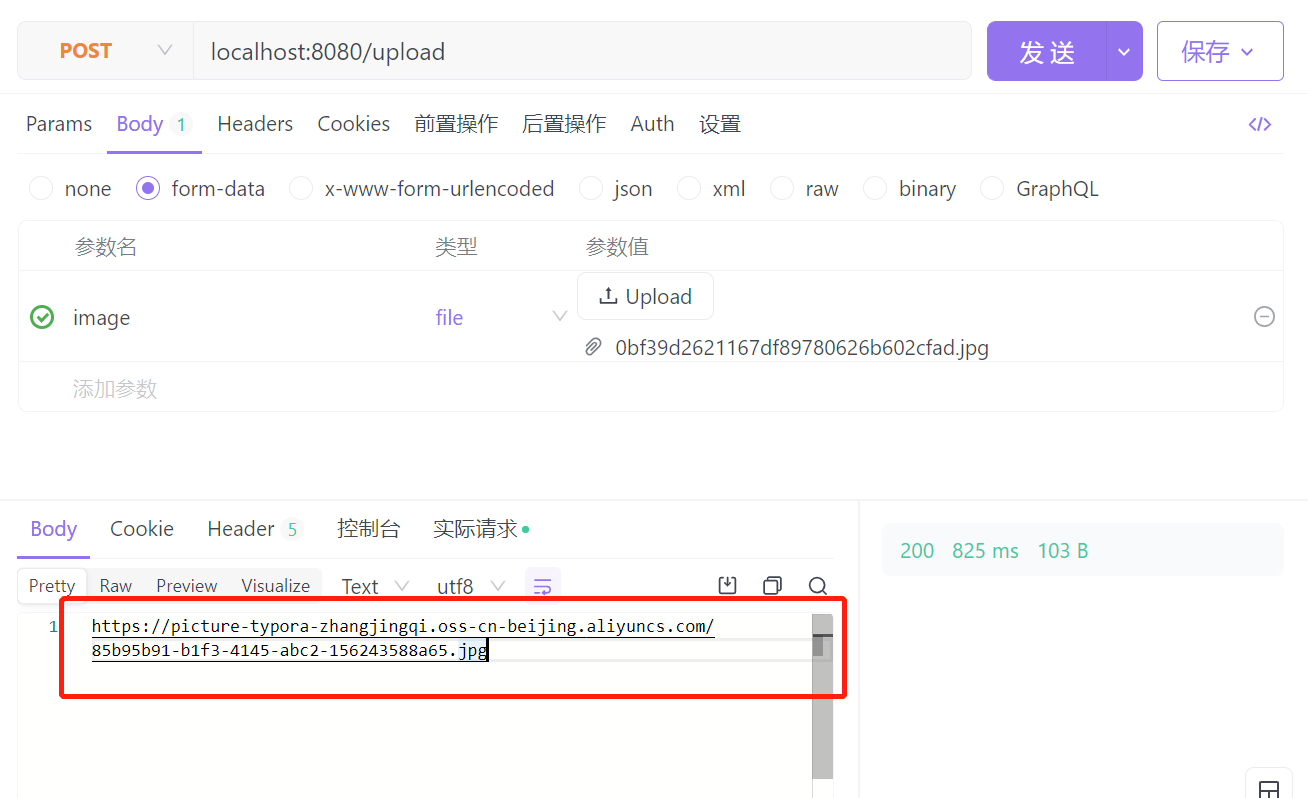
如果是将阿里云的配置信息存放在yaml配置文件中时,我们现在只需要将配置信息存放在测试模块的yaml文件中即可, 在阿里云工具类模块中也是可以读取到的
@RestController
public class UploadController {

    @Autowired
    private AliOSSUtils aliOSSUtils;

    @PostMapping("/upload")
    public String upload(MultipartFile image) throws Exception {
        //上传文件到阿里云 OSS
        String url = aliOSSUtils.upload(image);
        return url;
    }

}


 U8W/U8W-Mini使用与常见问题解决
 QT多线程的5种用法,通过使用线程解决UI主界面的耗时操作代码,防止界面卡死。...
 stm32使用HAL库配置串口中断收发数据(保姆级教程)
 分享几个国内免费的ChatGPT镜像网址(亲测有效)
 Allegro16.6差分等长设置及走线总结