您现在的位置是:首页 >技术教程 >【经典论文】打通文本图像的里程碑--clip网站首页技术教程
【经典论文】打通文本图像的里程碑--clip
CLIP 论文逐段精读【论文精读】_哔哩哔哩_bilibili
clip是openai团队在4亿对文本图像对上训练出来的。它的训练方法简单,但效果缺出奇的好。是打通图片文本的里程碑式的模型。
目录
2.Prompt Engineering and Ensemble
一.模型结构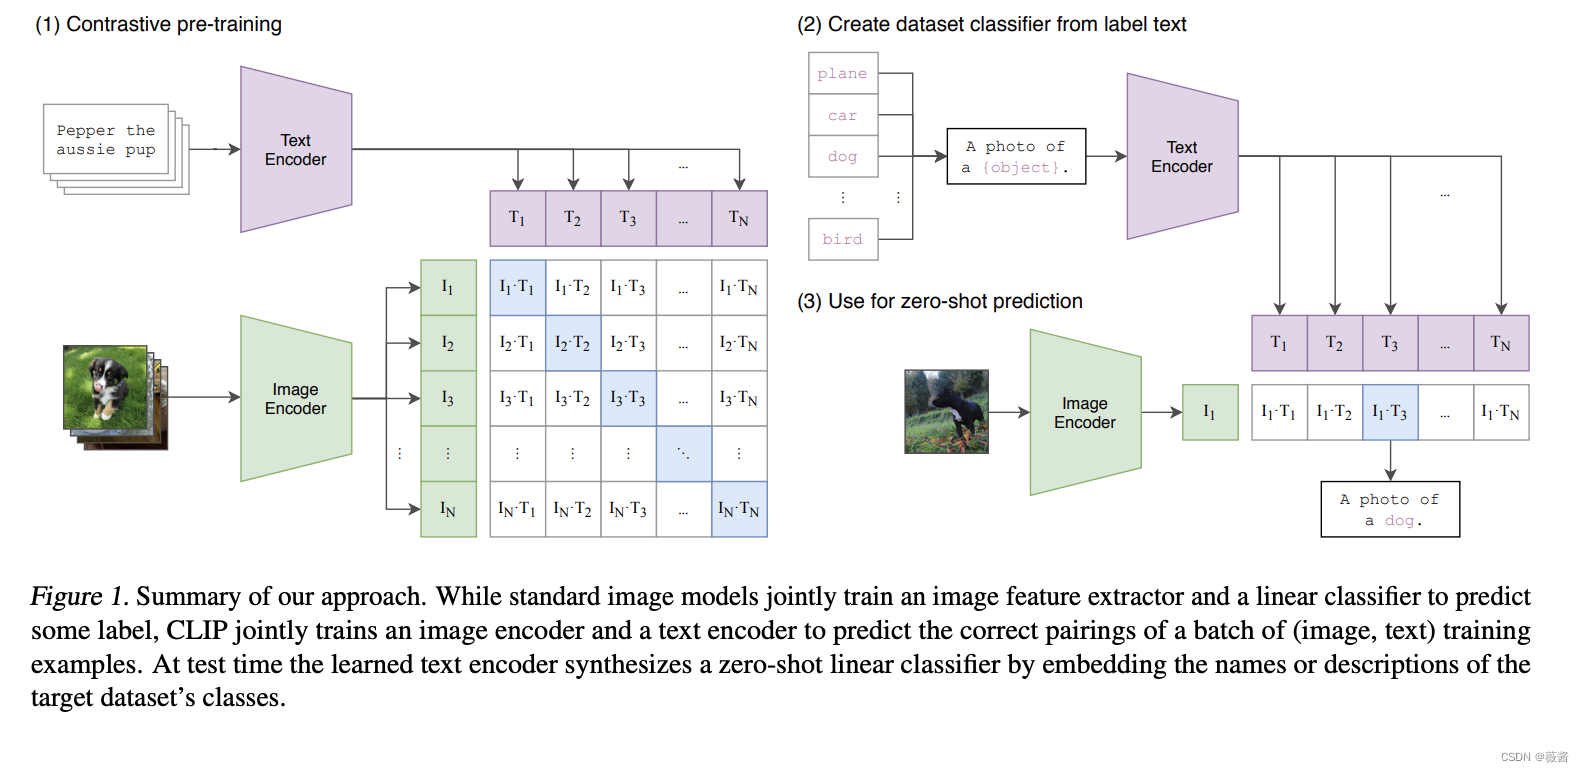
如图所示:
clip整体分为了三个部分,
1)通过对比学习进行预训练
clip整体的原理非常简单,就是将图片-文本pair对进行对比学习。图片经过图片编码器(resnet50/vit),文本经过文本编码器,同一对文本-图片的结果为1,不同pair的文本-图片为0。通过对比学习,联合训练图片和文本编码器。
clip通过将一个图像和一段文本输入到同一个神经网络,将它们映射到同一个嵌入空间,从而实现了图像和文本跨模态的语义对齐。
2)构建文本标签 3)进行zero-shot 预测
对于图像分类任务,对于已知的标签,openai通过prompt emsemble和promt enginering构建了一批模板,然后用label对模板进行填充。
举个例子,对于标签dog,将其改写为一个句子:this is a picture of a dog,以便和预训练时保持一致(都是句子)。
将所有可能的标签用模板得到对应的句子,然后使用text_encoder得到文本向量。
将待预测的图片使用image_encoder得到图片向量,和所有文本向量做cosine,计算出其中最相似的作为其label。
1.为什么选择用自然语言的监督信号去训练视觉模型?
1)不需要再标注了,且文本的自由度比多标签的形式的大了很多
2)将视觉特征和语言特征联系在一起后,提取出了多模态的特征,更容易去做zero-shot的学习。
2.为什么用对比学习?
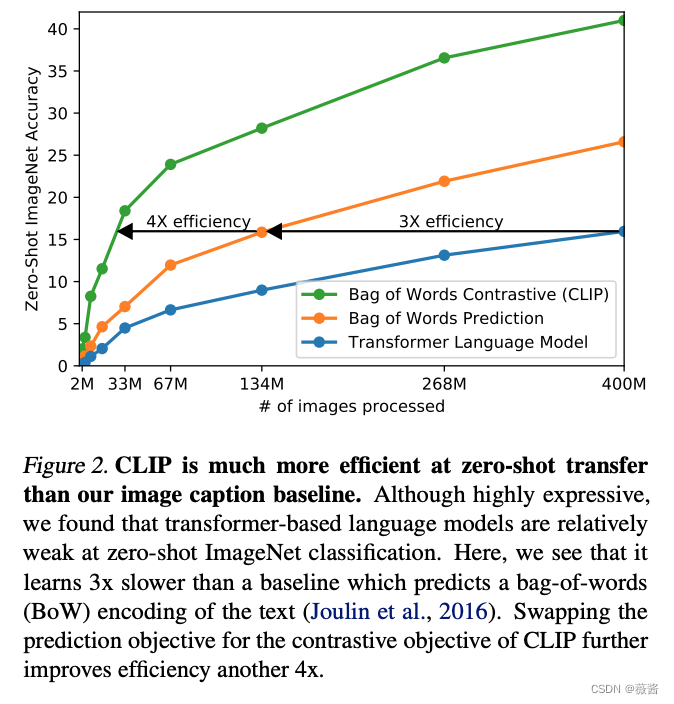
用图片预测对应的文本,结果会非常多样,训练起来会非常慢。而使用对比学习,判断图片文本是否是一对,就简化了任务。
论文中也提到,将预测型的目标函数换为对比型的目标函数,训练速度快了4倍。
二.伪代码实现
# image_encoder - ResNet or Vision Transformer
# text_encoder - CBOW or Text Transformer
# I[n, h, w, c] - minibatch of aligned images
# T[n, l] - minibatch of aligned texts
# W_i[d_i, d_e] - learned proj of image to embed
# W_t[d_t, d_e] - learned proj of text to embed
# t - learned temperature parameter
# extract feature representations of each modality
I_f = image_encoder(I) #[n, d_i]
T_f = text_encoder(T) #[n, d_t]

# joint multimodal embedding [n, d_e]
# 这里还有一个投射层,也就是W_i,W_t,是用来学习如何从单模态学习到多模态
# 多模态里非常常见的做法,fusion学习一个联合表征空间
I_e = l2_normalize(np.dot(I_f, W_i), axis=1)
T_e = l2_normalize(np.dot(T_f, W_t), axis=1)
# scaled pairwise cosine similarities [n, n]
logits = np.dot(I_e, T_e.T) * np.exp(t)
# symmetric loss function
labels = np.arange(n)
loss_i = cross_entropy_loss(logits, labels, axis=0)
loss_t = cross_entropy_loss(logits, labels, axis=1)
loss = (loss_i + loss_t)/2
三.实验
1.zero-shot Transfer
动机:为什么要做zero-shot任务?
结果:之前预训练好的embedding,都需要用下游任务去微调,但是会遇到几个问题:
1)下游数据不好收集
2)distribution shift
用文本做引导,利用文本信号去很灵活地做zero-shot的迁移学习。
下面2张图分别是clip在zero-shot/few-shot的结果
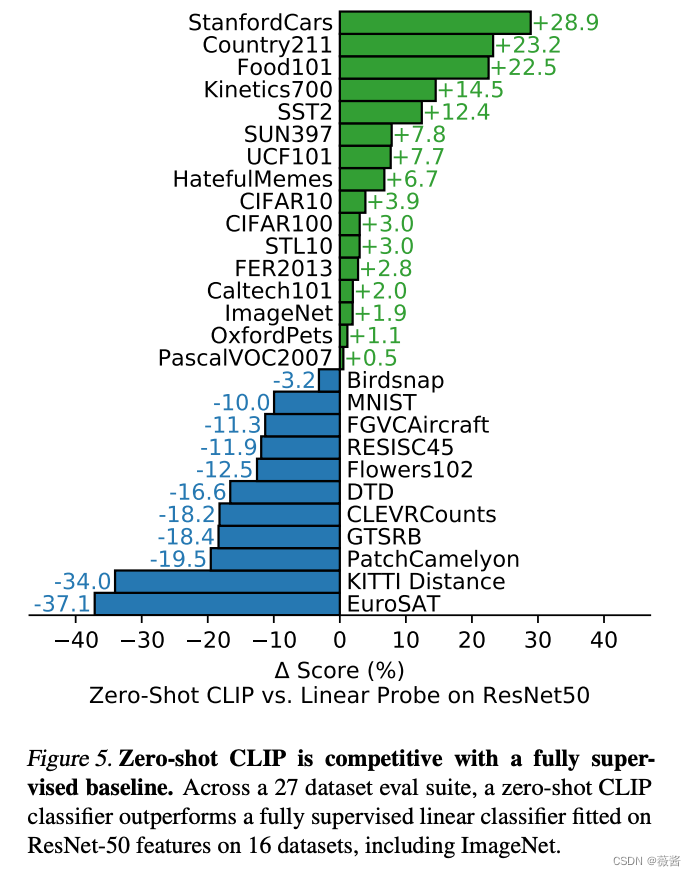
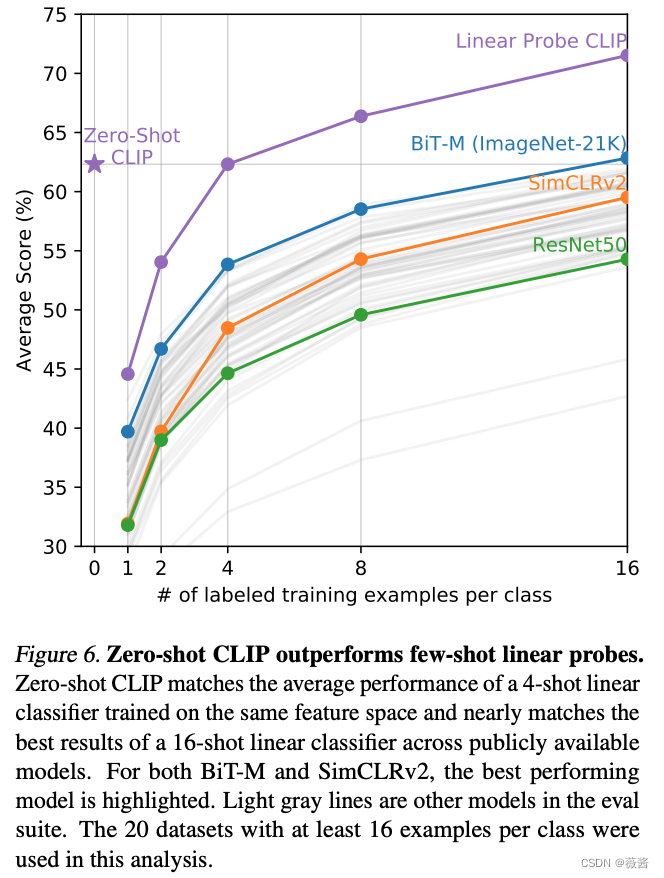
对于特别困难的任务,比如需要特定领域知识的任务,人类都无法很好识别,需要给clip几张图片学习一下。
右图就是clip进行few-shot learning的结果,可以看到,随着给的例子的增加,clip的效果越来越好。但是比较有意思的一点是,1-4 few-shot learning的结果是打不过左上角的zero-shot clip的效果,这也是作者在后面所讲的局限性之一。
2.Prompt Engineering and Ensemble
为什么要做提示工程?
1)文本本身的多样性,比如remote既可以做遥控器,也有遥远的意思,只给单独的一个单词,很有可能有歧义性。
2)推理时和训练是保持一致,避免distribution gap。
最简单的prompt就是a picture of [label]。
但是当你知道这个数据集是什么相关的,还可以给出额外的提示:a picture of [label],a type of pet,这样进一步缩小解的空间,帮助clip更好地选出正确的答案。
对于OCR任务,在你想要找的文本上打上双引号,模型会更明白你的意思(感觉和chatgpt一样,符号会帮助模型理解)
ensemble多个模板(clip里是80个)的结果,这个是可以根据自己的需求/下游数据集去编写一些模板的。
3.特征学习
在下游数据集上,使用全部的训练数据去训练。
训练的方式选择linear probe而不是fine-tune。
- 一方面想要更直观地观察预训练的模型的好坏,使用fine-tune的话,有可能预训练模型不好,但是fine-tune过后得到一个比较好的结果。
- linear-probe的训练比较简单,而fine-tune的话需要为每一个数据集调参,非常麻烦
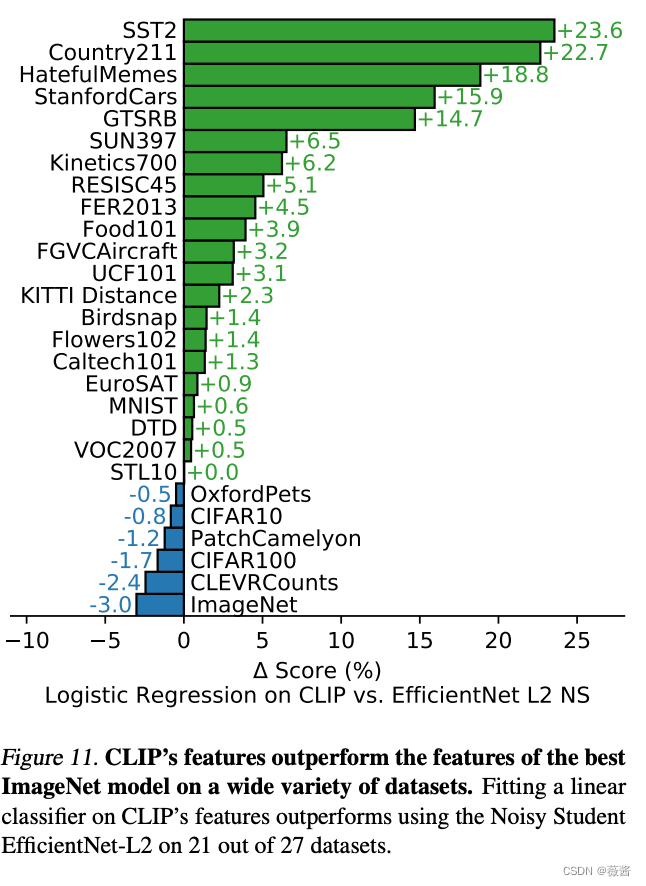
结果如下:
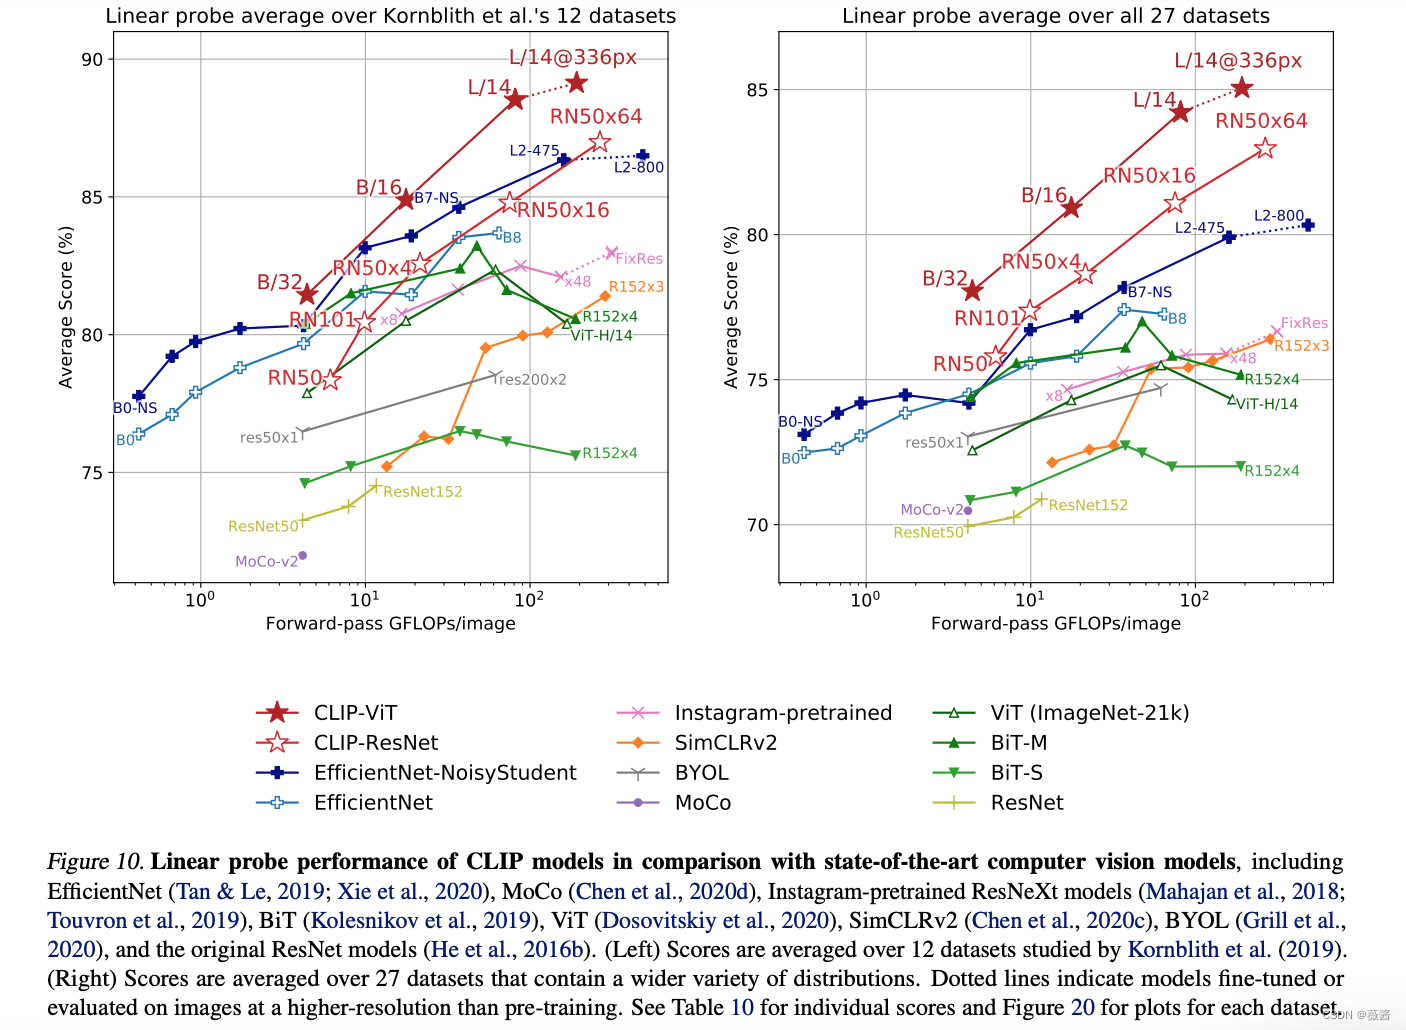
clip的在多个数据集上要大幅优于在imageNet上预训练的最好的模型
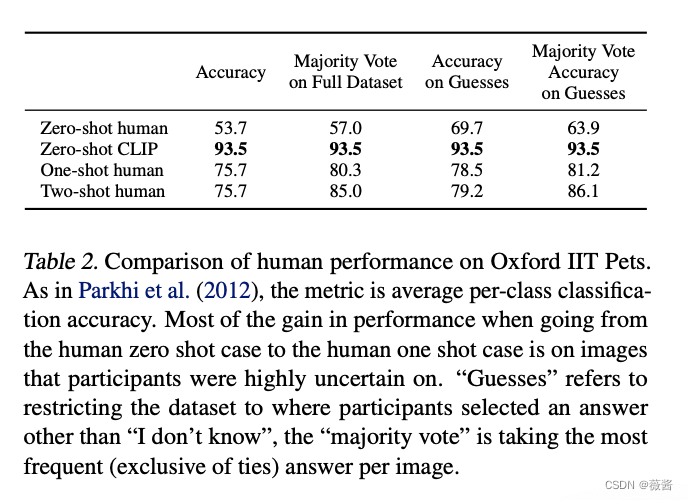
4.和人进行对比
5个参赛者在Pets数据集上vsclip的效果,clip大幅优于人类,人类在one-shot learning后,效果大幅提升,但是再多看一个例子并没有提升更多的准确率。
5. Data Overlap Analysis
很多人会质疑,是不是训练数据太大太好了,囊括了很多下游数据,导致clip的效果这么好。这一章也是做了一些去重实验,证明了clip本身泛化性比较好。
6.局限
1)目前clip只是远高于res50,和其他sota的结果还有一定差距(提升数据量可以提升clip的效果,但是需要扩大1000倍的数据量才可能弥补和sota之间十几个点的差距)
2)clip在某些细分领域、逻辑性较强的数据集上表现不好
3)对于out of distribution的数据,clip的效果也不太好(比如手写数字识别mnist,clip的效果连lr都打不过,后来利用去重方法查找,在4亿条训练数据中确实不存在和这些人造图片相似的图片)。
4)生成式模型不需要做prompt engineering,可以直接得到图片的标题,而clip还需要自己进行处理。(blip可以的)
5)clip对数据的利用并不是很高效,用了4亿条数据。
6)clip调参时其实用到了imageNet,在研发过程中,也是围绕着实验的27个数据集展开的,可能并不是真正意义上的zero-shot。
7)爬取的图片-文本对可能会带有偏见。
8)在1-4个样本上的few-shot结果反而不如zero-shot。
(有几个都是chatgpt也有的问题,哈哈哈)
四.如何调用clip
在git上,官方给出了使用的代码
1.需要安装的包
$ conda install --yes -c pytorch pytorch=1.7.1 torchvision cudatoolkit=11.0
$ pip install ftfy regex tqdm
$ pip install git+https://github.com/openai/CLIP.git
cudatoolkit可以换成自己机器对应的版本,也可以不装,只使用cpu。
2.zero-shot Prediction demo
import torch
import clip
from PIL import Image

device = "cuda" if torch.cuda.is_available() else "cpu"
model, preprocess = clip.load("ViT-B/32", device=device)

# 处理将待预测的图片,这里可以使用自己的图片
image = preprocess(Image.open("CLIP.png")).unsqueeze(0).to(device)
# zero-shot,这里也可以根据自己的数据集去生成相应的label,让clip预测图片最可能是什么类别
# 最好在小数据集上尝试些prompt,看识别准确率是否有所上升,再在大数据集上预测。
text = clip.tokenize(["a diagram", "a dog", "a cat"]).to(device)

with torch.no_grad():
    image_features = model.encode_image(image)
    text_features = model.encode_text(text)

    logits_per_image, logits_per_text = model(image, text)
    probs = logits_per_image.softmax(dim=-1).cpu().numpy()

print("Label probs:", probs) # prints: [[0.9927937 0.00421068 0.00299572]]使用CIFAR-100 dataset进行zero-shot Prediction
import os
import clip
import torch
from torchvision.datasets import CIFAR100

# Load the model
device = "cuda" if torch.cuda.is_available() else "cpu"
model, preprocess = clip.load('ViT-B/32', device)

# Download the dataset
cifar100 = CIFAR100(root=os.path.expanduser("~/.cache"), download=True, train=False)

# Prepare the inputs
image, class_id = cifar100[3637]
image_input = preprocess(image).unsqueeze(0).to(device)
text_inputs = torch.cat([clip.tokenize(f"a photo of a {c}") for c in cifar100.classes]).to(device)

# Calculate features
with torch.no_grad():
    image_features = model.encode_image(image_input)
    text_features = model.encode_text(text_inputs)

# Pick the top 5 most similar labels for the image
image_features /= image_features.norm(dim=-1, keepdim=True)
text_features /= text_features.norm(dim=-1, keepdim=True)
similarity = (100.0 * image_features @ text_features.T).softmax(dim=-1)
values, indices = similarity[0].topk(5)

# Print the result
print("
Top predictions:
")
for value, index in zip(values, indices):
    print(f"{cifar100.classes[index]:>16s}: {100 * value.item():.2f}%")
3.Linear-probe evaluation
import os
import clip
import torch

import numpy as np
from sklearn.linear_model import LogisticRegression
from torch.utils.data import DataLoader
from torchvision.datasets import CIFAR100
from tqdm import tqdm

# Load the model
device = "cuda" if torch.cuda.is_available() else "cpu"
model, preprocess = clip.load('ViT-B/32', device)

# Load the dataset
root = os.path.expanduser("~/.cache")
train = CIFAR100(root, download=True, train=True, transform=preprocess)
test = CIFAR100(root, download=True, train=False, transform=preprocess)


def get_features(dataset):
    all_features = []
    all_labels = []

    with torch.no_grad():
        for images, labels in tqdm(DataLoader(dataset, batch_size=100)):
            features = model.encode_image(images.to(device))

            all_features.append(features)
            all_labels.append(labels)

    return torch.cat(all_features).cpu().numpy(), torch.cat(all_labels).cpu().numpy()

# Calculate the image features
train_features, train_labels = get_features(train)
test_features, test_labels = get_features(test)

# Perform logistic regression
classifier = LogisticRegression(random_state=0, C=0.316, max_iter=1000, verbose=1)
classifier.fit(train_features, train_labels)

# Evaluate using the logistic regression classifier
predictions = classifier.predict(test_features)
accuracy = np.mean((test_labels == predictions).astype(float)) * 100.
print(f"Accuracy = {accuracy:.3f}")


 U8W/U8W-Mini使用与常见问题解决
 QT多线程的5种用法,通过使用线程解决UI主界面的耗时操作代码,防止界面卡死。...
 stm32使用HAL库配置串口中断收发数据(保姆级教程)
 分享几个国内免费的ChatGPT镜像网址(亲测有效)
 Allegro16.6差分等长设置及走线总结