您现在的位置是:首页 >其他 >webpack将vue3单页面应用改造成多页面应用网站首页其他
webpack将vue3单页面应用改造成多页面应用
上篇文章搞了个单页面vue,现在要将其改成多页面,只是简单尝试,给了例子
其实也就是改个webpack的入口和html模版的配置,其他的话,每个页面都有自己的vue和路由实例,pinia的话就共享吧
!important,这里是根据上篇文章配置的更改,更具体的配置可以参考上篇文章
一、改一下项目结构
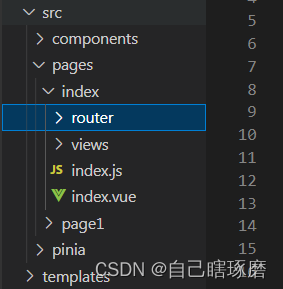
大概就是在src下新建一个pages目录,然后再文件件下新建一个单页面运用,每个页面都有自己的main.js和App.vue,此外还有自己的views和router,至于通用组件components和pinia文件夹就放在pages的目录的同级区域,截图如下:

这里我把index文件夹具体展开了,page1里面也是类似的结构,只不过page1当中的index.js换成了page1.js,index.vue换成了page1.vue(实际上全写成main.js和App.vue也没啥事,我就是手欠)。每个page的配置其实类似vue-cli生成的单页面运用。( 忽略一下最下面的templates,那是存放html模板的地方)
二、更改webpack的配置
两个部分,首先我们这里有两个page,就有两个入口文件
entry: {
        index: path.resolve(__dirname, './src/pages/index/index.js'),
        page1: path.resolve(__dirname, './src/pages/page1/page1.js')
    },
    output: {
        path: path.resolve(__dirname, 'dist'), // 打包出口
        filename: '[name].js', // 打包完的静态资源文件名
        clean: true,//每次打包都会删除dist里面旧的内容
    },
注意和上篇比较,我这里的output的filename有些更改,这些配置不是最终的,最后还有优化一下结构
第二个则是html模板的改变,这里的话需要创建两个模板
plugins: [
        new HtmlWebpackPlugin({
            template: path.resolve(__dirname, './templates/index.html'), // 我们要使用的 html 模板地址
            filename: 'index.html', // 打包后输出的文件名
            title: 'index页面',
            chunks: ["index"]
        }),
        new HtmlWebpackPlugin({
            template: path.resolve(__dirname, './templates/page1.html'), // 我们要使用的 html 模板地址
            filename: 'page1.html', // 打包后输出的文件名
            title: 'page1页面',
            chunks: ["page1"]
        }),
        new VueLoaderPlugin() //vue-loader插件
    ],
这里有两个htmlwebpackplugin的插件配置,每个配置对应了一个页面,两个模板我也放在了pages同级的template文件夹之中,template文件夹如下:

里面的模版都是一样的,如下
<!DOCTYPE html>
<html lang="en">

<head>
    <meta charset="UTF-8">
    <meta name="viewport" content="width=device-width, initial-scale=1.0">
    <title>
        <%= htmlWebpackPlugin.options.title %>
    </title>
</head>

<body>
    <div id="root"></div>
</body>
就是body里面加了个id是root的格子,方便我们vue实例的挂载
另外要注意一下,我们两个page的vue实例是公用的一个pinia例子,我不太确定能不能用,所以的话,测试了一下,大体就是创建了一个userInfor的pinia模块,写下如下的配置
import { defineStore } from 'pinia'

export const useUserStore = defineStore('user', {
    state: () => {
        return { userName: "黄烽" }
    },
    // 也可以这样定义
    // state: () => ({ count: 0 })
    actions: {
        changeName () {
            this.userName = "gss"
        }
    },
})
在index页面的views的Home.vue上进行一下展示,这个页面还有一个按钮,触发之后会触发change函数,将页面导向page1.html
<template>
    <div class="msg">this msg is from page index
        <span>this is from span</span><br />
        <span>{{ "userName: " + user.userName }}</span>
        <button @click="change">跳转</button>
    </div>
</template>
<script setup>
import { onMounted } from 'vue';
import { useUserStore } from "../../../pinia/userInfor.js"
const user = useUserStore()
const testFunction = (msg) => {
    alert(msg)
}
onMounted(() => {
    testFunction("hhhh")
})
const change = () => {
    window.location.href = "./page1.html"
}
</script>
<style scoped lang="scss">
.msg {
    color: red;

    span {
        color: green;
    }
}
</style>
对应的page1当中的Home.vue的配置如下
<template>
    <div class="msg">this msg is from page1
        <span>this is from span</span><br />
        <span>{{ "userName: " + user.userName }}</span>
        <button @click="change">改变用户姓名</button>
    </div>
</template>
<script setup>
import { onMounted } from 'vue';
import { useUserStore } from "../../../pinia/userInfor.js"
const user = useUserStore()
const change = () => {
    user.changeName()
}
const testFunction = (msg) => {
    alert(msg)
}
onMounted(() => {
    testFunction("hhhh")
})
</script>
<style scoped lang="scss">
.msg {
    color: red;

    span {
        color: green;
    }
}
</style>
基本上是一样的,除了msg内容不同之外,就是这里的change函数测试的是pinia当中的一个mutation。
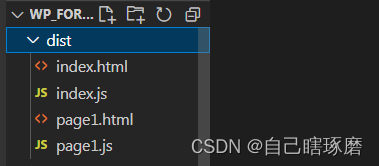
最后一步就是打开dev 服务器测试,npm run dev,然后就行了,虽然有点简单,但是基本的意思是有了 ,打包之后dist文件夹里就是这个样子

三、结尾
其实还是比较简单的,难的还是相关的优化,我个人对优化还是有些模糊的,有机会写几个优化的例子。


 U8W/U8W-Mini使用与常见问题解决
 QT多线程的5种用法,通过使用线程解决UI主界面的耗时操作代码,防止界面卡死。...
 stm32使用HAL库配置串口中断收发数据(保姆级教程)
 分享几个国内免费的ChatGPT镜像网址(亲测有效)
 Allegro16.6差分等长设置及走线总结