您现在的位置是:首页 >其他 >微信小程序xr-frame实现多光源效果网站首页其他
微信小程序xr-frame实现多光源效果
简介微信小程序xr-frame实现多光源效果
1.基础知识:
-
灯光
灯光组件Light用于给场景提供照明,也是阴影的核心。相机组件一般被代理到灯光元素XRLight中使用,其派生自XRNode,对应在xml中的标签为xr-light。
-
主光源以及参数
| 类型 | uniforms | 宏 | 说明 | 书写 |
|---|---|---|---|---|
| 环境光 | 颜色和亮度u_ambientLightColorIns | 是否开启WX_USE_AMBIENT_LIGHT | [r, g, b, ins] | type="ambient" |
| 平行光 | 颜色和亮度u_mainLightColorIns和方向u_mainLightDir | 是否开启WX_USE_MAIN_DIR_LIGHT | [r, g, b, ins]/vec3 | type="directional" |
-
追加光源
| 类型 | 支持 | 书写 |
| 点光源 | 支持颜色color和亮度intensity,以及position决定的位置和range决定的照亮范围。 | type="point" |
| 聚光灯 | 支持颜色color和亮度intensity,以及position决定的位置、rotation决定的方向、range决定的照亮范围,和inner-cone-angle与outer-cone-angle决定的锥角。 | type="spot" |
注明:
- 环境光:360度无死角的光照,不会产生阴影,类似于自然环境中无数物体反射太阳光的效果,一般作为打底的弱亮度光源,保证整个场景不会漆黑一片。
- 平行光:类似于太阳光的平行光照效果,只有平行光能产生阴影,可以设置rotation角度。
- 点光源:类似于发光点,从一点向所有方向发射光线,可以设置position和range光照范围。
- 聚光灯:不同于点光源,他只会向某个范围发射光线,可以设置position、rotation和range还有inner-cone-angle和outer-cone-angle决定锥形角度。
官方案例效果:(来源于:微信开放文档)
1.wxml部分
<xr-scene id="xr-scene" bind:ready="handleReady">
  <xr-assets bind:progress="handleAssetsProgress" bind:loaded="handleAssetsLoaded">
    <xr-asset-material asset-id="standard-mat" effect="standard" />
  </xr-assets>
  <xr-node>
    <xr-node node-id="camera-target" position="0 0 0"></xr-node>
    <xr-mesh node-id="mesh-cube-floor" position="2 -1.01 0" rotation="0 0 0" scale="10 1 10" geometry="cube" material="standard-mat" uniforms="u_baseColorFactor:0.2 0.2 0.2 1" states="cullOn: false"></xr-mesh>
    <xr-mesh node-id="mesh-cube" position="0.6 -0.25 0.8" rotation="0 30 0" scale="0.5 0.5 0.5" geometry="cube" material="standard-mat" uniforms="u_baseColorFactor:1 1 1 1"></xr-mesh>
    <xr-mesh node-id="mesh-sphere" position="2 -0.15 -1" scale="0.4 0.4 0.4" geometry="sphere" material="standard-mat" uniforms="u_baseColorFactor:1 1 1 1"></xr-mesh>
    <xr-mesh node-id="mesh-cylinder" position="-0.2 -0.2 -0.8" scale="0.5 0.4 0.5" geometry="cylinder" material="standard-mat" uniforms="u_baseColorFactor:1 1 1 1"></xr-mesh>
    <xr-mesh node-id="mesh-cube-far" position="3 -0.25 1" rotation="0 -30 0" scale="0.5 0.5 0.5" geometry="cube" material="standard-mat" uniforms="u_baseColorFactor:1 1 1 1"></xr-mesh>
    <xr-camera
      id="camera" node-id="camera" position="-2 1 0" clear-color="0 0 0 1"
      target="camera-target"
      camera-orbit-control=""
    ></xr-camera>
  </xr-node>
  <!-- 光源部分 -->
  <xr-node node-id="lights">
    <xr-light type="ambient" color="1 1 1" intensity="0.1" />
    <xr-light type="directional" rotation="40 170 0" color="1 1 1" intensity="0.2" />
    <xr-light type="point" position="0 0 0" color="1 0 0" range="3" intensity="3" />
    <xr-light type="point" position="2 0 1" color="0 1 0" range="3" intensity="3" />
    <xr-light type="spot" position="0 0 0" color="0 0 1" range="12" intensity="12" rotation="0 120 0" inner-cone-angle="30" outer-cone-angle="35" />
  </xr-node>
</xr-scene>
2.js部分:
Component({
  properties: {
    a: Number,
  },
  data: {
    loaded: false
  },
  lifetimes: {},
  methods: {
    handleReady({detail}) {
      const xrScene = this.scene = detail.value;
      console.log('xr-scene', xrScene);
    },
    handleAssetsProgress: function({detail}) {
      console.log('assets progress', detail.value);
    },
    handleAssetsLoaded: function({detail}) {
      console.log('assets loaded', detail.value);
      this.setData({loaded: true});
    },
    handleRaf: function({detail}) {
      console.log('raf', detail.value);
    }
  }
})
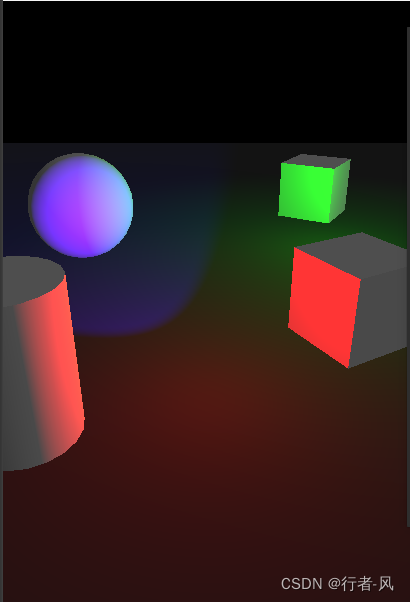
3.案例效果:

风语者!平时喜欢研究各种技术,目前在从事后端开发工作,热爱生活、热爱工作。


 U8W/U8W-Mini使用与常见问题解决
 QT多线程的5种用法,通过使用线程解决UI主界面的耗时操作代码,防止界面卡死。...
 stm32使用HAL库配置串口中断收发数据(保姆级教程)
 分享几个国内免费的ChatGPT镜像网址(亲测有效)
 Allegro16.6差分等长设置及走线总结