您现在的位置是:首页 >技术杂谈 >VUE学习网站首页技术杂谈
VUE学习
VUE学习
#url: jdbc:mysql://xxxx:3306/spm?useUnicode=true&characterEncoding=utf8&zeroDateTimeBehavior=convertToNull&useSSL=true&serverTimezone=GMT%2B8
url: jdbc:mysql://47.113.216.255:3306/spm?useUnicode=true&characterEncoding=utf8&zeroDateTimeBehavior=convertToNull&useSSL=true&serverTimezone=GMT%2B8
username: spm
#password: spm123456
password: fExjHtrWFkEM6yrh

Admin-Token
eyJhbGciOiJIUzUxMiJ9.eyJsb2dpbl91c2VyX2tleSI6IjFiYjg3MDIxLWI3NDYtNDdmNi1hYWE5LTMwNTA0ZDNkYTgyNiJ9.oMBX2DJl8wivExtKSLDOfwigcbmnY0Zm_bNW7hYxtiZUJOJ4qxbVzzPyWB68fgF578t-caSjPaz9g-VdkPq6pQ
https://www.cnblogs.com/Linzj5950/p/15817176.html
使用软件抓取视频
https://zhuanlan.zhihu.com/p/21571327
若依自动生成代码:
https://blog.csdn.net/qq_53480941/article/details/127271858
在若依中使用swagger:
https://blog.csdn.net/yxlyy0909/article/details/125525755
若依验证码url:
http://localhost:8080/captchaImage
CROS错误:
@RequestMapping("/org/tree/children")
@ResponseBody
@CrossOrigin  //解决CROS错误
public ResponseEntity getOrgsTreeChildren(@RequestParam(name = "id",defaultValue = "",required = true) String current_id) {
    log.info("进入控制类");
    try {
        List<Map<String, Object>> res =  orgTreeService.getOrgTreeChildren(current_id);
        log.info("res=>"+res);
        return ResponseEntity.ok(res);
    } catch (Exception e) {
        log.error("getOrgsTreeChildren获取组织树:"+e.getMessage());
        e.printStackTrace();
        return ResponseEntity.err(e.getMessage());
    }
}
一、初始化项目
PS D:企业级Java开发> npm -v
8.15.0
PS D:企业级Java开发> vue -v
Usage: vue <command> [options]

Options:
  -V, --version                              output the version number
  -h, --help                                 display help for command
  ui [options]                               start and open the vue-cli ui
  init [options] <template> <app-name>       generate a project from a remote template (legacy API, requires @vue/cli-init)
  config [options] [value]                   inspect and modify the config
  outdated [options]                         (experimental) check for outdated vue cli service / plugins
  Run vue <command> --help for detailed usage of given command.

PS D:企业级Java开发> npm install webpack -g   #安装webpack

added 77 packages, and audited 79 packages in 14s

found 0 vulnerabilities
PS D:企业级Java开发> vue init webpack vue-ui   #vue-ui:你的项目名

? Project name vue-ui
? Project description A Vue.js project
? Author xiaoshu
? Vue build standalone
? Install vue-router? Yes
? Use ESLint to lint your code? No
? Set up unit tests No
? Setup e2e tests with Nightwatch? No
? Should we run `npm install` for you after the project has been created? (recommended) npm

   vue-cli · Generated "vue-ui".


# Installing project dependencies ...
# ========================

npm WARN deprecated stable@0.1.8: Modern JS already guarantees Array#sort() is a stable sort, so this library is deprecated. See the compatibility table on MDN: https://developer.mozilla.org/en-US/docs/Web/JavaScript/Reference/Global_Objects/Array/sort#browser_compatibility
npm WARN deprecated source-map-url@0.4.1: See https://github.com/lydell/source-map-url#deprecated
npm WARN deprecated flatten@1.0.3: flatten is deprecated in favor of utility frameworks such as lodash.
npm WARN deprecated urix@0.1.0: Please see https://github.com/lydell/urix#deprecated
npm WARN deprecated browserslist@1.7.7: Browserslist 2 could fail on reading Browserslist >3.0 config used in other tools.
npm WARN deprecated browserslist@1.7.7: Browserslist 2 could fail on reading Browserslist >3.0 config used in other tools.
npm WARN deprecated browserslist@1.7.7: Browserslist 2 could fail on reading Browserslist >3.0 config used in other tools.
npm WARN deprecated acorn-dynamic-import@2.0.2: This is probably built in to whatever tool you're using. If you still need it... idk
npm WARN deprecated source-map-resolve@0.5.3: See https://github.com/lydell/source-map-resolve#deprecated
npm WARN deprecated chokidar@2.1.8: Chokidar 2 does not receive security updates since 2019. Upgrade to chokidar 3 with 15x fewer dependencies
npm WARN deprecated chokidar@2.1.8: Chokidar 2 does not receive security updates since 2019. Upgrade to chokidar 3 with 15x fewer dependencies
npm WARN deprecated resolve-url@0.2.1: https://github.com/lydell/resolve-url#deprecated
npm WARN deprecated browserslist@2.11.3: Browserslist 2 could fail on reading Browserslist >3.0 config used in other tools.
npm WARN deprecated html-webpack-plugin@2.30.1: out of support
npm WARN deprecated extract-text-webpack-plugin@3.0.2: Deprecated. Please use https://github.com/webpack-contrib/mini-css-extract-plugin
npm WARN deprecated querystring@0.2.0: The querystring API is considered Legacy. new code should use the URLSearchParams API instead.
npm WARN deprecated uuid@3.4.0: Please upgrade  to version 7 or higher.  Older versions may use Math.random() in certain circumstances, which is known to be problematic.  See https://v8.dev/blog/math-random for details.
npm WARN deprecated uglify-es@3.3.9: support for ECMAScript is superseded by `uglify-js` as of v3.13.0
npm WARN deprecated bfj-node4@5.3.1: Switch to the `bfj` package for fixes and new features!
npm WARN deprecated svgo@0.7.2: This SVGO version is no longer supported. Upgrade to v2.x.x.
npm WARN deprecated svgo@1.3.2: This SVGO version is no longer supported. Upgrade to v2.x.x.
npm WARN deprecated core-js@2.6.12: core-js@<3.23.3 is no longer maintained and not recommended for usage due to the number of issues. Because of the V8 engine whims, feature detection in old core-js versions could cause a slowdown up to 100x even if nothing is polyfilled. Some versions have web compatibility issues. Please, upgrade your dependencies to the actual version of core-js.

added 1307 packages, and audited 1308 packages in 1m

85 packages are looking for funding
  run `npm fund` for details

86 vulnerabilities (1 low, 49 moderate, 29 high, 7 critical)

To address issues that do not require attention, run:
  npm audit fix

To address all issues (including breaking changes), run:
  npm audit fix --force

Run `npm audit` for details.

# Project initialization finished!
# ========================

To get started:

  cd vue-ui
  npm run dev

Documentation can be found at https://vuejs-templates.github.io/webpack

PS D:企业级Java开发> cd vue-ui
PS D:企业级Java开发vue-ui> npm install

up to date, audited 1308 packages in 7s

85 packages are looking for funding
  run `npm fund` for details

86 vulnerabilities (1 low, 49 moderate, 29 high, 7 critical)

To address issues that do not require attention, run:
  npm audit fix

To address all issues (including breaking changes), run:
  npm audit fix --force

Run `npm audit` for details.
PS D:企业级Java开发vue-uivue-ui> npm run dev #运行项目

> vue-ui@1.0.0 dev
> webpack-dev-server --inline --progress --config build/webpack.dev.conf.js

(node:17972) [DEP0111] DeprecationWarning: Access to process.binding('http_parser') is deprecated.
(Use `node --trace-deprecation ...` to show where the warning was created)
 10%  1 12%  12%  12%  12%  12%  12%  13%  13%  13% building modules 27/30 modules 3 active ...:企业级Java开发vue-uivue-uisrcApp.vue{ parser: "babylon" } is deprecated; we now treat it as { parser: "babel" }.
 14%  14%  1 95% emitting

 DONE  Compiled successfully in 2799ms                                                                                                                                           09:39:31

 I  Your application is running here: http://localhost:8080   #访问网站
打包项目
PS D:企业级Java开发vue-ui> npm run build

> vue-ui@1.0.0 build
> node build/build.js

- building for production...(node:15036) Warning: Accessing non-existent property 'cat' of module exports inside circular dependency
(Use `node --trace-warnings ...` to show where the warning was created)
(node:15036) Warning: Accessing non-existent property 'cd' of module exports inside circular dependency
(node:15036) Warning: Accessing non-existent property 'chmod' of module exports inside circular dependency
(node:15036) Warning: Accessing non-existent property 'cp' of module exports inside circular dependency
(node:15036) Warning: Accessing non-existent property 'dirs' of module exports inside circular dependency
(node:15036) Warning: Accessing non-existent property 'pushd' of module exports inside circular dependency
(node:15036) Warning: Accessing non-existent property 'popd' of module exports inside circular dependency
(node:15036) Warning: Accessing non-existent property 'echo' of module exports inside circular dependency
(node:15036) Warning: Accessing non-existent property 'tempdir' of module exports inside circular dependency
(node:15036) Warning: Accessing non-existent property 'pwd' of module exports inside circular dependency
(node:15036) Warning: Accessing non-existent property 'exec' of module exports inside circular dependency
(node:15036) Warning: Accessing non-existent property 'ls' of module exports inside circular dependency
(node:15036) Warning: Accessing non-existent property 'find' of module exports inside circular dependency
(node:15036) Warning: Accessing non-existent property 'grep' of module exports inside circular dependency
(node:15036) Warning: Accessing non-existent property 'head' of module exports inside circular dependency
(node:15036) Warning: Accessing non-existent property 'ln' of module exports inside circular dependency
(node:15036) Warning: Accessing non-existent property 'mkdir' of module exports inside circular dependency
(node:15036) Warning: Accessing non-existent property 'rm' of module exports inside circular dependency
(node:15036) Warning: Accessing non-existent property 'mv' of module exports inside circular dependency
(node:15036) Warning: Accessing non-existent property 'sed' of module exports inside circular dependency
(node:15036) Warning: Accessing non-existent property 'set' of module exports inside circular dependency
(node:15036) Warning: Accessing non-existent property 'sort' of module exports inside circular dependency
(node:15036) Warning: Accessing non-existent property 'tail' of module exports inside circular dependency
(node:15036) Warning: Accessing non-existent property 'test' of module exports inside circular dependency
(node:15036) Warning: Accessing non-existent property 'to' of module exports inside circular dependency
(node:15036) Warning: Accessing non-existent property 'toEnd' of module exports inside circular dependency
(node:15036) Warning: Accessing non-existent property 'touch' of module exports inside circular dependency
(node:15036) Warning: Accessing non-existent property 'uniq' of module exports inside circular dependency
(node:15036) Warning: Accessing non-existent property 'which' of module exports inside circular dependency
Hash: 155da69b16365c5acc35
Version: webpack 3.12.0
Time: 5887ms
                                                  Asset       Size  Chunks             Chunk Names
               static/js/vendor.43019ad10f30041714f6.js     131 kB       0  [emitted]  vendor
                  static/js/app.b22ce679862c47a75225.js    11.6 kB       1  [emitted]  app
             static/js/manifest.2ae2e69a05c33dfc65f8.js  857 bytes       2  [emitted]  manifest
    static/css/app.30790115300ab27614ce176899523b62.css  432 bytes       1  [emitted]  app
static/css/app.30790115300ab27614ce176899523b62.css.map  797 bytes          [emitted]
           static/js/vendor.43019ad10f30041714f6.js.map     729 kB       0  [emitted]  vendor
              static/js/app.b22ce679862c47a75225.js.map    22.2 kB       1  [emitted]  app
         static/js/manifest.2ae2e69a05c33dfc65f8.js.map    4.97 kB       2  [emitted]  manifest
                                             index.html  508 bytes          [emitted]

  Build complete.

  Tip: built files are meant to be served over an HTTP server.
  Opening index.html over file:// won't work.

PS D:企业级Java开发vue-ui>
http://localhost:8080/#/
打包成功即可出现dist文件夹
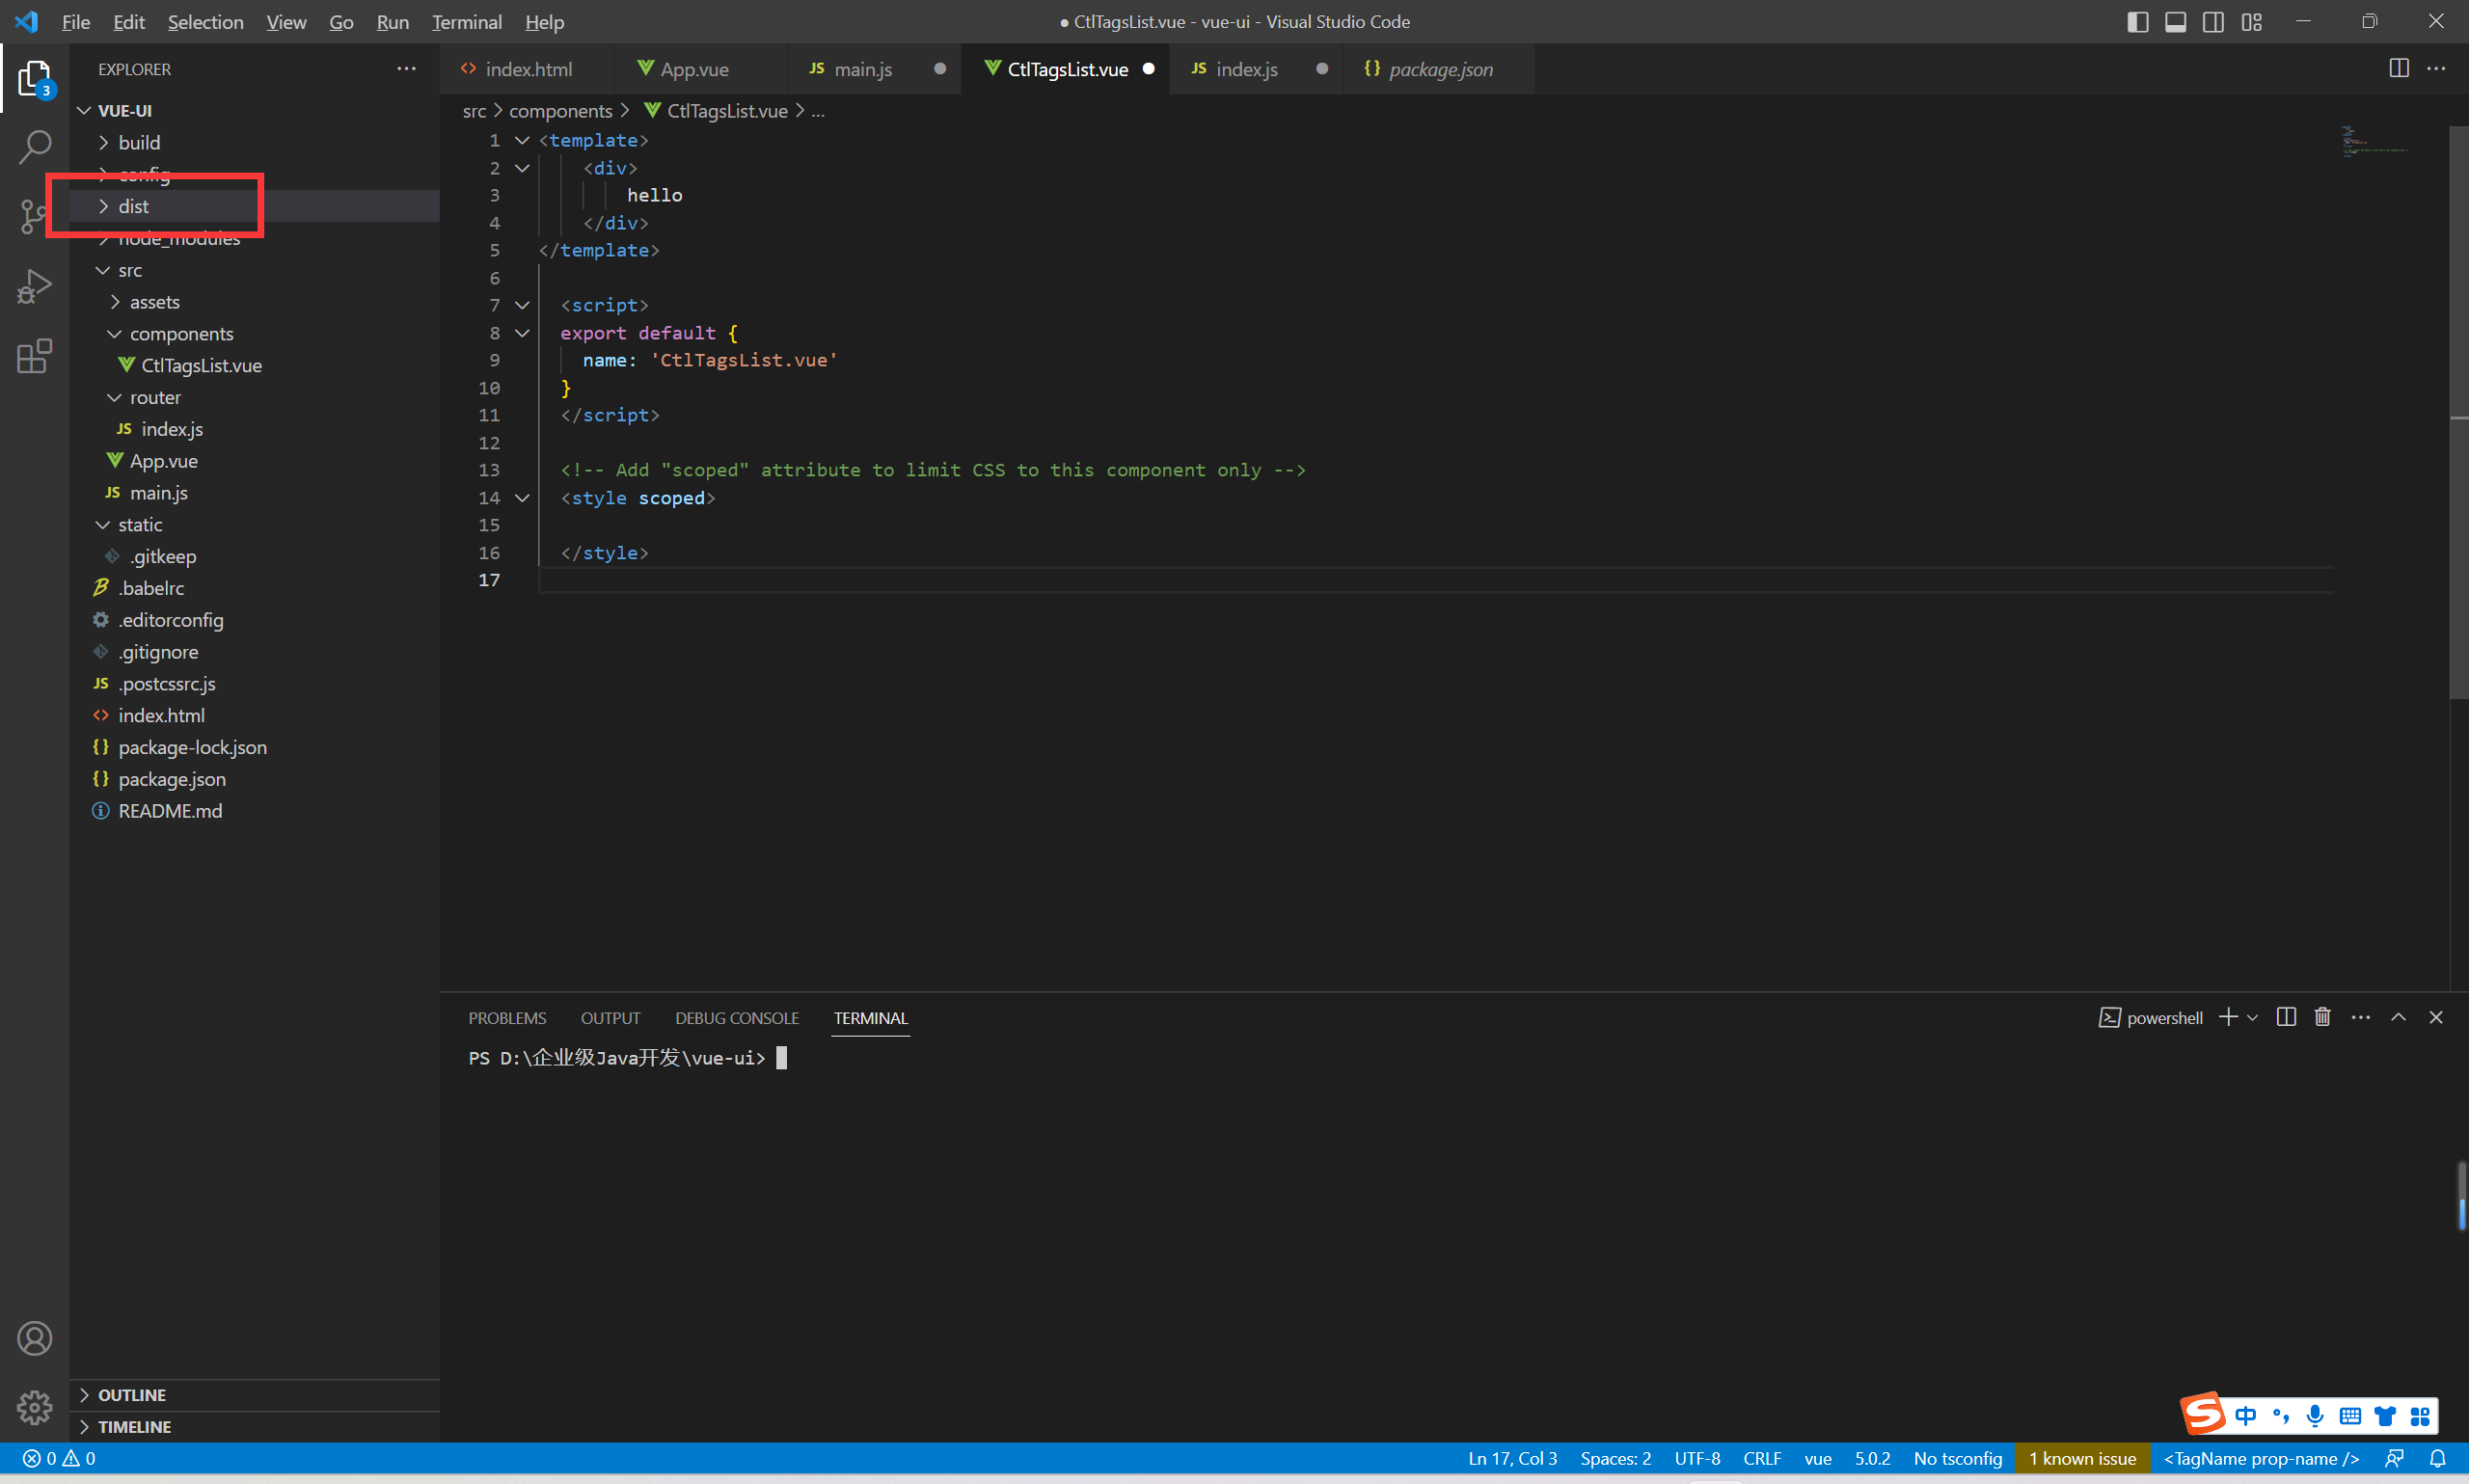
二、使用nginx部署项目
访问网址:http://nginx.org/
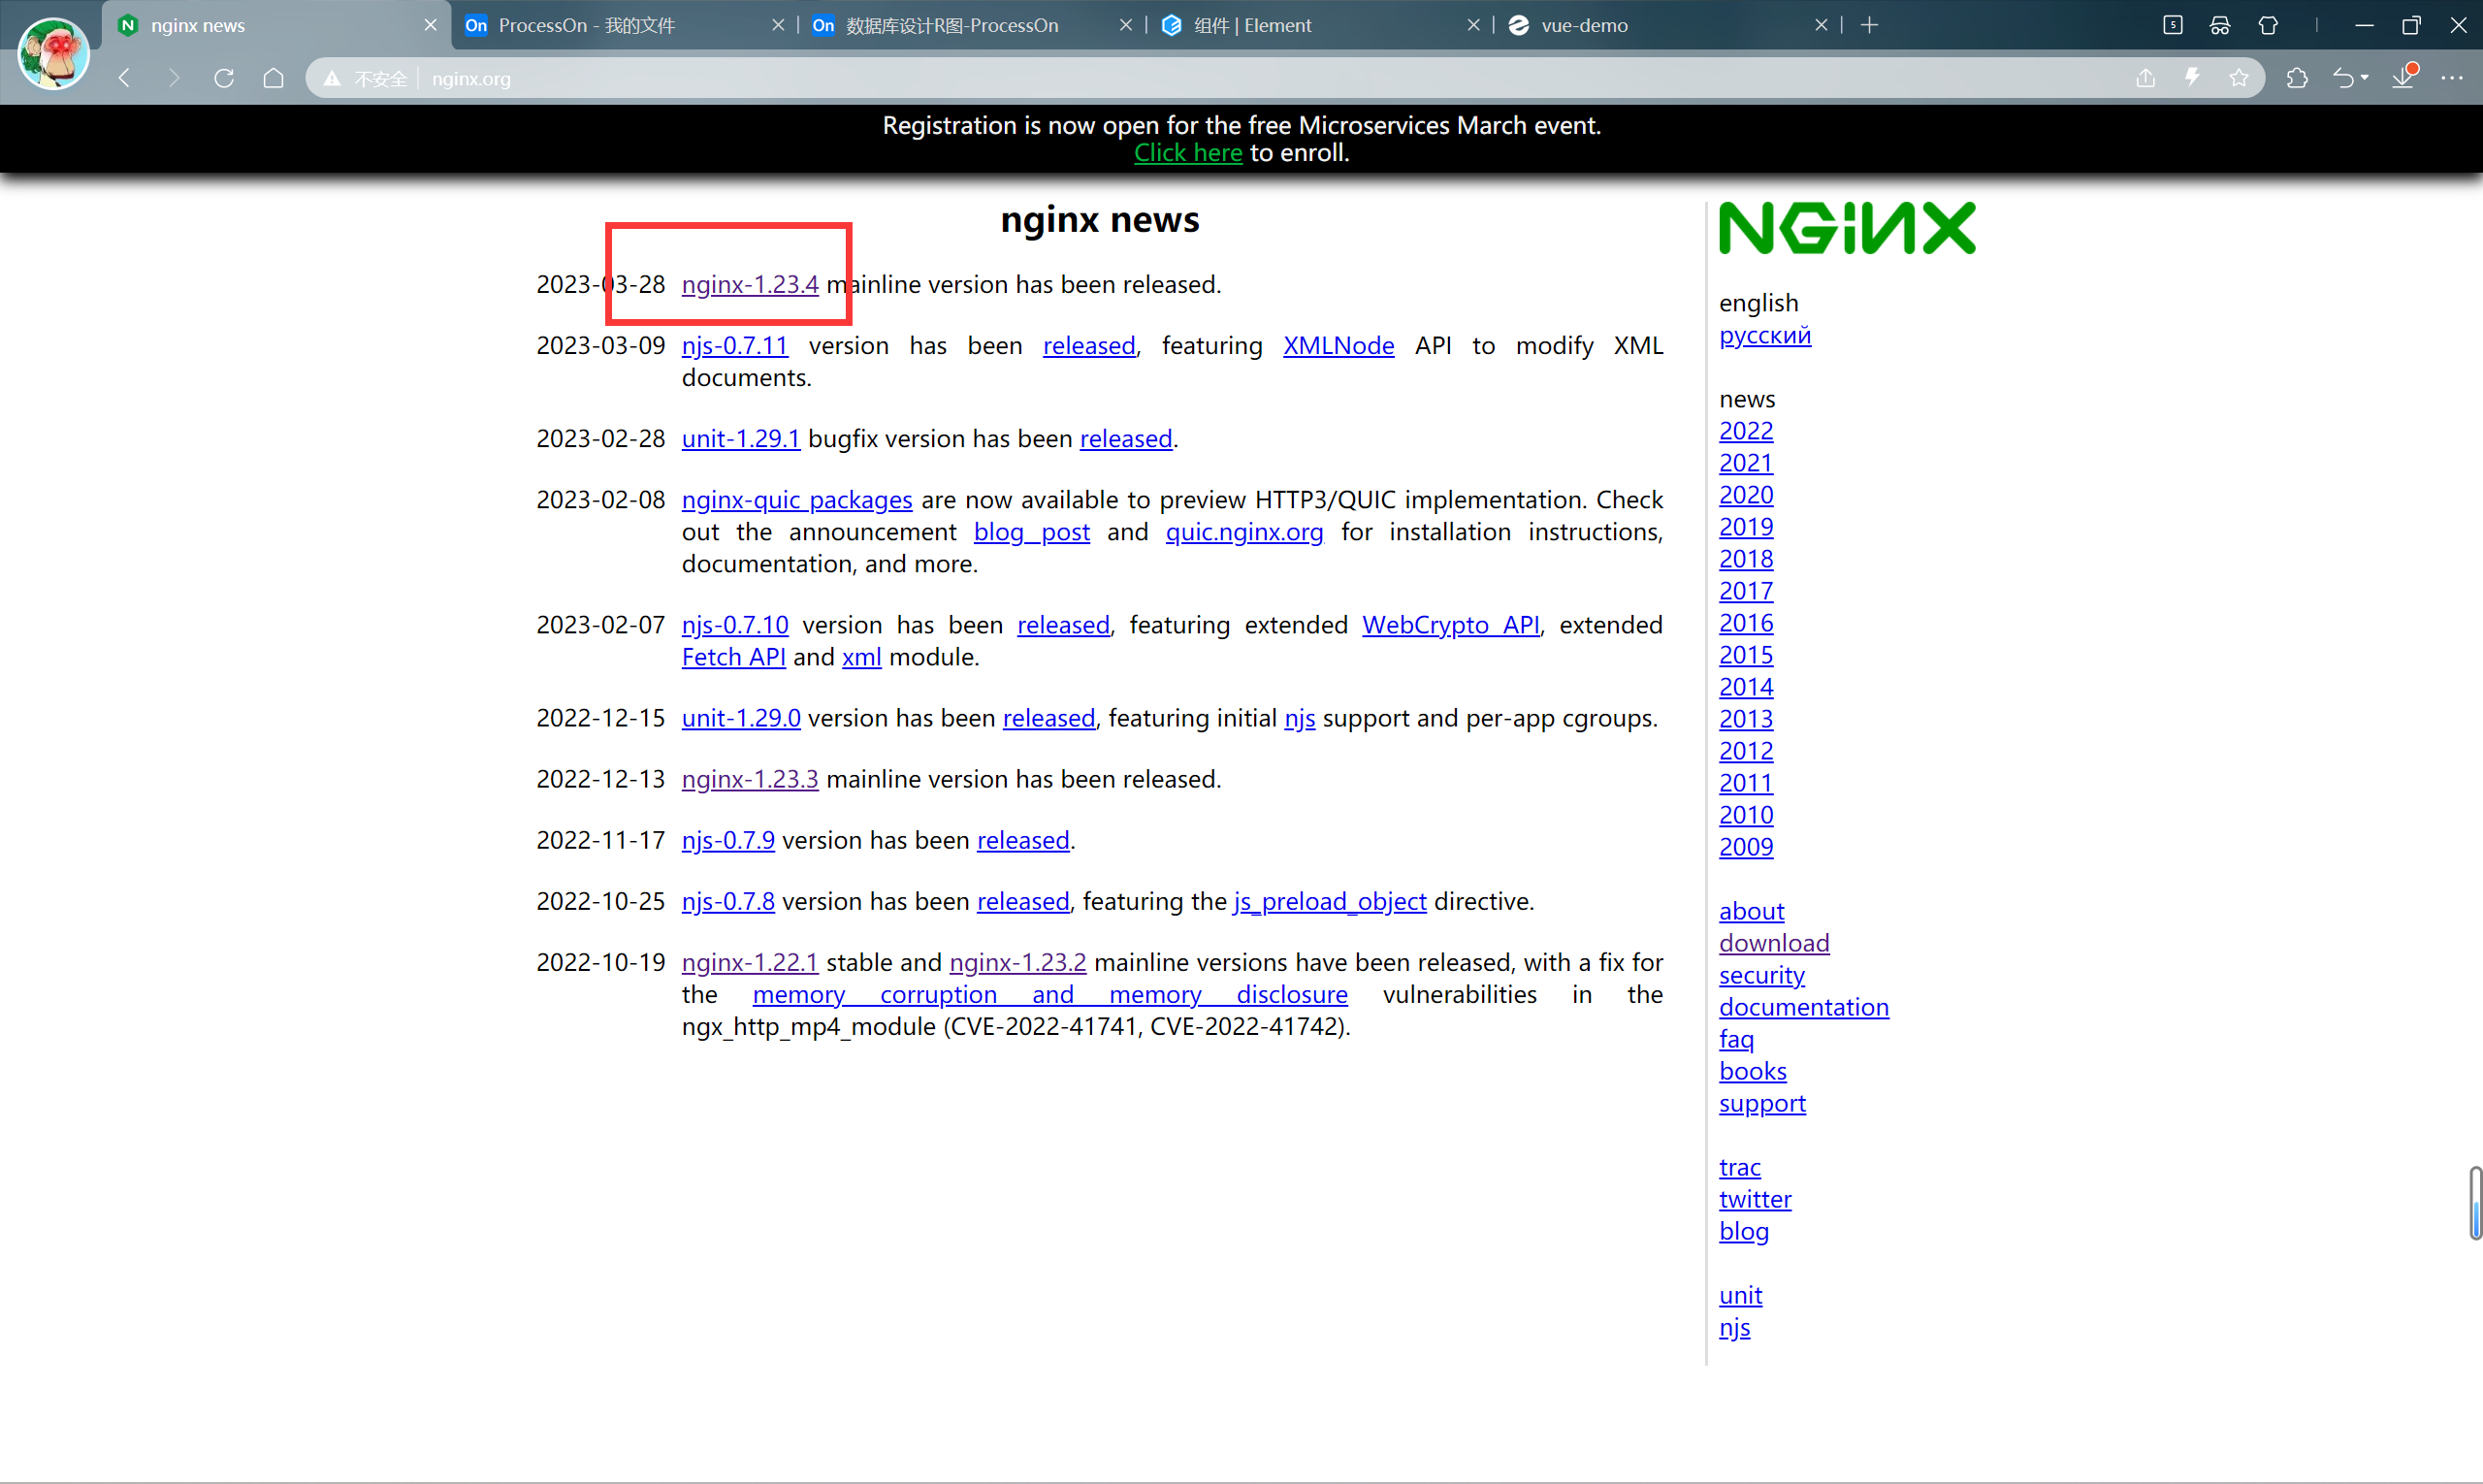
点击进入下载
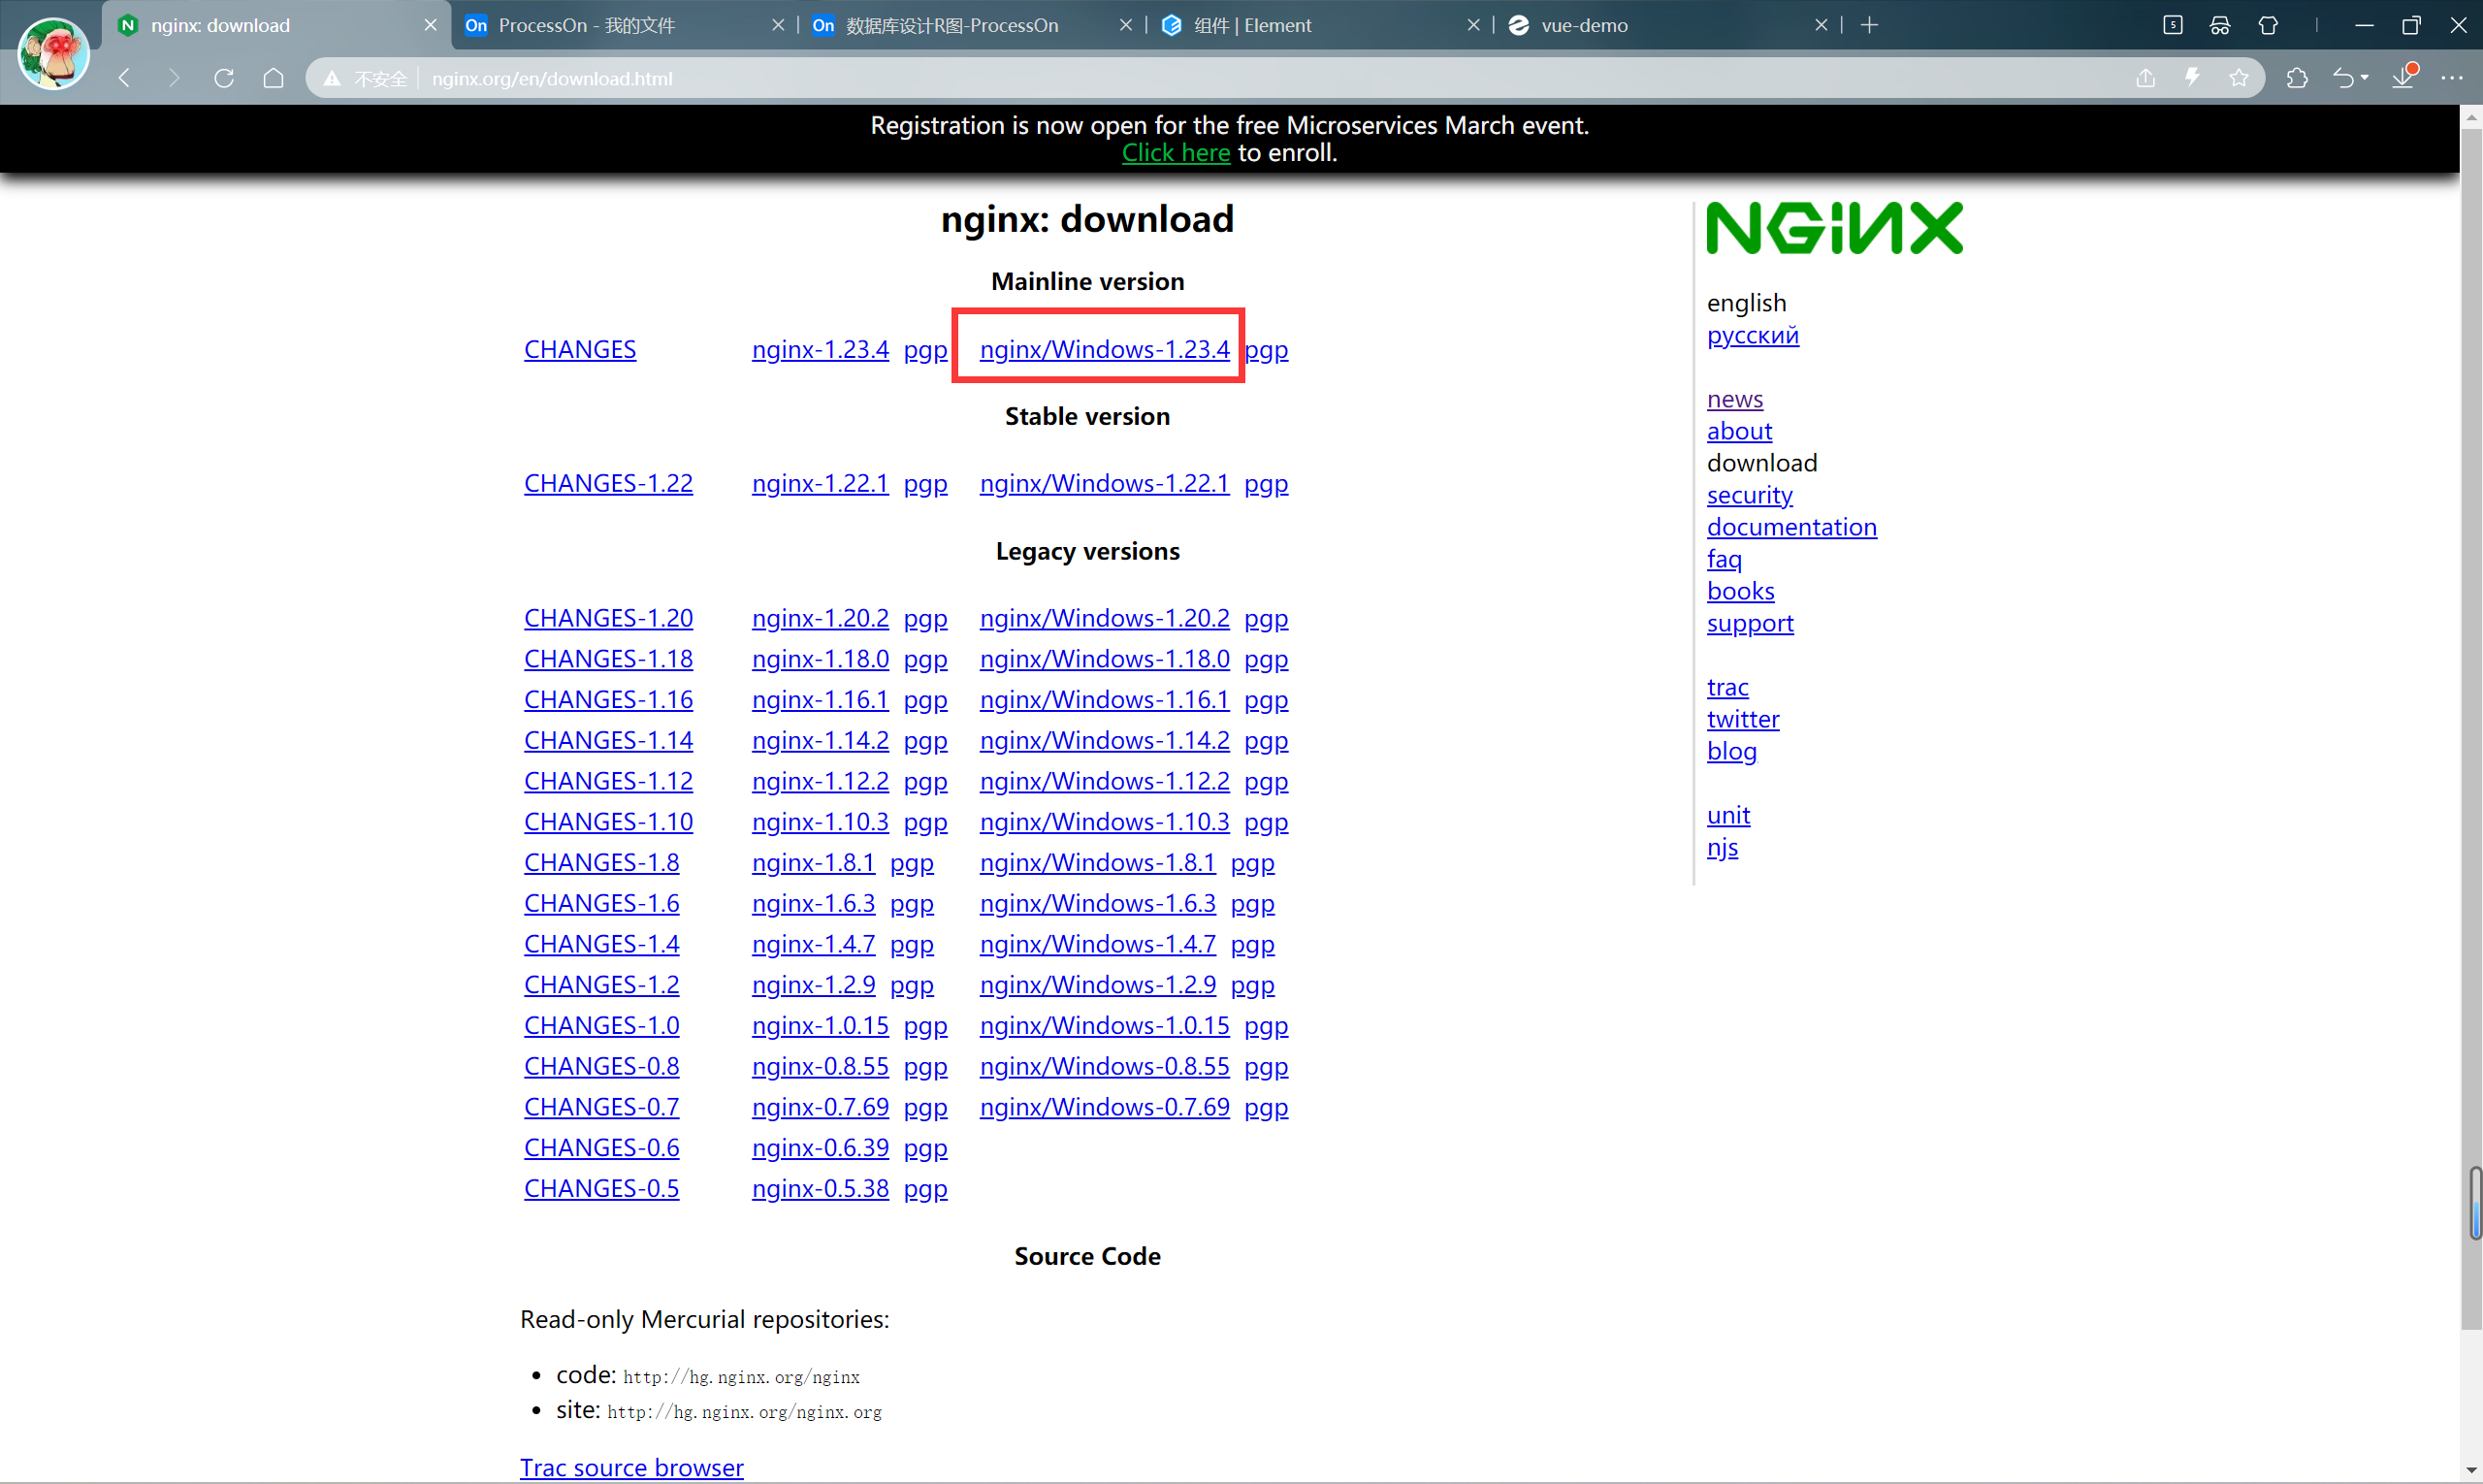
下载成功后解压并将dist文件夹中的文件放到 /nginx/html 目录下
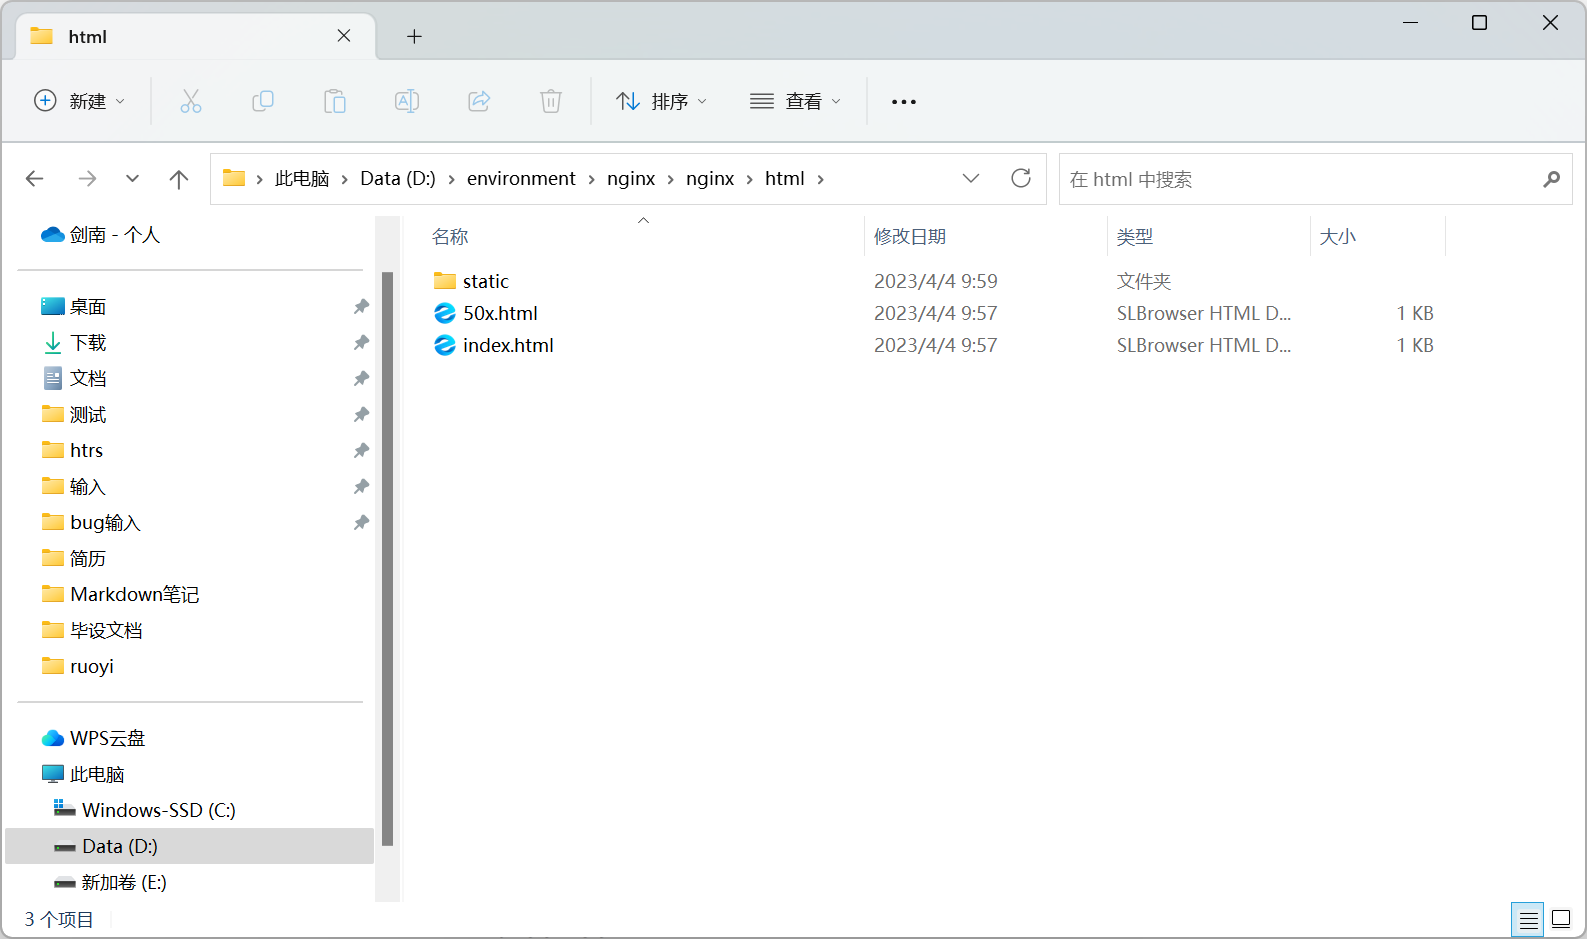
打开终端运行 nginx.exe
Microsoft Windows [版本 10.0.22624.1391]
(c) Microsoft Corporation。保留所有权利。

D:environment
ginx
ginx>nginx.exe
nginx: [emerg] bind() to 0.0.0.0:80 failed (10013: An attempt was made to access a socket in a way forbidden by its access permissions)

D:environment
ginx
ginx>
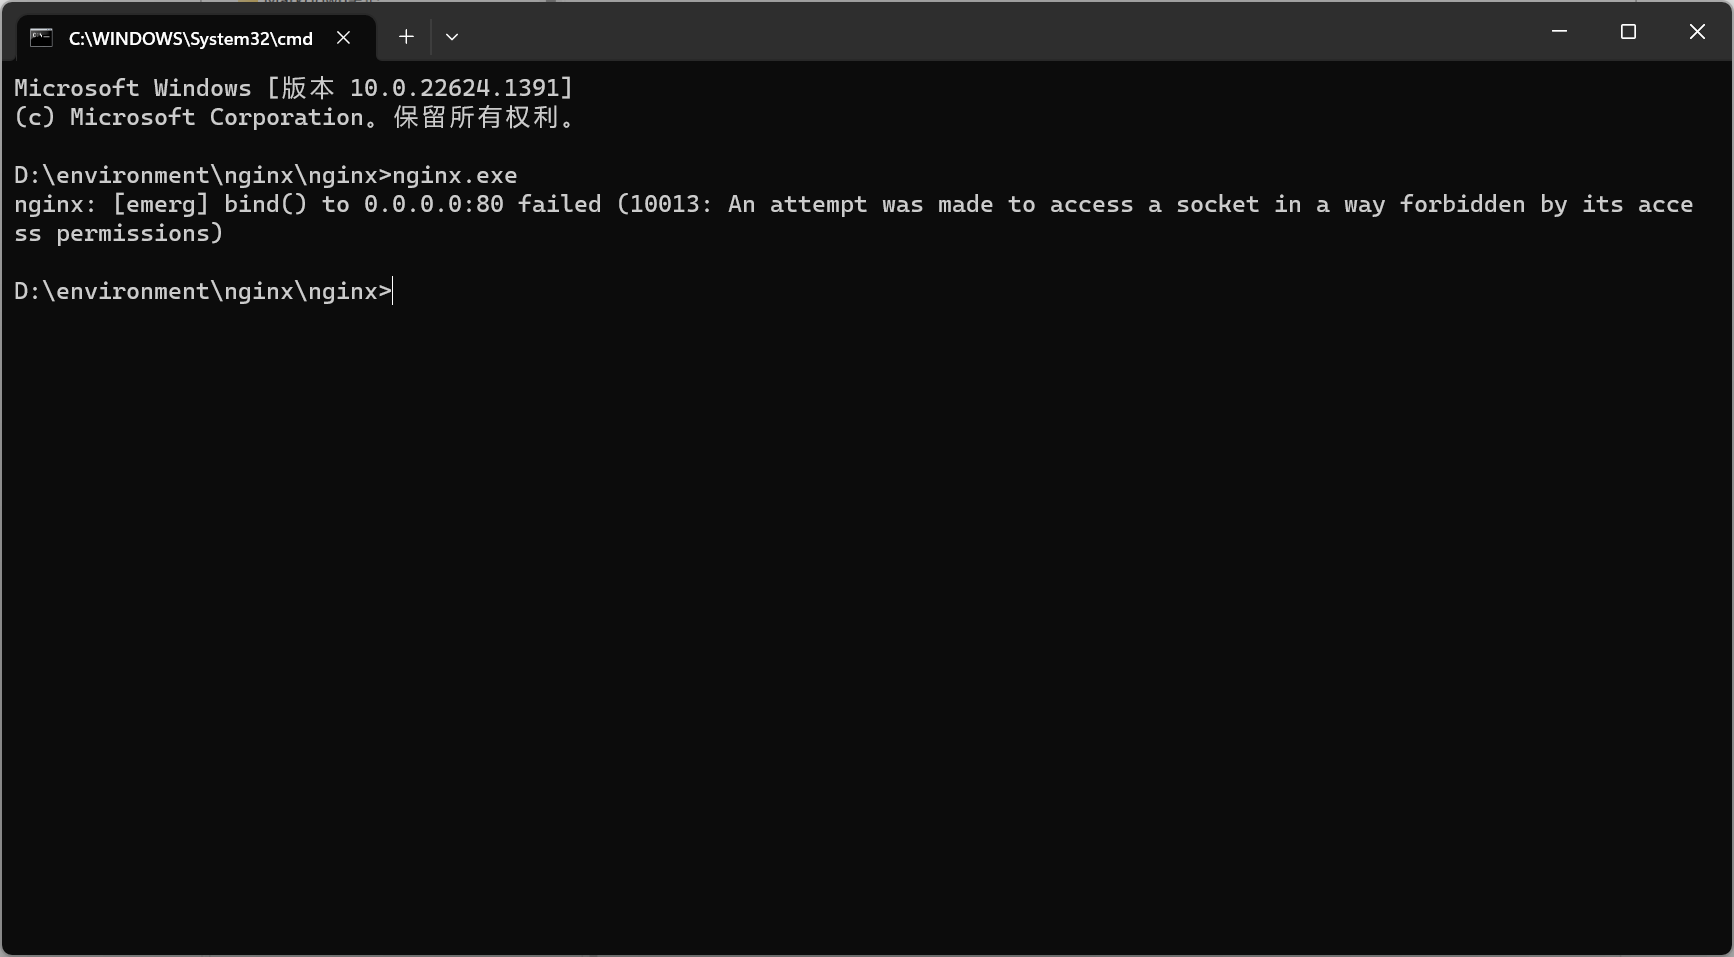
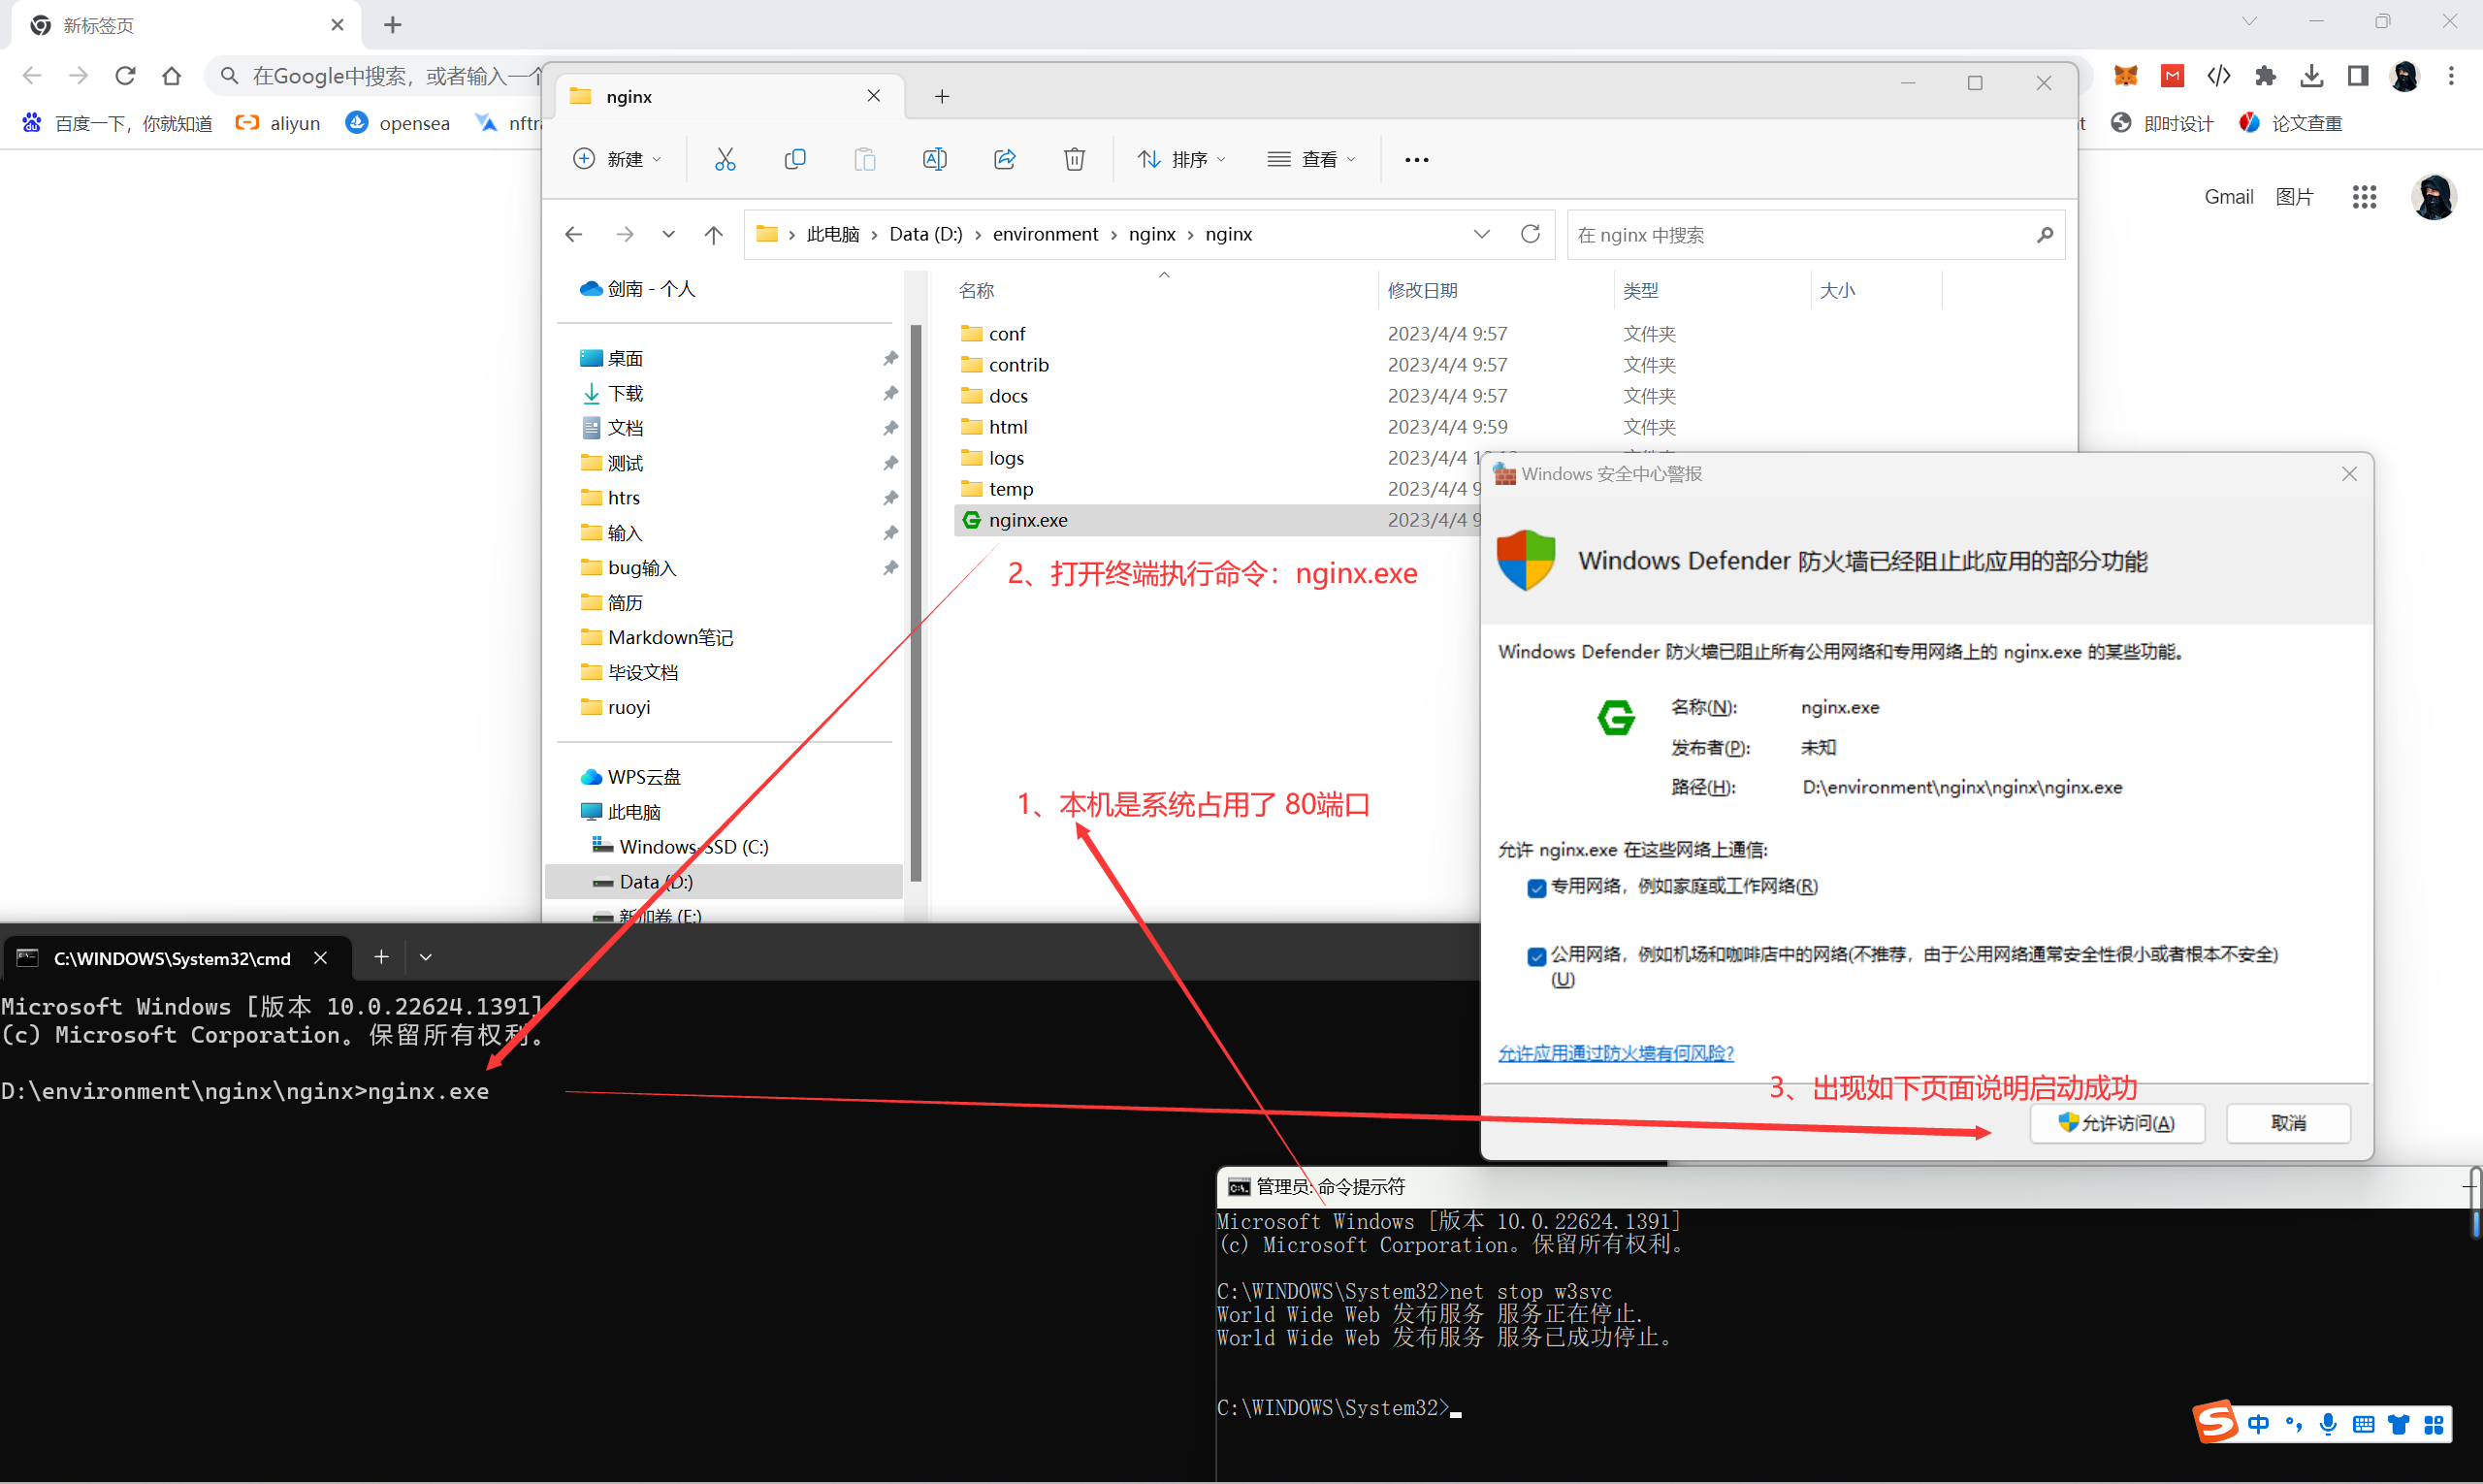
踩坑链接 https://blog.csdn.net/zch981964/article/details/127318302
IIS服务占用80端口
访问 http://localhost:80/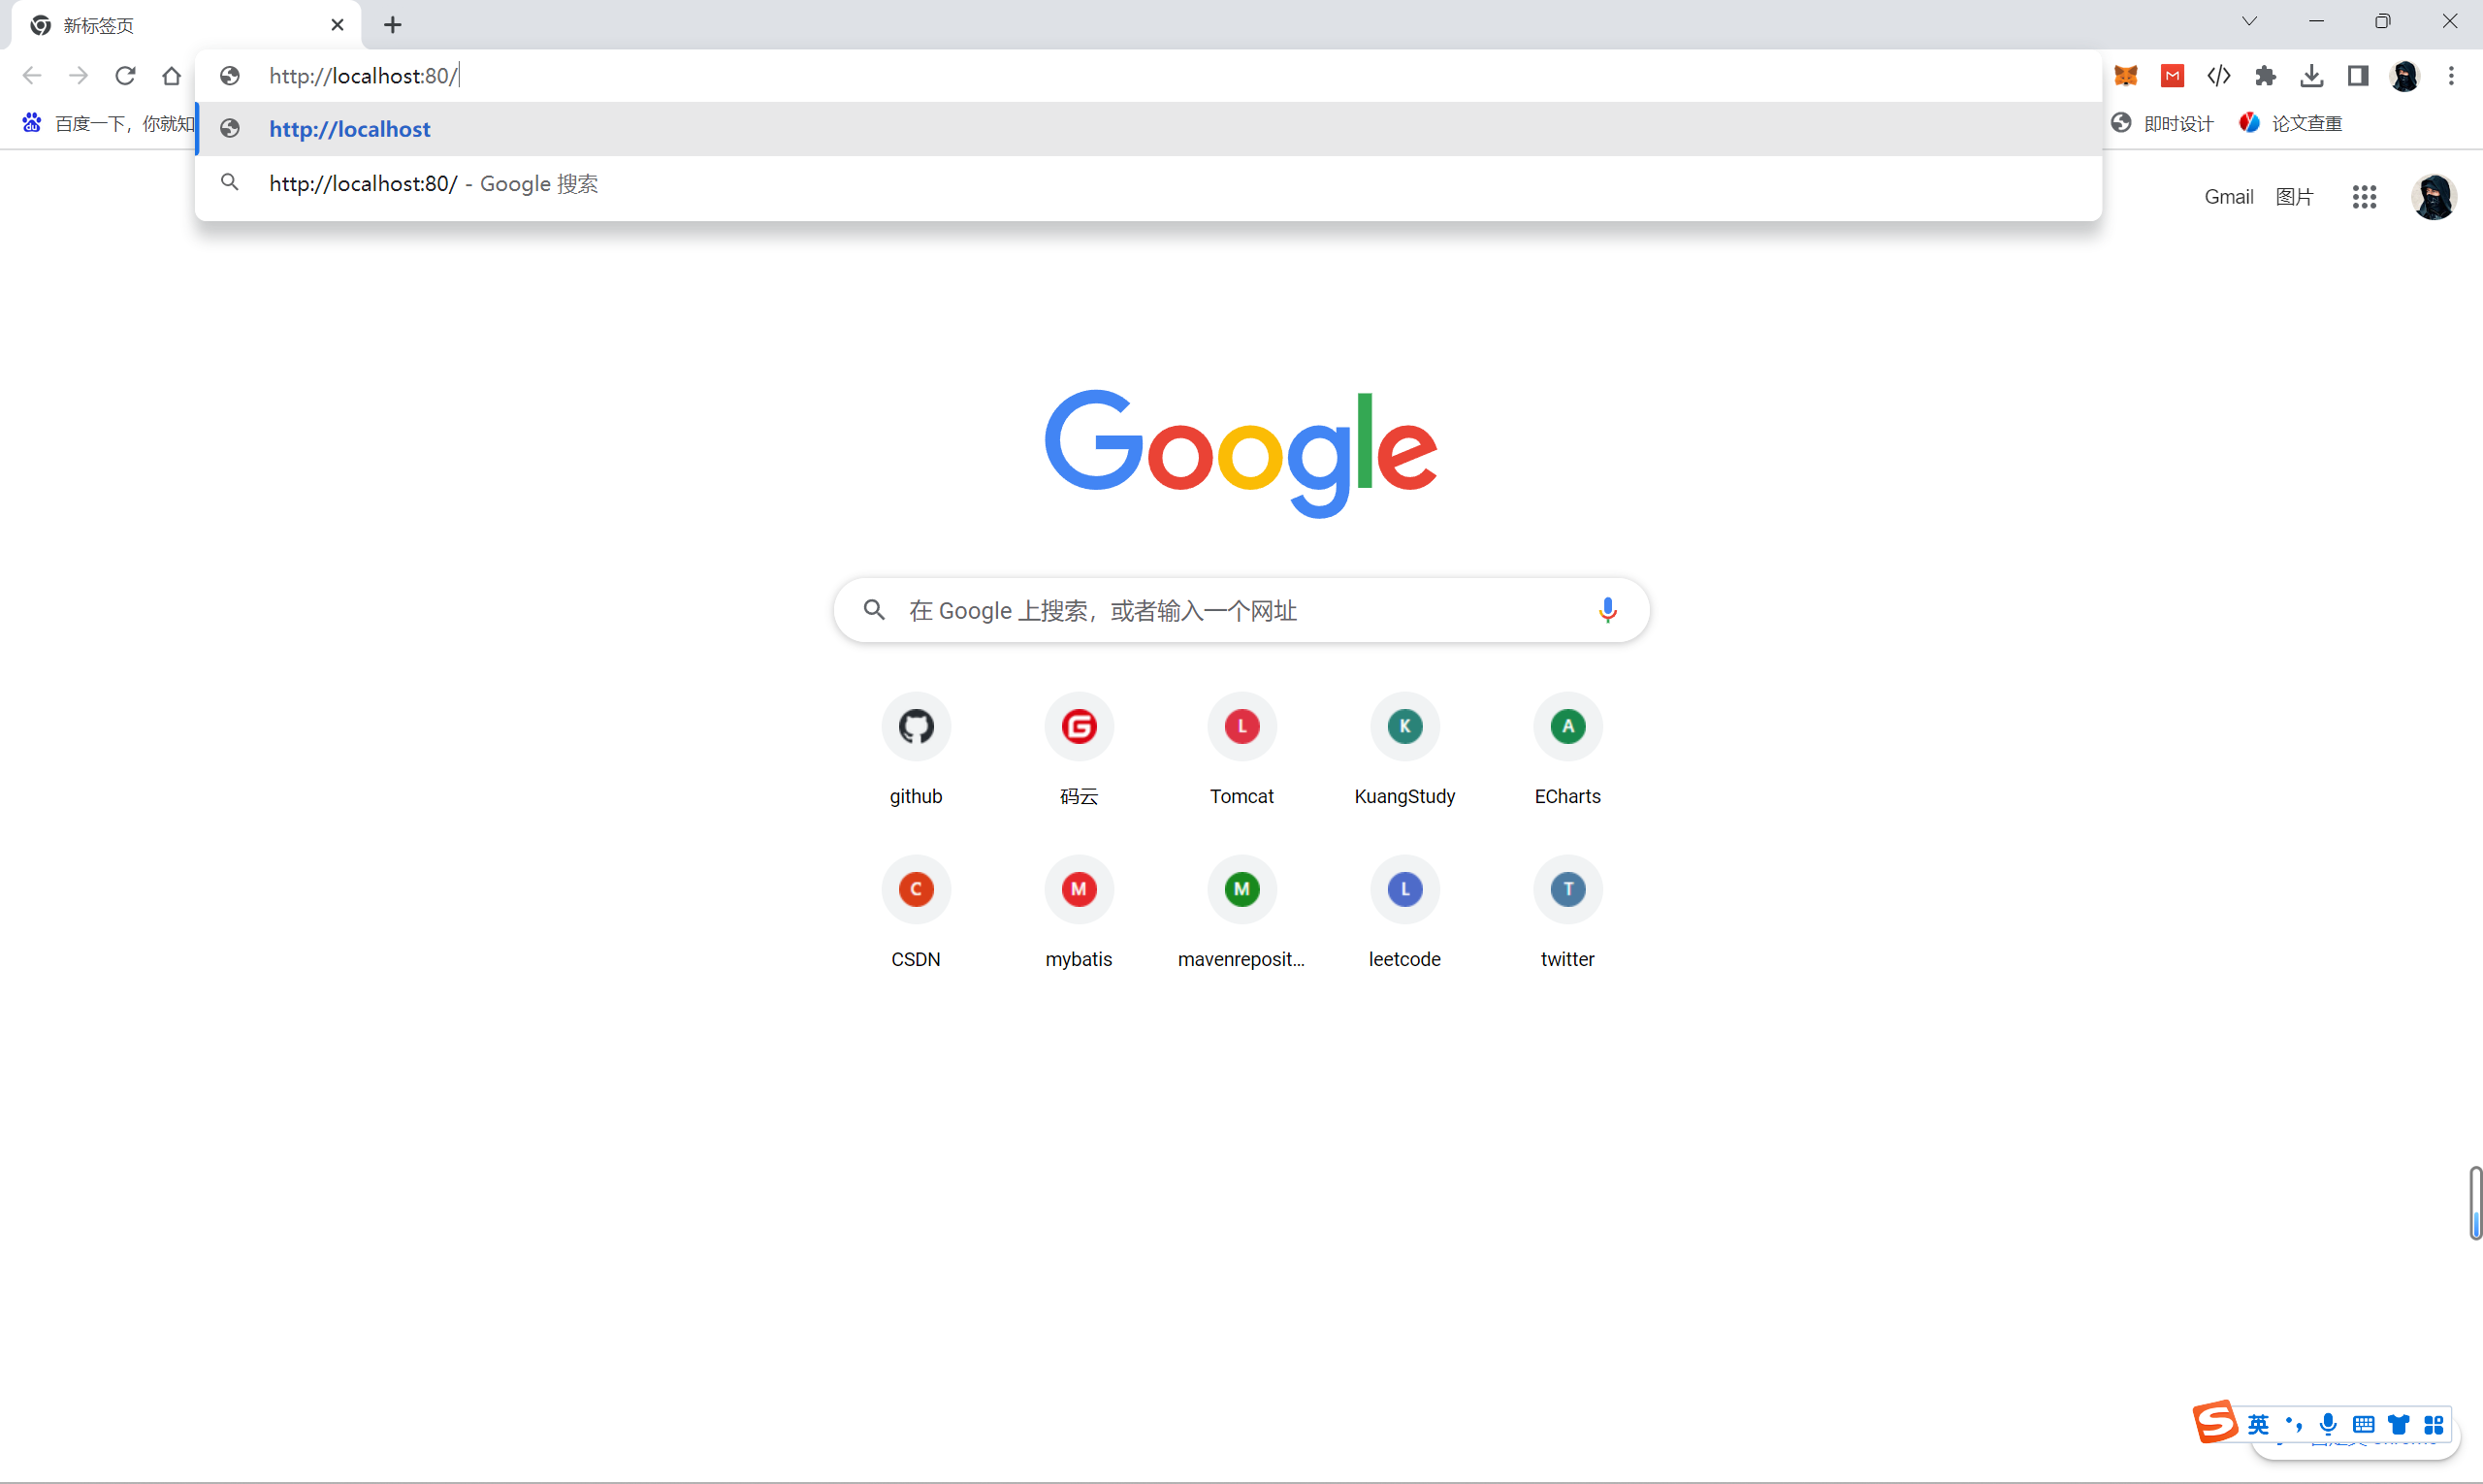
访问成功

三、实战
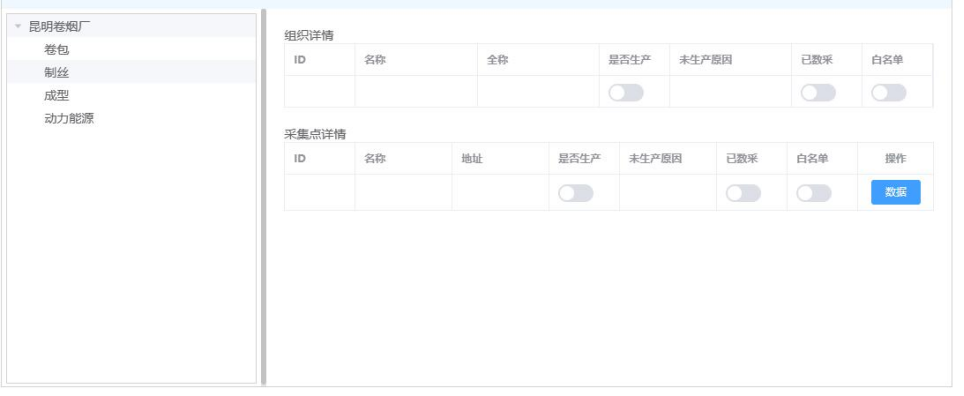
考核练习,用SpringBoot+Vue+element开发一个如图功能界面,4.22提交代码和实验报告
-
树状
-- id name parent_id -- id name parent_id -- id name parent_id -- id name parent_id -
数据库表设计
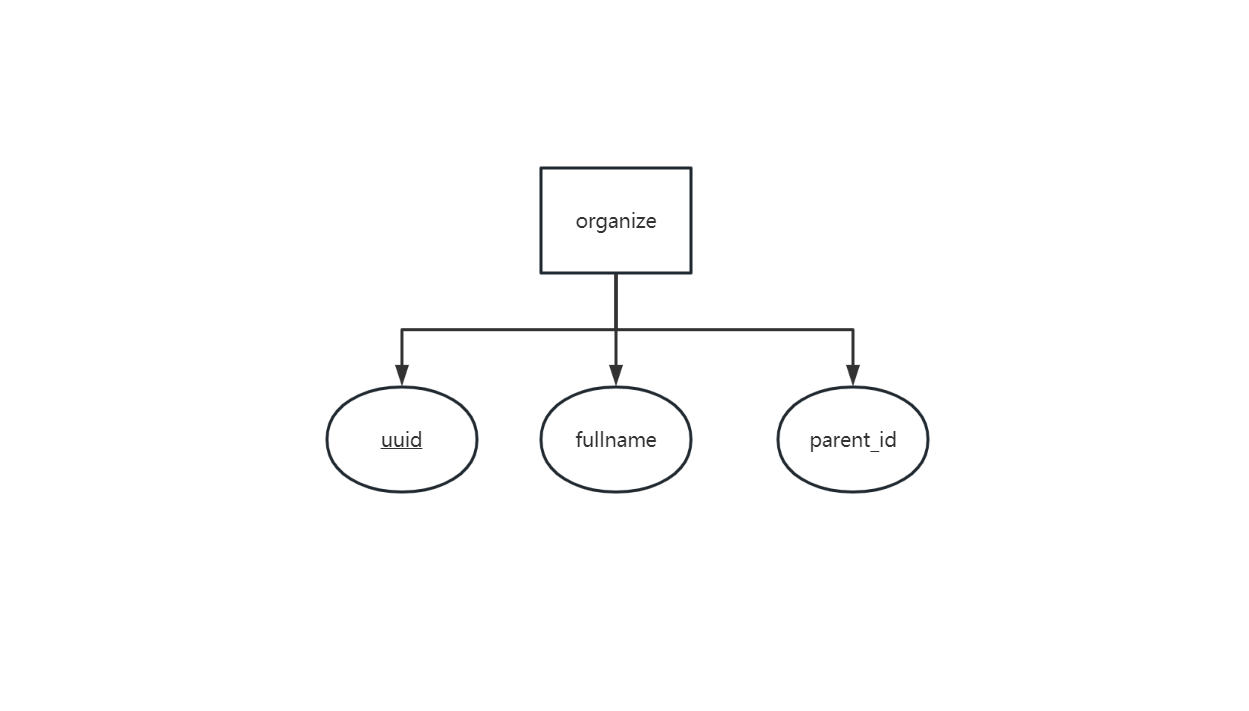
-- 根据⼀个⽗节点查询所有⼦节点(包含⾃⾝)
SELECT au.uuid, au.fullname, au.parent_id
  FROM (SELECT * FROM view_organize WHERE parent_id IS NOT NULL) au,
       (SELECT @parent_id := '1000') pd
 WHERE FIND_IN_SET(parent_id, @parent_id) > 0
   AND @parent_id := concat(@parent_id, ',', uuid)
UNION
SELECT uuid, fullname, parent_id
  FROM view_organize
 WHERE uuid = '1000'
 ORDER BY uuid;

 -- 一次加载某节点下全部节点
SELECT
	au.uuid AS organize_id,
	au.fullname,
	au.parent_id,
	au.organize_code
FROM
	(
		SELECT
			*
		FROM
			t_view_organize au
		WHERE
			parent_id IS NOT NULL
	) au,
	(SELECT @parent_id := '1100') pd
WHERE
	FIND_IN_SET(parent_id, @parent_id) > 0
AND @parent_id := concat(@parent_id, ',', uuid)
UNION
	SELECT
		uuid AS organize_id,
		fullname,
		parent_id,
		organize_code
	FROM
		t_view_organize
	WHERE
		uuid = '1100';

--  树节点懒加载,按父节点查询子集
SELECT
	t.uuid,
	t.ORGANIZE_NAME
FROM
	t_view_organize t
WHERE
	PARENT_ID = '110020';
-
创建数据库,插入数据出现如下错误
CREATE TABLE `organize` (
  `uuid` varchar(128) CHARACTER SET utf8mb4 NOT NULL COMMENT 'UUID',
  `fullname` varchar(128) DEFAULT NULL COMMENT '完整名称',
  `parent_id` varchar(128) DEFAULT NULL COMMENT '父级id',
  PRIMARY KEY (`uuid`)
) ENGINE=InnoDB DEFAULT CHARSET=latin1;
-
解决方案:
1、首先检查当前表格的字符集(出现问题的地方是name,考虑是字符上的问题)2、检查数据库的字符集
SHOW CREATE DATABASE vue;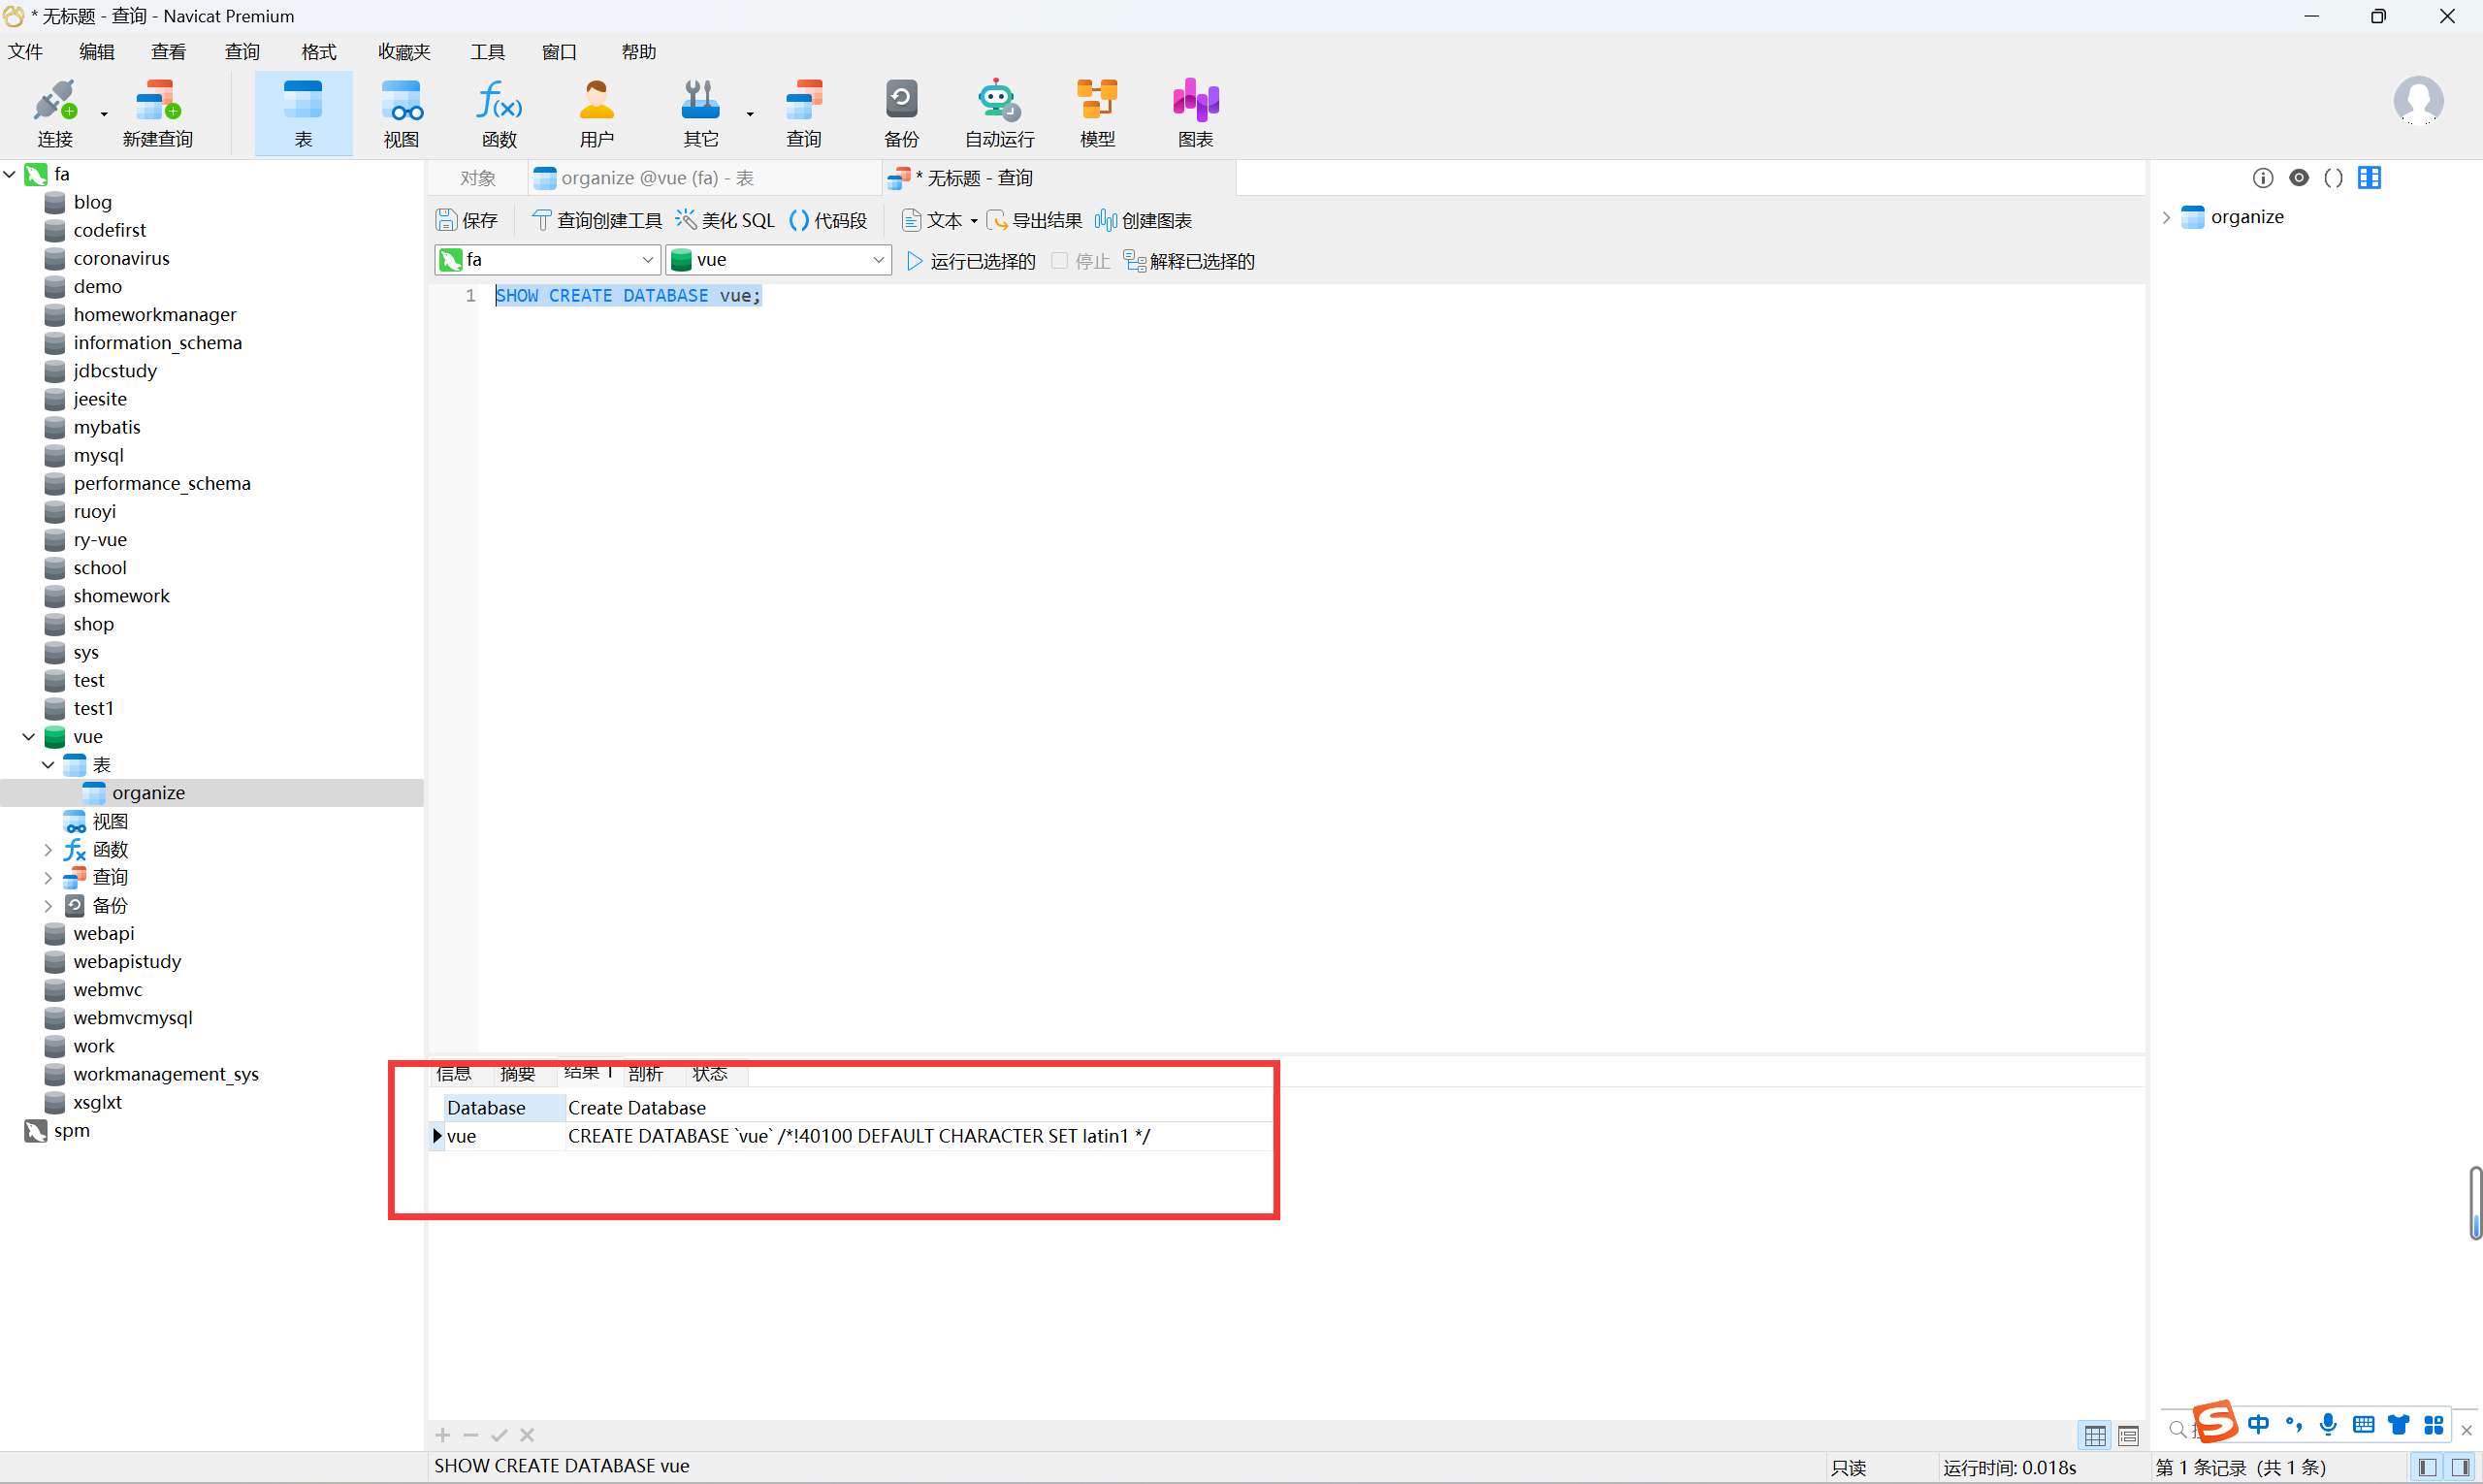
/* ALTER DATABASE vue CHARACTER SET latin1; */
ALTER DATABASE vue CHARACTER SET utf8;/*修改数据库字符集*/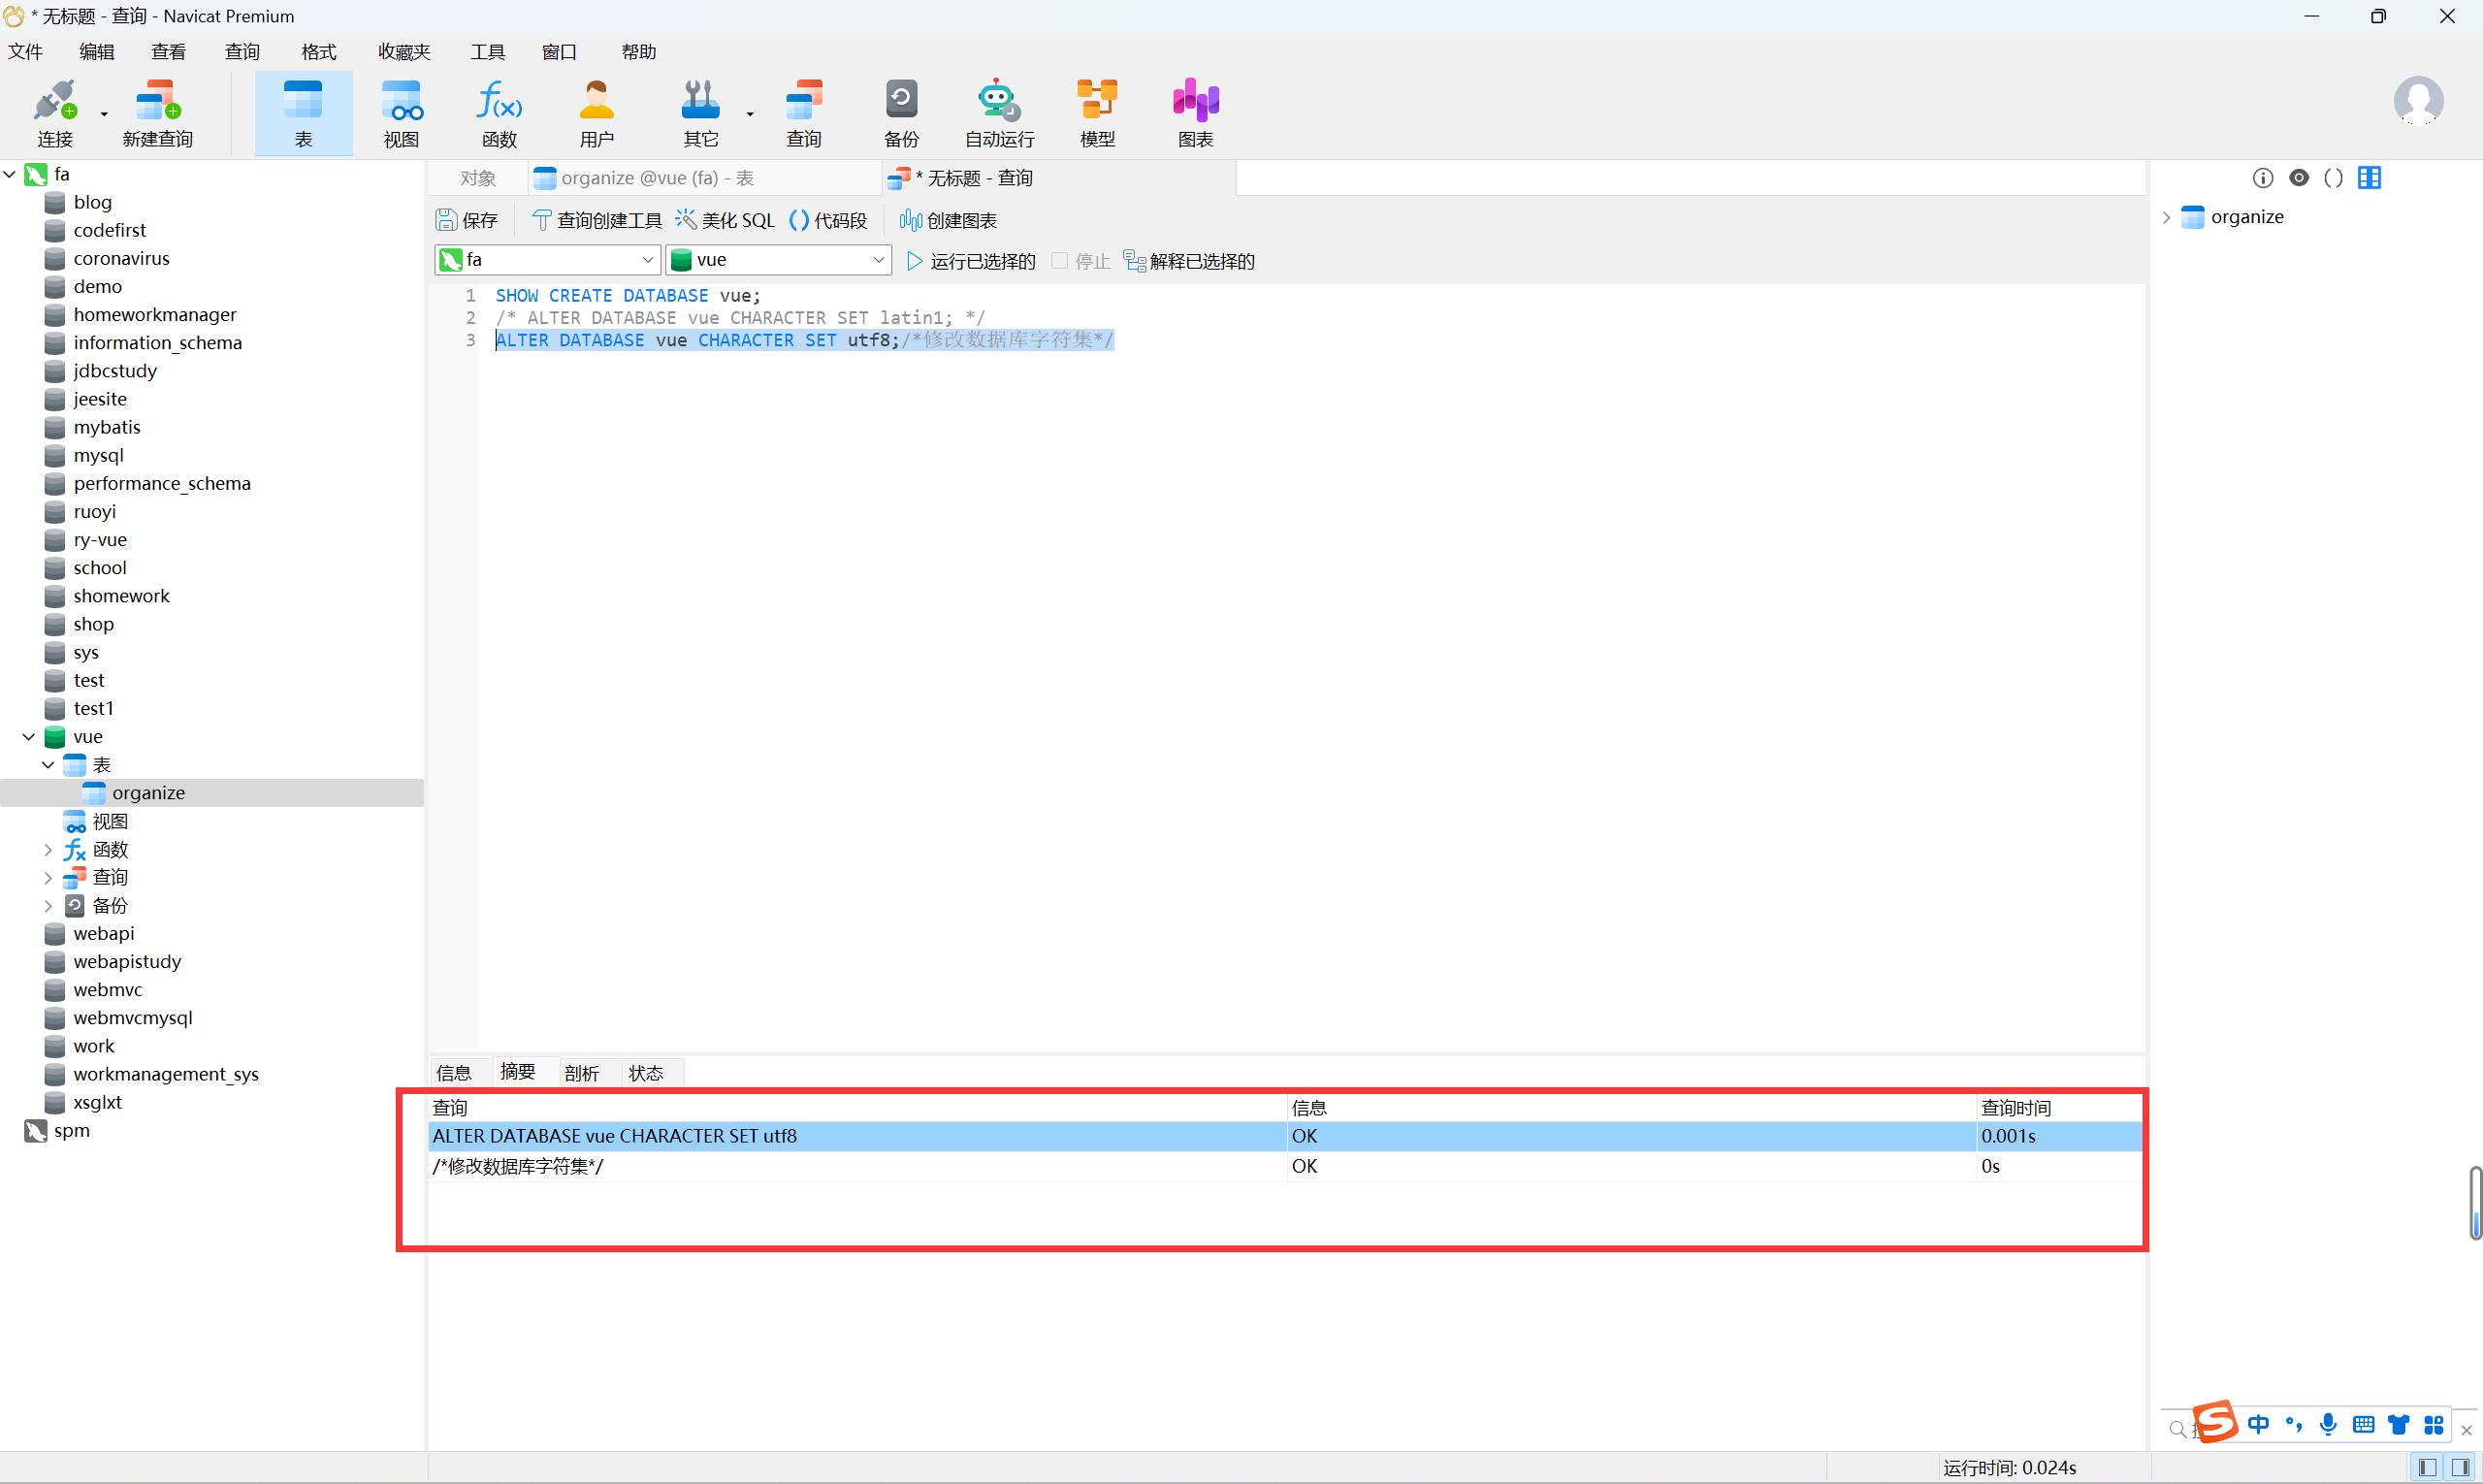
重新插入数据,没有解决,重新建一个表吧!
CREATE TABLE `organize` (
  `uuid` varchar(128) CHARACTER SET utf8mb4 NOT NULL COMMENT 'UUID',
  `fullname` varchar(128) DEFAULT NULL COMMENT '完整名称',
  `parent_id` varchar(128) DEFAULT NULL COMMENT '父级id',
  PRIMARY KEY (`uuid`)
) ENGINE=InnoDB DEFAULT CHARSET=utf8;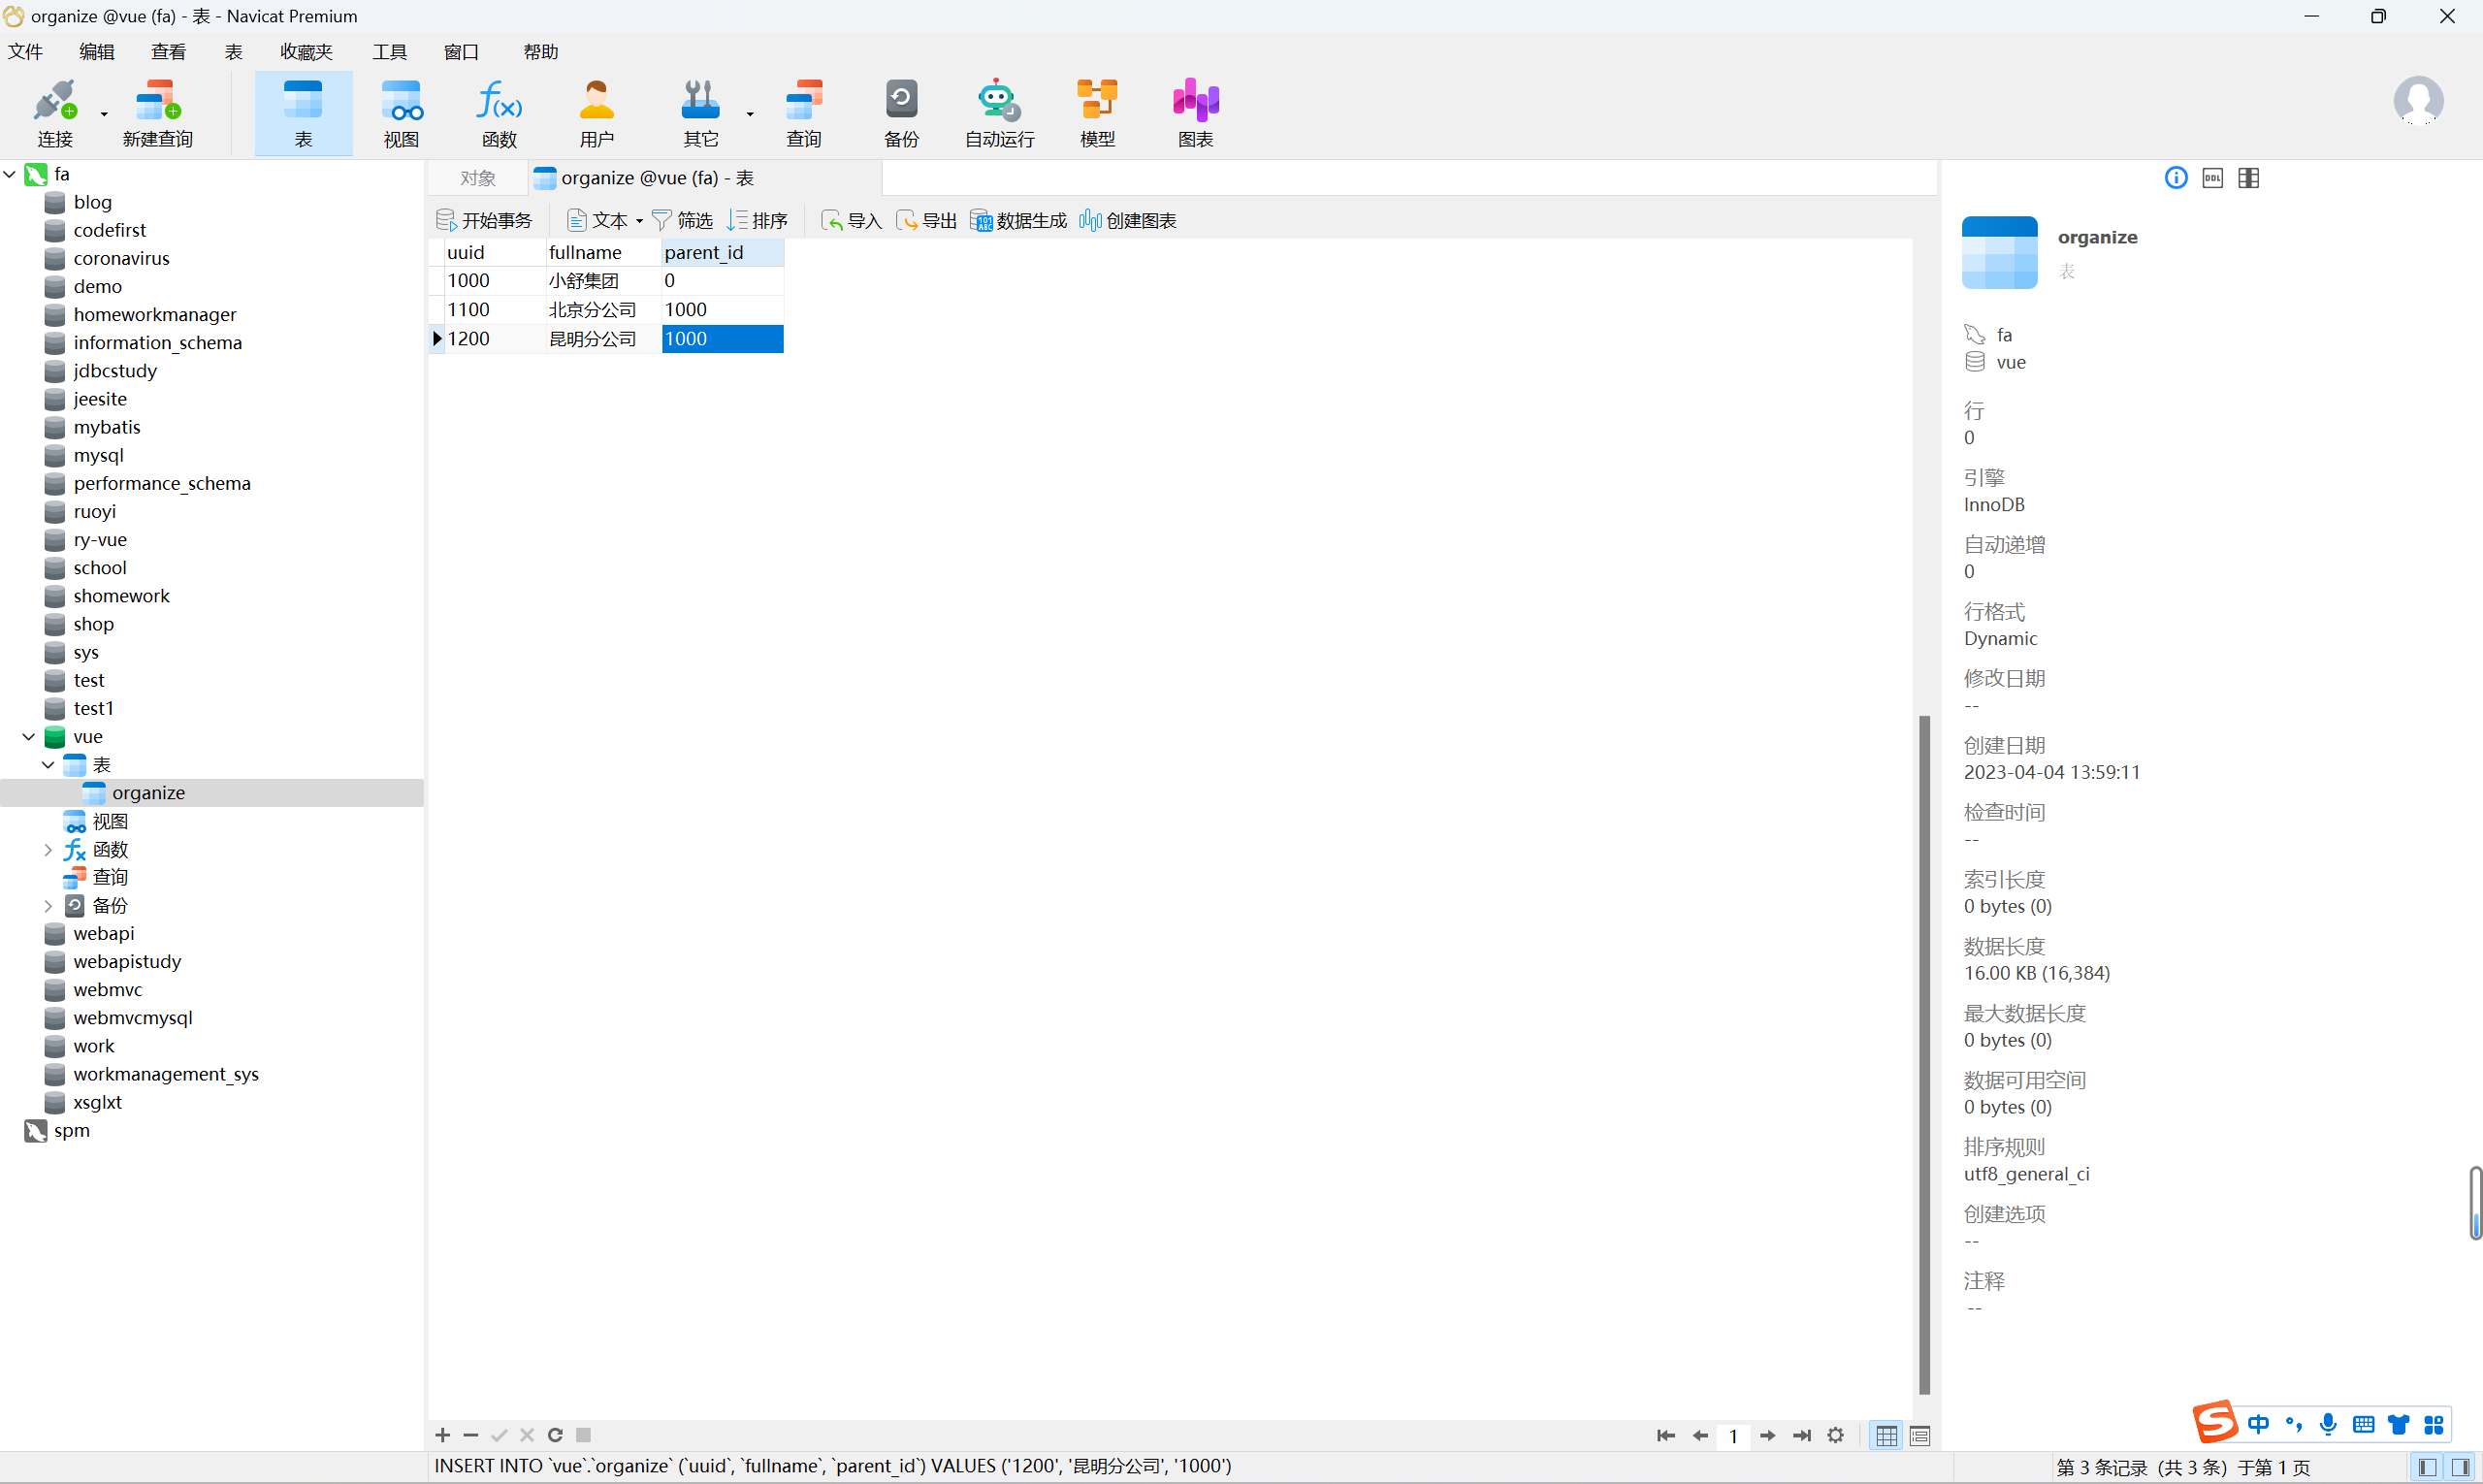
导入数据:
/*
 Navicat Premium Data Transfer

 Source Server         : fa
 Source Server Type    : MySQL
 Source Server Version : 50727
 Source Host           : localhost:3306
 Source Schema         : vue

 Target Server Type    : MySQL
 Target Server Version : 50727
 File Encoding         : 65001

 Date: 15/04/2023 09:46:21
*/

SET NAMES utf8mb4;
SET FOREIGN_KEY_CHECKS = 0;

-- ----------------------------
-- Table structure for organize
-- ----------------------------
DROP TABLE IF EXISTS `organize`;
CREATE TABLE `organize`  (
  `uuid` varchar(128) CHARACTER SET utf8mb4 COLLATE utf8mb4_general_ci NOT NULL COMMENT 'UUID',
  `fullname` varchar(128) CHARACTER SET utf8 COLLATE utf8_general_ci NULL DEFAULT NULL COMMENT '完整名称',
  `parent_id` varchar(128) CHARACTER SET utf8 COLLATE utf8_general_ci NULL DEFAULT NULL COMMENT '父级id',
  PRIMARY KEY (`uuid`) USING BTREE
) ENGINE = InnoDB CHARACTER SET = utf8 COLLATE = utf8_general_ci ROW_FORMAT = Dynamic;

-- ----------------------------
-- Records of organize
-- ----------------------------
INSERT INTO `organize` VALUES ('1000', '小舒集团', '0');
INSERT INTO `organize` VALUES ('1100', '北京分公司', '1000');
INSERT INTO `organize` VALUES ('110010', '卷包', '1100');
INSERT INTO `organize` VALUES ('110011', '卷包1号', '110010');
INSERT INTO `organize` VALUES ('110012', '卷包2号', '110010');
INSERT INTO `organize` VALUES ('110013', '卷包3号', '110010');
INSERT INTO `organize` VALUES ('110020', '制丝', '1100');
INSERT INTO `organize` VALUES ('110021', '制丝1号', '110020');
INSERT INTO `organize` VALUES ('110022', '制丝2号', '110020');
INSERT INTO `organize` VALUES ('110030', '设备', '1100');
INSERT INTO `organize` VALUES ('110031', '设备1号', '110030');
INSERT INTO `organize` VALUES ('1200', '昆明分公司', '1000');
INSERT INTO `organize` VALUES ('1300', '南京分公司', '1000');

SET FOREIGN_KEY_CHECKS = 1;
[外链图片转存失败,源站可能有防盗链机制,建议将图片保存下来直接上传(img-XT7pPl46-1683969444801)(C:UserskevinAppDataRoamingTypora ypora-user-imagesimage-20230415094722631.png)]
简单查询1:
SELECT
	o.uuid,
	o.fullname
FROM
	organize o
WHERE
	parent_id = '110020';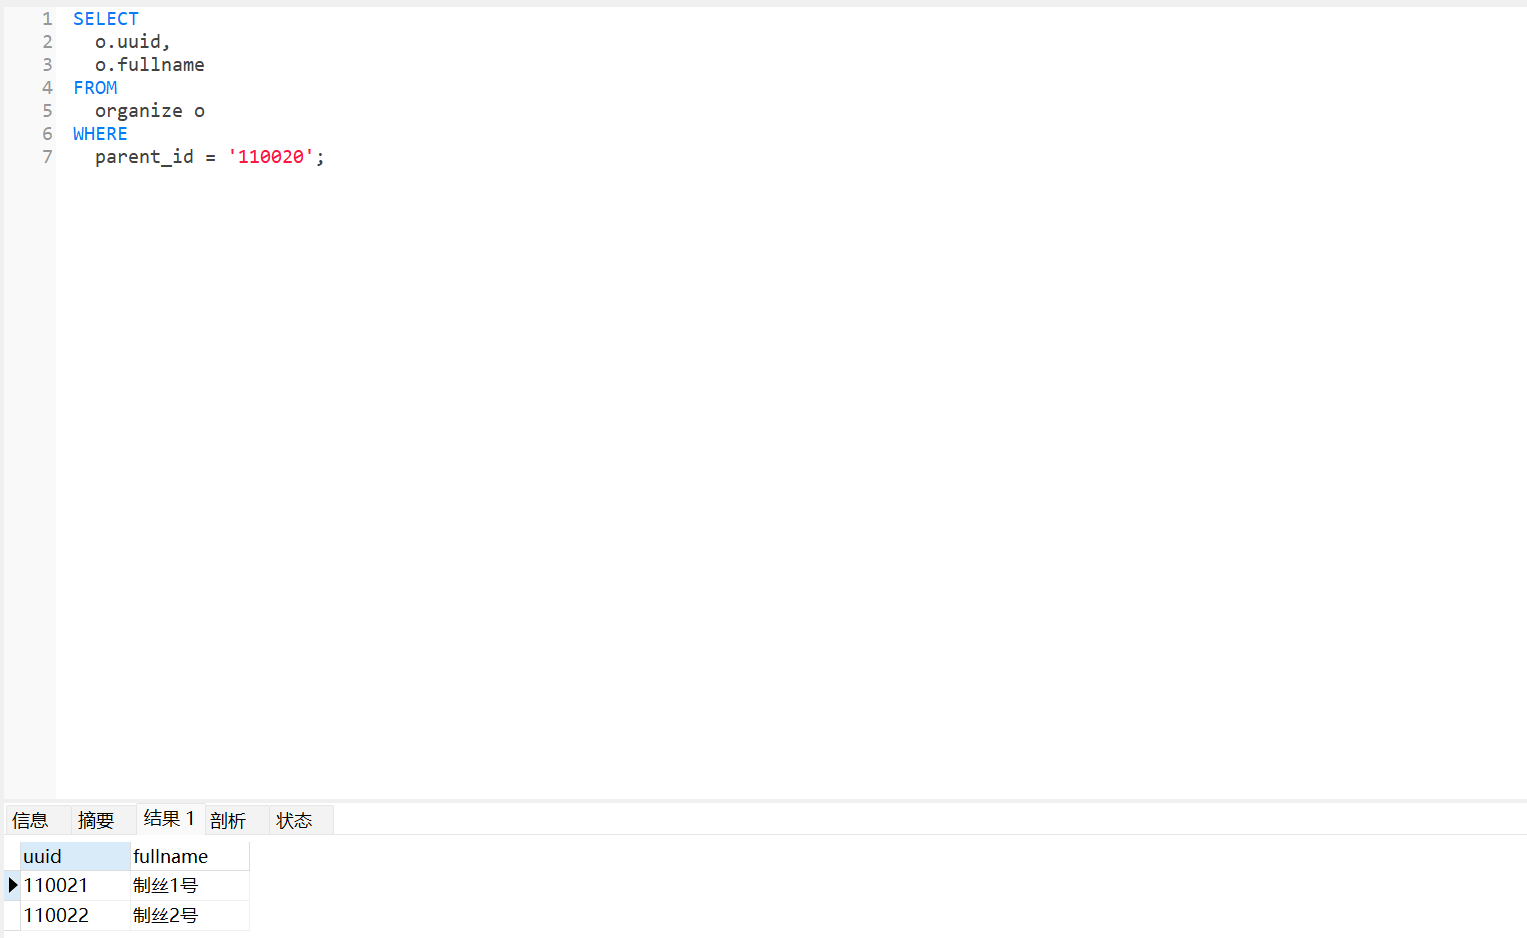
简单查询2:
 -- 一次加载某节点下全部节点
SELECT
	o.uuid AS organize_id,
	o.fullname,
	o.parent_id
FROM
	(
		SELECT
			*
		FROM
			organize o
		WHERE
			parent_id IS NOT NULL
	) o,
	(SELECT @parent_id := '1100') pd
WHERE
	FIND_IN_SET(parent_id, @parent_id) > 0
AND @parent_id := concat(@parent_id, ',', uuid)
UNION
	SELECT
		uuid AS organize_id,
		fullname,
		parent_id
	FROM
		organize
	WHERE
		uuid = '1100';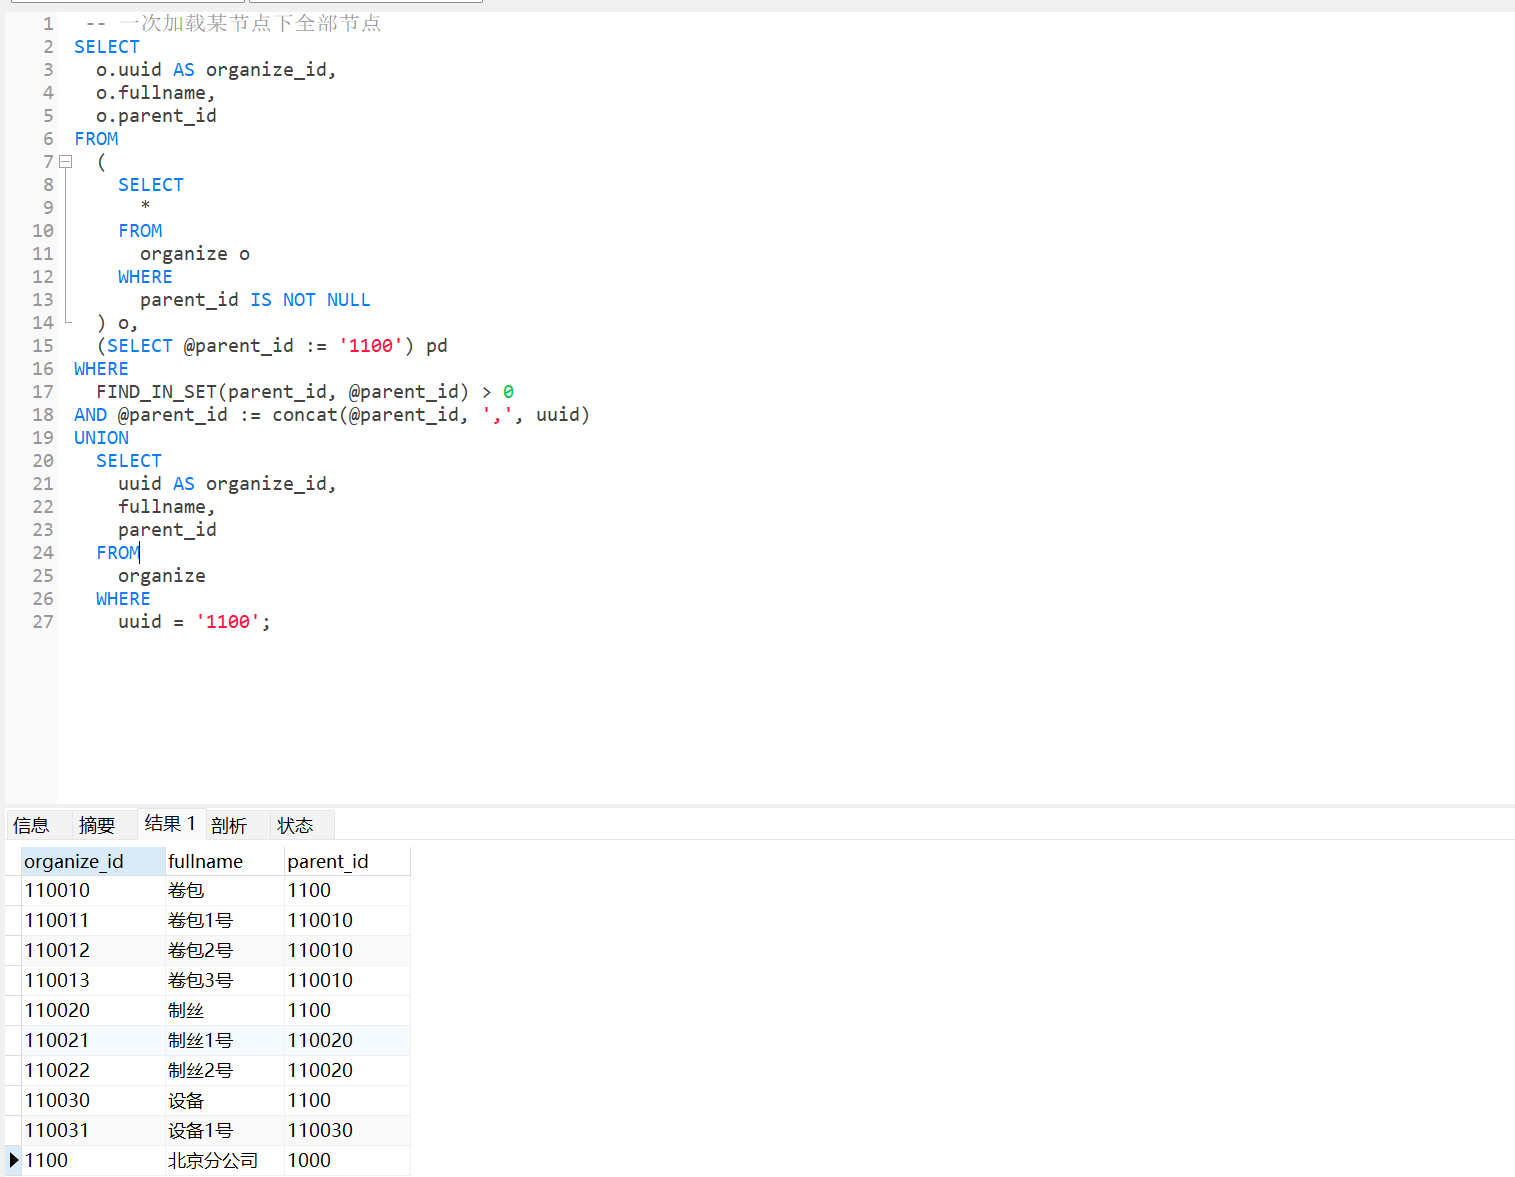
-
前端页面设计
https://element.eleme.cn/#/zh-CN/component/tree
懒加载自定义叶子节点:
由于在点击节点时才进行该层数据的获取,默认情况下 Tree 无法预知某个节点是否为叶子节点,所以会为每个节点添加一个下拉按钮,如果节点没有下层数据,则点击后下拉按钮会消失。同时,你也可以提前告知 Tree 某个节点是否为叶子节点,从而避免在叶子节点前渲染下拉按钮。
<el-tree :props="props" :load="loadNode" lazy show-checkbox> </el-tree> <script> export default { data() { return { props: { label: 'name', children: 'zones', isLeaf: 'leaf' }, }; }, methods: { loadNode(node, resolve) { if (node.level === 0) { return resolve([{ name: 'region' }]); } if (node.level > 1) return resolve([]); setTimeout(() => { const data = [{ name: 'leaf', leaf: true }, { name: 'zone' }]; resolve(data); }, 500); } } }; </script> -
后端功能
entity:
 @Data
public class OrgTreeEntity {
    private String uuid;
    private String fullname;
    private String parent_id;
}
dao:
@Autowired和 @Resource有什么区别?
@Autowired和@Resource都是用于自动注入依赖对象的注解,但它们之间有以下几个区别:@Autowired是Spring提供的注解,而@Resource是Java EE提供的注解。因此,使用@Autowired需要导入Spring相关的依赖包,而@Resource不需要。@Autowired默认按照类型匹配进行注入,如果多个类型匹配,则会根据名称进行匹配。而@Resource默认按照名称进行注入,如果名称匹配失败,则按照类型进行匹配。@Autowired可以用在构造器、属性、方法和参数上,而@Resource只能用在属性和方法上。@Autowired可以支持@Qualifier注解来指定具体的实现类,而@Resource不支持。@Autowired可以用required=false来标注注入的对象不是必须的,而@Resource不支持。
总之,两者都可以用于自动注入依赖对象,但具体使用哪一个取决于具体的使用场景。
@Autowired可以用于实例化dao类吗?
是的,
@Autowired可以用于实例化DAO类。一般情况下,我们使用@Autowired来自动装配DAO层的实现类,让Service层可以通过依赖注入的方式来获取DAO层的实例,从而访问数据库。下面是一个使用
@Autowired来注入DAO类的示例:javaCopy code@Service public class UserServiceImpl implements UserService { @Autowired private UserDao userDao; //... }在这个示例中,
UserServiceImpl类通过@Autowired注解将UserDao接口的实现类自动注入到userDao字段中,从而实现了依赖注入。在使用userDao字段时,Spring会自动为它创建一个实例并注入到UserServiceImpl中。需要注意的是,
@Autowired注解会根据类型进行自动注入,默认情况下,如果存在多个同类型的实例,会抛出异常。如果需要指定具体的实现类,可以结合使用@Qualifier注解。@Resource可以用来实例化dao类吗?
是的,
@Resource注解也可以用来实例化DAO类,通过指定name或type属性来注入对应的DAO实例。下面是一个使用
@Resource来注入DAO类的示例:kotlinCopy code@Service public class UserServiceImpl implements UserService { @Resource(name = "userDaoImpl") private UserDao userDao; //... }在这个示例中,
UserServiceImpl类通过@Resource注解将UserDao接口的实现类自动注入到userDao字段中。name属性指定了注入的DAO实例的名称为userDaoImpl,Spring会自动查找并注入名称为userDaoImpl的DAO实例。如果没有指定name属性,则默认根据userDao字段的类型来注入对应的实例。需要注意的是,
@Resource注解也可以用在构造器、setter方法和参数上,用于注入依赖对象,但不能用在私有字段上。此外,@Resource注解也支持type属性来指定注入的对象类型。如果指定了type属性,Spring会自动查找并注入类型为指定类型的实例。service:
public  List<Map<String, Object>>  getOrgTreeChildren(String org_id) throws RuntimeException {
        Map<String, Object> rootNode = dao.getTreeNode(org_id);

        //开始递归查找所有子集
        getOrgTreeAllChildren(rootNode);

        //el-tree: 数据必须以数组形式返回
        List<Map<String, Object>> all = new ArrayList<>();
        all.add(rootNode);

        return all;
    }

    //递归函数,历遍所有子节点
    private  void  getOrgTreeAllChildren(Map<String, Object> node) throws RuntimeException {
        //1.查询传入节点下一级是否有子节点
        List<Map<String, Object>> rsChild = dao.getTreeNodeChildren(node.get("id").toString());
        if(rsChild!=null && rsChild.size()>0){
            //设置当前节点children
            node.put("children", rsChild);
            //所有自己点重复找
            for (Map<String, Object> c: rsChild
                 ) {
                getOrgTreeAllChildren(c);
            }
        }
    }
controller:
get请求如何在url中传入参数
在 GET 请求中,可以将参数通过 URL 的查询字符串(query string)来传递。查询字符串是指 URL 中问号(?)后面的部分,由一组键值对(key-value pairs)组成,多个键值对之间用 & 符号分隔。
例如,假设要向 URL http://example.com/api/users 发送一个 GET 请求,带有两个参数:id=123 和 name=John,可以这样构造 URL:
bashCopy code
http://example.com/api/users?id=123&name=John
在上述 URL 中,id 和 name 分别是两个参数的键名,123 和 John 则是它们的值。注意,键名和键值之间要用等号(=)连接,而多个键值对之间要用&符号连接。
在服务器端,可以通过读取 URL 中的查询字符串来获取客户端传递过来的参数。具体方法取决于所使用的编程语言和 Web 框架。通常,Web 框架会提供一个请求对象(request object),其中包含了客户端传递过来的参数。例如,在 Python 的 Flask 框架中,可以使用 request.args 字典来获取查询字符串中的参数。
下面是一个使用 Java Spring 框架编写的后端 controller 示例,可以接收来自 URL 查询字符串中的参数:
javaCopy codeimport org.springframework.web.bind.annotation.GetMapping;
import org.springframework.web.bind.annotation.RequestParam;
import org.springframework.web.bind.annotation.RestController;

@RestController
public class UserController {

    @GetMapping("/api/users")
    public String getUsers(@RequestParam(name = "id") String userId,
                           @RequestParam(name = "name") String userName) {
        // 在这里对参数进行处理
        return "user_id=" + userId + ", user_name=" + userName;
    }
}
在上述示例中,我们使用了 Spring 的 @GetMapping 注解来指定接收 GET 请求,并指定了请求的路径为 /api/users。同时,使用 @RequestParam 注解来声明接收的参数,并指定了参数的键名(id 和 name)。
在方法体内部,可以使用这些参数进行业务处理。在示例中,我们简单地将这些参数拼接成字符串返回。
-
http.js
import axios from "axios";
const http = axios.create({
  baseUR: 'http://127.0.0.1:8001/'
  //baseUR: 'http://公网IP:8001/'  //前后端分离部署
})

export default http;
在main.js中挂载全局对象
Vue.prototype.$http = http; -
CROS错误
@RequestMapping("/org/tree/children") @ResponseBody @CrossOrigin //解决CROS错误 public ResponseEntity getOrgsTreeChildren(@RequestParam(name = "id",defaultValue = "",required = true) String current_id) { log.info("进入控制类"); try { List<Map<String, Object>> res = orgTreeService.getOrgTreeChildren(current_id); log.info("res=>"+res); return ResponseEntity.ok(res); } catch (Exception e) { log.error("getOrgsTreeChildren获取组织树:"+e.getMessage()); e.printStackTrace(); return ResponseEntity.err(e.getMessage()); } } -
JSON处理
前端可以使用JSON.parse()函数将这个JSON数据解析为JavaScript对象。例如:
let data = '[{"uuid":1100,"fullname":"北京分公司","parent_id":1000,"children":[{"uuid":110010,"fullname":"卷包","parent_id":1100,"children":[{"uuid":110011,"fullname":"卷包1号","parent_id":110010},{"uuid":110012,"fullname":"卷包2号","parent_id":110010},{"uuid":110013,"fullname":"卷包3号","parent_id":110010}]},{"uuid":110020,"fullname":"制丝","parent_id":1100,"children":[{"uuid":110021,"fullname":"制丝1号","parent_id":110020},{"uuid":110022,"fullname":"制丝2号","parent_id":110020}]},{"uuid":110030,"fullname":"设备","parent_id":1100,"children":[{"uuid":110031,"fullname":"设备1号","parent_id":110030}]}]}]';

let parsedData = JSON.parse(data);
现在,
parsedData变量中包含了一个JavaScript对象,可以使用该对象访问JSON数据的各个属性和值。例如,使用以下代码输出“北京分公司”的全名:console.log(parsedData[0].fullname);
四、前后端分离项目ECS部署
4.1 ECS 安装nvm
[root@iZ0jlfn0tcghxqiy1g2ej6Z ~]# mkdir -p /root/.nvm
[root@iZ0jlfn0tcghxqiy1g2ej6Z ~]# cd /root/.nvm
[root@iZ0jlfn0tcghxqiy1g2ej6Z .nvm]# ls
[root@iZ0jlfn0tcghxqiy1g2ej6Z .nvm]# wget https://github.com/nvm-sh/nvm/archive/refs/tags/v0.38.0.tar.gz
--2023-05-10 14:24:52--  https://github.com/nvm-sh/nvm/archive/refs/tags/v0.38.0.tar.gz
Resolving github.com (github.com)... 20.205.243.166
Connecting to github.com (github.com)|20.205.243.166|:443... connected.
HTTP request sent, awaiting response... 302 Found
Location: https://codeload.github.com/nvm-sh/nvm/tar.gz/refs/tags/v0.38.0 [following]
--2023-05-10 14:24:52--  https://codeload.github.com/nvm-sh/nvm/tar.gz/refs/tags/v0.38.0
Resolving codeload.github.com (codeload.github.com)... 20.205.243.165
Connecting to codeload.github.com (codeload.github.com)|20.205.243.165|:443... connected.
HTTP request sent, awaiting response... 200 OK
Length: unspecified [application/x-gzip]
Saving to: ‘v0.38.0.tar.gz’

    [  <=>                                                                                                                                                           ] 154,875      488KB/s   in 0.3s

2023-05-10 14:24:54 (488 KB/s) - ‘v0.38.0.tar.gz’ saved [154875]

[root@iZ0jlfn0tcghxqiy1g2ej6Z .nvm]# ls
v0.38.0.tar.gz
[root@iZ0jlfn0tcghxqiy1g2ej6Z .nvm]# tar -zxvf v0.38.0.tar.gz  #解压文件
...
[root@iZ0jlfn0tcghxqiy1g2ej6Z .nvm]# ls
nvm-0.38.0  v0.38.0.tar.gz
[root@iZ0jlfn0tcghxqiy1g2ej6Z .nvm]# vim ~/.bashrc

#输入以下代码
export NVM_DIR="$HOME/.nvm/nvm-0.38.0"
[ -s "$NVM_DIR/nvm.sh" ] && . "$NVM_DIR/nvm.sh"
# This loads nvm
[ -s "$NVM_DIR/bash_completion" ] && . "$NVM_DIR/bash_completion"
# This loads nvm bash_completion
# nodejs下载更换淘宝镜像
export NVM_NODEJS_ORG_MIRROR=https://npm.taobao.org/mirrors/node

#ps:输入完成后先按esc,再输入:wq!强制保存退出!

[root@iZ0jlfn0tcghxqiy1g2ej6Z .nvm]# source ~/.bashrc
[root@iZ0jlfn0tcghxqiy1g2ej6Z .nvm]# nvm list #查看正在使用的node版本
            N/A
iojs -> N/A (default)
node -> stable (-> N/A) (default)
unstable -> N/A (default)
[root@iZ0jlfn0tcghxqiy1g2ej6Z .nvm]#
4.2 从nvm安装node
[root@iZ0jlfn0tcghxqiy1g2ej6Z ~]# nvm list
            N/A
iojs -> N/A (default)
node -> stable (-> N/A) (default)
unstable -> N/A (default)
[root@iZ0jlfn0tcghxqiy1g2ej6Z ~]# nvm install 16.17.0
Downloading and installing node v16.17.0...
Downloading https://npm.taobao.org/mirrors/node/v16.17.0/node-v16.17.0-linux-x64.tar.xz...
######################################################################## 100.0%
Computing checksum with sha256sum
Checksums matched!
Now using node v16.17.0 (npm v8.15.0)
Creating default alias: default -> 16.17.0 (-> v16.17.0)
[root@iZ0jlfn0tcghxqiy1g2ej6Z ~]# nvm list
->     v16.17.0
default -> 16.17.0 (-> v16.17.0)
iojs -> N/A (default)
unstable -> N/A (default)
node -> stable (-> v16.17.0) (default)
stable -> 16.17 (-> v16.17.0) (default)
lts/* -> lts/hydrogen (-> N/A)
lts/argon -> v4.9.1 (-> N/A)
lts/boron -> v6.17.1 (-> N/A)
lts/carbon -> v8.17.0 (-> N/A)
lts/dubnium -> v10.24.1 (-> N/A)
lts/erbium -> v12.22.12 (-> N/A)
lts/fermium -> v14.21.3 (-> N/A)
lts/gallium -> v16.20.0 (-> N/A)
lts/hydrogen -> v18.16.0 (-> N/A)
[root@iZ0jlfn0tcghxqiy1g2ej6Z ~]# nvm use 16.17.0
Now using node v16.17.0 (npm v8.15.0)
[root@iZ0jlfn0tcghxqiy1g2ej6Z ~]# node -v
v16.17.0
[root@iZ0jlfn0tcghxqiy1g2ej6Z ~]#
4.3 安装cnpm
[root@iZ0jlfn0tcghxqiy1g2ej6Z ~]# npm install -g cnpm --registry=https://registry.npm.taobao.org
npm WARN deprecated @npmcli/move-file@2.0.1: This functionality has been moved to @npmcli/fs

added 468 packages in 19s

27 packages are looking for funding
  run `npm fund` for details
npm notice
npm notice New major version of npm available! 8.15.0 -> 9.6.6
npm notice Changelog: https://github.com/npm/cli/releases/tag/v9.6.6
npm notice Run npm install -g npm@9.6.6 to update!
npm notice
[root@iZ0jlfn0tcghxqiy1g2ej6Z ~]# cnpm -v
cnpm@9.2.0 (/root/.nvm/nvm-0.38.0/versions/node/v16.17.0/lib/node_modules/cnpm/lib/parse_argv.js)
npm@9.6.6 (/root/.nvm/nvm-0.38.0/versions/node/v16.17.0/lib/node_modules/cnpm/node_modules/npm/index.js)
node@16.17.0 (/root/.nvm/nvm-0.38.0/versions/node/v16.17.0/bin/node)
npminstall@7.8.0 (/root/.nvm/nvm-0.38.0/versions/node/v16.17.0/lib/node_modules/cnpm/node_modules/npminstall/lib/index.js)
prefix=/root/.nvm/nvm-0.38.0/versions/node/v16.17.0
linux x64 3.10.0-1160.83.1.el7.x86_64
registry=https://registry.npmmirror.com
[root@iZ0jlfn0tcghxqiy1g2ej6Z ~]# cnpm install -g @vue/cli  #用cnpm安装@vue-cli
reusing global emitter
Downloading @vue/cli to /root/.nvm/nvm-0.38.0/versions/node/v16.17.0/lib/node_modules/@vue/cli_tmp
Copying /root/.nvm/nvm-0.38.0/versions/node/v16.17.0/lib/node_modules/@vue/cli_tmp/.store/@vue+cli@5.0.8/node_modules/@vue/cli to /root/.nvm/nvm-0.38.0/versions/node/v16.17.0/lib/node_modules/@vue/cli
Installing @vue/cli's dependencies to /root/.nvm/nvm-0.38.0/versions/node/v16.17.0/lib/node_modules/@vue/cli/node_modules
[1/35] commander@^7.1.0 installed at node_modules/.store/commander@7.2.0/node_modules/commander
...
All packages installed (769 packages installed from npm registry, used 11s(network 11s), speed 3.98MB/s, json 671(8.48MB), tarball 33.5MB, manifests cache hit 0, etag hit 0 / miss 0)
[@vue/cli@5.0.8] link /root/.nvm/nvm-0.38.0/versions/node/v16.17.0/bin/vue@ -> /root/.nvm/nvm-0.38.0/versions/node/v16.17.0/lib/node_modules/@vue/cli/bin/vue.js

[root@iZ0jlfn0tcghxqiy1g2ej6Z ~]# npm install -g yarn #yarn安装和环境配置

added 1 package, and audited 2 packages in 4s

found 0 vulnerabilities
[root@iZ0jlfn0tcghxqiy1g2ej6Z ~]# yarn -v
1.22.19
[root@iZ0jlfn0tcghxqiy1g2ej6Z ~]#
4.4 部署项目
-
环境准备
- 购买一个云服务器,例如阿里云等等,操作系统为Linux
- 在云服务器上安装Nodejs
- 在云服务器上安装Nginx
- 在云服务器上安装jdk1.8+
- 在云服务器上安装mysqk5.7+
- 在云服务器上安装redis
- 远程连接工具xshell或者finalshell
-
以若依前后端分离版为例,项目地址:https://gitee.com/y_project/RuoYi-Vue
下载好项目之后将ruoyi-ui上传至云服务器上,可以通过xshell连上云服务器,使用xftp 7上传
[root@iZ0jlfn0tcghxqiy1g2ej6Z ~]# cd / [root@iZ0jlfn0tcghxqiy1g2ej6Z /]# ls bin boot dev etc home lib lib64 lost+found media mnt nodejs opt patch proc project root run sbin srv sys tmp usr var www [root@iZ0jlfn0tcghxqiy1g2ej6Z /]# cd project [root@iZ0jlfn0tcghxqiy1g2ej6Z project]# ls ruoyi-ui -
如果nodejs安装好,即可进入ruoyi-ui运行npm install下载项目依赖
[root@iZ0jlfn0tcghxqiy1g2ej6Z project]# cd ruoyi-ui [root@iZ0jlfn0tcghxqiy1g2ej6Z ruoyi-ui]# npm install npm WARN ERESOLVE overriding peer dependency npm WARN deprecated querystring@0.2.0: The querystring API is considered Legacy. new code should use the URLSearchParams API instead. ... Some issues need review, and may require choosing a different dependency. Run `npm audit` for details. [root@iZ0jlfn0tcghxqiy1g2ej6Z ruoyi-ui]# npm run dev #下载好之后即可运行前端项目试一下 > ruoyi@1.0.0 dev > vue-cli-service serve INFO Starting development server... 98% after emitting CopyPlugin WARNING Compiled with 1 warning 3:44:04 PM warning in ./src/views/statisticsAndCharts/charts/test.html Module parse failed: Unexpected token (1:0) You may need an appropriate loader to handle this file type, currently no loaders are configured to process this file. See https://webpack.js.org/concepts#loaders > <!DOCTYPE html> | <html lang="en"> | <head> @ ./src/views sync ^./.*$ @ ./src/store/modules/permission.js @ ./src/store/index.js @ ./src/main.js @ multi (webpack)-dev-server/client?http://172.26.93.169:81&sockPath=/sockjs-node (webpack)/hot/dev-server.js ./src/main.js App running at: - Local: http://localhost:81/ - Network: http://172.26.93.169:81/ Note that the development build is not optimized. To create a production build, run npm run build. ^C[root@iZ0jlfn0tcghxqiy1g2ej6Z ruoyi-ui]# -
此时运行项目成功,我们先对前端代码进行打包,生成一个dist文件夹。
[root@iZ0jlfn0tcghxqiy1g2ej6Z ruoyi-ui]# npm install --unsafe-perm --registry=https://registry.npm.taobao.org
npm WARN ERESOLVE overriding peer dependency
npm WARN While resolving: eslint-loader@2.2.1
npm WARN Found: eslint@7.15.0
npm WARN node_modules/eslint
npm WARN   dev eslint@"7.15.0" from the root project
npm WARN   4 more (@vue/cli-plugin-eslint, babel-eslint, ...)
npm WARN
npm WARN Could not resolve dependency:
npm WARN peer eslint@">=1.6.0 <7.0.0" from eslint-loader@2.2.1
npm WARN node_modules/@vue/cli-plugin-eslint/node_modules/eslint-loader
npm WARN   eslint-loader@"^2.2.1" from @vue/cli-plugin-eslint@4.4.6
npm WARN   node_modules/@vue/cli-plugin-eslint
npm WARN
npm WARN Conflicting peer dependency: eslint@6.8.0
npm WARN node_modules/eslint
npm WARN   peer eslint@">=1.6.0 <7.0.0" from eslint-loader@2.2.1
npm WARN   node_modules/@vue/cli-plugin-eslint/node_modules/eslint-loader
npm WARN     eslint-loader@"^2.2.1" from @vue/cli-plugin-eslint@4.4.6
npm WARN     node_modules/@vue/cli-plugin-eslint

up to date in 4s

135 packages are looking for funding
  run `npm fund` for details
[root@iZ0jlfn0tcghxqiy1g2ej6Z ruoyi-ui]# npm run build:prod

> ruoyi@1.0.0 build:prod
> vue-cli-service build


⠋  Building for production...
 WARNING  Compiled with 3 warnings                                                                                                                                                             3:51:38 PM

 warning  in ./src/views/statisticsAndCharts/charts/test.html
...
  dist/static/css/chunk-7928241e.4fa2df8    0.05 KiB         0.07 KiB
  8.css

  Images and other types of assets omitted.

 DONE  Build complete. The dist directory is ready to be deployed.
 INFO  Check out deployment instructions at https://cli.vuejs.org/guide/deployment.html

[root@iZ0jlfn0tcghxqiy1g2ej6Z ruoyi-ui]# ls
babel.config.js  bin  build  dist  node_modules  package.json  package-lock.json  public  README.md  src  vue.config.js
[root@iZ0jlfn0tcghxqiy1g2ej6Z ruoyi-ui]#
这就是前端代码打包后的文件

-
修改nginx的配置文件(也就是nginx.conf),使其前端项目能够被访问,一般nginx会被安装在/usr/local目录下,因此配置文件路径为/usr/local/nginx/conf/nginx.conf 。如果忘记nginx安装在哪里了,可以用如下命令找到它:
find / -name 'nginx.conf'我的在
[root@iZ0jlfn0tcghxqiy1g2ej6Z nginx]# find / -name 'nginx.conf'
/www/server/nginx/conf/nginx.conf
/www/server/nginx/src/conf/nginx.conf
[root@iZ0jlfn0tcghxqiy1g2ej6Z nginx]# vim /www/server/nginx/conf/nginx.conf
用vim编辑器打开nginx.conf,修改配置。修改几个地方:
user  www www;
worker_processes auto;
error_log  /www/wwwlogs/nginx_error.log  crit;
pid        /www/server/nginx/logs/nginx.pid;
worker_rlimit_nofile 51200;

stream {
    log_format tcp_format '$time_local|$remote_addr|$protocol|$status|$bytes_sent|$bytes_received|$session_time|$upstream_addr|$upstream_bytes_sent|$upstream_bytes_received|$upstream_connect_time';

    access_log /www/wwwlogs/tcp-access.log tcp_format;
    error_log /www/wwwlogs/tcp-error.log;
    include /www/server/panel/vhost/nginx/tcp/*.conf;
}

events
    {
        use epoll;
        worker_connections 51200;
        multi_accept on;
    }

http
    {
        include       mime.types;
                #include luawaf.conf;

                include proxy.conf;

        default_type  application/octet-stream;

        server_names_hash_bucket_size 512;
        client_header_buffer_size 32k;
        large_client_header_buffers 4 32k;
        client_max_body_size 50m;

        sendfile   on;
        tcp_nopush on;

        keepalive_timeout 60;

        tcp_nodelay on;

        fastcgi_connect_timeout 300;
        fastcgi_send_timeout 300;
        fastcgi_read_timeout 300;
        fastcgi_buffer_size 64k;
        fastcgi_buffers 4 64k;
        fastcgi_busy_buffers_size 128k;
        fastcgi_temp_file_write_size 256k;
                fastcgi_intercept_errors on;

        gzip on;
        gzip_min_length  1k;
        gzip_buffers     4 16k;
        gzip_http_version 1.1;
        gzip_comp_level 2;
        gzip_types     text/plain application/javascript application/x-javascript text/javascript text/css application/xml;
        gzip_vary on;
        gzip_proxied   expired no-cache no-store private auth;
        gzip_disable   "MSIE [1-6].";

        limit_conn_zone $binary_remote_addr zone=perip:10m;
                limit_conn_zone $server_name zone=perserver:10m;

        server_tokens off;
        access_log off;

server
    {
        listen 888;
        server_name phpmyadmin;
        index index.html index.htm index.php;
        root  /www/server/phpmyadmin;

        #error_page   404   /404.html;
        include enable-php.conf;

        location ~ .*.(gif|jpg|jpeg|png|bmp|swf)$
        {
            expires      30d;
        }

        location ~ .*.(js|css)?$
        {
            expires      12h;
        }

        location ~ /.
        {
            deny all;
        }

        access_log  /www/wwwlogs/access.log;
    }
include /www/server/panel/vhost/nginx/*.conf;
}
(1) 修改为root用户

(2)修改监听listen的端口号为9000,这个端口号取决于自己想从几号端口访问前端页面,后续也别忘了在防火墙中开启这个端口,不然无法访问;server_name为你的服务器ip,如果你有域名且配置解析好了,也可以再在此添域名

(3)找到这些内容并将root 后跟的路径修改为刚才前端代码打包的dist文件夹的路径,保存后退出。

server
    {
        listen 9000;
        server_name 8.130.91.208;
        #index index.html index.htm index.php;
        #root  /www/server/phpmyadmin;

        location /{
            root /project/ruoyi-ui/dist;
            index index.html index.htm;
        }
        #error_page   404   /404.html;
        include enable-php.conf;

        location ~ .*.(gif|jpg|jpeg|png|bmp|swf)$
        {
            expires      30d;
        }

        location ~ .*.(js|css)?$
        {
            expires      12h;
        }

        location ~ /.
        {
            deny all;
        }

        access_log  /www/wwwlogs/access.log;
    }
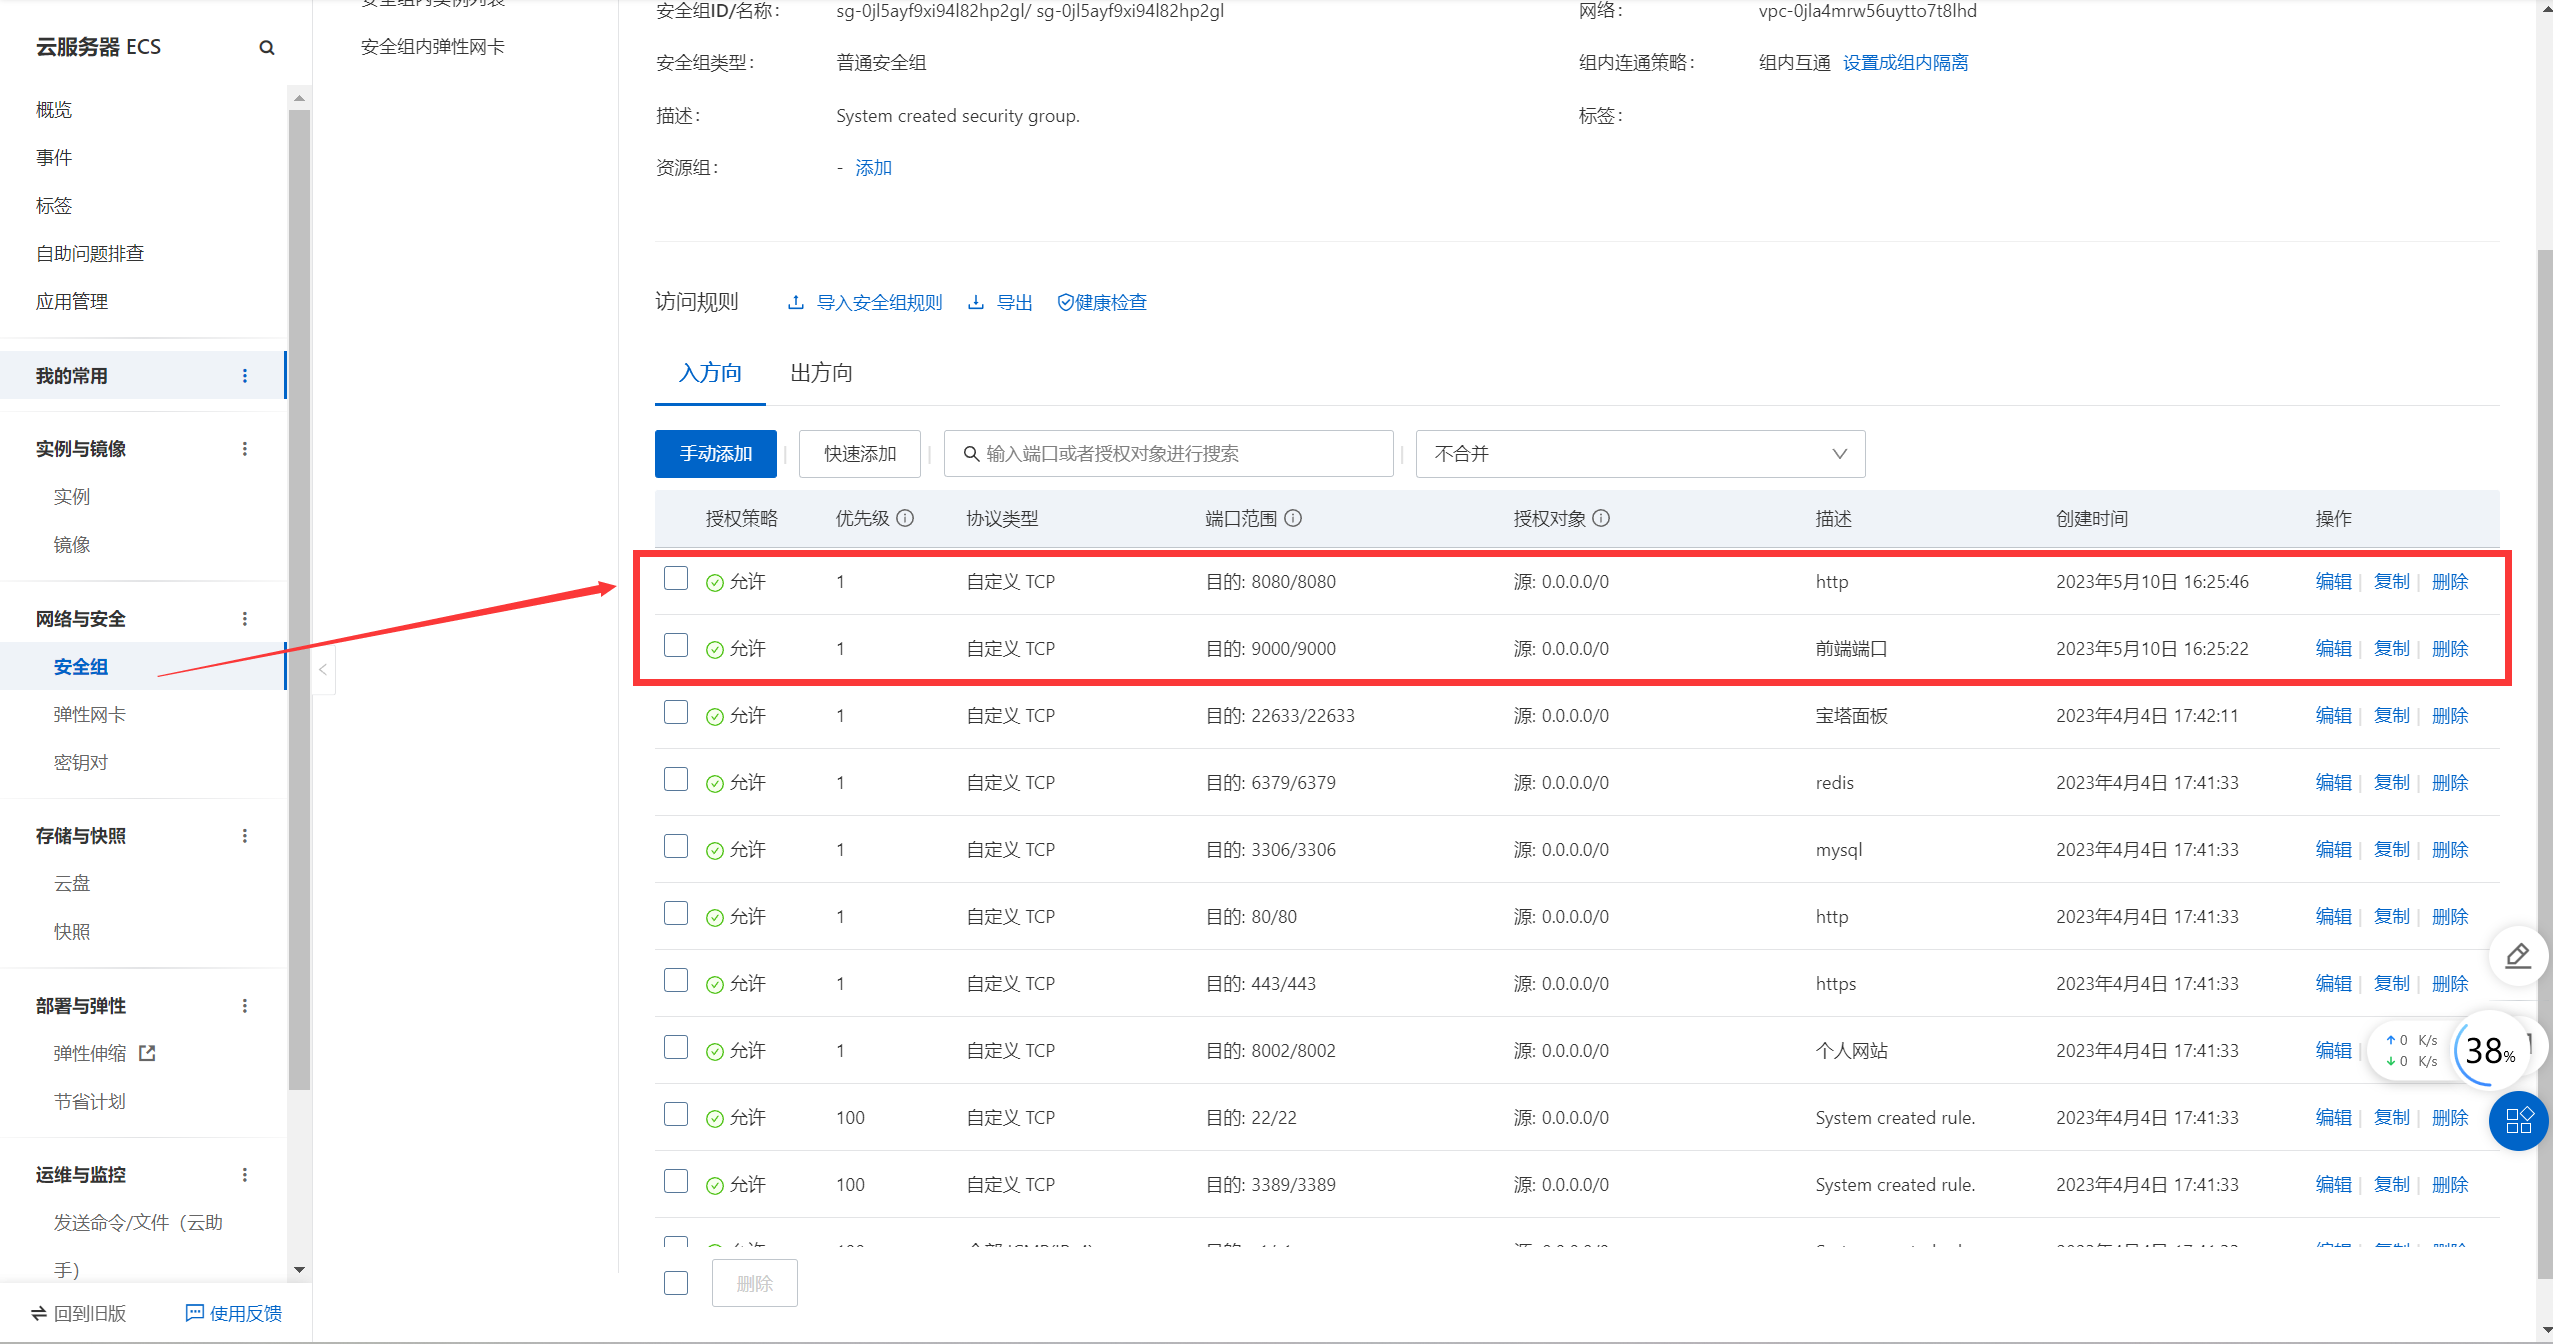
(4)由于上述前端使用的是9000端口(也可以换为你自己想要的端口,例如80端口),因此要在防火墙中也打开这个端口,外界才可以访问。于此同时,后端也需要一个8080端口,因此也要将其打开,后续部署后端服务要用到。注意有时候可能你想用的端口已经被其他进程占用,可以尝试找到该进程并将其kill掉或者重新开另一个端口号,具体方法不在此赘述,可上网查询。
firewall-cmd --zone=public --add-port=9000/tcp --permanent
firewall-cmd --zone=public --add-port=8080/tcp --permanent
我用的是阿里云的轻量应用型服务器,因此还需要检查以下宝塔界面的“安全”里面是否开启该端口,以及阿里云服务器工作台里的“安全”->“防火墙”中的端口,如果没有开启,则需要在这里手动开启。此外阿里云的ECS云服务器需要为该端口号添加安全组规则。

(5)端口配置好了后,每次修改了nginx的配置文件后一定要重新启动nginx,使新配置生效。如果重启失败,则先找到nginx的进程,然后将其kill掉,再重启nginx:
如果已经将nginx配置到全局的环境变量中,就可以直接运行这个命令重启nginx
nginx -s reload如果没有将其配置到全局的环境变量中,则需要进入安装的nginx/sbin/目录中,用如下命令:
./nginx -s reload查看进程号: ps -ef|grep nginx
杀死进程:kill -term xxxx/ kill -int xxxx[root@iZ0jlfn0tcghxqiy1g2ej6Z nginx]# ps -ef|grep nginx root 12049 12999 0 16:32 ? 00:00:00 nginx: worker process root 12050 12999 0 16:32 ? 00:00:00 nginx: worker process root 12051 12999 0 16:32 ? 00:00:00 nginx: cache manager process root 12210 6749 0 16:35 pts/0 00:00:00 grep --color=auto nginx root 12999 1 0 May09 ? 00:00:00 nginx: master process /www/server/nginx/sbin/nginx -c /www/server/nginx/conf/nginx.conf如何结束以上nginx进程?
可以使用以下命令结束上述的nginx进程:
kill -TERM 12049 12050 12051 12999这条命令会向PID为12049、12050、12051和12999的进程发送SIGTERM信号,请求它们正常终止。这会导致nginx进程收到信号后,进行一些清理工作,然后退出。
如果nginx进程没有响应SIGTERM信号,你也可以使用 “kill -KILL xxxx” 命令强制杀死进程,例如:
kill -KILL 12049 12050 12051 12999这会强制结束nginx进程,但可能会导致进程未完成的操作丢失数据或引起系统不稳定,所以建议先使用SIGTERM信号请求进程正常终止。
为什么12210不用结束?
PID为12210的进程是通过 “ps -ef|grep nginx” 命令启动的,它本身并不是nginx进程,而是用于查找nginx进程的grep命令的一个子进程。因此,不需要结束这个进程,它会在grep命令执行完毕后自动退出。如果你想结束它,也是可以使用 “kill -TERM 12210” 命令发送SIGTERM信号给它,让它正常退出。
[root@iZ0jlfn0tcghxqiy1g2ej6Z nginx]# kill -TERM 12049 12050 12051 12999
[root@iZ0jlfn0tcghxqiy1g2ej6Z nginx]# ps -ef|grep nginx
root     12499  6749  0 16:39 pts/0    00:00:00 grep --color=auto nginx
[root@iZ0jlfn0tcghxqiy1g2ej6Z nginx]#
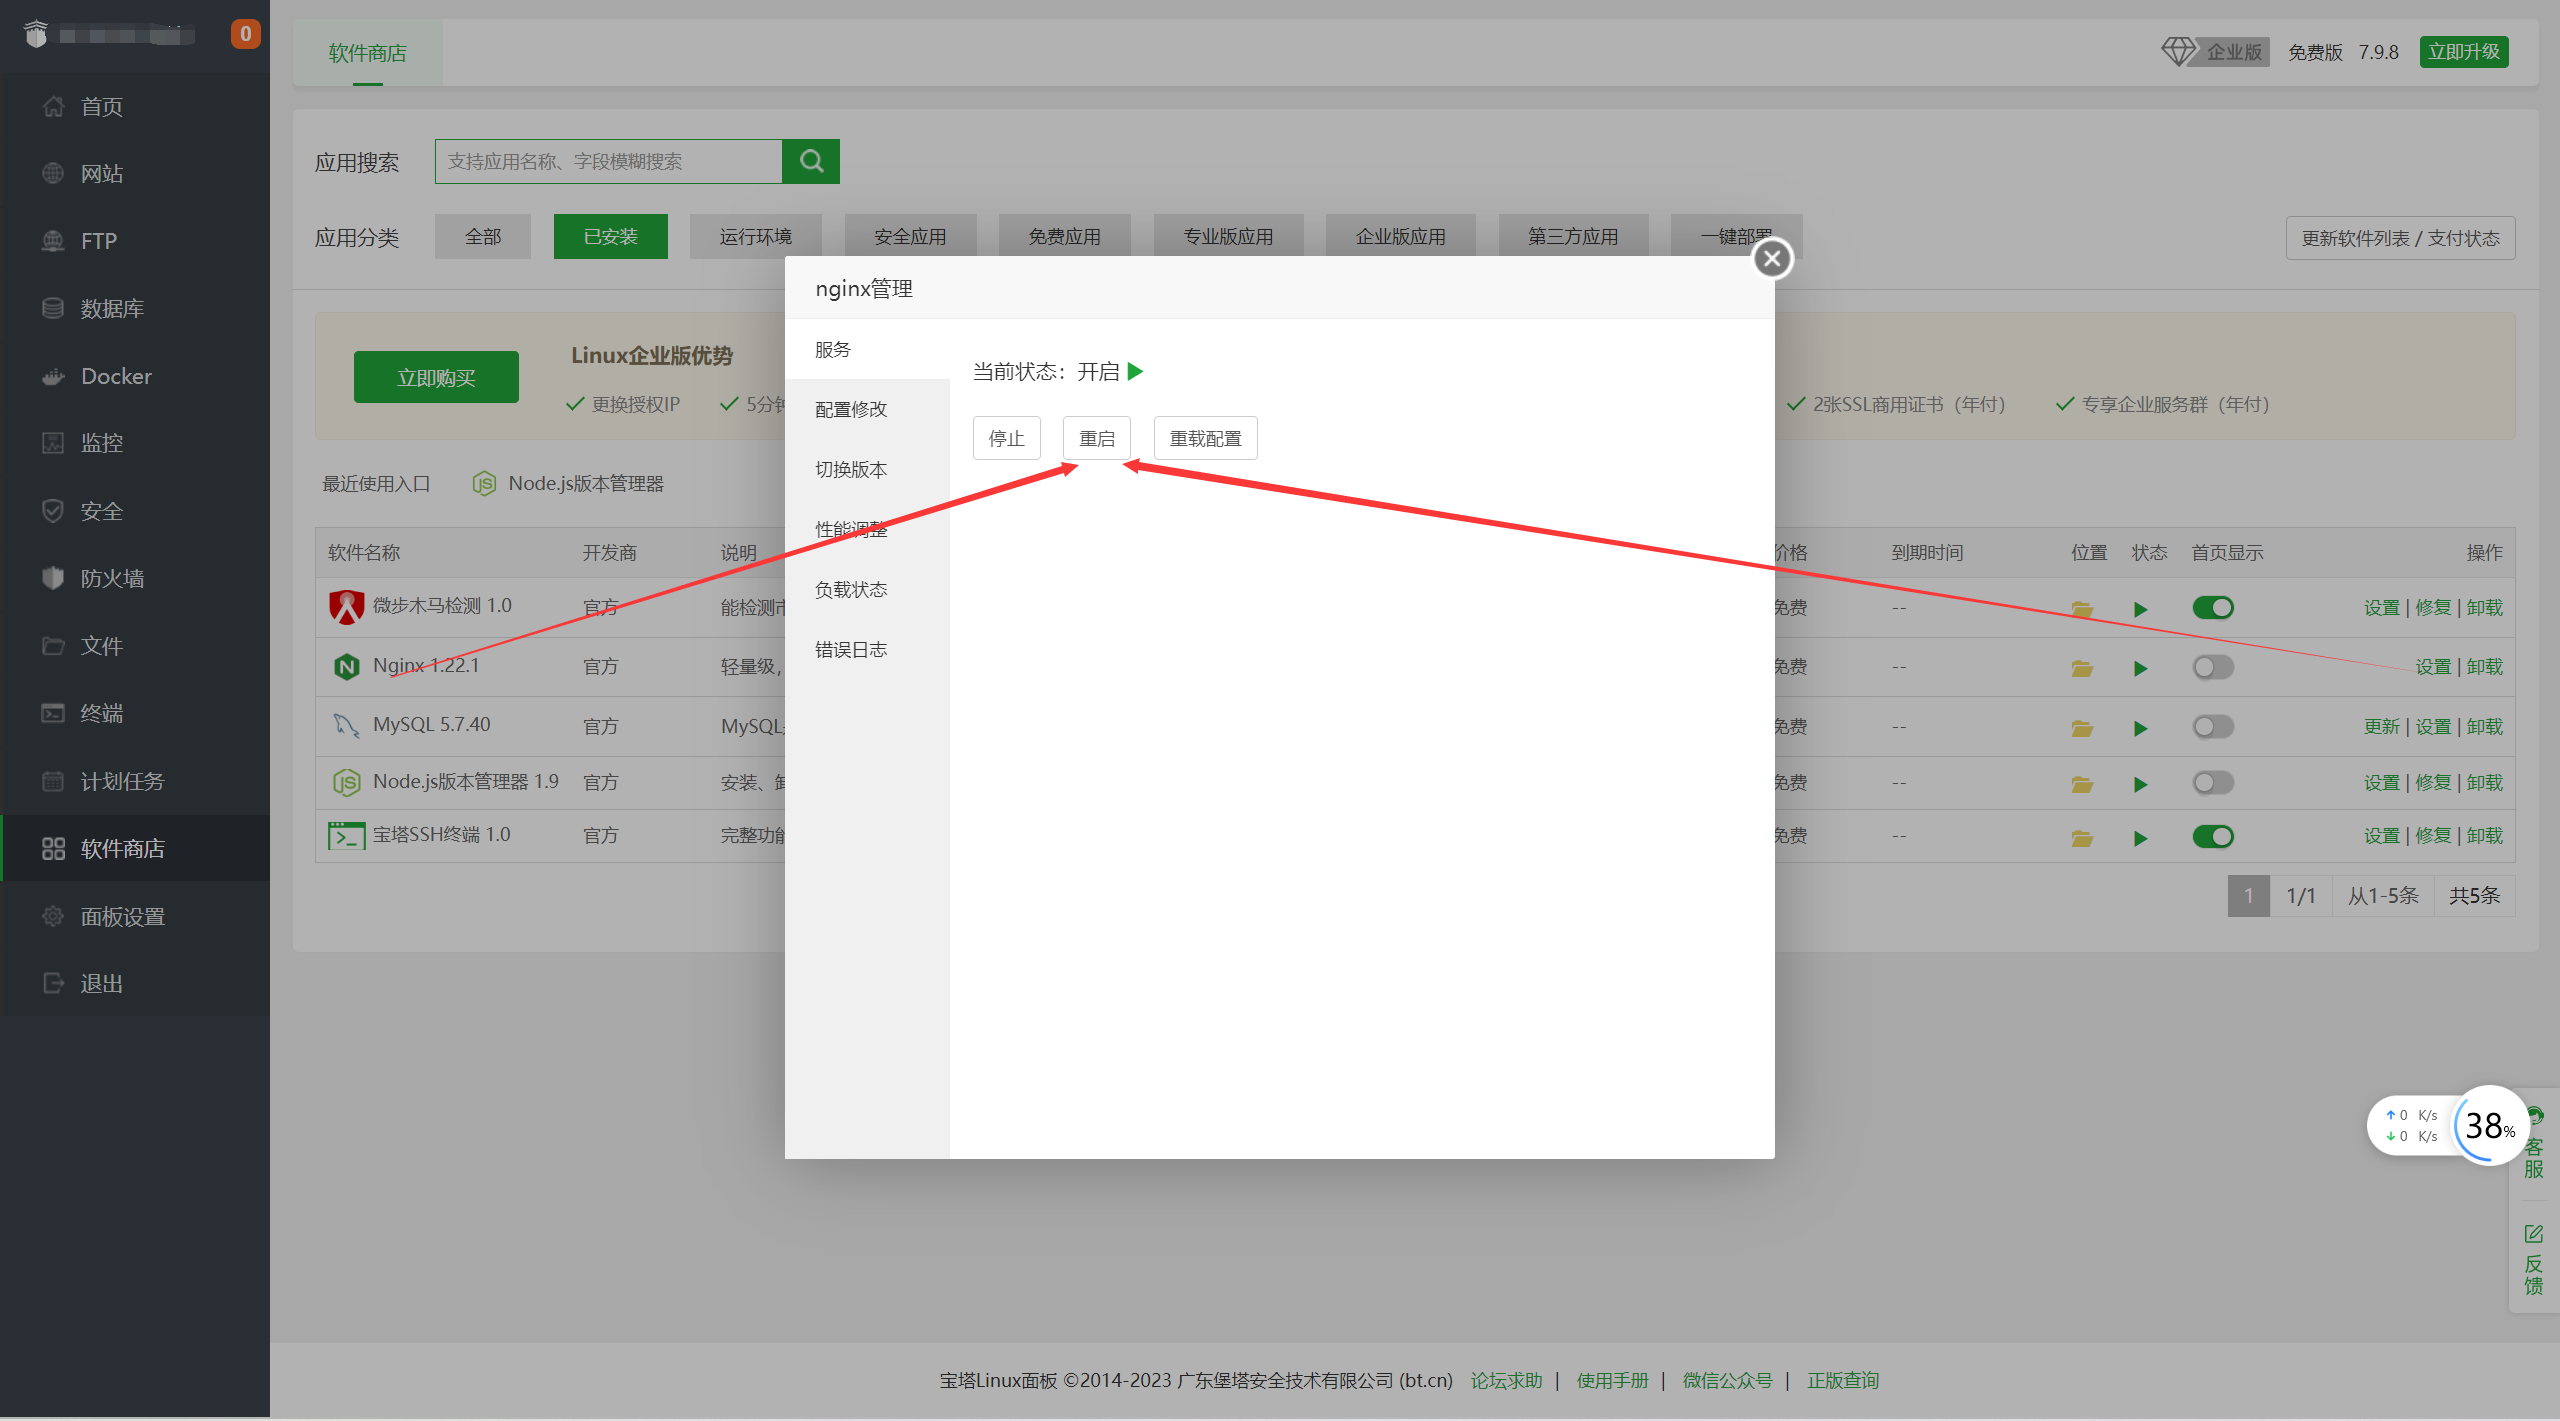
若是怕麻烦,配置好nginx.conf文件后结束进程,然后直接从宝塔面板重启
[root@iZ0jlfn0tcghxqiy1g2ej6Z sbin]# ps -ef|grep nginx #重启前
root     12946  6749  0 16:47 pts/0    00:00:00 grep --color=auto nginx
[root@iZ0jlfn0tcghxqiy1g2ej6Z sbin]# ps -ef|grep nginx #重启后
root     13080     1  0 16:49 ?        00:00:00 nginx: master process /www/server/nginx/sbin/nginx -c /www/server/nginx/conf/nginx.conf
root     13081 13080  0 16:49 ?        00:00:00 nginx: worker process
root     13082 13080  0 16:49 ?        00:00:00 nginx: worker process
root     13083 13080  0 16:49 ?        00:00:00 nginx: cache manager process
root     13084 13080  0 16:49 ?        00:00:00 nginx: cache loader process
root     13101  6749  0 16:49 pts/0    00:00:00 grep --color=auto nginx
[root@iZ0jlfn0tcghxqiy1g2ej6Z sbin]#
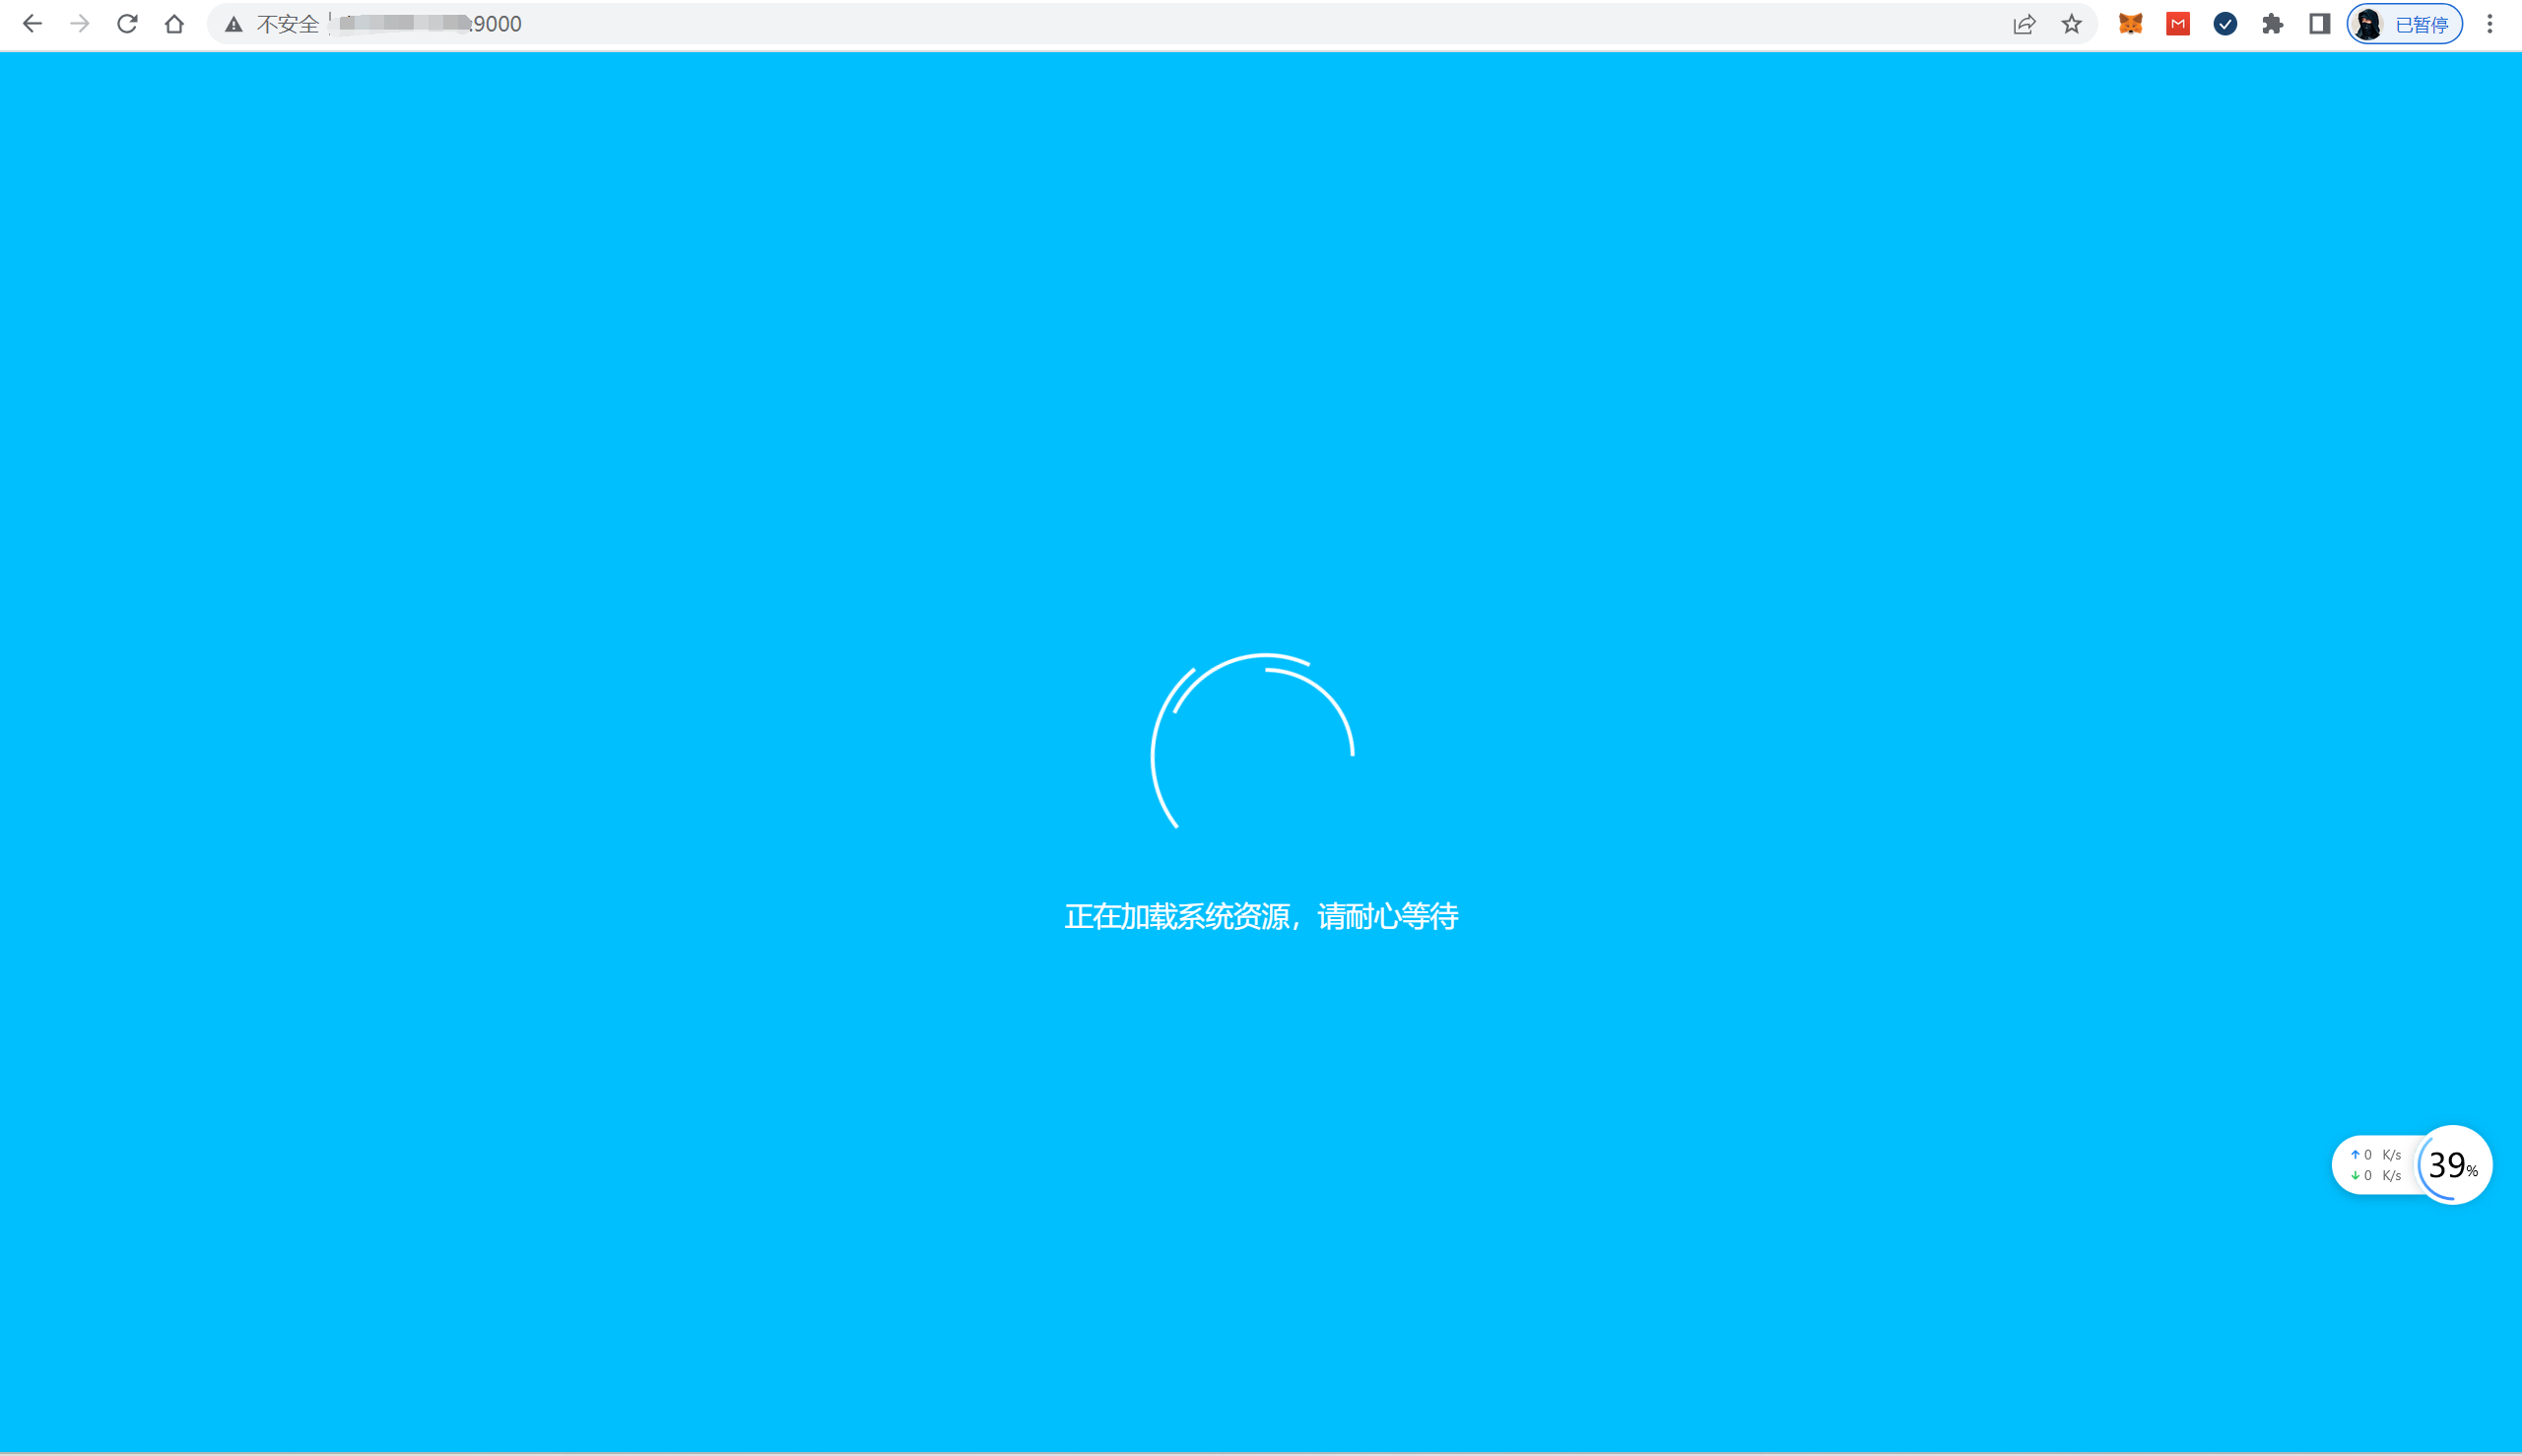
(6)浏览器输入“ip:9000“,例如:198.172.1.1:9000,如果出现出现如下画面,则表示前端启动成功。否则则需要仔细检查两个地方,一个是nginx的配置信息,一个是端口是否真的被完全打开:
-
后端准备,将数据库导入到ECS,redis也在后端启动,然后修改项目中ruoyi-admin中的三个文件,如下:
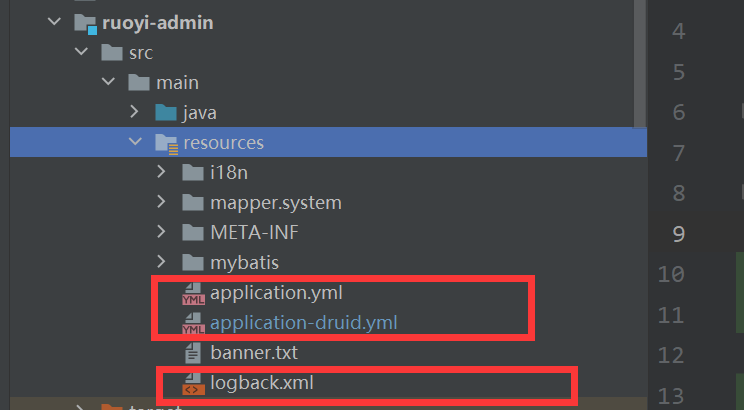
在application.yml中,修改redis的信息,分别为host地址(你的服务器ip),port端口号(你的redis开放的端口号,一般为6379),password密码(你的redis的密码)。

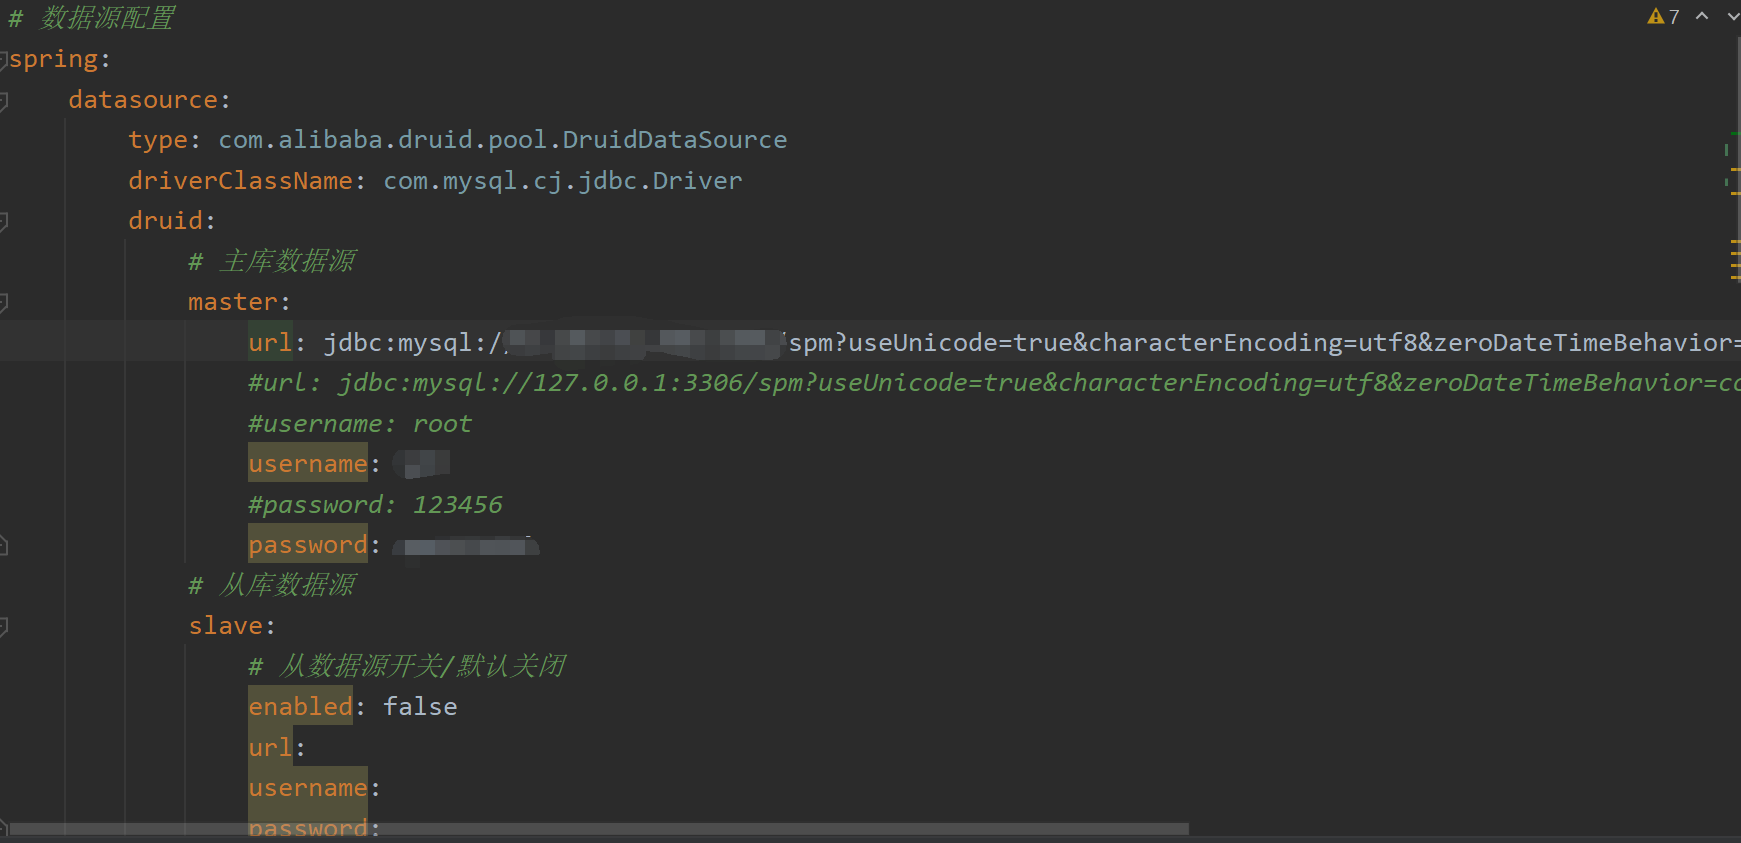
在application-druid.yml中,修改mysql的信息,url的中间填写访问mysql的 ip:端口号,例如:198.172.1.1:3306;username填你的mysql用户名;password填你的mysql密码。
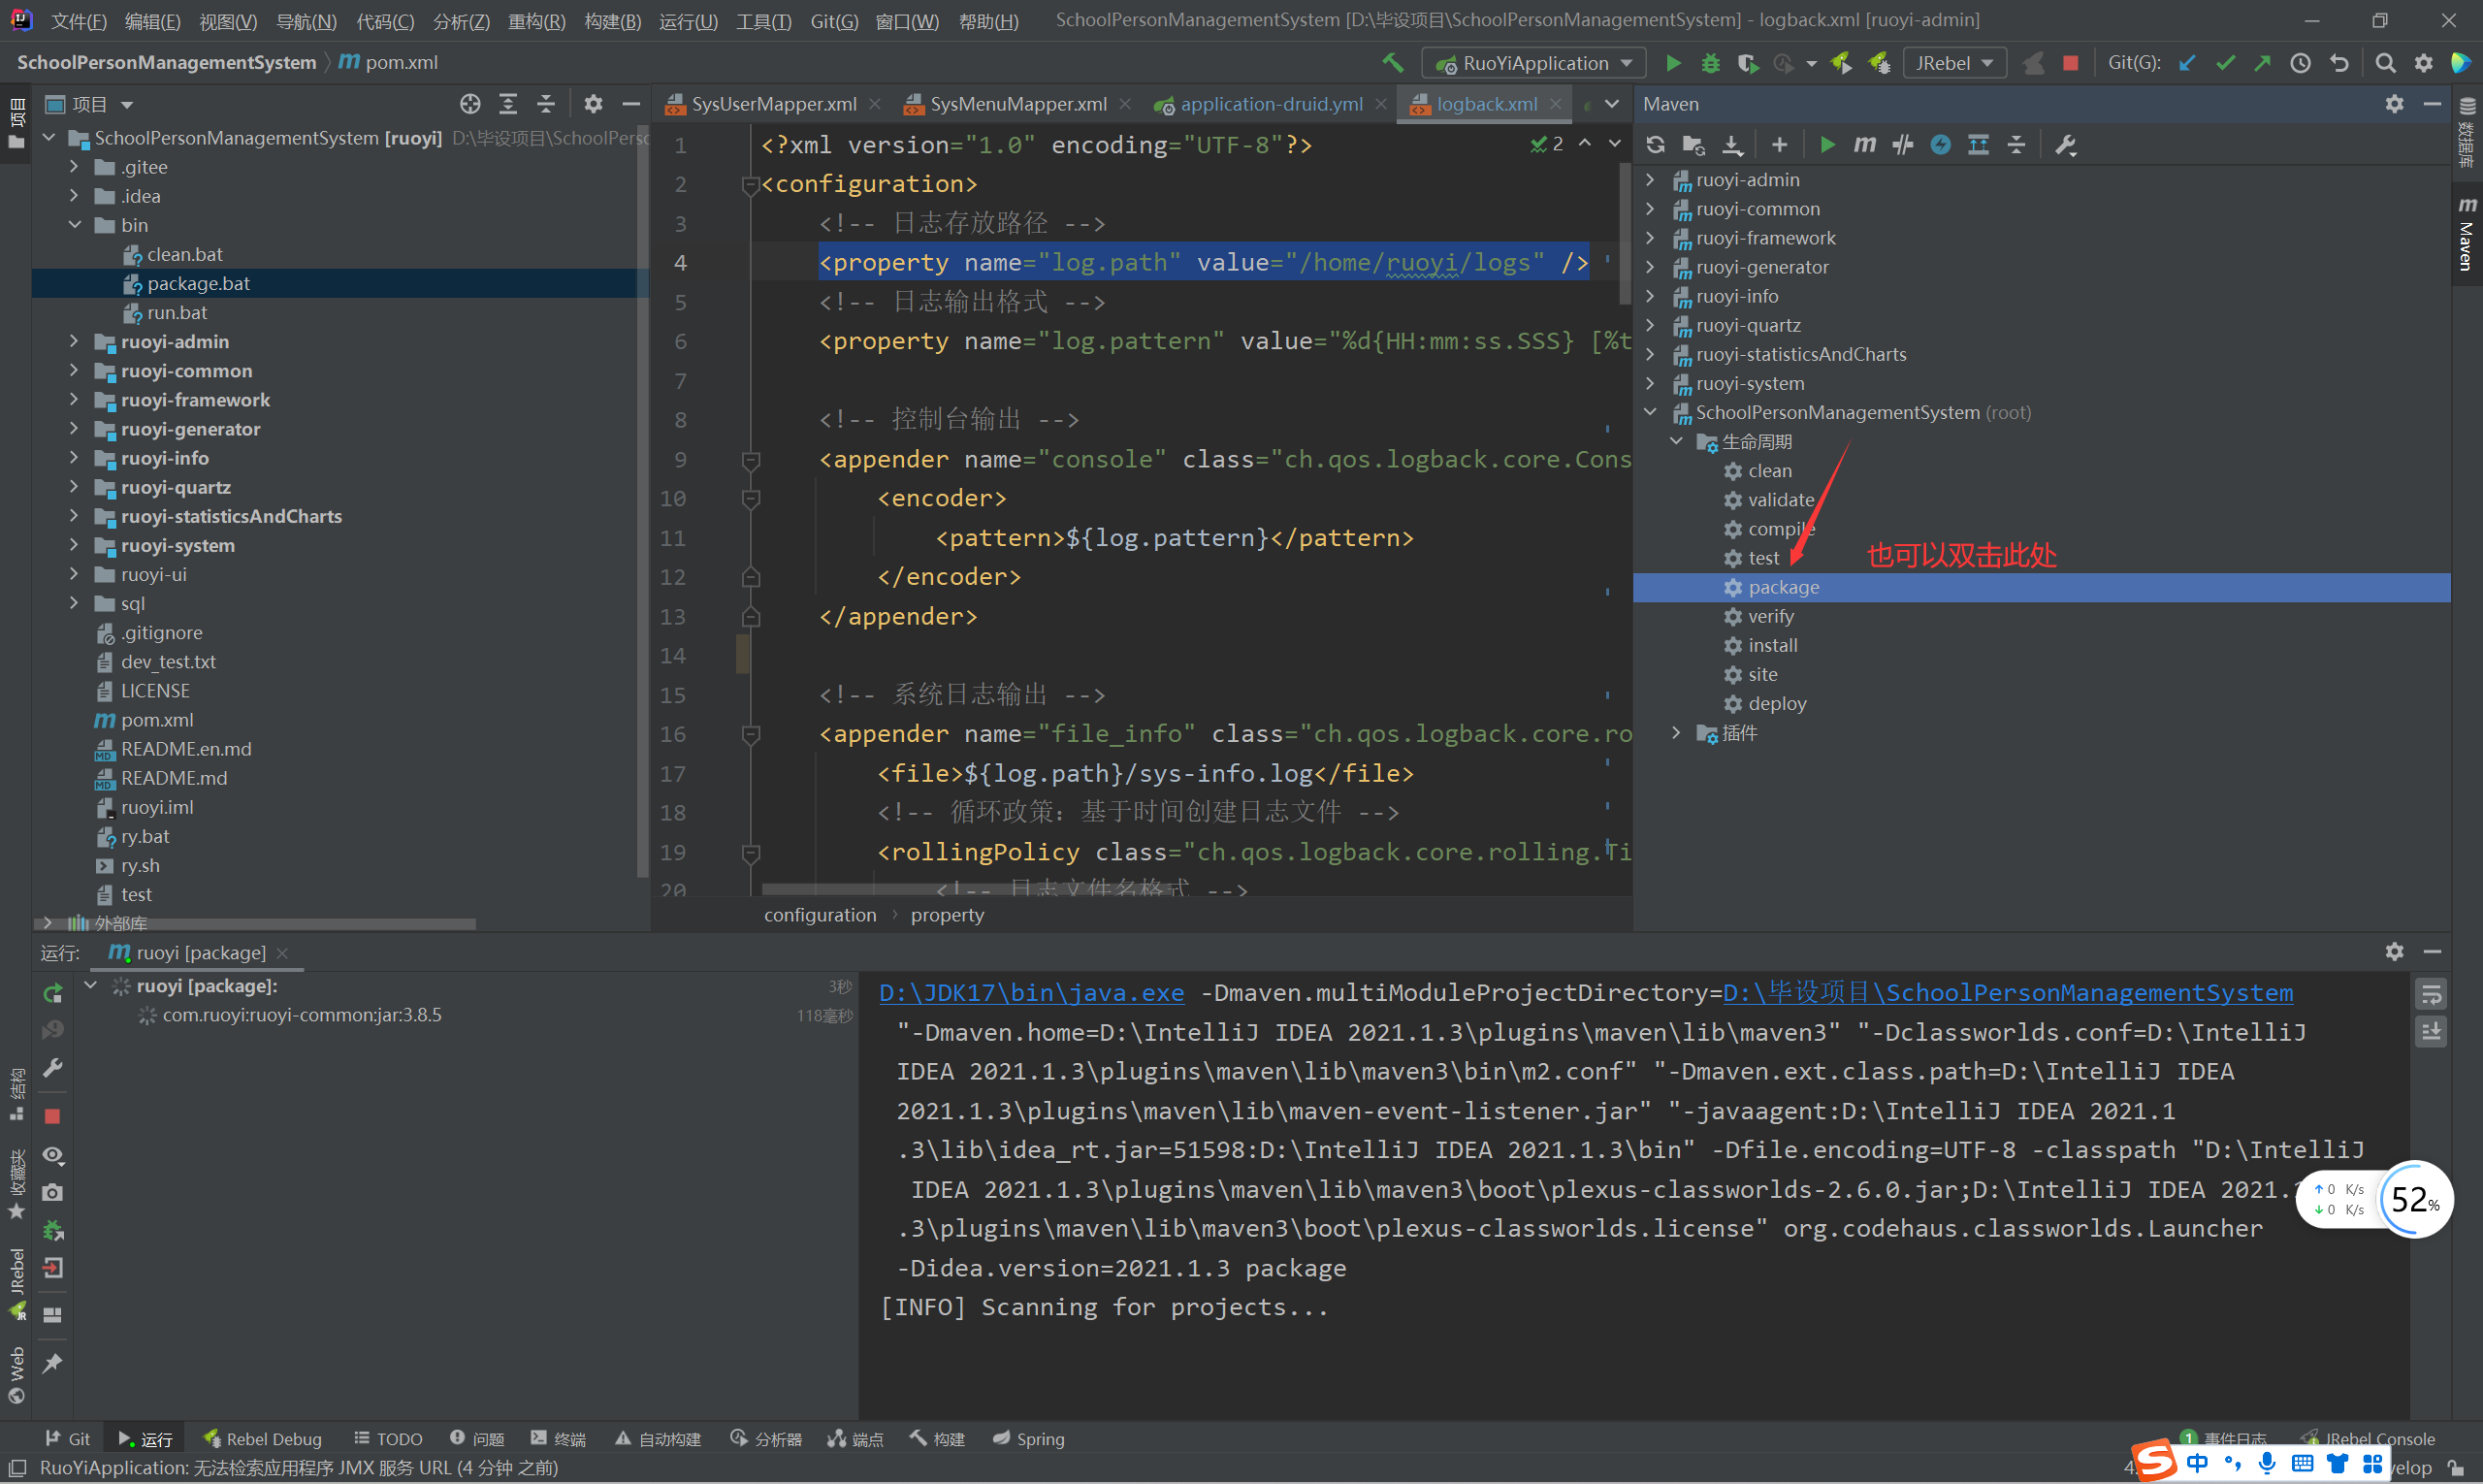
在logback.xml中,找到日志存放路径,value修改为你存放日志的目录,可以在之前创建的project文件夹中建一个logs文件夹,则填为value=”/project/logs“

-
然后保证你的项目能够运行起来

-
熟练使用java的人可以直接通过InteliJ IDEA或者eclipse软件打jar包。不熟悉的有第二种方法,是若依提供的。进入下载的项目文件夹中的bin目录下,直接双击执行package.bat,它会直接在项目中生成target文件夹,里面包含以及打包好的jar包。我们要使用的是ruoyi-admin文件夹下的target里的jar包。运行package.bat需要marven环境>=3.0,自行参考网上方法按照。如下图:

-
成功之后就会出现这个jar包
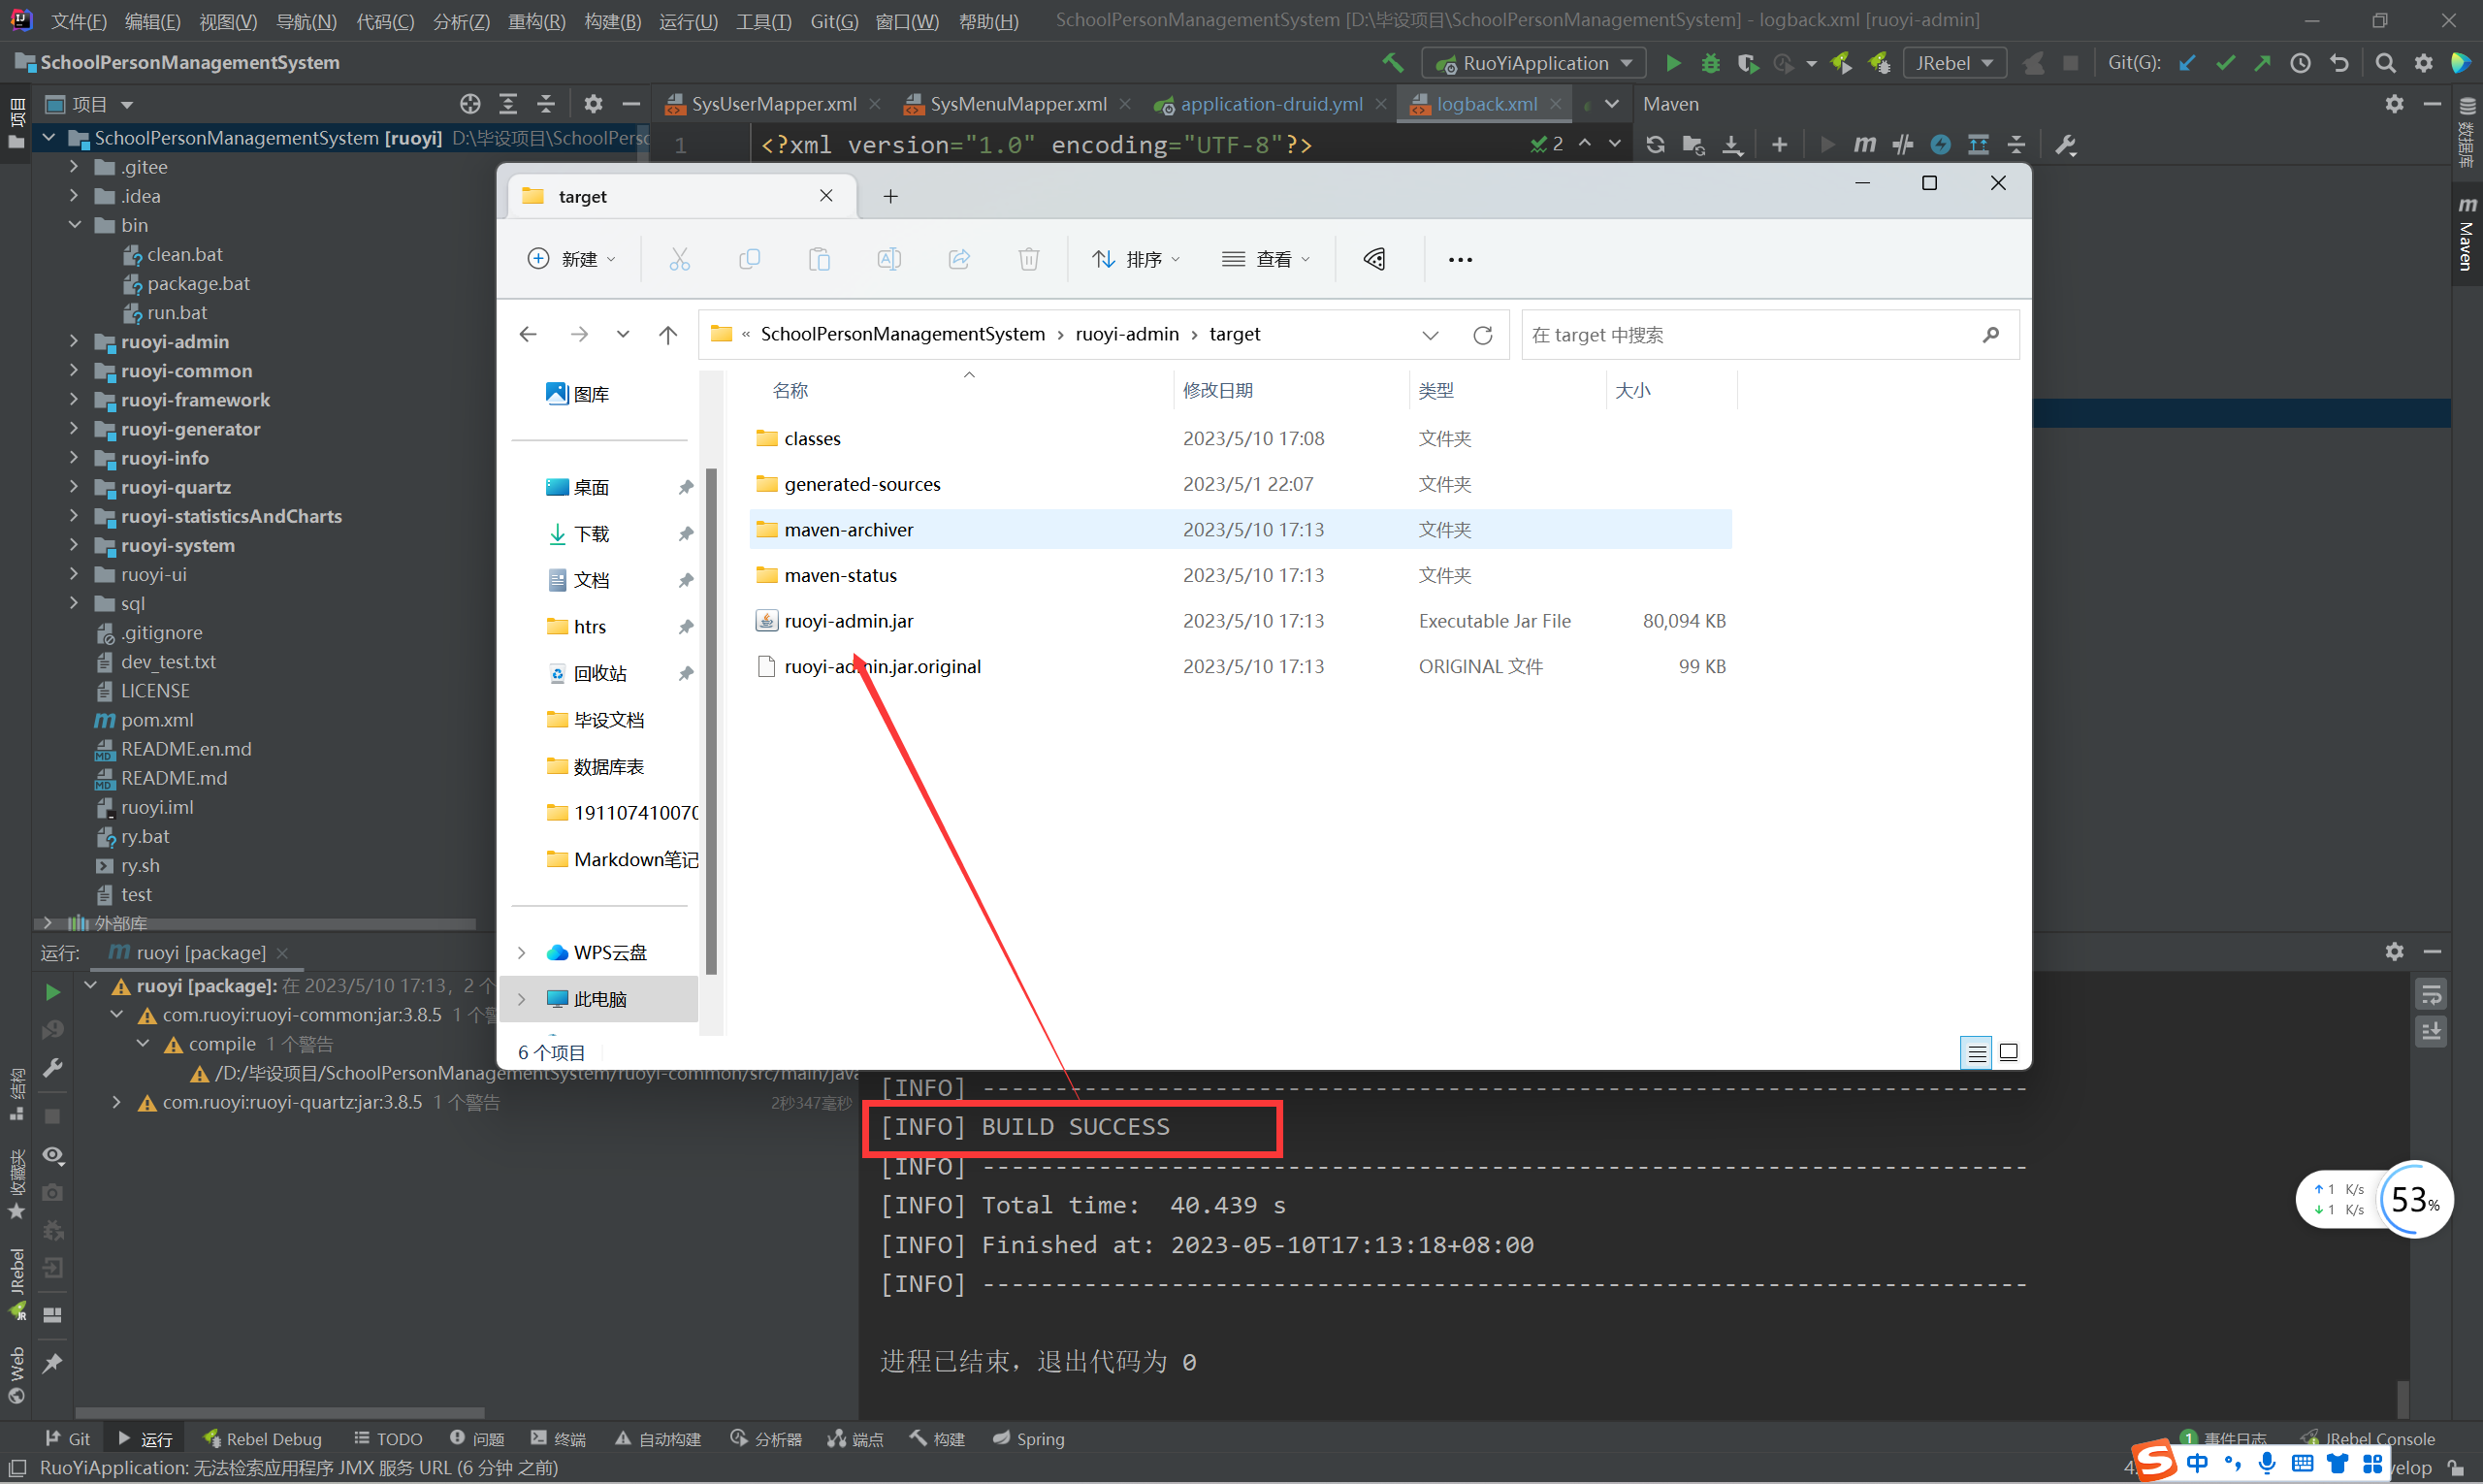
-
将这个ruoyi-admin.jar包上传至服务器,可继续存于刚才建的project目录中。
-
后端部署
(1)再此修改nginx配置文件(nginx.conf),添加后端信息。proxy_pass中空余的部分填服务器ip地址,别忘了上面是location /prod-api/。修改后别忘了重启nginx服务,用上面提到的操作。
        location /prod-api/ {
            proxy_set_header Host $http_host;
            proxy_set_header X-Real-IP &remote_addr;
            proxy_set_header X-Forwarded-For $proxy_add_x_forwarded_for;
            proxy_set_header REMOTE-HOST $remote_addr;
            proxy_pass http://8.130.91.208:8080/;
        }
修改未prod-api是由于前端发送请求的时候就是通过这个接口来发送的
-
远程连接服务器,进入project目录,后台启动jar包:
在运行该命令之前,请确保已经安装了Java环境,并且在当前目录下存在ruoyi-admin.jar文件。此外,如果你想将进程放入后台运行,可以使用nohup命令,例如:
nohup java -jar ruoyi-admin.jar &
该命令将启动一个Java应用程序,并将其放入后台运行。在此之后,即使用户注销或关闭了终端窗口,该Java应用程序仍将继续运行。如果你需要终止该进程,可以使用kill命令。
[root@iZ0jlfn0tcghxqiy1g2ej6Z project]# netstat -tuln | grep 8080
tcp6       0      0 :::8080                 :::*                    LISTEN
[root@iZ0jlfn0tcghxqiy1g2ej6Z project]# sudo fuser -v -n tcp 8080
                     USER        PID ACCESS COMMAND
8080/tcp:            root      17426 F.... java
[root@iZ0jlfn0tcghxqiy1g2ej6Z project]# sudo kill 17426
[root@iZ0jlfn0tcghxqiy1g2ej6Z project]# sudo fuser -v -n tcp 8080
[root@iZ0jlfn0tcghxqiy1g2ej6Z project]# java -jar ruoyi-admin.jar
user  root;
worker_processes auto;
error_log  /www/wwwlogs/nginx_error.log  crit;
pid        /www/server/nginx/logs/nginx.pid;
worker_rlimit_nofile 51200;

stream {
    log_format tcp_format '$time_local|$remote_addr|$protocol|$status|$bytes_sent|$bytes_received|$session_time|$upstream_addr|$upstream_bytes_sent|$upstream_bytes_received|$upstream_connect_time';

    access_log /www/wwwlogs/tcp-access.log tcp_format;
    error_log /www/wwwlogs/tcp-error.log;
    include /www/server/panel/vhost/nginx/tcp/*.conf;
}

events
    {
        use epoll;
        worker_connections 51200;
        multi_accept on;
    }

http
    {
        include       mime.types;
		#include luawaf.conf;

		include proxy.conf;

        default_type  application/octet-stream;

        server_names_hash_bucket_size 512;
        client_header_buffer_size 32k;
        large_client_header_buffers 4 32k;
        client_max_body_size 50m;

        sendfile   on;
        tcp_nopush on;

        keepalive_timeout 60;

        tcp_nodelay on;

        fastcgi_connect_timeout 300;
        fastcgi_send_timeout 300;
        fastcgi_read_timeout 300;
        fastcgi_buffer_size 64k;
        fastcgi_buffers 4 64k;
        fastcgi_busy_buffers_size 128k;
        fastcgi_temp_file_write_size 256k;
		fastcgi_intercept_errors on;

        gzip on;
        gzip_min_length  1k;
        gzip_buffers     4 16k;
        gzip_http_version 1.1;
        gzip_comp_level 2;
        gzip_types     text/plain application/javascript application/x-javascript text/javascript text/css application/xml;
        gzip_vary on;
        gzip_proxied   expired no-cache no-store private auth;
        gzip_disable   "MSIE [1-6].";

        limit_conn_zone $binary_remote_addr zone=perip:10m;
		limit_conn_zone $server_name zone=perserver:10m;

        server_tokens off;
        access_log off;

server {
        listen       80;
        server_name 8.130.91.208;
		charset utf-8;

		location / {
            root   /project/ruoyi-ui/dist;
			try_files $uri $uri/ /index.html;
            index  index.html index.htm;
        }

		location /prod-api/ {
			proxy_set_header Host $http_host;
			proxy_set_header X-Real-IP $remote_addr;
			proxy_set_header REMOTE-HOST $remote_addr;
			proxy_set_header X-Forwarded-For $proxy_add_x_forwarded_for;
			proxy_pass http://localhost:8080/;
		}

        error_page   500 502 503 504  /50x.html;
        location = /50x.html {
            root   html;
        }
    }
include /www/server/panel/vhost/nginx/*.conf;
}


 U8W/U8W-Mini使用与常见问题解决
 QT多线程的5种用法,通过使用线程解决UI主界面的耗时操作代码,防止界面卡死。...
 stm32使用HAL库配置串口中断收发数据(保姆级教程)
 分享几个国内免费的ChatGPT镜像网址(亲测有效)
 Allegro16.6差分等长设置及走线总结